

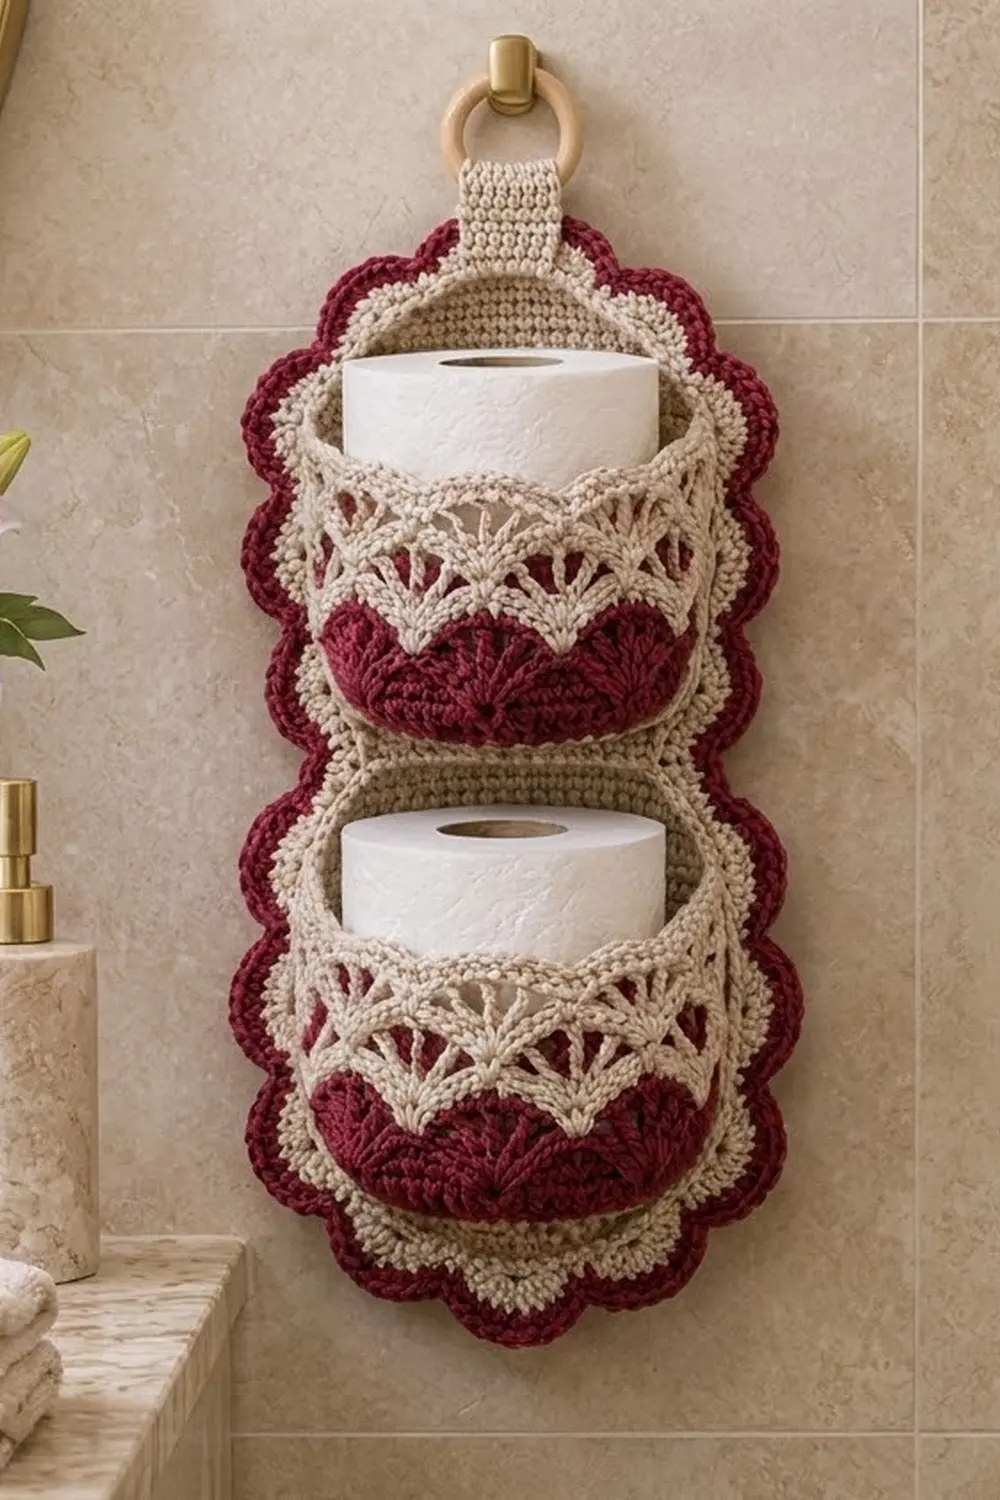
This hanging holder stores two spare rolls in a soft, decorative way. A beige single crochet back panel holds two rounded pockets. Each pocket has a band of deep burgundy shell fans and a lacy beige band of open fans above it. A burgundy scalloped border frames the whole panel. A short tab looped through a wooden ring lets it hang from a hook or towel bar.
The palette is two colors: warm beige and wine burgundy. The style is vintage and cottage-like, but the construction is simple: rows, oval rounds and basic shell stitches.
The pattern uses US crochet terms. The finished holder measures about 9 in (22.9 cm) wide and 21.1 in (53.6 cm) tall, not counting the tab and ring.
Here is the order of work. You crochet the back panel in rows with gently rounded ends. Next you make two oval-based pockets in rounds and sew them to the panel, then add the tab and ring. Last, you work a three-round border around the panel.
Finished Size and Construction
- Finished size: 9 in x 21.1 in (22.9 cm x 53.6 cm), excluding the hanger
- Skill level: Intermediate beginner
- Terminology: US terms
- Yarn weight: Worsted (#4), cotton or cotton blend
- Hook: 5.0 mm (H-8)
- Number of pieces: 4 (1 back panel, 2 pockets, 1 tab), plus a wooden ring
- Layout: Vertical: tab at the top, upper pocket in the middle, lower pocket near the bottom
- Back panel before border: 7 in x 19.1 in (17.8 cm x 48.5 cm)
- Pocket base: 5.25 in x 2.75 in (13.3 cm x 7.0 cm); walls about 2.75 in (7.0 cm) tall
- Border depth: 1 in (2.5 cm) on every side
Materials
Use a smooth worsted cotton or cotton blend. Cotton holds its shape, shows the shells clearly and handles bathroom humidity well. The amounts below assume about 85 m per 50 g.
- Beige (main color): 100 g, about 170 m
- Burgundy (contrast color): 40 g, about 68 m
Both quantities include a margin of about 20% for your gauge swatch and tension differences.
Tools:
– 5.0 mm (H-8) crochet hook
– Wooden ring, 2.5 in (6.4 cm) diameter
– Tapestry needle
– 6 locking stitch markers
– Scissors
– Measuring tape
– Blocking mat and rust-proof pins
– Spray bottle
Abbreviations (US Terms)
- ch – chain
- sl st – slip stitch
- sc – single crochet
- dc – double crochet
- sc2tog – single crochet 2 together
- inc – 2 sc in the same stitch
- BLO – back loop only
- sp – space
- st(s) – stitch(es)
- RS / WS – right side / wrong side
Special stitches:
– Fan: 7 dc in the same stitch.
– Scallop: 5 dc in the same stitch.
– Reverse sc (crab stitch): Work sc from left to right (right-handed). Insert the hook in the next stitch to the right, yarn over, pull up a loop, yarn over and pull through both loops.
Gauge and Checkpoints
Gauge: 16 sc x 18 rows = 4 in (10.2 cm) in sc worked in rows.
Make one pocket before you start the panel. It is the fastest way to test your tension on both sc and the shell rounds. Checkpoints:
- Pocket Rnd 6: the oval base measures 5.25 in x 2.75 in (13.3 cm x 7.0 cm).
- Panel Row 5: 28 sts measure 7 in (17.8 cm).
- Panel Row 43: the panel is about 9.5 in (24.1 cm) tall.
- Panel Row 86: the panel is 19.1 in (48.5 cm) tall.
If your pieces come out too big, go down 0.5 mm. If they come out too small, go up 0.5 mm. Never change the stitch counts, because the border math depends on them.

Back Panel
Use beige. Ch 1 at the start of each row does not count as a stitch.
Row 1 (RS): Ch 21. Sc in 2nd ch from hook and in each ch across. Turn. (20 sc)
Row 2: Ch 1, inc in first st, sc in next 18, inc in last st. Turn. (22)
Row 3: Repeat Row 2. (24)
Row 4: Repeat Row 2. (26)
Row 5: Repeat Row 2. (28)
Rows 6–82: Ch 1, sc in each st across. Turn. (28 in each row; 77 rows total)
Row 83: Ch 1, sc2tog, sc in next 22, sc2tog. Turn. (26)
Row 84: Ch 1, sc2tog, sc in next 20, sc2tog. Turn. (24)
Row 85: Ch 1, sc2tog, sc in next 18, sc2tog. Turn. (22)
Row 86: Ch 1, sc2tog, sc in next 16, sc2tog. Do not turn. (20)
Fasten off and weave in the ends. You now have 86 rows, 20 sts across each end and 28 sts at full width. The 2-stitch shaping at each end makes the softly rounded top and bottom.
Pocket (make 2)
Work in joined rounds without turning. Ch 1 at the start of a round does not count as a stitch.
Base (beige):
Rnd 1: Ch 11. Work 4 sc in 2nd ch from hook, sc in next 8 ch, 4 sc in last ch. Rotate and work along the other side of the foundation chain: sc in next 8 ch. Join with sl st to first sc. (24)
Rnd 2: Ch 1, [inc in each of next 4 sts, sc in next 8] twice. Join. (32)
Rnd 3: Ch 1, [(sc in next st, inc) 4 times, sc in next 8] twice. Join. (40)
Rnd 4: Ch 1, [(sc in next 2, inc) 4 times, sc in next 8] twice. Join. (48)
Rnd 5: Ch 1, [(sc in next 3, inc) 4 times, sc in next 8] twice. Join. (56)
Rnd 6: Ch 1, [(sc in next 4, inc) 4 times, sc in next 8] twice. Join. (64)
Checkpoint: the base measures 5.25 in x 2.75 in (13.3 cm x 7.0 cm).
Walls:
Rnd 7: Ch 1, sc in BLO of each st around. Join. (64) This creates a crisp turning ridge between base and wall.
Rnd 8: Ch 1, sc in each st around. Join. (64) Fasten off beige.
Rnd 9 (burgundy): Join burgundy in any st. Ch 1, sc in each st around. Join. (64)
Rnd 10 (burgundy): Ch 1, sc in first st. Skip 3 sts, Fan in next st, skip 3 sts, sc in next st. Repeat from * 7 times more, ending the last repeat with skip 3. Join to first sc. (8 Fans; 8 sc + 56 dc = 64 sts) Fasten off.
Rnd 11 (beige): Join beige in the 4th (center) dc of any Fan. Ch 1, sc in the same st. Ch 7, sc in the center dc of the next Fan. Repeat from * 6 times more, then ch 7. Join to first sc. (8 sc + 8 ch-7 sps = 64 sts)
Rnd 12: Ch 1, sc in the same sc. In the next ch-7 sp work (dc, ch 1) 4 times, dc. Sc in the next sc. Repeat around, leaving out the final sc. Join. (8 open fans of 5 dc + 4 ch-1 sps, plus 8 sc = 80 sts)
Rnd 13: Ch 1, skip the joining sc. Sc in each of the next 5 dc and 4 ch-1 sps (9 sc), skip the next sc. Repeat around. Join. (72)
Rnd 14: Ch 1, reverse sc in each st around. Join. (72)
Fasten off. Leave a 30 in (76.2 cm) beige tail for sewing.
This round sequence gives a base edge of 64 sts, a fan band of 64 sts and a rim of 72 sts. The extra 8 sts at the rim make the top flare gently, so the pocket opens to take a roll.
Hanging Tab
Use beige.
Row 1: Ch 9. Sc in 2nd ch from hook and in each ch across. Turn. (8)
Rows 2–20: Ch 1, sc in each st across. Turn. (8)
Fasten off and leave a 12 in (30.5 cm) tail. The tab measures 2 in x 4.4 in (5.1 cm x 11.2 cm).
Make All Pieces
- Back panel: 1 (beige)
- Pockets: 2 (beige base and walls, burgundy fan band, beige lace and rim)
- Tab: 1 (beige)
- Wooden ring: 1
Layout, from top to bottom:
        [ ring ]
        [ tab  ]
+----------------------+
|     back panel       |
|   [ upper pocket ]   |   base on Row 48
|                      |
|   [ lower pocket ]   |   base on Row 8
+----------------------+
Joining
Pocket placement: Lay the panel flat with the RS facing up. Place markers at both ends of Row 8 and Row 48.
- Row 8 is 1.75 in (4.4 cm) above the bottom edge. The lower pocket’s base sits there.
- Row 48 is 10.75 in (27.3 cm) above the bottom edge. The upper pocket’s base sits there.
Attaching a pocket: Flatten the pocket so that the long straight sides of its base sit front and back. The back half of the Rnd 7 ridge is 32 sts: 8 straight sts plus 12 sts from each curved end.
- Center those 32 sts along the marked row. This leaves about 0.9 in (2.3 cm) of panel showing on each side.
- Whipstitch one Rnd 7 st to each panel st, easing gently. The 5.25 in (13.3 cm) base sits across about 21 panel sts, so ease the 32 ridge sts over those 21 sts. Skip no panel rows.
- At each side, whipstitch straight up the wall fold from Rnd 7 to Rnd 13. Work one stitch per round, following a single panel column.
- Leave the back rim free so the roll drops in easily.
Tension: Keep your whipstitches snug but not tight. If you pull too hard, the panel will pucker behind the pocket.
Tab: Slide the tab through the ring and fold it in half so that Rows 1 and 20 meet. Place the doubled ends on the WS of the panel at the top center, overlapping the top 0.75 in (1.9 cm). Sew around all edges of the overlap.
Size checkpoint: The panel should still lie flat at 7 in x 19.1 in (17.8 cm x 48.5 cm).
Border
Border gauge: 1 sc per row end along the sides, and 1 sc per st along the shaped ends. This matches the 18 rows = 4 in (10.2 cm) row gauge, so the edges stay flat.
Rnd 1 (beige): With the RS facing, join in the first st of Row 86. Ch 1.
- Top: 3 sc in the same st, sc in next 18 sts, 3 sc in last st. (24 sts)
- Side: Sc in the end of each row from Row 85 down to Row 2. (84 sts)
- Bottom: Working into the foundation ch, 3 sc in first ch, sc in next 18, 3 sc in last ch. (24 sts)
- Side: Sc in the end of each row from Row 2 up to Row 85. (84 sts)
Join to the first sc. (216 sts: 24 + 84 + 24 + 84) Each end’s 24 sts already include its two 3-sc corner groups. Fasten off.
Rnd 2 (burgundy): Join in the first sc of Rnd 1. Ch 1, sc in the same st. Skip 2 sts, Scallop in next st, skip 2 sts, sc in next st. Repeat around, ending the last repeat with skip 2. Join. (36 Scallops; 36 sc + 180 dc = 216 sts)
That gives 4 Scallops across the top, 14 along each side and 4 across the bottom.
Rnd 3 (burgundy): Ch 1. Sc in each st around, working 2 sc in the center (3rd) dc of each Scallop. Join. (216 + 36 = 252 sts)
Per side, that is: top 28, side 98, bottom 28, side 98.
Fasten off.
Why the math works: Every Scallop uses exactly 6 sts. Each end has 24 sts (4 x 6) and each side has 84 sts (14 x 6). So every side starts a fresh repeat and no Scallop is squeezed or stretched. The total of 216 is 36 x 6.
The border adds 1 in (2.5 cm) all around, so the holder grows to 9 in x 21.1 in (22.9 cm x 53.6 cm).
Final Blocking
- Weave in all remaining ends on the WS.
- Pin the panel flat, RS up, to 9 in x 21.1 in (22.9 cm x 53.6 cm).
- Pin out each Scallop at its center dc so the curves are even.
- Stuff each pocket with a roll wrapped in plastic. This holds the flare in shape.
- Spray everything until damp, but not soaked.
- Shape the burgundy Fans in the pockets with your fingers so they sit upright.
- Let it dry completely, at least 12 hours, before unpinning.
Final Quality-Control Checklist
- The panel measures 7 in x 19.1 in (17.8 cm x 48.5 cm) before the border.
- Each pocket has 8 burgundy Fans and 8 beige open fans.
- The pocket bases are level, on Rows 8 and 48.
- There are 36 Scallops: 4 + 14 + 4 + 14.
- The finished size is 9 in x 21.1 in (22.9 cm x 53.6 cm).
- The tab is firmly sewn, and the ring sits centered above the top border.
- No ends show on the RS.
Troubleshooting
- Panel edges ripple: Your border tension is loose. Redo Rnd 1 with a hook 0.5 mm smaller.
- Panel edges cup: Your border tension is tight. Go up 0.5 mm for Rnd 1.
- Fans lean sideways: Recount the skipped stitches. There must be exactly 3 on each side of every Fan.
- Pocket too tight for a roll: Work Rnds 12–14 with a hook 0.5 mm larger.
- Pocket sags forward: Tack the back rim to the panel at the center and at both sides.
- Holder tilts: Re-center the tab, and check that both pockets sit centered on the panel.
Care
Hand wash in cool water and press out the excess without wringing. Reshape and dry flat. If burgundy is your first dyed cotton, test it for colorfastness first.
Final Notes
The measurement chain works like this:
- A gauge of 16 sc x 18 rows = 4 in (10.2 cm) makes a 7 in x 19.1 in (17.8 cm x 48.5 cm) panel.
- Each oval pocket base measures 5.25 in x 2.75 in (13.3 cm x 7.0 cm).
- 216 border sts make 36 even Scallops.
- The 1 in (2.5 cm) border brings the holder to 9 in x 21.1 in (22.9 cm x 53.6 cm).
Check each stage before moving on and the finished holder will hang straight and flat.
Happy crocheting!