

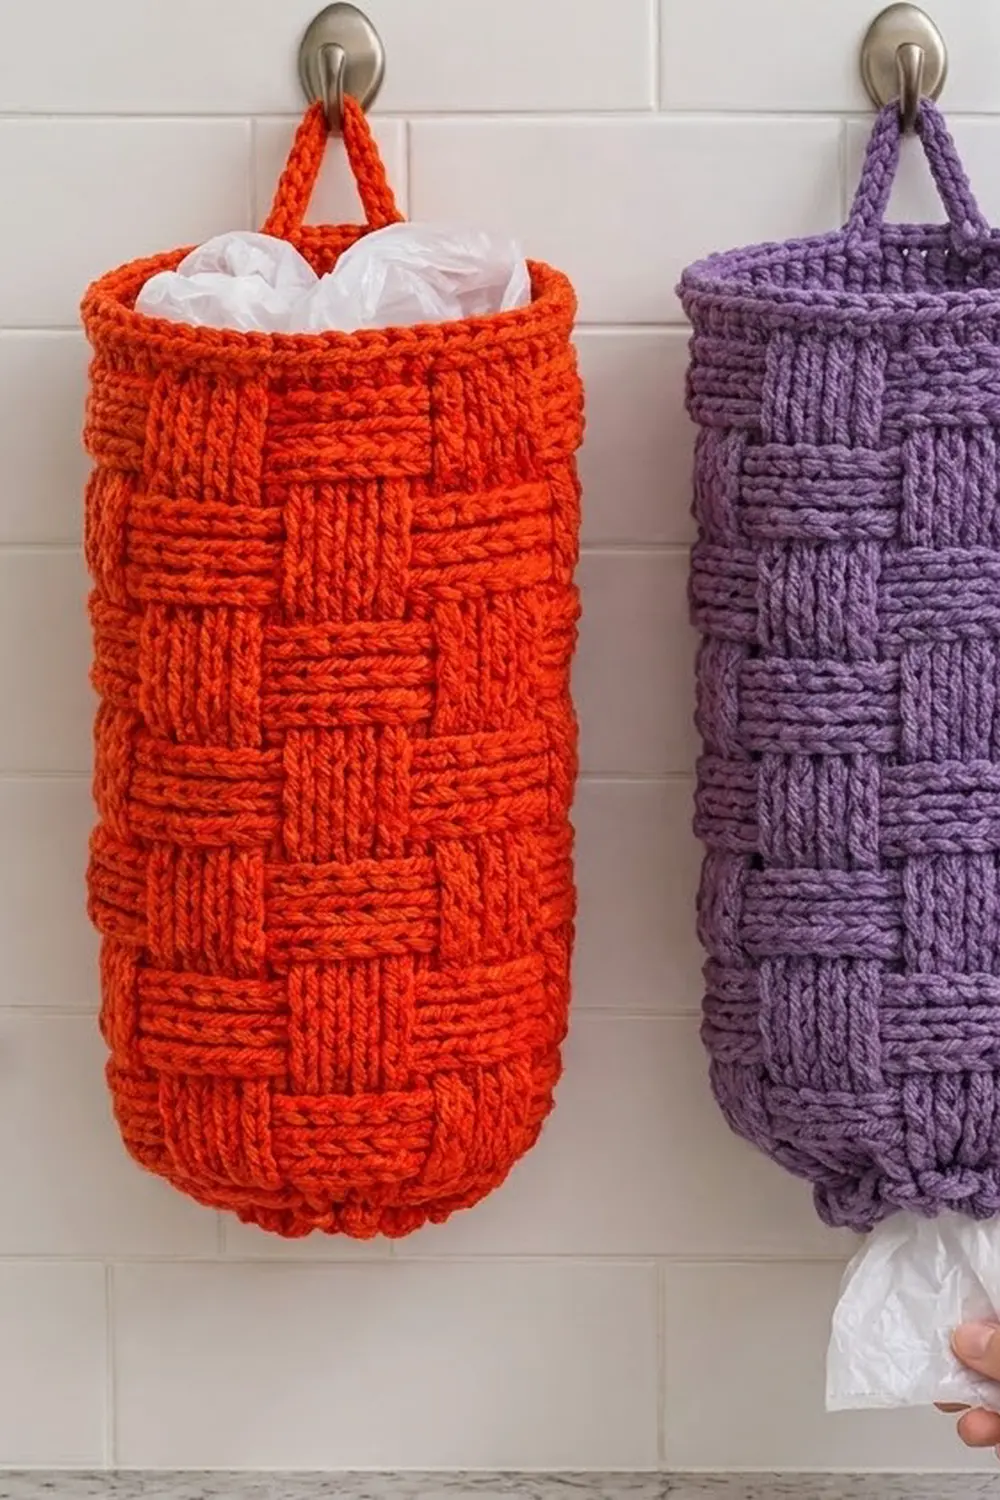
Every kitchen has a drawer full of loose grocery bags. The Hearthside Basketweave Bag Holder gives them a tidy home on the wall. You push used bags in at the top and pull them out one at a time through the small ruffled opening at the bottom.
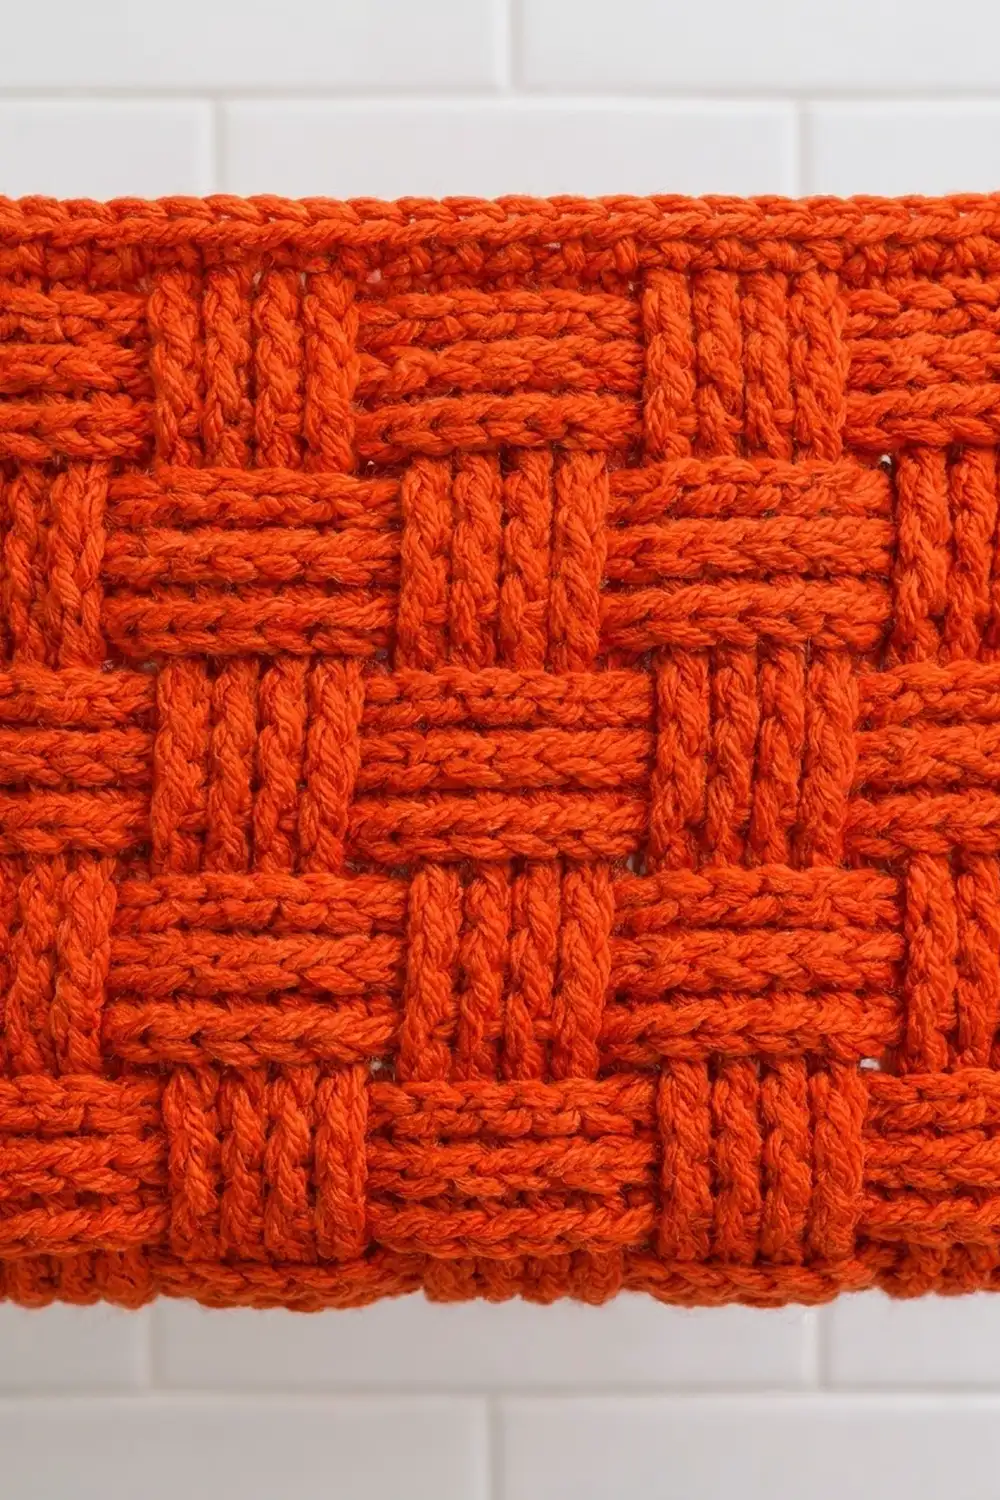
The sample is a bright orange-red, and the design works just as well in purple, sage, navy or cream. The deep basketweave texture comes from front post and back post double crochet. Vertical blocks of raised posts sit next to horizontal blocks of ridges, and the blocks swap places every three rounds, so it looks like woven strips.
This pattern uses US crochet terms. The finished holder is about 6.7 in (17.0 cm) wide when laid flat, 13.3 in (33.8 cm) around and 15.5 in (39.4 cm) long, plus a hanging loop of about 3 in (7.6 cm).
You make it as one seamless tube, starting at the top. After a foundation round of double crochet, you work 24 rounds of basketweave, then shape the bottom with four single crochet rounds that decrease to a small opening. To finish, you add a ruffled round at the bottom and a three-round rim with a hanging loop at the top.
Finished Size and Construction
- Finished size: 6.7 in (17.0 cm) wide flat × 15.5 in (39.4 cm) long; circumference 13.3 in (33.8 cm)
- Hanging loop: about 3 in (7.6 cm) tall
- Skill level: Intermediate (post stitches worked in the round)
- Terminology: US crochet terms
- Yarn weight: Bulky (#5)
- Hook: 6.0 mm (US J-10)
- Number of pieces: 1, worked seamlessly in the round
- Layout: a single vertical tube that tapers at the bottom
- Body size before the border: 6.7 in (17.0 cm) flat × 13.8 in (35.1 cm) long
- Border depth: top rim 1 in (2.5 cm); bottom ruffle about 0.7 in (1.8 cm)
Materials
Yarn: Use a smooth, plied bulky yarn so the post stitches show up clearly. Acrylic or an acrylic-cotton blend holds its shape well and survives a kitchen. Avoid fuzzy or brushed yarns, which blur the weave.
- Main color (orange-red, or a color of your choice): 200 g, about 220 m (240 yd)
Post stitches use more yarn than standard stitches, so this amount includes a safety margin of about 15%.
Tools:
- 6.0 mm (US J-10) crochet hook
- 2 locking stitch markers
- Tapestry needle
- Scissors
- Measuring tape
- Rust-proof pins and a spray bottle for blocking
- A rolled towel or a 2 L soda bottle to use as a blocking form
Abbreviations (US Terms)
- ch – chain
- sl st – slip stitch
- sc – single crochet
- hdc – half double crochet
- dc – double crochet
- sc2tog – single crochet 2 together
- FPdc – front post double crochet
- BPdc – back post double crochet
- st(s) – stitch(es)
- rnd(s) – round(s)
Special stitches
- FPdc: Yarn over. Insert the hook from front to back to front around the post of the stitch below, so the post sits in front of your hook. Yarn over, pull up a loop, then [yarn over, pull through 2 loops] twice. This makes a raised vertical post.
- BPdc: Yarn over. Insert the hook from back to front to back around the post of the stitch below, so the post sits behind your hook. Finish like a regular dc. This makes a horizontal ridge on the outside.
Throughout the pattern, the beginning ch-2 or ch-1 does not count as a stitch. Always join with a sl st to the first real stitch of the round.
Gauge and Checkpoints
Basketweave gauge: 12 sts and 8 rnds = 4 in (10.2 cm).
Single crochet gauge: 12 sts and 12 rnds = 4 in (10.2 cm).
The finished holder is your gauge swatch. Work the foundation and Rnds 1–7, then stop and measure.
- Checkpoint 1 (after Rnd 1): The ring lies flat at 13.3 in (33.8 cm) around, or 6.7 in (17.0 cm) when flattened.
- Checkpoint 2 (after Rnd 7): The piece is 3.5 in (8.9 cm) tall.
- Checkpoint 3 (after Rnd 25): The body is 12.5 in (31.8 cm) tall.
- Checkpoint 4 (after Rnd 29): The total length is 13.8 in (35.1 cm).
- Checkpoint 5 (finished): The holder is 15.5 in (39.4 cm) long.
If your piece is too big (more than 6.9 in / 17.5 cm flat), switch to a 5.5 mm hook. If it is too small (less than 6.5 in / 16.5 cm flat), switch to a 6.5 mm hook. Do not change the stitch count, because 40 stitches is exactly 5 repeats of the 8-stitch weave. If only your height is off, you can add or remove one full 3-round band. Each band is 1.5 in (3.8 cm) tall.
Body
Foundation
Ch 40. Join with a sl st to the first ch to form a ring, making sure the chain is not twisted. Place a marker in the join; this is the back of the holder.
Rnd 1: Ch 2. Work 1 dc in each ch around and join. (40 dc)
This round gives the post stitches something to wrap around.
Basketweave Bands
Each band is 3 rounds tall, and there are 8 bands in total. You never turn, so the outside always faces you. A FPdc block makes vertical posts and a BPdc block makes horizontal ridges.
Band A (Rnds 2–4): Ch 2. 4 FPdc, 4 BPdc; repeat from * 4 more times. Join. (40 sts: 20 FPdc + 20 BPdc)*
Work each of Rnds 2, 3 and 4 exactly like this. In every round, work FPdc around FPdc and BPdc around BPdc so the blocks stack up neatly.
Band B (Rnds 5–7): Ch 2. 4 BPdc, 4 FPdc; repeat from * 4 more times. Join. (40 sts: 20 BPdc + 20 FPdc)*
Work each of Rnds 5, 6 and 7 like this. The blocks are now shifted, so vertical blocks sit on top of horizontal blocks and the checkerboard begins.
Checkpoint 2: The piece measures 3.5 in (8.9 cm) from the foundation edge.
Rnds 8–10: Repeat Band A. (40 sts)
Rnds 11–13: Repeat Band B. (40 sts)
Rnds 14–16: Repeat Band A. (40 sts)
Rnds 17–19: Repeat Band B. (40 sts)
Rnds 20–22: Repeat Band A. (40 sts)
Rnds 23–25: Repeat Band B. (40 sts)
Checkpoint 3: The body is 25 rounds tall and 12.5 in (31.8 cm) long. The width is still 6.7 in (17.0 cm) when flattened. Count the vertical blocks across the flattened front: you should see 2.5 repeats, or 5 blocks of 4 stitches.
Bottom Shaping
In these rounds the tube gets narrower to form the soft, rounded bottom.
Rnd 26 (conversion round): Ch 1. Sc in each st around and join. (40 sc: 40 worked 1 per stitch + 0 added)
This round flattens the post texture so the decreases look smooth.
Rnd 27: Ch 1. Sc in next 3 sts, sc2tog; repeat from * 7 more times. Join. (32 sc)*
Rnd 28: Ch 1. Sc in next 2 sts, sc2tog; repeat from * 7 more times. Join. (24 sc)*
Rnd 29: Ch 1. Sc in next st, sc2tog; repeat from * 7 more times. Join. (16 sc)*
Checkpoint 4: The total length is 13.8 in (35.1 cm). The bottom opening is 16 sts around, which is 5.3 in (13.5 cm), or about 1.75 in (4.4 cm) across when relaxed. That is wide enough to pull a bag through, but snug enough to hold the rest inside.
Do not fasten off. Continue straight into the bottom border.
Border
The border has two parts: a ruffled round at the bottom opening, and a firm rim with a hanging loop at the top.
Border gauge: 12 sc = 4 in (10.2 cm), and 3 sc rounds = 1 in (2.5 cm).
Bottom Ruffle
Rnd 30 (trim round): Ch 1. Work 2 hdc in each st around and join. (32 hdc: 16 worked 1 per stitch + 16 added)
Fasten off and weave in the tail.
Why the math works: The round has twice as many stitches as the 16-stitch opening it sits on. The extra fabric has nowhere to go, so it rolls and puffs into a soft gathered ring, like the one in the photo. The edge can stretch when you pull a bag out and springs back afterward. The ruffle adds about 0.7 in (1.8 cm), bringing the length to 14.5 in (36.8 cm).
Top Rim
Turn the holder upside down. Join the yarn with a sl st at the marked back join, working into the free loops on the other side of the foundation chain.
Rnd B1: Ch 1. Sc in each of the 40 free chain loops and join. (40 sc)
Rnd B2: Ch 1. Sc in each st around and join. (40 sc)
Rnd B3: Ch 1. Sc in each st around and join. (40 sc)
Why the math works: You work one sc into each of the 40 foundation stitches, which matches the body gauge of 12 sts = 4 in (10.2 cm). The rim stays exactly 13.3 in (33.8 cm) around, so it does not flare or pull in. The three rounds add 1 in (2.5 cm), bringing the holder to its full 15.5 in (39.4 cm).
Hanging Loop
At the end of Rnd B3, do not fasten off.
- Ch 20. Sl st into the same st as the join to form a loop.
- Work 30 sc into the ch-20 loop space, packing them close together so the chain is fully covered.
- Sl st into the first sc of Rnd B3. Fasten off.
The finished loop stands about 3 in (7.6 cm) above the rim. Because it sits on the back join, the seam line faces the wall. Use the tails to reinforce the base of the loop with 2 or 3 extra stitches, since this point carries all the weight.
Final Blocking
- Weave in all the ends along the inside, following the post stitches so they disappear.
- Lightly mist the whole holder with water until it feels damp but not soaked.
- Slide a rolled towel or an empty 2 L bottle inside the tube to hold it round.
- Gently square up the blocks with your fingers: line up the vertical posts and even out the horizontal ridges.
- Pin the top rim flat to keep it level, and shape the hanging loop upright.
- Fluff the bottom ruffle with your fingertips so it puffs evenly all the way around.
- Let it dry completely, which usually takes 12–24 hours. Then remove the form.
- Measure: the holder should be 6.7 in (17.0 cm) flat and 15.5 in (39.4 cm) long.
Acrylic yarn can also be steam blocked. Hold the iron 2 in (5.1 cm) above the fabric and never press down on the post stitches.
Final Quality-Control Checklist
- [ ] Every basketweave round has exactly 40 stitches.
- [ ] There are 8 bands of 3 rounds each, alternating between Band A and Band B.
- [ ] The vertical and horizontal blocks line up in a clean checkerboard with no shifts.
- [ ] The bottom decreases go 40 → 32 → 24 → 16.
- [ ] The ruffle has 32 hdc and puffs evenly.
- [ ] The top rim has 3 rounds of 40 sc and sits level.
- [ ] The hanging loop is fully covered, reinforced and centered on the back join.
- [ ] The finished holder is 6.7 in (17.0 cm) wide flat and 15.5 in (39.4 cm) long.
- [ ] All ends are woven in securely on the inside.
Troubleshooting
The blocks look slanted or shifted. The join may have drifted. Always join to the first real stitch, and make sure the ch-2 is not counted as a stitch. Move the marker up every round.
The tube is getting wider as you go. You may be working an extra stitch into the joining sl st. Count 40 stitches at the end of every round.
The horizontal ridges look flat. Make sure each BPdc goes around the post from the back, so the top of the stitch below lies across the front.
The bottom opening is too tight for bags. Rip back and leave out Rnd 29, then work the ruffle as 2 hdc in each of 24 sts (48 hdc).
The bottom opening is too loose and bags fall out. Work the ruffle with a hook one size smaller, or add one more round of sc, sc2tog before the ruffle, which leaves 11 sts after working the last 2 sts as sc2tog. Then work 2 hdc in each of those sts.
The rim is ruffling. Your tension is too loose for the rim. Rework it with a 5.5 mm hook.
The loop stretches over time. Add 2 or 3 more sc into the loop, or work a second round of sl sts all around it.
Care
Hand wash in cool water or machine wash on gentle inside a laundry bag, then reshape and lay flat to dry. Do not tumble dry, because the post stitches can lose their crisp shape.
Final Notes
The whole design follows one measurement chain:
- Gauge is 12 sts = 4 in (10.2 cm), so 40 stitches make a tube 13.3 in (33.8 cm) around, or 6.7 in (17.0 cm) flat.
- 25 rounds of body make 12.5 in (31.8 cm).
- The bottom shaping brings the length to 13.8 in (35.1 cm).
- The ruffle brings it to 14.5 in (36.8 cm).
- The top rim brings it to the finished 15.5 in (39.4 cm), with a 3 in (7.6 cm) loop above.
If you check your measurements at each checkpoint, the holder will come out the right size. Stuff it with bags, hang it by the door and enjoy a tidier kitchen.
Happy crocheting!