

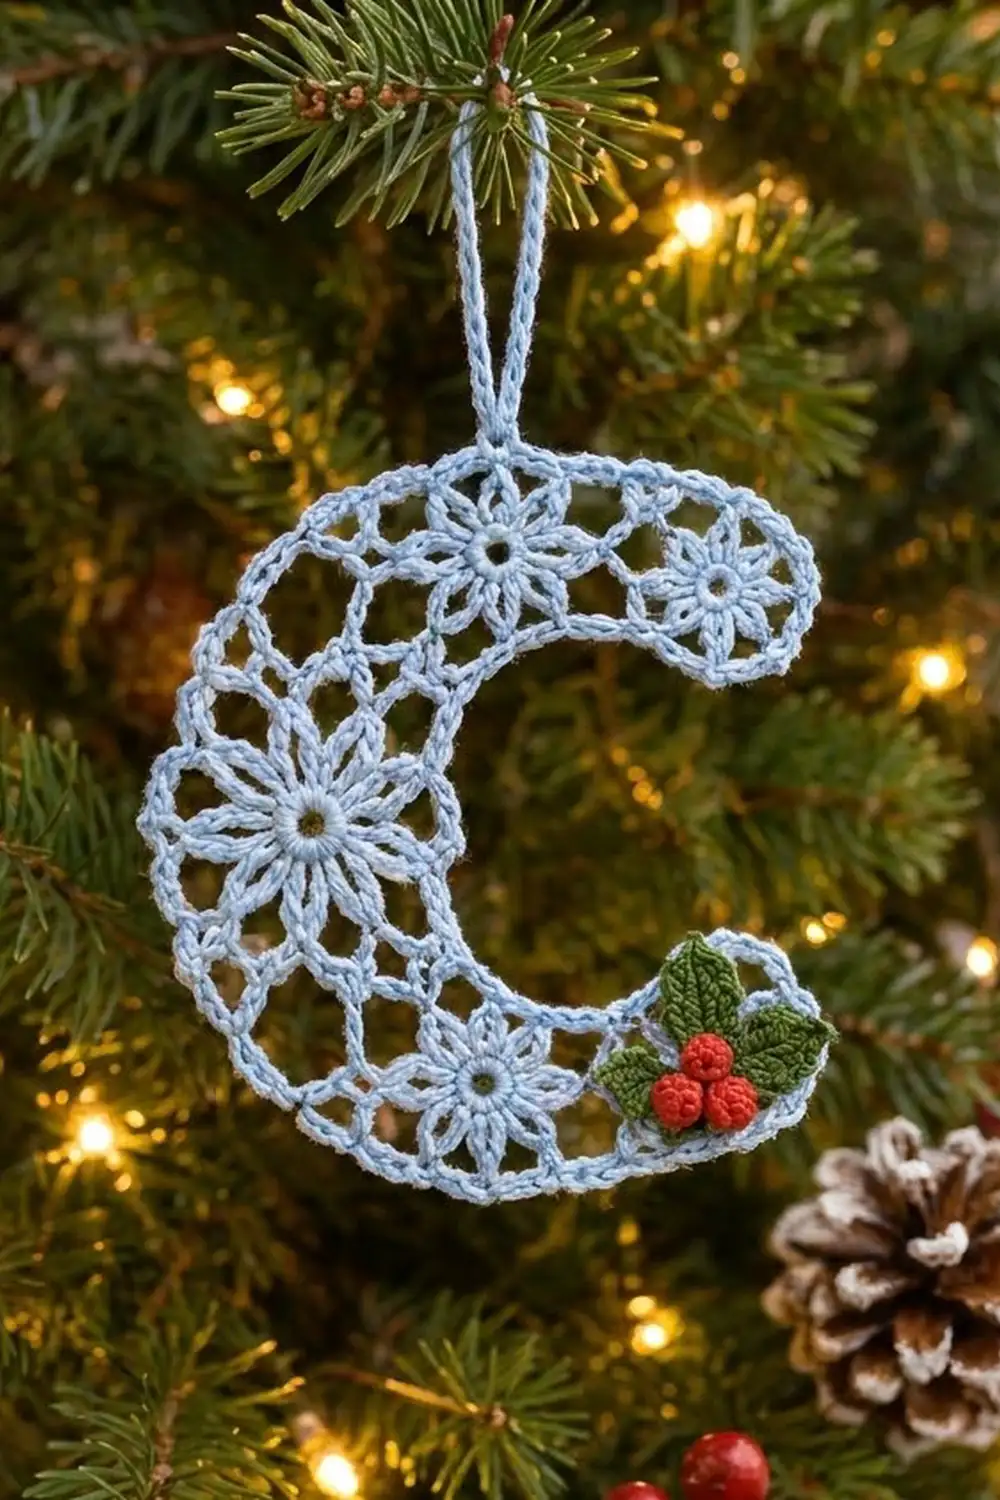
This crescent moon ornament looks like frost on a window. Five lacy flower motifs (one large eight-petal bloom and four smaller six-petal blooms) are joined into a C-shaped crescent. A chain-mesh frame holds them together, and a firm single crochet outline finishes the edge. A chain loop at the top lets it hang from a branch.
The sample is worked in a soft light blue cotton thread, which gives it a wintry, heirloom feel. A tiny holly sprig (two green leaves and three red berries) sewn onto the lower tip is optional. The moon looks just as pretty plain.
The pattern uses US crochet terms. The finished ornament measures 4.5 in (11.4 cm) tall and 3.5 in (8.9 cm) wide, not counting the hanging loop.
Construction is simple and done in stages. You make the flower motifs and join each one to the last while you work its final round. Next you work a two-round border all the way around the crescent. Then you add the loop, block the piece, and sew on the holly if you’re using it.
Finished Size and Construction
- Finished size: 4.5 in (11.4 cm) tall x 3.5 in (8.9 cm) wide
- Hanging loop: 1.5 in (3.8 cm) tall
- Skill level: Intermediate
- Terminology: US terms
- Yarn weight: Size 3 crochet cotton thread (fingering weight, category 1)
- Hook: 2.25 mm (US B-1)
- Number of pieces: 5 flower motifs joined as you go into one crescent, plus an optional holly appliqué (2 leaves, 3 berries)
- Layout: C-shaped arc made of small, small, large, small, small
- Piece size: large motif 1.75 in (4.4 cm) across, small motif 1.25 in (3.2 cm) across
- Size before border: 4 in (10.2 cm) tall x 3 in (7.6 cm) wide
- Border depth: 0.25 in (0.6 cm)
Materials
Use a smooth, mercerized cotton thread. It shows off the lace clearly and holds its shape after blocking. Fuzzy or very soft yarns blur the petals and mesh.
- Light blue (main color): 10 g, about 16 m (17.5 yd)
- Green (holly leaves, optional): 2 g, about 3 m (3.3 yd)
- Red (holly berries, optional): 1 g, about 2 m (2.2 yd)
All quantities include a margin for swatching and weaving in ends.
Tools:
- 2.25 mm (US B-1) crochet hook
- 6–8 locking stitch markers
- Tapestry needle (small eye)
- Scissors
- Blocking board or foam mat
- Rustproof pins
- Spray bottle with water (optional: light spray starch)
Abbreviations (US Terms)
- ch: chain
- sl st: slip stitch
- sc: single crochet
- hdc: half double crochet
- dc: double crochet
- tr: treble crochet
- sc2tog: single crochet 2 together
- sk: skip
- sp(s): space(s)
- st(s): stitch(es)
- rnd(s): round(s)
Special technique – drop-loop join: Take the hook out of the working loop. Insert the hook from front to back through the stitch on the neighboring motif named in the pattern. Pick up the dropped loop and pull it through. Then carry on as written. This join adds no stitches.
Section: In Rnd 5 of each motif, a section is one sc worked into a Rnd 4 sc plus the sc worked into the ch-sp that follows it. On a small motif a section is 6 sts. On the large motif it is 7 sts. The anchor of a section is its 4th st.
Gauge and Checkpoints
Gauge matters more for size than for fit, but your motifs need to match each other so the crescent lies flat.
Test one piece first: Make one small motif and block it lightly.
- Small motif after Rnd 3: 1 in (2.5 cm) across the petal tips
- Small motif after Rnd 5: 1.25 in (3.2 cm) across
- Large motif after Rnd 3: 1.25 in (3.2 cm) across
- Large motif after Rnd 5: 1.75 in (4.4 cm) across
- Border gauge: 11 sc = 1 in (2.5 cm) along the outline
Too big? Go down a hook size to 2 mm, or tighten the chains in Rnds 2 and 4.
Too small? Go up to 2.5 mm (US C-2).
Allow about 1/8 in (0.3 cm) of difference. Anything more will make the crescent noticeably bigger or smaller.
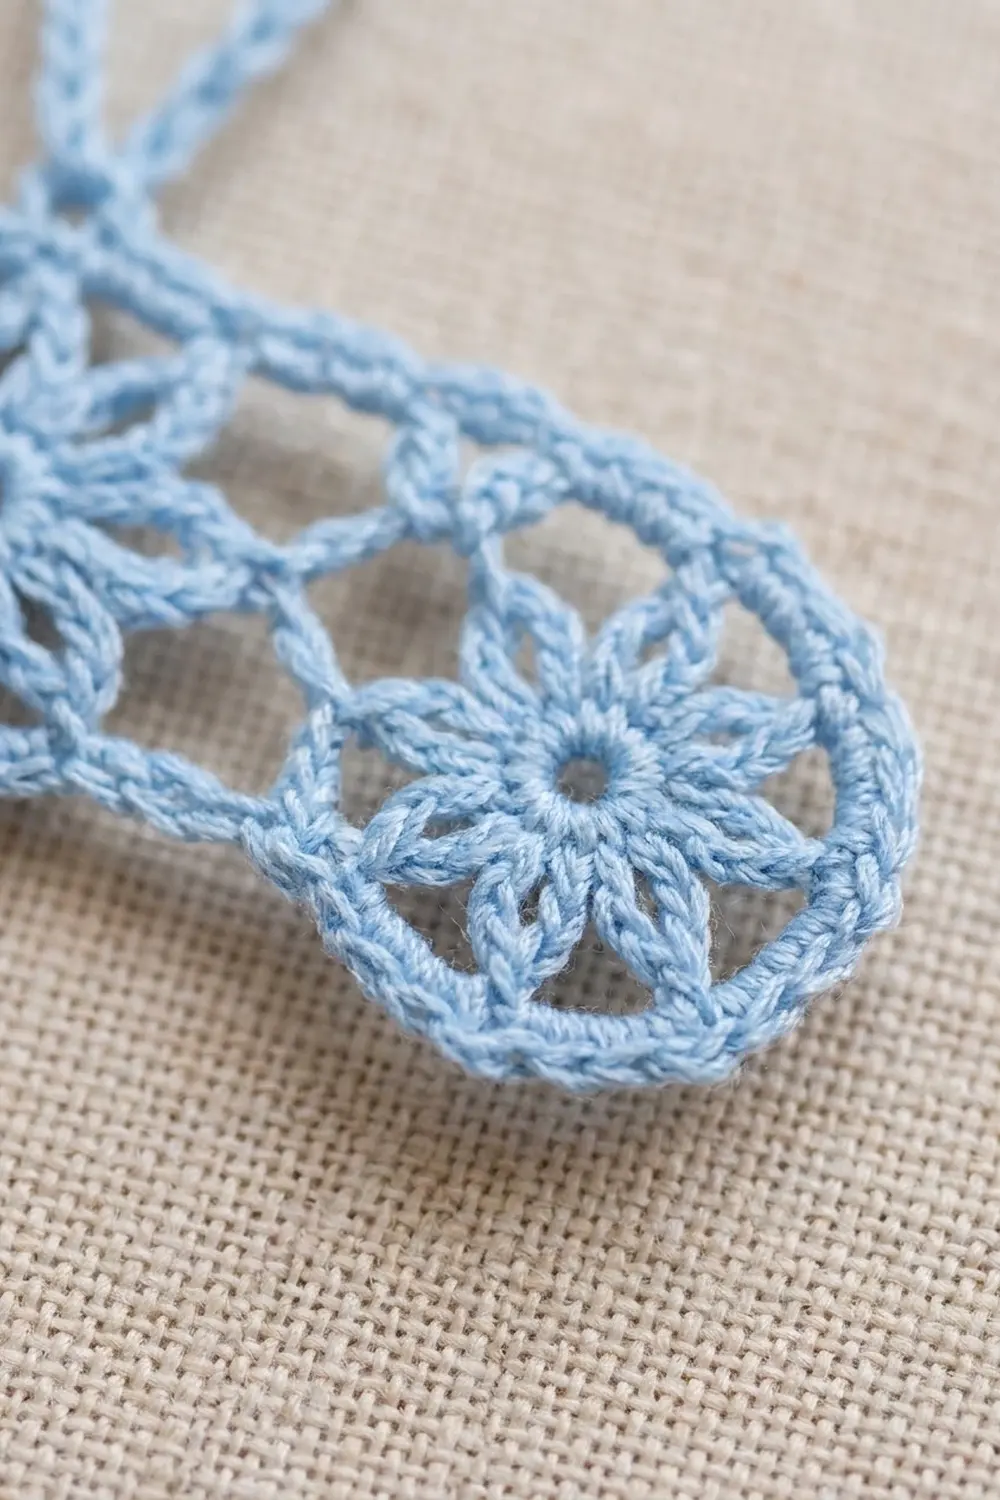
Small Flower Motif (make 4)
Use light blue.
Rnd 1: Ch 5, sl st in first ch to form a ring. Ch 1, 12 sc in ring, join with sl st in first sc. (12 sc)
Rnd 2: Ch 1, sc in first sc, ch 4, sk next sc, sc in next sc, ch 4, sk next sc 5 times, join with sl st in first sc. (6 sc, 6 ch-4 sps)
Rnd 3 (petals): Work (sc, hdc, dc, tr, dc, hdc, sc) in each ch-4 sp around, join with sl st in first sc. (6 petals of 7 sts = 42 sts)
Rnd 4: Sl st in next hdc, sl st in next dc, sl st in next tr. Ch 1, sc in same tr, ch 4, sc in tr of next petal, ch 4 5 times, join with sl st in first sc. (6 sc, 6 ch-4 sps)
Rnd 5 (conversion round): Ch 1, sc in next sc, 5 sc in next ch-4 sp 6 times, join. (6 sc worked 1-per-sc + 30 sc worked into the spaces = 36 sc, 6 sections of 6 sts)
Fasten off on the first motif only. On the others, join while working Rnd 5 (see Joining below).
Large Flower Motif (make 1)
Use light blue.
Rnd 1: Ch 6, sl st in first ch to form a ring. Ch 1, 16 sc in ring, join. (16 sc)
Rnd 2: Ch 1, sc in first sc, ch 5, sk next sc, sc in next sc, ch 5, sk next sc 7 times, join. (8 sc, 8 ch-5 sps)
Rnd 3 (petals): Work (sc, hdc, 2 dc, tr, 2 dc, hdc, sc) in each ch-5 sp around, join. (8 petals of 9 sts = 72 sts)
Rnd 4: Sl st in next hdc and next 2 dc, sl st in tr. Ch 1, sc in same tr, ch 5, sc in tr of next petal, ch 5 7 times, join. (8 sc, 8 ch-5 sps)
Rnd 5 (conversion round): Ch 1, sc in next sc, 6 sc in next ch-5 sp 8 times, join. (8 sc worked 1-per-sc + 48 sc worked into the spaces = 56 sc, 8 sections of 7 sts)
Make All Pieces
- Light blue: 1 large motif (L), 4 small motifs (S1, S2, S3, S4)
- Green: 2 holly leaves (optional)
- Red: 3 holly berries (optional)
Layout grid (right side facing you):
        [S2]   [S1]
  [ L ]
        [S3]   [S4]
S1 is the top tip and S4 is the bottom tip. The opening of the C faces right.
Joining
The motifs are joined as you go, in this order: S1, S2, L, S3, S4. Each pair is joined at one point only, so the joins add no stitches to any count.
S1: Work all 5 rnds and fasten off.
S2: Work Rnd 5 up to section 1. Work sc in sc and 2 sc in the ch-4 sp. Drop-loop join into the anchor of any section of S1. Then work 3 sc in the same ch-4 sp and finish the round. That makes section 1 of S2.
L: In Rnd 5, join section 1 to the anchor of section 4 of S2 (the section opposite its join to S1). For the large motif, work sc in sc and 2 sc in the ch-5 sp, join, then work 4 sc in the same sp. Work section 4 of L as a plain section. Do not join S3 to it yet.
S3: Join section 1 of S3 to the anchor of section 4 of L.
S4: Join section 1 of S4 to the anchor of section 4 of S3.
Tension advice: Keep the drop-loop join snug, but don’t tug. If you pull too hard, the motifs overlap. Too loose, and a gap opens at the seam.
Free sections: Lay the strip in the C layout and put a marker on each free anchor.
- S1 and S4: 5 free sections each. Two face the outer curve, one is the tip, and two face the inner curve.
- S2 and S3: 4 free sections each, 2 outer and 2 inner.
- L: 6 free sections. Sections 2–3 face the inner curve and sections 5–8 face the outer curve.
Total anchors: 12 outer + 10 inner + 2 tips = 24.
Size checkpoint: The joined motifs should measure 4 in (10.2 cm) tall and 3 in (7.6 cm) wide.
Border
Border gauge: 11 sc = 1 in (2.5 cm).
Rnd 1 (chain mesh): Join light blue with sc in the S1 tip anchor. Work toward the outer curve, putting 1 sc in each anchor in order around the crescent. Between anchors, chain as follows:
- Between two anchors on the same motif: ch 5 (16 gaps)
- Across an outer seam (S1–S2, S2–L, L–S3, S3–S4): ch 7 (4 gaps)
- Across an inner seam: ch 3 (4 gaps)
After the last S1 inner anchor, ch 5 and join to the first sc.
(24 sc and 24 ch-sps: 16 ch-5, 4 ch-7, 4 ch-3, a total of 120 ch)
Rnd 2 (conversion round, solid outline): Ch 1. Work sc in each sc, 5 sc in each ch-5 sp, 7 sc in each ch-7 sp, and 2 sc in each ch-3 sp. Join.
(24 sc worked 1-per-sc + 80 + 28 + 8 sc worked into the spaces = 140 sc)
Counts per edge in Rnd 2:
- Outer curve: 12 anchors + 7 ch-5 sps (35) + 4 ch-7 sps (28) = 75 sc, about 6.8 in (17.3 cm)
- Inner curve: 10 anchors + 5 ch-5 sps (25) + 4 ch-3 sps (8) = 43 sc, about 3.9 in (9.9 cm)
- Each tip: 1 anchor + 2 ch-5 sps (10) = 11 sc, about 1 in (2.5 cm)
Check: 75 + 43 + 11 + 11 = 140 sc, about 12.7 in (32.3 cm) of outline.
Why the math works:
- A ch-5 covered with 5 sc lies flat, since there’s one sc per chain.
- The convex outer seams cover more distance, so ch 7 with 7 sc keeps the curve smooth without pulling.
- The concave inner seams need to draw in, so ch 3 with only 2 sc cinches them and stops the inner curve from ruffling.
- Together, the two rounds add 0.25 in (0.6 cm) on every side, taking the piece from 4 x 3 in to 4.5 x 3.5 in (11.4 x 8.9 cm).
Hanging loop: Find the highest sc on the outer curve, which is the Rnd 2 sc above the S2 outer anchor next to L. Sl st into it, ch 30, and sl st in the same st. Then sl st in each ch back around the loop to make a firm cord. The loop stands 1.5 in (3.8 cm) tall. Fasten off.
Holly Appliqué (optional)
Leaf (make 2, green): Ch 8. Sl st in 2nd ch from hook, then sc, hdc, dc, dc, hdc, sc in the next 6 chs (7 sts). Ch 2 for the tip. Working in the free loops along the other side: sc, hdc, dc, dc, hdc, sc, sl st (7 sts). (14 sts + ch-2 tip) Each leaf is 0.75 in (1.9 cm) long.
Berry (make 3, red): Magic ring, 6 sc in ring (6 sc). Then sc2tog 3 times (3 sts). Tuck the tail inside and pull closed. Each berry is 0.25 in (0.6 cm) across.
Sew the leaves in a V on S4, near the lower tip, then sew the berries in a cluster where the leaves meet.
Final Blocking
- Weave in all ends along the back of the border before blocking.
- Soak the ornament in cool water for 5 minutes, then press out the water in a towel.
- Pin it to the board right side up. Put one pin at each tip and pins every 0.5 in (1.3 cm) around the outer curve.
- Measure 4.5 in (11.4 cm) tall and 3.5 in (8.9 cm) wide, and adjust the pins.
- Open each flower’s petals with your fingertips and straighten the mesh openings.
- Mist with spray starch if you’d like a crisper finish.
- Let it dry completely, then unpin. If you’re adding holly, sew it on now.
Final Quality-Control Checklist
- Large motif has 8 petals and 56 sts in Rnd 5; each small motif has 6 petals and 36 sts.
- Each joined pair has exactly 1 join point.
- Border Rnd 1 has 24 sc and Rnd 2 has 140 sc.
- The outer curve is smooth and the inner curve lies flat without ruffling.
- Size is 4.5 x 3.5 in (11.4 x 8.9 cm).
- Hanging loop is centered over the top of the curve and stands 1.5 in (3.8 cm) tall.
- No loose ends are showing on the front.
Troubleshooting
- Petals cup: Your Rnd 4 chains are too tight. Loosen them, or add 1 ch to each loop and work 1 more sc into it in Rnd 5.
- Inner curve ruffles: Work 1 sc instead of 2 into each inner ch-3 sp.
- Outer curve pulls tight: Make sure every outer seam has ch 7, not ch 5.
- Motifs overlap at the joins: Your drop-loop join was pulled too tight. Undo it and rework it more loosely.
- Loop twists: Block it straight and add a little starch.
Care
Hand wash in cool water with a mild soap, and lay flat or pin to dry. Store flat in tissue paper so the lace keeps its shape.
Final Notes
Here is the measurement chain for the whole ornament:
- Small motifs are 1.25 in (3.2 cm) across and the large motif is 1.75 in (4.4 cm).
- Joined, the five motifs measure 4 x 3 in (10.2 x 7.6 cm).
- Border Rnd 1 has 24 anchors, and Rnd 2 has 140 sc at 11 sc per inch.
- The two border rounds add 0.25 in (0.6 cm) on every side, for a final size of 4.5 x 3.5 in (11.4 x 8.9 cm).
If each stage matches its checkpoint, your crescent will come out right. Make a few moons in light blue or another frosty shade, and hang them together on the tree.
Happy crocheting!