

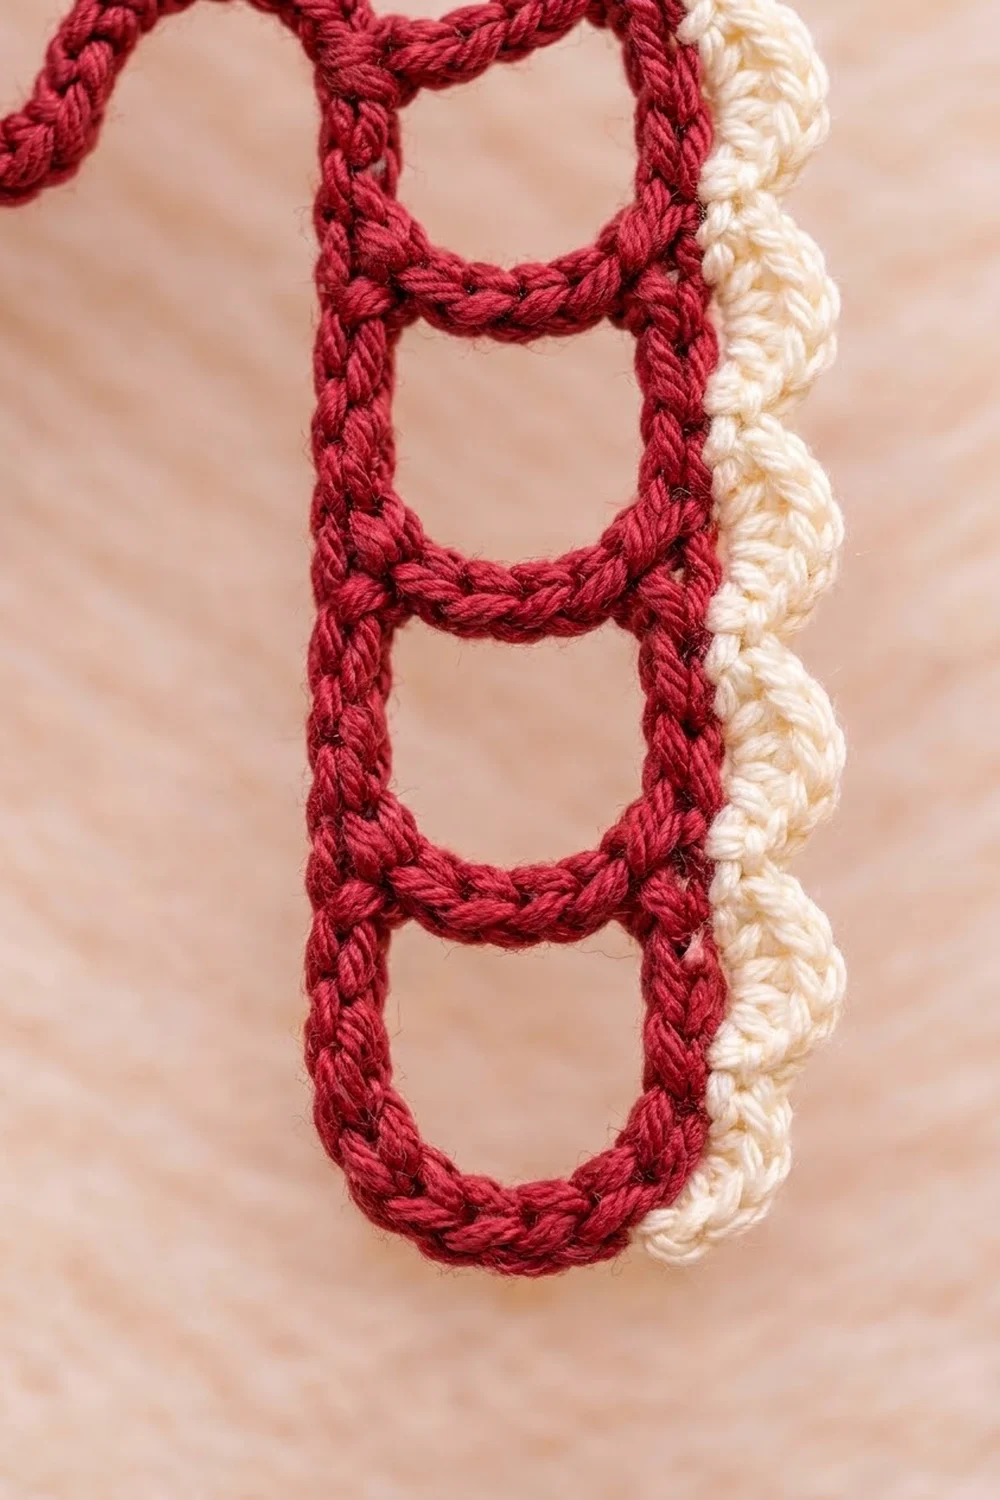
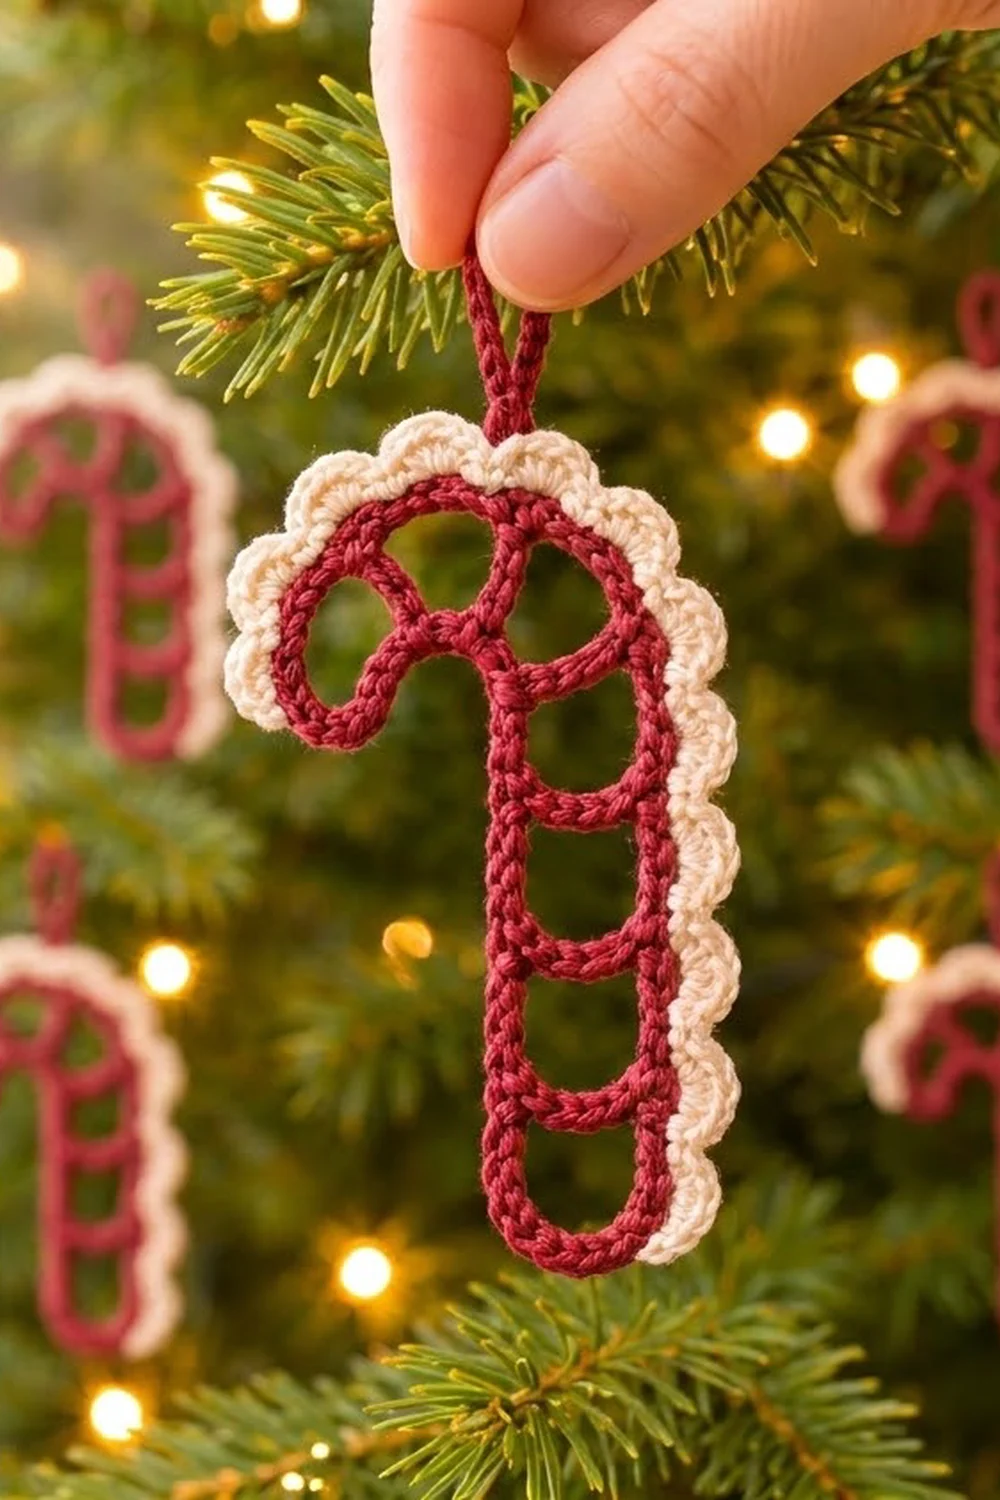
This little ornament is a candy cane drawn in yarn. It isn’t a solid shape. A thick cranberry-red cord traces the whole outline of the cane, with five short rungs across the straight shaft and two spokes across the curved hook. The open spaces between them look like the stripes on a real peppermint stick.
A cream scalloped edging runs along the outside of the cane. It starts at the hook tip, goes over the top of the hook, and continues down the right side of the shaft. A small red hanging loop sits at the top of the hook, ready for a tree branch, a gift tag, or a window hook.
All instructions use US crochet terms. The finished ornament is 5 in (12.7 cm) tall without the loop and 2.5 in (6.4 cm) wide across the hook, including the edging. With the loop, it hangs about 5.75 in (14.6 cm) tall.
The construction is simple and needs no sewing. You make one long chain, join it into a ring, and work single crochet into it to build a closed cord. Then you pin the cord into a cane shape, add the rungs and spokes with slip stitches, work the cream scallops along the outer edge, and finish with the hanging loop.
Finished Size and Construction
- Finished size: 5 in (12.7 cm) tall x 2.5 in (6.4 cm) wide, without loop
- Height with loop: about 5.75 in (14.6 cm)
- Skill level: Easy / advanced beginner
- Terminology: US crochet terms
- Yarn weight: Sport weight (#2), cotton or cotton blend
- Hook: 3.25 mm (US D/3)
- Number of pieces: 1 (single ornament, worked in one piece)
- Layout: Not applicable; this is a single motif
- Piece size before border: 4.75 in (12.1 cm) tall x 2 in (5.1 cm) wide
- Border depth: 0.25 in (0.6 cm)
- Shaft width (outside edge to outside edge): 1 in (2.5 cm)
Materials
Choose a smooth, tightly plied cotton in sport weight. Cotton holds the cord shape crisply and blocks well. Fuzzy or loosely spun yarn will blur the open ladder spaces.
- Color A, cranberry red: 8 g, about 26 m
- Color B, cream: 4 g, about 13 m
These quantities include a margin of about 30% for your test ornament and tails. One ball of each color makes many ornaments.
Tools:
- 3.25 mm (US D/3) crochet hook
- 6 locking stitch markers (or scraps of contrasting yarn)
- Tapestry needle
- Scissors
- Blocking board or foam mat with a grid
- Rust-proof pins
- Spray bottle with water
- Optional: fabric stiffener or diluted white glue for a firmer ornament
Abbreviations (US Terms)
- ch – chain
- sl st – slip stitch
- sc – single crochet
- hdc – half double crochet
- sk – skip
- st(s) – stitch(es)
- rep – repeat
- Rnd – round
Special stitch – Scallop: sk 1 st, 5 hdc in next st, sk 1 st, sc in next st. Each scallop uses 4 stitches of the cord.
Special technique – Rung: ch 3, sl st in the marked st on the opposite side, then sl st in each of the 3 ch to travel back. This makes a doubled bar that matches the thickness of the outline cord.
Gauge and Checkpoints
Gauge is measured along the finished cord (chain plus single crochet).
Gauge: 18 sts of cord = 3 in (7.6 cm), or 6 sts per 1 in (2.5 cm).
Make a test ornament first. It uses very little yarn, and it’s the most reliable swatch for this design. Check these points as you go:
- After Rnd 1 (chain ring): lay the ring flat without stretching it. The full ring should measure 14 in (35.6 cm) around.
- After Rnd 2 (cord): the cord should be about 0.25 in (0.6 cm) wide. A 22-st rail section should measure 3.7 in (9.4 cm).
- After pinning the shape: the shaft should be 1 in (2.5 cm) wide and the piece 4.75 in (12.1 cm) tall x 2 in (5.1 cm) wide.
- After the border: 5 in (12.7 cm) tall x 2.5 in (6.4 cm) wide.
If your cord is too long: switch to a 3.0 mm hook or chain more tightly. A long cord lets the rungs pull the shaft into an hourglass.
If your cord is too short: switch to a 3.5 mm hook. A short cord crowds the hook and squashes the spokes.
Don’t change the stitch counts. Every marker position depends on the 84-stitch total.
The Pattern
Rnd 1: Foundation Ring
With Color A, ch 84. Check that the chain isn’t twisted, then sl st in the first ch to join into a ring. (84 ch)
Rnd 2: Outline Cord
Ch 1. Sc in the back bump of each ch around. Sl st in the first sc to join. (84 sc)
Working into the back bump leaves the neat “V” of each chain free along one edge. This V edge becomes the inner edge of the outline, where the rungs attach. The sc tops form the outer edge, where the border goes.
Fasten off and weave the tail into the cord at the join.
Number and Mark the Cord
Count the stitches from the join, in the direction you worked, and assign them to sections:
| Stitches | Section | Count |
|---|---|---|
| 1–6 | Bottom curve | 6 |
| 7–28 | Right rail (bottom to top) | 22 |
| 29–48 | Outer hook arc | 20 |
| 49–52 | Hook tip | 4 |
| 53–62 | Inner hook arc (tip back toward shaft) | 10 |
| 63–84 | Left rail (top to bottom) | 22 |
| Total | 84 |
Place markers in sts 9, 28, 48, 52, 62, and 84. These mark the section ends and the start of the border.
Shape the Cane
Pin the cord flat on your board with the inner (V) edge facing the inside of the shape:
- Sts 7–28 and 63–84 run as two parallel rails. Their outer edges sit 1 in (2.5 cm) apart, leaving a 0.5 in (1.3 cm) gap between the cords.
- Sts 1–6 round off the bottom.
- Sts 29–48 arch up and over to the left in a smooth curve.
- Sts 49–52 form a tight, rounded tip.
- Sts 53–62 curve back to meet the top of the left rail.
The hook should reach about 1 in (2.5 cm) to the left of the shaft. Checkpoint: 4.75 in (12.1 cm) tall x 2 in (5.1 cm) wide.
Rungs and Spokes
Work every rung stitch into the free V loops on the inner edge of the cord. Keep the piece pinned, or hold it carefully so the shape stays true.
On the shaft, each pair of rung stitches adds up to 91, and that keeps the rungs level. The k-th stitch up the right rail is st (6 + k), and the k-th stitch up the left rail is st (85 – k).
Rung 1: With Color A, join with sl st in st 81. Ch 3, sl st in st 10, sl st in each of the 3 ch, sl st in st 81.
Travel: Sl st in sts 80, 79, 78, and 77. (4 sl st)
Rung 2: Ch 3, sl st in st 14, sl st in each of the 3 ch, sl st in st 77.
Travel: Sl st in sts 76, 75, 74, and 73.
Rung 3: Ch 3, sl st in st 18, sl st in each of the 3 ch, sl st in st 73.
Travel: Sl st in sts 72, 71, 70, and 69.
Rung 4: Ch 3, sl st in st 22, sl st in each of the 3 ch, sl st in st 69.
Travel: Sl st in sts 68, 67, 66, and 65.
Rung 5: Ch 3, sl st in st 26, sl st in each of the 3 ch, sl st in st 65.
That gives 5 rungs spaced every 4 sts, with 6 open spaces on the shaft. The spaces are about 2/3 in (1.7 cm) tall, and the top space opens into the hook.
Travel into the hook: Sl st in sts 64, 63, 62, 61, 60, and 59. (6 sl st)
Spoke 1: Ch 3, sl st in st 35, sl st in each of the 3 ch, sl st in st 59.
Travel: Sl st in sts 58, 57, and 56. (3 sl st)
Spoke 2: Ch 3, sl st in st 42, sl st in each of the 3 ch, sl st in st 56.
Fasten off and weave the tail along the inner arc.
The two spokes divide the hook band into three windows. The outer arc has 20 sts and the inner arc has 10, so the spokes fan out slightly, like the stripes on a curved candy cane.
Border
The cream scalloped border covers only the outer edge. It runs from near the bottom of the right rail, up and over the hook, to the start of the tip. The left rail, inner arc, and bottom curve stay plain red.
Border gauge: each scallop spans 4 cord sts, about 2/3 in (1.7 cm), and stands 0.25 in (0.6 cm) tall.
Border (worked as one row): With Color B, join with sc in the sc top of st 9. *Sk 1 st, 5 hdc in next st, sk 1 st, sc in next st; rep from * 9 more times. The last sc lands in st 49. Fasten off. (10 scallops: 50 hdc + 11 sc = 61 sts)
Per section:
- Right rail (sts 9–28): 5 scallops. The sc fall on sts 9, 13, 17, 21, and 25, and the fifth scallop (centered on st 27) uses sts 26–28.
- Outer arc to tip (sts 29–49): 5 more scallops, centered on sts 31, 35, 39, 43, and 47. The sc fall on sts 29, 33, 37, 41, 45, and 49.
Why the math works: the border covers sts 9 through 49, which is 41 sts. One starting sc plus 10 repeats of 4 sts gives 1 + (10 x 4) = 41. Every sc falls on st 9 + 4n, so one lands exactly on st 37, the top of the hook, which is where the loop goes.
The 5-hdc scallops fan out naturally on the convex curve of the hook. On the straight rail, blocking opens them evenly.
Hanging Loop
With Color A, join with sl st in the cream sc at st 37, inserting the hook through both the cream sc and the red cord stitch beneath it. Ch 10, then sl st in the same st. Work 14 sc over the chain loop and sl st in the first sc. Fasten off. (14 sc)
The loop stands about 0.75 in (1.9 cm) above the border.
Final Blocking
- Weave in all tails along the cord, never across an open space.
- Soak the ornament in cool water, then press out the excess water in a towel. Don’t wring it.
- Lay it on your blocking board over the grid.
- Pin the bottom curve first. Then set the two rails straight and 1 in (2.5 cm) apart.
- Pin the top of the hook and the tip. Confirm the size is 5 in (12.7 cm) tall and 2.5 in (6.4 cm) wide.
- If a rung tilts, pin through each end of it. Each rung should be level and about 0.5 in (1.3 cm) long.
- Ease each scallop open with your fingertip.
- Pin the loop straight up.
- For a stiffer ornament, brush on fabric stiffener now.
- Let it dry completely, usually overnight, before you remove the pins.
Final Quality-Control Checklist
- The cord is 84 sc with a neat join.
- The rails are 22 sts each, parallel, and 1 in (2.5 cm) wide overall.
- The shaft has five level rungs and six open spaces.
- The hook has two spokes and three windows.
- There are ten cream scallops from st 9 to st 49, with none on the left rail or inner arc.
- The loop is centered at st 37, on top of the hook.
- The finished size is 5 in (12.7 cm) x 2.5 in (6.4 cm), or 5.75 in (14.6 cm) tall with the loop.
- All tails are hidden inside the cord.
Troubleshooting
The rungs slant. Recount from the join. Each pair of rung stitches must add up to 91 (for example, 10 + 81).
The shaft pinches in the middle. Your rungs are tighter than the rails. Work the 3 ch more loosely, or use a hook half a size larger for the rungs.
The cord twists. The foundation chain was twisted when you joined it. Wet blocking usually fixes a slight twist, but a full twist means starting again.
The scallops ruffle on the rail. Work 4 hdc per scallop on the right rail only, with the same skips.
The border ends in the wrong place. You probably skipped 2 sts somewhere. The sc must fall on sts 9, 13, 17, and so on up to 49.
The loop leans. Check that it’s joined at st 37, and pin it upright while it dries.
Care
Hand wash in cool water and lay flat to dry, pinning it back into shape if needed. If you used stiffener, spot clean only and store the ornament flat between layers of tissue.
Final Notes
Every measurement in this ornament follows from the gauge. At 6 sts per 1 in (2.5 cm), 84 chains make a 14 in (35.6 cm) cord. Split into fixed sections, that cord shapes a 4.75 in (12.1 cm) x 2 in (5.1 cm) cane. Rungs every 4 sts create six 2/3 in (1.7 cm) spaces. Ten 4-stitch scallops add a 0.25 in (0.6 cm) border, for a finished 5 in (12.7 cm) x 2.5 in (6.4 cm) ornament plus a 0.75 in (1.9 cm) loop. Get the cord right, and everything else falls into place.
Happy crocheting!