

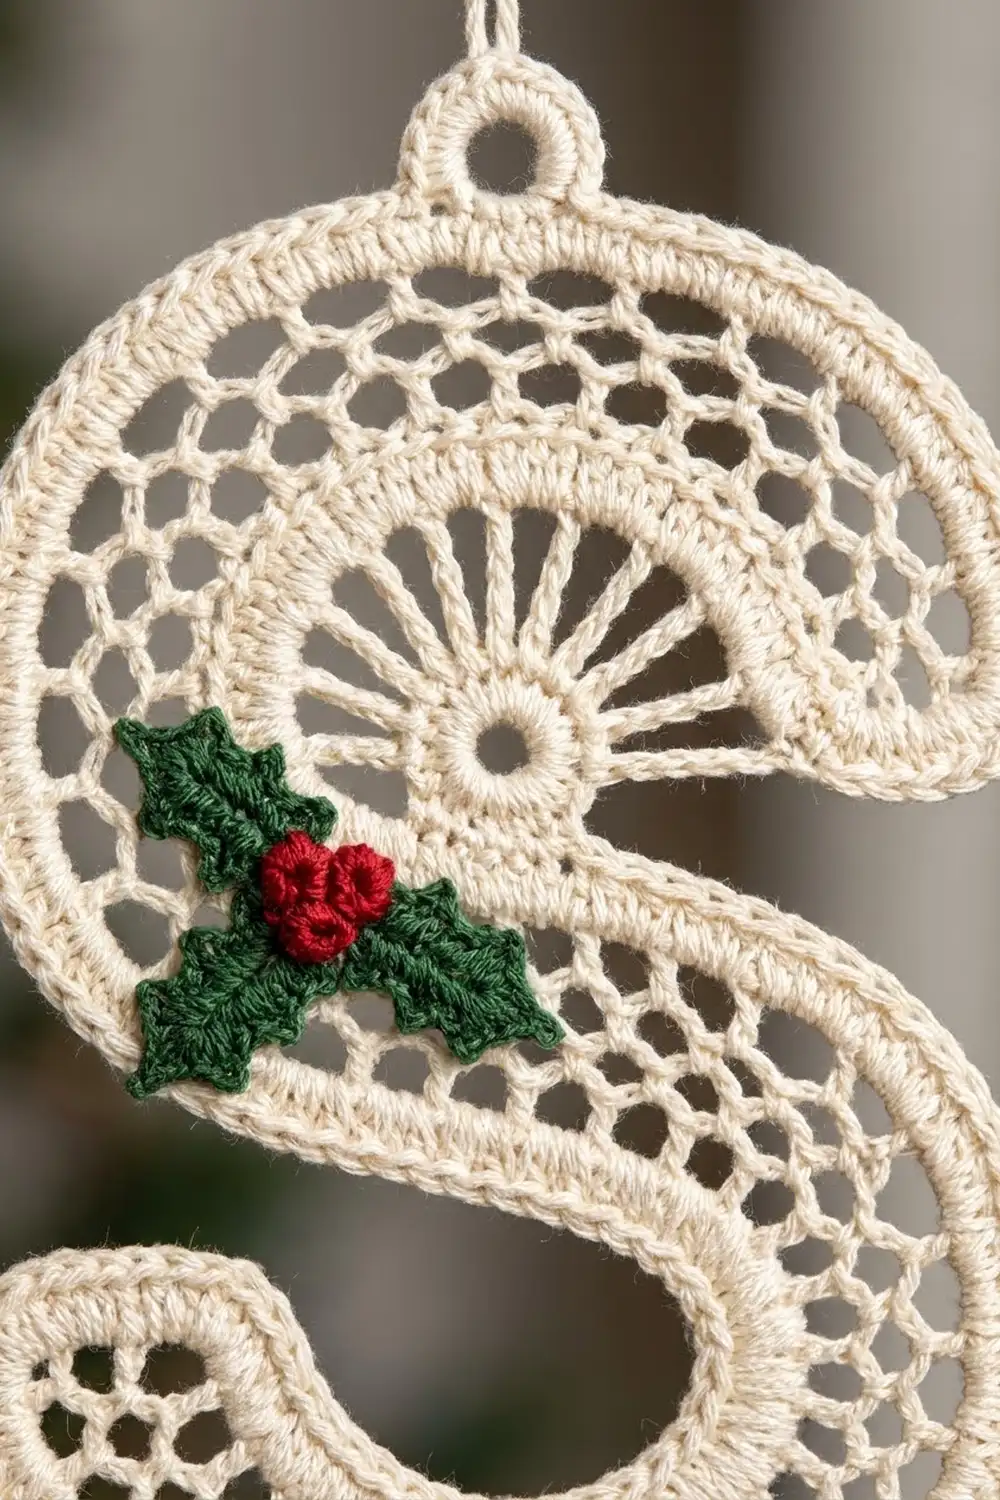
This lace letter S ornament is made in cream cotton thread. Each curve of the letter holds a fan that radiates from a small ring. Open chain-loop netting fills the top end, the middle and the bottom end, and a solid single-crochet edge outlines the whole shape. Three holly sprigs in forest green and red finish it off.
The style is a little vintage, like a lace monogram from a heirloom linen drawer. Hang it on the tree, tie it to a gift as a name tag, or stitch it as a personalized keepsake.
This pattern uses US crochet terms. The finished ornament measures 3.25 in (8.3 cm) wide and 4 in (10.2 cm) tall. The hanging loop adds 1.25 in (3.2 cm).
The S is made as one continuous strip. You start at the top end and work rows of netting. At each curve you work a half-wheel fan to turn the strip around, then pick up the netting again along the fan’s straight edge. Two rounds of border tidy the outline. Last, you crochet the hanging loop and sew on the holly.
Finished Size and Construction
- Finished size: 3.25 in × 4 in (8.3 cm × 10.2 cm), plus a 1.25 in (3.2 cm) loop
- Skill level: Intermediate
- Terminology: US
- Yarn weight: Size 10 cotton crochet thread (Lace, 0)
- Hook: 1.75 mm steel hook
- Number of pieces: 1 lace body, plus 6 leaves and 9 berries that are sewn on
- Layout: Top net band → upper fan → middle net band → lower fan → bottom net band
- Band width: 1.25 in (3.2 cm), which is 5 net loops
- Size before border: 3 in × 3.75 in (7.6 cm × 9.5 cm)
- Border depth: 0.125 in (0.3 cm) on every side
Materials
Use mercerized cotton thread. It gives crisp stitch definition and holds starch well. Avoid fuzzy or acrylic thread, because the netting will blur and won’t block sharply.
- Cream: 6 g / 19 m, for the body, border and loop
- Forest green: 1 g / 3 m, for the leaves
- Red: 1 g / 2 m, for the berries
These quantities include a margin of about 20% for your gauge swatch and tails.
Tools:
- 1.75 mm steel crochet hook
- Fine tapestry needle
- Sharp scissors
- Rustproof pins
- Foam blocking board
- Liquid starch, or a sugar-water stiffener
- Small ruler
Abbreviations (US Terms)
- ch – chain
- sl st – slip stitch
- sc – single crochet
- hdc – half double crochet
- dc – double crochet
- tr – treble crochet
- sc2tog – single crochet 2 together
- sp – space
- st(s) – stitch(es)
- RS – right side
Berry bobble: Work (yo, insert hook in the st, yo and pull up a loop, yo and draw through 2 loops) 4 times in the same st. You now have 5 loops on the hook. Yo and draw through all 5.
Gauge and Checkpoints
Work the top band (Rows 1–5) first and measure it before you continue.
- Net gauge: 5 ch-5 loops = 1.25 in (3.2 cm) wide, and 4 rows = 1 in (2.5 cm) tall, measured lightly stretched.
- Checkpoint 1: After Row 5, the band is 1.25 in × 1.25 in (3.2 cm × 3.2 cm).
- Checkpoint 2: After the upper fan, its straight edge measures 2.5 in (6.4 cm), and the fan’s radius is 1.25 in (3.2 cm).
- Checkpoint 3: Before the border, the body is 3 in × 3.75 in (7.6 cm × 9.5 cm).
- Checkpoint 4: After the border, the body is 3.25 in × 4 in (8.3 cm × 10.2 cm).
If your band measures more than 1.25 in (3.2 cm) wide, go down to a 1.5 mm hook. If it measures less than 1.1 in (2.8 cm), go up to a 2 mm hook. Netting stretches a lot, so pin it lightly when you measure.
Body Pattern
Top Band
Use cream thread. Hold the work so that side B (where Row 1 ends) is the lower edge of the band. This is the inner edge, facing the upper curve.
Foundation: Ch 22.
Row 1 (RS): Sc in 2nd ch from hook. [Ch 5, skip 3 ch, sc in next ch] 5 times. Turn.
(5 ch-5 loops, 6 sc; ends at side B)
Row 2: Ch 5 (counts as dc + ch 2). Sc in first loop. [Ch 5, sc in next loop] 4 times. Ch 2, dc in last sc. Turn.
(4 ch-5 loops + 2 ch-2 half loops; ends at side A)
Row 3: Ch 1, sc in first dc. [Ch 5, sc in next ch-5 loop] 4 times. Ch 5, sc in 3rd ch of turning ch. Turn.
(5 ch-5 loops, 6 sc; ends at side B)
Row 4: Repeat Row 2.
Row 5: Repeat Row 3. Do not turn.
(5 ch-5 loops, 6 sc; ends at side B)
Upper Fan
Ring: Ch 6, sl st in last sc made to form a ring at side B.
F1: Sl st in ring. Ch 5 (counts as tr + ch 1). [Tr in ring, ch 1] 7 times. Tr in ring. Turn.
(9 tr spokes, 8 ch-1 sp)
The first spoke lies along Row 5. The last spoke points the opposite way, which completes a half circle.
F2: Ch 4 (counts as tr). [Ch 3, tr in next tr] 7 times. Ch 3, tr in 4th ch of beginning ch-5. Sl st in the 3rd ch-5 loop of Row 5, counting from side B. Turn.
(9 tr, 8 ch-3 sp)
Working each tr into the tr below makes the long radiating spokes.
F3: Ch 1, sc in first tr. [Ch 7, sc in next tr] 8 times. Do not turn.
(9 sc, 8 ch-7 loops)
Middle Band
M1: Ch 1. Work along the straight edge of the last spoke, from the outer edge toward the ring:
- Sc in last sc of F3.
- Ch 5, sc around the post of the last F2 tr near its top.
- Ch 5, sc around the same post near its base.
- Ch 5, sc around the post of the last F1 tr near its top.
- Ch 5, sc around the same post near its base.
- Ch 5, sc in ring.
Turn.
(5 ch-5 loops, 6 sc; ends at the ring edge)
M2: Repeat Row 2. Do not turn.
(4 ch-5 loops + 2 half loops; ends at the opposite edge, which is the inner edge of the lower curve)
Lower Fan
Ring: Ch 6, sl st in the dc just made.
F1–F3: Work as for the upper fan. On F2, finish with a sl st in the 3rd ch-5 loop of M2, counting from the ring edge. Do not turn after F3.
This fan sweeps the other way, which turns the strip back to form the bottom curve of the S.
Bottom Band
B1: Work as for M1 along the lower fan’s straight edge.
(5 loops, 6 sc)
B2: Repeat Row 2.
B3: Repeat Row 3.
B4: Repeat Row 2.
B5: Repeat Row 3. Do not fasten off.
(5 ch-5 loops, 6 sc)
Measure for Checkpoint 3 now. The bands are 1.25 in (3.2 cm) each, so 3 bands stack to 3.75 in (9.5 cm) tall. Across the middle, two fan radii of 1.25 in plus the 0.5 in (1.3 cm) middle band make 3 in (7.6 cm) wide.
Border
Border gauge: 12 sc = 1 in (2.5 cm), and 2 rounds = 0.125 in (0.3 cm) deep.
Edge rules for Round 1:
- 3 sc in each row-end
- 4 sc in each terminal loop or foundation group
- 6 sc in each ch-7 fan loop
- 3 sc in each corner
Round 1
Start at the top terminal’s outer corner and work counterclockwise. Count each segment as you go.
| Segment | Working | Sc |
|---|---|---|
| Top band, outer edge | Row-ends 2–5, 3 sc each | 12 |
| Upper fan | 3 sc in gap at band, 6 sc in each of 8 loops | 51 |
| Middle band, lower edge | 3 sc in M2 end, 5 sc around exposed ring | 8 |
| Bottom band, inner edge | Row-ends B2–B4, 3 sc each | 9 |
| Bottom terminal end | 3 sc corner, 4 sc in each of 5 loops, 3 sc corner | 26 |
| Bottom band, outer edge | Row-ends B4–B2, 3 sc each | 9 |
| Lower fan | 6 sc in each of 8 loops, 3 sc in gap at band | 51 |
| Middle band, upper edge | 3 sc in M2 end, 5 sc around exposed ring | 8 |
| Top band, inner edge | Row-ends 4–2, 3 sc each | 9 |
| Top terminal end | 3 sc corner, 4 sc in each of 5 foundation groups, 3 sc corner | 26 |
Sl st to the first sc to join.
Total: 209 sc.
Round 2
Ch 1. Sc in each sc around, with these changes:
- Work 3 sc in the center sc of each of the 4 terminal corners.
- Work sc2tog over the 2 center sc of each 5-sc ring group.
Sl st to join.
Total: 215 sts = 201 sc worked 1 per st + 12 corner sc + 2 sc2tog.
Why the math works:
- The two terminal-end segments match exactly, at 26 sts each. Both edges are 5 loops × 4 sc = 20, plus two 3-sc corners.
- Both fans total 51, and both inner edges total 9, so the S stays rotationally balanced.
- In Round 2, the corners add stitches where the outline turns outward, and the two decreases tighten the inside curves so they don’t ruffle.
Hanging Loop
Find the center sc of the 3-sc gap group where the top band meets the upper fan. Do not fasten off.
- Ch 30, then sl st in the same sc.
- Work 40 sc over the chain loop.
- Sl st in the base, then fasten off.
The finished loop stands 1.25 in (3.2 cm) tall.
Holly Appliqués
Leaf (make 6, in green)
- Ch 9.
- Starting in the 2nd ch from hook: sl st, sc, hdc, dc in each of next 2 ch, hdc, sc.
- Work 3 sc in the last ch.
- Work along the other side of the chain: sc, hdc, dc in each of next 2 ch, hdc, sc, sl st.
- Work (sl st, ch 2, sl st) in the skipped ch at the tip.
You should have 17 sts plus the tip picot. Each leaf measures 0.6 in × 0.3 in (1.5 cm × 0.8 cm). Leave a 6 in (15.2 cm) tail.
Berry (make 9, in red)
- Ch 3.
- Work a berry bobble in the 3rd ch from hook.
- Ch 1 to close.
Each berry is 0.2 in (0.5 cm) across. Leave a 6 in (15.2 cm) tail.
Placement
Each sprig is 2 leaves set in a shallow V, with 3 berries clustered at the point of the V. Sew the sprigs in three places:
- On the top band, near the upper end
- Where the upper fan meets the middle band
- On the bottom band, just below the lower fan
Use each piece’s tail to sew it on. Catch only the sc of the net or border so that your stitches don’t show on the back.
Final Blocking
- Weave in all tails before you block.
- Soak the ornament in liquid starch, then press out the extra between towels.
- Lay it on the foam board. Measure 3.25 in × 4 in (8.3 cm × 10.2 cm) and mark the outline.
- Pin each of the four terminal corners first.
- Pin into each ch-7 loop around both fans, so each loop is a smooth arc and the spokes run straight.
- Pin the net loops open, one pin about every 0.5 in (1.3 cm) along the bands.
- Lift and shape the holly leaves so they curve a little and sit slightly raised.
- Leave it to dry completely, at least 12 hours, before you unpin.
Final Quality-Control Checklist
- [ ] The body measures 3.25 in × 4 in (8.3 cm × 10.2 cm).
- [ ] The S reads correctly from the front.
- [ ] Each fan has 9 straight spokes and 8 even loops.
- [ ] Every net band is 5 loops wide.
- [ ] Round 1 has 209 sts and Round 2 has 215 sts.
- [ ] The inside curves lie flat with no ruffling.
- [ ] The loop is centered and secure.
- [ ] All 3 sprigs are sewn down firmly.
- [ ] No tails show on either side.
Troubleshooting
- The S reads backward: The lace is reversible. Flip the piece over, and sew the holly onto that side.
- The fan cups or bowls: Your F3 chains are too short. Work ch 8 instead of ch 7, or block harder.
- The fan ruffles: Your chains are too long. Try ch 6, and check that F2 really has 9 tr.
- The bands are too wide: Change to a smaller hook. Check that Row 1 measures 1.25 in (3.2 cm).
- The border waves: You worked too many sc. Count each segment against the table.
- The inside curves pucker: Make sure the sc2tog decreases sit at the center of each ring group.
- The ornament is floppy: Starch it again, with a stronger mix.
Care
Hand wash in cool water, then reshape and pin flat to dry. Starch again after washing to bring back the crisp shape.

Final Notes
Every measurement builds on the one before it:
- The net band is 5 loops, or 1.25 in (3.2 cm), wide.
- Each fan’s radius matches that band width.
- Three band widths stack to the 3.75 in (9.5 cm) height.
- The two fans and the middle band make the 3 in (7.6 cm) width.
- A 0.125 in (0.3 cm) border on every side brings the ornament to 3.25 in × 4 in (8.3 cm × 10.2 cm).
If Row 1 measures correctly, everything that follows will fit.
Happy crocheting!