

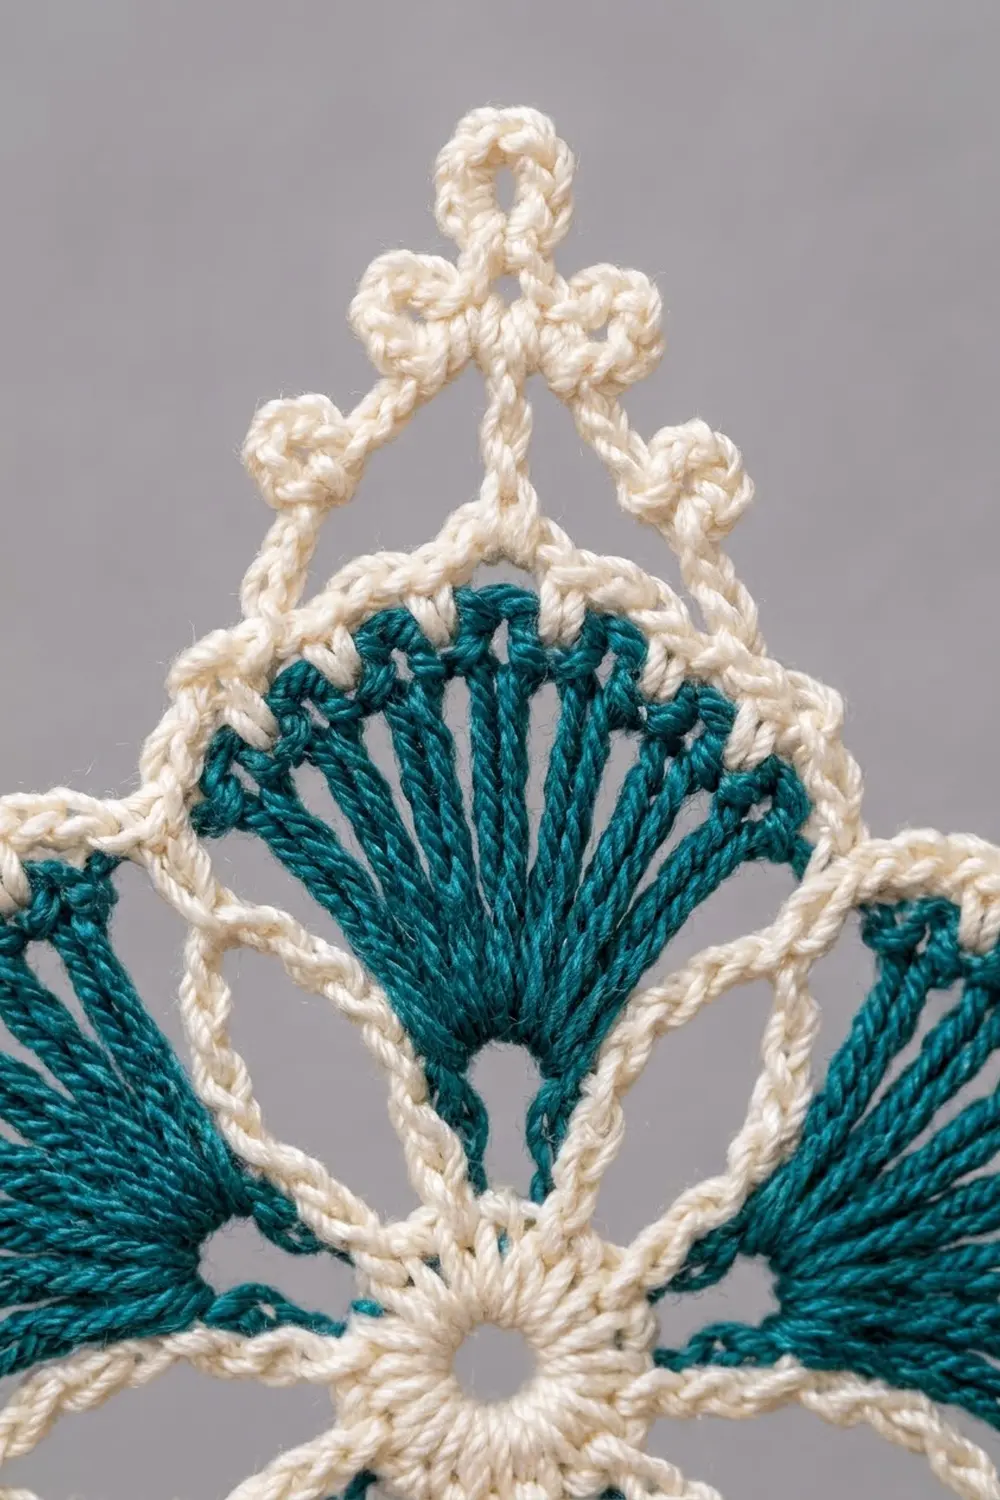
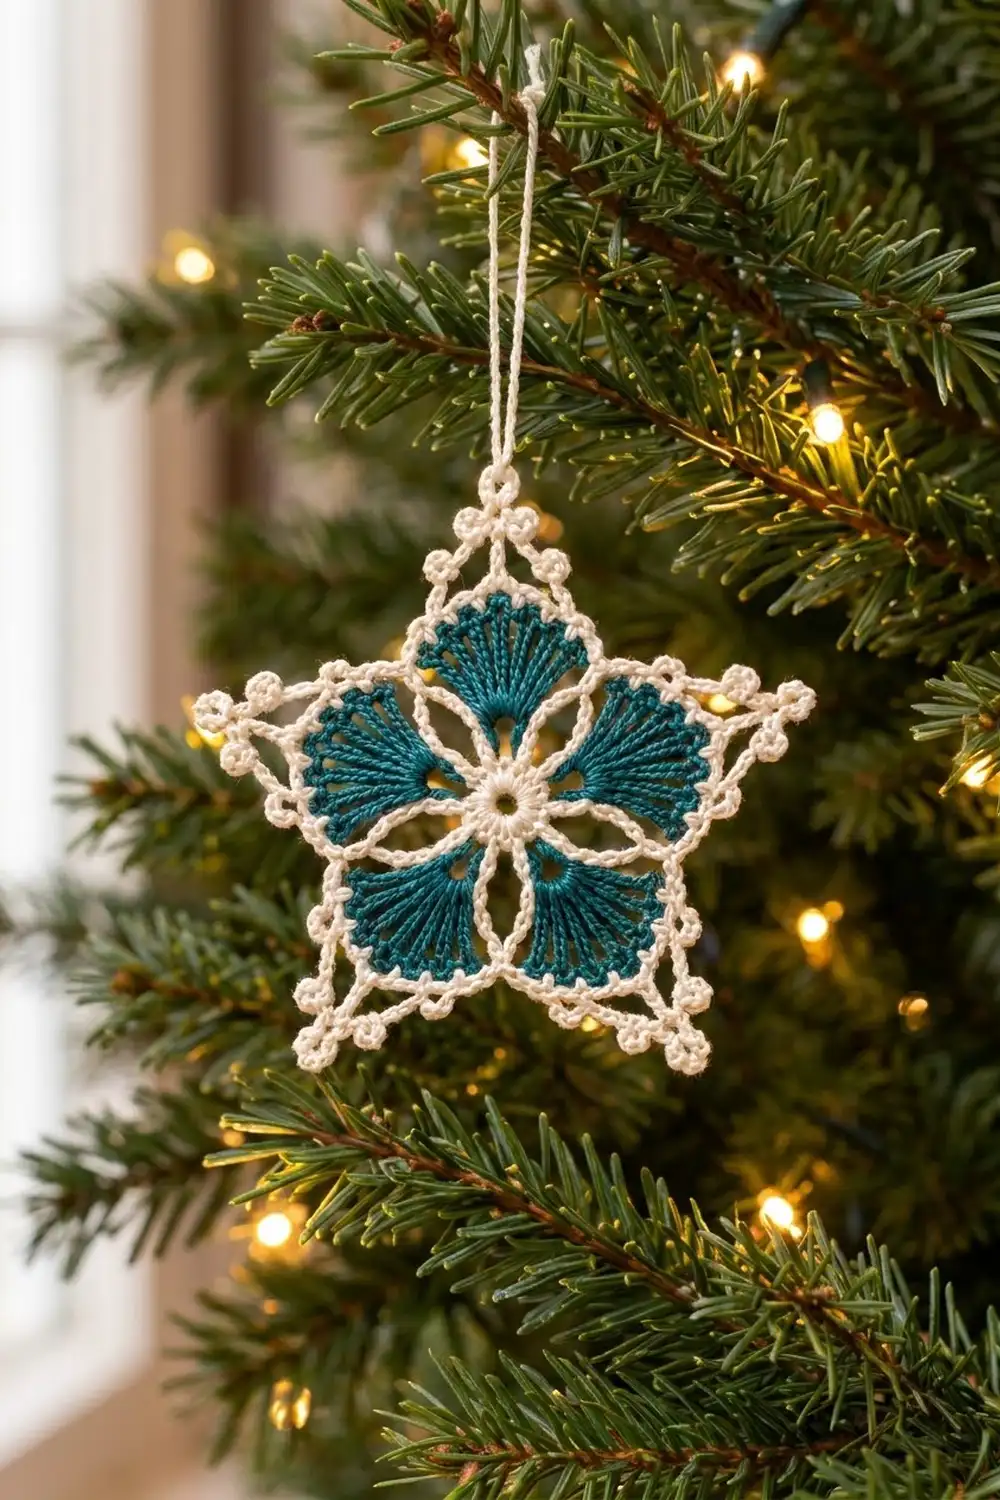
This star ornament is a single piece of thread crochet with a lacy, heirloom look. Five deep teal fans open out from a small cream ring in the center, and a fine cream outline frames each one. A cream lace edging turns the round motif into a crisp five-pointed star, with tiny picots along the sides and a three-loop trefoil at each tip.
There are only two colors, warm cream and rich teal. The cream does the structural work: the center, the outlines, the star points and the hanging loop. The teal fills the fans, so the star is easy to read even from across the room on a tree.
The pattern uses US crochet terms. The finished star fits inside a 3.5 in (8.9 cm) circle, measured as the diameter of the circle that touches all five tips. The hanging loop adds about 1.25 in (3.2 cm) above the top point.
You work in the round from the center out:
– a cream ring
– a cream round of chain loops
– teal treble fans
– a cream outline round
– two cream edging rounds that build and decorate the points
The chain hanging loop goes on last, at one tip. There is no sewing and no joining.
Finished Size and Construction
- Finished size: 3.5 in (8.9 cm) across the circle that touches all five tips
- Skill level: Intermediate (fine thread, color changes, picots)
- Terminology: US crochet terms
- Yarn weight: Size 10 cotton crochet thread (lace weight)
- Hook: 1.75 mm steel hook
- Number of pieces: 1 (single motif, no joining)
- Layout: One five-pointed star with a hanging loop at the top point
- Piece size: 3.5 in (8.9 cm)
- Size before border: 2.5 in (6.4 cm) across, after Round 4
- Border depth: about 0.5 in (1.3 cm) beyond Round 4 on each side, measured at the tips
Materials
Use a mercerized size 10 cotton thread. Mercerized cotton has a slight sheen, holds picots crisply and blocks well with starch. Avoid fuzzy or acrylic thread. The tall trebles in the fans need a smooth, firm fiber so they sit neatly side by side.
- Cream (Color A): 6 g, about 22 m (24 yd)
- Teal (Color B): 3 g, about 11 m (12 yd)
These amounts include extra for tails, a gauge test and the hanging loop. One standard ball of each color makes a full set of stars.
Tools:
- 1.75 mm steel crochet hook
- Fine tapestry needle with an eye that fits size 10 thread
- Small sharp scissors
- Rust-proof pins
- Foam blocking board or folded towel
- Fabric stiffener or spray starch
- Ruler or tape measure
- Paper and pencil for a blocking template
Abbreviations (US Terms)
- ch: chain
- sl st: slip stitch
- sc: single crochet
- tr: treble crochet (yarn over twice, insert hook, pull up a loop, [yarn over, pull through 2 loops] 3 times)
- sp(s): space(s)
- st(s): stitch(es)
- sk: skip
- rep: repeat
Special stitches:
- Picot: ch 3, sl st in 3rd ch from hook.
- Trefoil: ch 4, sl st in 4th ch from hook (first loop made); (ch 3, sl st in the same ch as the first sl st) 2 times. You now have three small loops on one base.
Gauge and Checkpoints
Exact gauge isn’t critical for an ornament, but controlling the size keeps the points sharp and the fans flat. Work Rounds 1–3 once as a test and measure before you go on.
- After Round 1: the cream ring is about 0.5 in (1.3 cm) across.
- After Round 3: the teal fans are about 2.25 in (5.7 cm) across, measured from fan tip to fan tip through the center.
- After Round 4: about 2.5 in (6.4 cm) across.
- After Round 5: the chain points touch a circle of about 3.25 in (8.3 cm).
- After Round 6: the tips touch a circle of 3.5 in (8.9 cm).
If Round 3 is wider than 2.5 in (6.4 cm), switch to a 1.5 mm hook. If it’s narrower than 2 in (5.1 cm), switch to a 2 mm hook. Blocking can fix small differences. Bigger ones will show as wavy fans or blunt points.
Pattern
Round 1: Center Ring (Cream)
With cream, make a magic ring.
Ch 1, 15 sc in ring. Pull the ring closed, leaving a small open center about 0.25 in (0.6 cm) wide. Sl st in first sc to join. (15 sc)
Round 2: Chain-Loop Foundation (Cream)
Ch 1, sc in same st as join, ch 5, sk 2 sc, sc in next sc, ch 5, sk 2 sc; rep from * 3 more times. Sl st in first sc to join. (5 sc, 5 ch-5 sps)*
Check: each repeat uses 3 sts of Round 1 (1 worked + 2 skipped), and 5 × 3 = 15. Fasten off cream.
Round 3: Teal Fans (Teal)
Join teal with a sl st in any ch-5 sp.
Ch 4 (counts as first tr), 10 tr in same sp, sc in next sc, 11 tr in next ch-5 sp, sc in next sc; rep from * 3 more times. Sl st in top of beginning ch-4 to join. (55 tr + 5 sc = 60 sts)*
Each group of 11 tr spreads into a fan. Keep the tr the same height and push them close together along the chain. That keeps the base of each fan narrow near the center while the tops open wide. The single sc between fans pulls each fan down so the fans stay clearly separate. Fasten off teal.
Round 4: Cream Outline (Cream)
This round outlines each teal fan in cream and marks the lines between fans.
Join cream with a sc in any sc between two fans. Ch 1, sc in each of the next 11 tr, ch 1, sc in next sc, ch 1, sc in each of next 11 tr, ch 1; rep from * 3 more times. Sl st in first sc to join. (60 sc, 10 ch-1 sps)*
Count: 5 between-fan sc + (5 × 11 fan-top sc) = 5 + 55 = 60 sc. The ch-1 on each side of every between-fan sc lets the outline turn the corner cleanly instead of cupping. Do not fasten off.
For the next two rounds, number the 11 sc across each fan top from sc 1 to sc 11. Sc 6 is the center of the fan and becomes the star tip.
Border
The border is Rounds 5 and 6. Round 5 builds the star shape with chain arches. Round 6 covers the arches with sc, picots and trefoils.
Border gauge: before they are covered, each ch-5 arch is about 0.5 in (1.3 cm) long and each ch-8 tip arch is about 0.75 in (1.9 cm) long.
Round 5: Star Arches (Cream)
Ch 1, sc in same st as join (the between-fan sc). Ch 5, sk ch-1 sp and sc 1 to sc 4, sc in sc 5; ch 8, sk sc 6, sc in sc 7; ch 5, sk sc 8 to sc 11 and the ch-1 sp, sc in next between-fan sc; rep from * 4 more times, leaving out the final sc on the last repeat. Sl st in first sc to join. (15 sc, 10 ch-5 sps, 5 ch-8 sps)*
Why the math works: each fan top has 11 sc, and each repeat uses all of them: 4 skipped + sc 5 + sc 6 skipped + sc 7 + 4 skipped = 11. The ch-8 arch spans only one skipped stitch, so it has to bow outward, and that bow makes the point. The ch-5 arches pull each between-fan sc slightly inward, which curves the sides of the star in.
Round 6: Picot Edging (Cream)
Ch 1. Sc in next sc (between-fan sc), picot; in next ch-5 sp work (2 sc, picot, 2 sc); sc in next sc; in next ch-8 sp work (4 sc, trefoil, 4 sc); sc in next sc; in next ch-5 sp work (2 sc, picot, 2 sc); rep from * 4 more times. Sl st in first sc to join. (95 sc, 15 picots, 5 trefoils)*
Per point: 1 + 4 + 1 + 8 + 1 + 4 = 19 sc, with 3 picots and 1 trefoil. Over 5 points that makes 5 × 19 = 95 sc, 5 × 3 = 15 picots and 5 × 1 = 5 trefoils.
Why the math works: this round uses every part of Round 5 exactly once:
– the 15 sc of Round 5 get 1 sc each (15 sc)
– the 10 ch-5 sps get 4 sc each (40 sc)
– the 5 ch-8 sps get 8 sc each (40 sc)
That gives 15 + 40 + 40 = 95. Four sc over five chains and eight sc over eight chains keep the edge firm without ruffling. The trefoil adds length right at the tip, which sharpens the point.
The picot after each between-fan sc sits in an inner corner of the star. The picots in the ch-5 arches sit halfway along each side. The trefoils sit exactly at the five tips.
Fasten off, leaving a 6 in (15.2 cm) tail.
Hanging Loop (Cream)
Choose the point that will be at the top. Join cream with a sl st in the base of its trefoil.
Ch 30, sl st in the same base st. Sl st into the next sc to anchor. Fasten off.
Folded, the loop is about 1.25 in (3.2 cm) tall. For a longer or shorter loop, add or remove chains in groups of 6. Each 6 ch changes the folded height by about 0.25 in (0.6 cm).
Weave in all ends along the back of the sc stitches, splitting the thread as you go. Trim close.
Final Blocking
Thread stars need firm blocking to show their points.
- Draw a 3.5 in (8.9 cm) circle on paper. Mark 5 points evenly around it, 72 degrees apart. Draw a line from each mark to the center.
- Put the paper on a foam board and cover it with plastic wrap.
- Soak the star in fabric stiffener or a strong starch solution. Gently squeeze out the extra; do not wring.
- Lay the star on the template with the center ring over the center mark.
- Pin each trefoil to a point mark. Pin through the center loop of each trefoil so all three loops open evenly.
- Pin each inner-corner picot toward the center along its guide line to sharpen the inward curve of the sides.
- Use a pin tip to open each teal fan so the tr spread evenly and lie flat.
- Pin the side picots so they stand outward.
- Let it dry completely, at least 12 hours. Remove the pins and check the size against the circle.
Final Quality-Control Checklist
- Round 1 has 15 sc and a small center that is closed firmly.
- Round 3 has five fans of 11 tr each, separated by one sc.
- Round 4 has 60 sc: 11 across each fan and 1 between fans.
- Round 5 has 15 sc, 10 ch-5 arches and 5 ch-8 tip arches.
- Round 6 has 95 sc, 15 picots and 5 trefoils.
- All five tips touch a 3.5 in (8.9 cm) circle.
- Each trefoil sits exactly at a tip, with three open loops.
- The hanging loop is secure and centered on the top point.
- All ends are woven in and can’t be seen from the front.
- The star lies flat, with no cupping or ruffling.
Troubleshooting
Fans cup or ruffle: your tr are too tall or too loose. Go down a hook size, or work each tr more firmly as you pull through the loops.
Fans look gappy at the base: push the tr closer together along the ch-5 before you close the round. A slightly tighter chain in Round 2 also helps.
Star points are rounded: check that you skipped only sc 6 under the ch-8 arch. Then block with stronger stiffener and pin the trefoils firmly.
Sides bulge instead of curving in: the ch-5 arches may be loose. Work them more tightly, or pin the inner-corner picots farther toward the center when blocking.
Count is off in Round 6: count each point on its own; every point needs 19 sc. The usual mistake is missing the single sc on one side of the tip arch.
Teal shows through the cream outline: work the Round 4 sc firmly, and weave the cream ends so they stay on top.
Star is too large after blocking: make it again with a smaller hook instead of pinning it tighter. Overstretched thread lace looks thin, and the picots flatten.
Care
Hand wash gently in cool water with mild soap. Then reshape it and stiffen it again on the blocking template. Store it flat or hanging, away from direct sunlight.
Final Notes
The sizes build step by step:
– 0.5 in (1.3 cm) ring after Round 1
– 2.25 in (5.7 cm) across the teal fans after Round 3
– 2.5 in (6.4 cm) after the cream outline
– 3.25 in (8.3 cm) after the star arches
– 3.5 in (8.9 cm) finished star after the picot edging
If Round 3 measures right, the rest will follow.
The stitch counts build the same way. The 15 sc become 5 loops, which hold 55 tr. The outline gives 60 sc. Round 5 uses all 11 sc of each fan, and Round 6 ends with 19 sc per point. Make one, then make a set for the tree in any two colors you like.
Happy crocheting!