

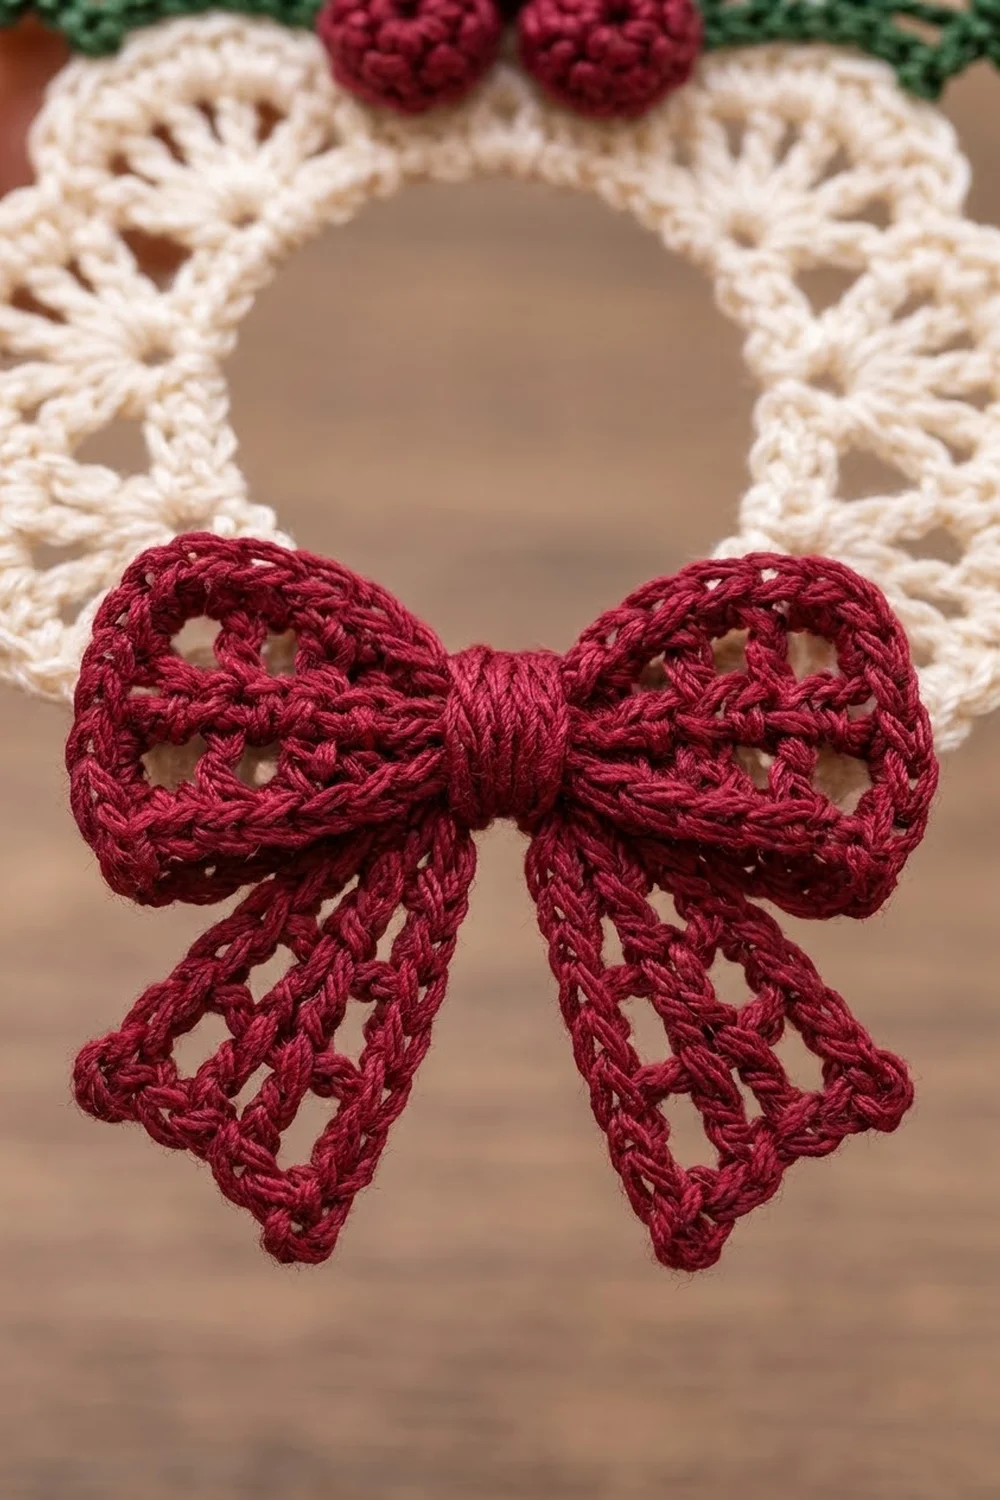
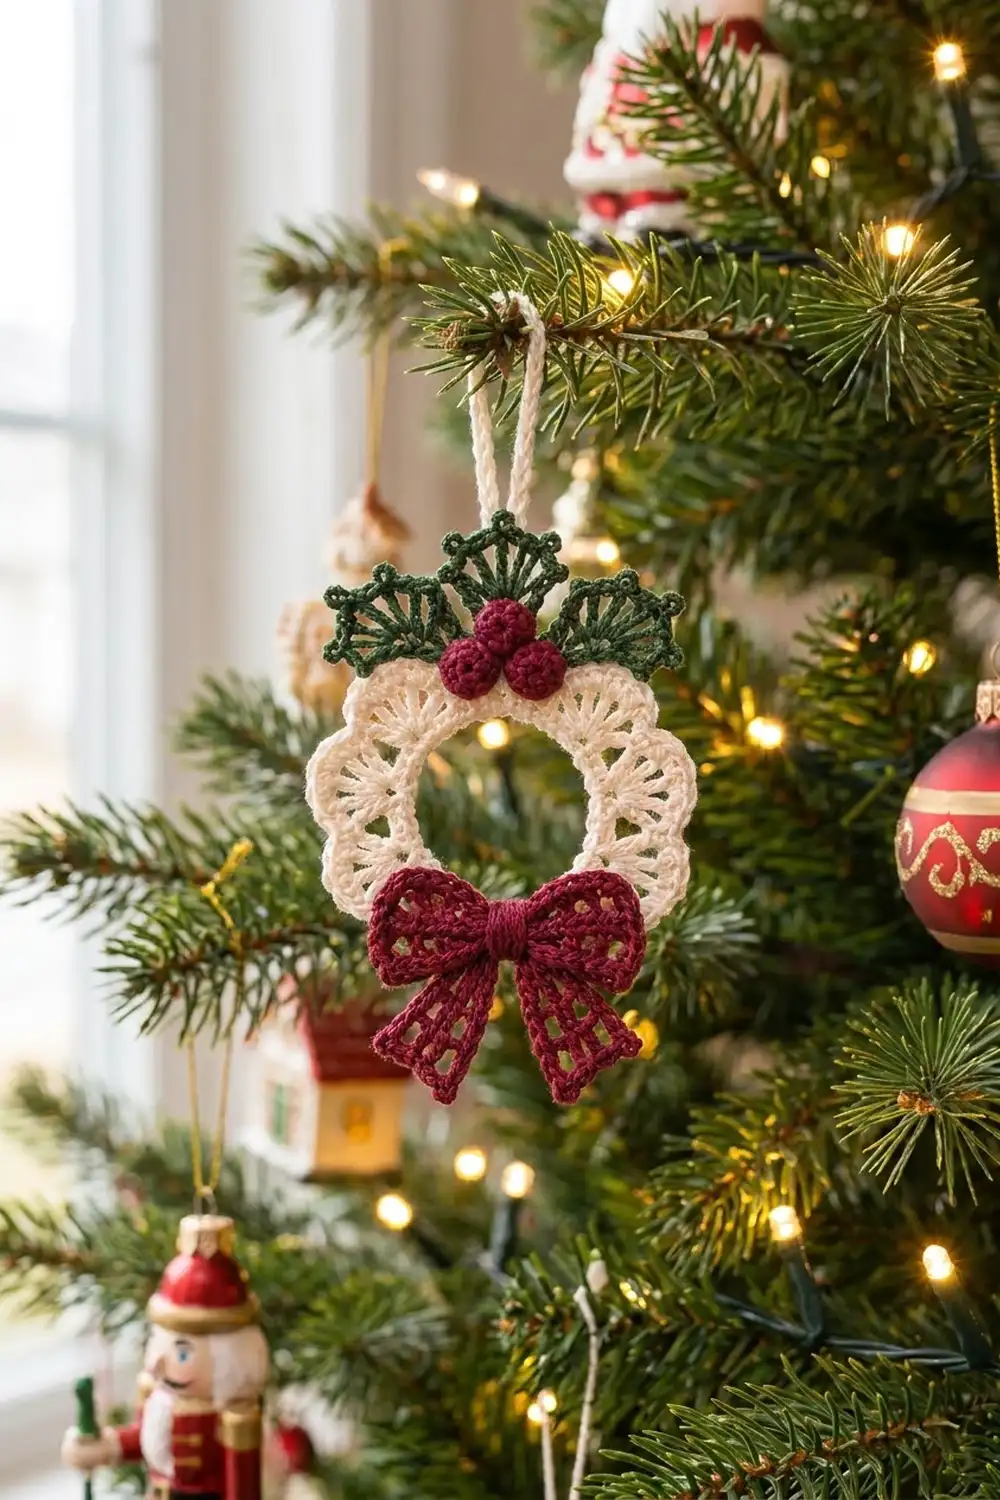
This little wreath ornament has a lacy cream ring with scalloped edges. It’s topped with green picot leaves and three round berries, and a cranberry bow with mesh loops and forked tails sits at the bottom. It looks like vintage doily work but makes up in one evening.
The palette is classic and soft: ivory, deep forest green, and cranberry red. Fine cotton thread gives crisp stitch definition, and the fans and mesh show clearly against a dark tree.
All instructions use US crochet terms. The finished wreath ring measures 3 in (7.6 cm) across. With the leaves and bow tails, the ornament is 3 in (7.6 cm) wide and 4.25 in (10.8 cm) tall, not counting the 1.75 in (4.4 cm) hanging loop.
You work the ring in five joined rounds. Next you make three leaves, three berries, a bow strip, a center band, and two tails. Then you sew them on and add a cord loop.
Finished Size and Construction
- Finished size: 3 in (7.6 cm) wide x 4.25 in (10.8 cm) tall, plus a 1.75 in (4.4 cm) loop
- Skill level: Intermediate (thread work, small appliqués)
- Terminology: US
- Yarn weight: Size 10 crochet thread (Lace, 0)
- Hook: 1.75 mm steel hook
- Number of pieces: 1 ornament. That’s 1 wreath ring plus appliqués: 3 leaves, 3 berries, 1 bow strip, 1 center band, 2 tails, and 1 hanging cord.
- Layout: Single ring. The leaves and berries sit at the top center, the bow sits at the bottom center, and the loop is at the top back.
- Ring size: 3 in (7.6 cm) diameter, with a 1.25 in (3.2 cm) opening
- Size before border: 2.5 in (6.4 cm) diameter after Round 3
- Border depth: 0.25 in (0.6 cm) all around (Rounds 4–5)
Materials
Use mercerized cotton size 10 thread. It holds its shape after blocking and has a slight sheen. Acrylic thread won’t block as crisply. Pick a cream with a warm tone so the ring reads as ivory rather than stark white next to the red.
- Cream (ivory): 6 g, about 33 m. This covers the ring and the hanging cord.
- Forest green: 2 g, about 11 m. This covers the leaves.
- Cranberry red: 4 g, about 22 m. This covers the berries, bow, band, and tails.
These quantities include a margin of roughly 20% for swatching and sewing tails.
Tools:
- 1.75 mm steel crochet hook
- Fine tapestry needle or sharp embroidery needle
- Scissors
- Rustproof pins and a blocking mat
- Spray bottle, plus optional light spray starch
- Ruler or tape measure
Abbreviations (US Terms)
- ch – chain
- sl st – slip stitch
- sc – single crochet
- hdc – half double crochet
- dc – double crochet
- sc2tog – single crochet 2 together
- sp – space
- st(s) – stitch(es)
- RS – right side
Special stitch – picot: Ch 3, then sl st in the 3rd ch from the hook.
Fan: 7 dc worked into the same ch-5 loop.
Gauge and Checkpoints
Gauge: 10 dc = 1 in (2.5 cm), and 6 dc rows = 1 in (2.5 cm).
Make the wreath ring first, since it’s the piece that sets the ornament’s size. Measure it flat and unstretched at each checkpoint:
- After Round 1: 1.6 in (4.1 cm) across
- After Round 3: 2.5 in (6.4 cm) across
- After Round 4: 2.9 in (7.4 cm) across
- After Round 5: 3 in (7.6 cm) across
If your ring is more than 0.1 in (0.3 cm) too big at Round 1, switch to a 1.5 mm hook. If it’s too small, or the center cups, try a 2 mm hook. Change the hook, not the stitch counts. The fan and scallop repeats depend on exactly 60 stitches in Round 1.
Thread is less forgiving than yarn. Measure on a hard surface and don’t pull the ring into a circle while you measure.
Wreath Ring
Use cream. Join each round with a sl st. Don’t turn, so the RS faces you throughout.
Foundation: Ch 40 and sl st to the first ch to form a ring. Check that the chain isn’t twisted.
Round 1 (growth): Ch 3 (counts as dc). Work 1 dc in the same ch and dc in the next ch. Then 2 dc in the next ch, dc in the next ch 19 times. Join to the top of the ch-3. (60 dc)
This is the solid inner band. Over 20 repeats of 3 dc, each pair of chains grows to 3 stitches.
Round 2: Ch 1, then sc in the same st. Ch 5, skip 2 dc, sc in the next dc 19 times. Ch 5, skip the last 2 dc, and join to the first sc. (20 sc, 20 ch-5 loops)
Round 3 (fans): Sl st in each of the first 3 ch of the first loop to reach its center. Ch 1 and sc in the same loop. Ch 2, 7 dc in the next loop, ch 2, sc in the next loop 9 times. Ch 2, work 7 dc in the last loop, ch 2, and join to the first sc. (10 fans = 70 dc, 10 sc, 20 ch-2 sps)
The fans alternate with the sc anchors. This makes the spoke-like shells around the middle of the wreath. Check that the ring measures 2.5 in (6.4 cm) across.
Don’t fasten off. Continue straight into the border.
Border
Border gauge: One scallop spans about 0.9 in (2.3 cm) along the outer edge. Each scallop adds 0.25 in (0.6 cm) of depth all around.
On a round piece, each “side” is one scallop repeat. There are 10 repeats, and each one sits on top of one Round 3 fan.
Round 4 (open shells): Ch 1 and sc in the same sc. Skip the ch-2 sp. Dc in the first dc of the fan, then (ch 1, dc in the next dc) 6 times. Skip the ch-2 sp and sc in the next sc. Repeat around, but on the last repeat, replace the final sc with a join to the first sc.
- Per scallop: 7 dc and 6 ch-1 sps
- Round total: 70 dc, 60 ch-1 sps, and 10 sc
Round 5 (trim): Ch 1 and sc in the same sc. Sc in the next dc, then (sc in the ch-1 sp, sc in the next dc) 6 times. Sc in the next sc. Repeat around. On the last repeat, skip the final sc and join to the first sc.
- Count: 80 sts worked 1 per existing stitch (70 dc + 10 sc) plus 60 sts added in the ch-1 sps, for 140 sc
- Per scallop: 13 sc, plus 1 valley sc between scallops
Fasten off and weave in the ends.
Why the math works: Round 1’s 60 stitches divide by 3 into 20 loops. Alternate loops hold fans, which gives 10 fans of 7 dc each. Round 4 keeps those same 7 dc per scallop, so every repeat is complete and nothing is left over. Each border round only spreads the existing fans with chains and adds no new repeats, so the edge lies flat. The ring measures 2.5 in (6.4 cm) across, and the border adds 0.25 in (0.6 cm) on each side. That makes 3 in (7.6 cm).
Leaves (Make 3)
Use forest green.
Foundation: Ch 5 and sl st to the first ch to form a ring.
Row 1 (RS): Ch 3 (counts as dc). Work 6 dc into the ring and turn. (7 dc in a half-circle fan)
Row 2: Ch 4 (counts as dc + ch 1). Dc in the next dc, ch 1 5 times. Dc in the top of the turning ch and turn. (7 dc, 6 ch-1 sps)
Row 3: Ch 1 and sc in the first dc. (Sc, picot, sc) in the next ch-1 sp, then sc in the next dc 6 times. (19 sc, 6 picots)
Fasten off and leave a 6 in (15.2 cm) tail for sewing. Each leaf measures about 1 in (2.5 cm) wide x 0.75 in (1.9 cm) tall.
Berries (Make 3)
Use cranberry red.
Round 1: Work 6 sc in a magic ring. (6 sc)
Round 2: 2 sc in each st. (12 sc)
Round 3: Sc2tog 6 times. (6 sc)
Tuck the starting tail inside for stuffing. Cut the thread and leave an 8 in (20.3 cm) tail. Thread the tail through the front loops of the last 6 sts and pull tight. Each berry is about 0.4 in (1.0 cm) across.
Bow
Use cranberry red for all bow parts.
Bow Strip
Foundation: Ch 43.
Row 1: Dc in the 4th ch from the hook and in each ch across, then turn. (41 dc, including the turning ch)
Row 2 (mesh): Ch 4 (counts as dc + ch 1). Skip the next dc and dc in the next dc. Ch 1, skip the next dc, dc in the next dc across, then turn. (21 dc, 20 ch-1 sps = 41 sts)
Row 3: Ch 3 (counts as dc). Dc in each ch-1 sp and each dc across, then turn. (41 dc)
Row 4: Repeat Row 2. (21 dc, 20 ch-1 sps)
Row 5: Repeat Row 3. (41 dc)
Fasten off. The strip measures 4.1 in (10.4 cm) x 0.85 in (2.2 cm).
Shape the bow: Lay the strip RS down. Fold both short ends to the center so they overlap by 0.1 in (0.3 cm), and tack them together. Turn it over and pinch the middle with a few wraps of thread. The bow measures 2 in (5.1 cm) wide, with two open, puffy loops.
Center Band
Foundation: Ch 5.
Row 1: Sc in the 2nd ch from the hook and in each ch across, then turn. (4 sc)
Rows 2–12: Ch 1, sc in each st, and turn. (4 sc)
The band measures 1.2 in (3.0 cm) long. Wrap it around the pinched center and sew the short ends together at the back. Add or remove rows until it fits snugly.
Tails (Make 2)
Foundation: Ch 9.
Row 1: Dc in the 4th ch from the hook and in each ch across, then turn. (7 dc)
Row 2 (mesh): Ch 4, skip 1, and dc in the next dc. Ch 1, skip 1, dc in the next dc across, then turn. (4 dc, 3 ch-1 sps)
Row 3: Ch 3 and dc in each st and sp across, then turn. (7 dc)
Rows 4–5: Repeat Rows 2–3.
Row 6 (forked end): Ch 3 (counts as dc). Work hdc in the next st, sc in the next st, sl st in the center st, sc in the next st, hdc in the next st, and dc in the last st. (7 sts)
The tall edges and low center form the swallowtail notch. Each tail measures 0.7 in (1.8 cm) wide x 1 in (2.5 cm) long.
Hanging Cord
Use cream. Ch 36, then sl st in the back bump of the 2nd ch from the hook and in each ch across. (35 sl sts) Fold the cord in half.
Assembly
- Tails: Sew the top edge of both tails to the back of the bow center, angled out in an inverted V. They should hang 0.75 in (1.9 cm) below the bow.
- Bow: Center the bow over the bottom of the ring so it covers Rounds 2–5. Sew it through the center band and the top corners of each loop.
- Leaves: Place one leaf at the top center, with its fan edge rising 0.4 in (1.0 cm) above the ring. Sew a leaf on each side, slightly lower and tucked under the center leaf.
- Berries: Stitch two berries side by side at the base of the center leaf. Stitch the third above and between them.
- Cord: Sew both cord ends to the back of the top center to make a 1.75 in (4.4 cm) loop.
Sew with matching thread and small stitches through the back loops only, so nothing shows on the front.
Final Blocking
- Before sewing, block the ring alone. Wet it, then roll it in a towel to remove excess water.
- Lay it RS up on the mat. Pin the outer edge to a 3 in (7.6 cm) circle.
- Put one pin in each scallop tip, 10 pins in total, so the points line up evenly.
- Ease the center opening to a 1.25 in (3.2 cm) circle.
- Mist the leaves and bow flat, and pin the leaf picots open.
- Add light starch if you like. Let everything dry completely before you assemble the ornament.
Final Quality-Control Checklist
- Round 1 has exactly 60 dc, and the ring lies flat.
- There are exactly 10 fans and 10 scallops, evenly spaced.
- The ring measures 3 in (7.6 cm) across after blocking.
- Each leaf has 6 picots.
- The berries are firm and round, with the tails hidden inside.
- The bow loops are open, and the band is snug.
- The tails splay evenly and show crisp forked ends.
- All ends are woven in, and no sewing shows on the front.
- The ornament hangs straight from the loop.
Troubleshooting
- The ring ruffles: You may have too many dc in Round 1. Recount it to 60, or go down a hook size.
- The ring cups: Your tension is tight. Loosen up or go up a hook size.
- The scallops lean: Check that each fan has exactly 7 dc, and that you skipped every ch-2 sp in Round 4.
- The bow looks flat: Pinch the center tighter, or shorten the band by 1–2 rows.
- The berries look lumpy: Pull the closing tail harder and roll each berry between your fingers.
- The ornament hangs crooked: Re-sew the cord exactly at the top center, aligned with the center leaf.
Care
Spot clean or hand wash in cool water. Then reshape and dry flat, and store it flat or hanging, away from crushing weight.
Final Notes
The measurement chain is simple. Round 1 is 1.6 in (4.1 cm) across. Round 3 is 2.5 in (6.4 cm), Round 4 is 2.9 in (7.4 cm), and Round 5 is 3 in (7.6 cm). With the leaves and tails added, the ornament is 4.25 in (10.8 cm) tall. If your first ring hits those checkpoints, the leaves and bow will fit just as shown.
Happy crocheting!