

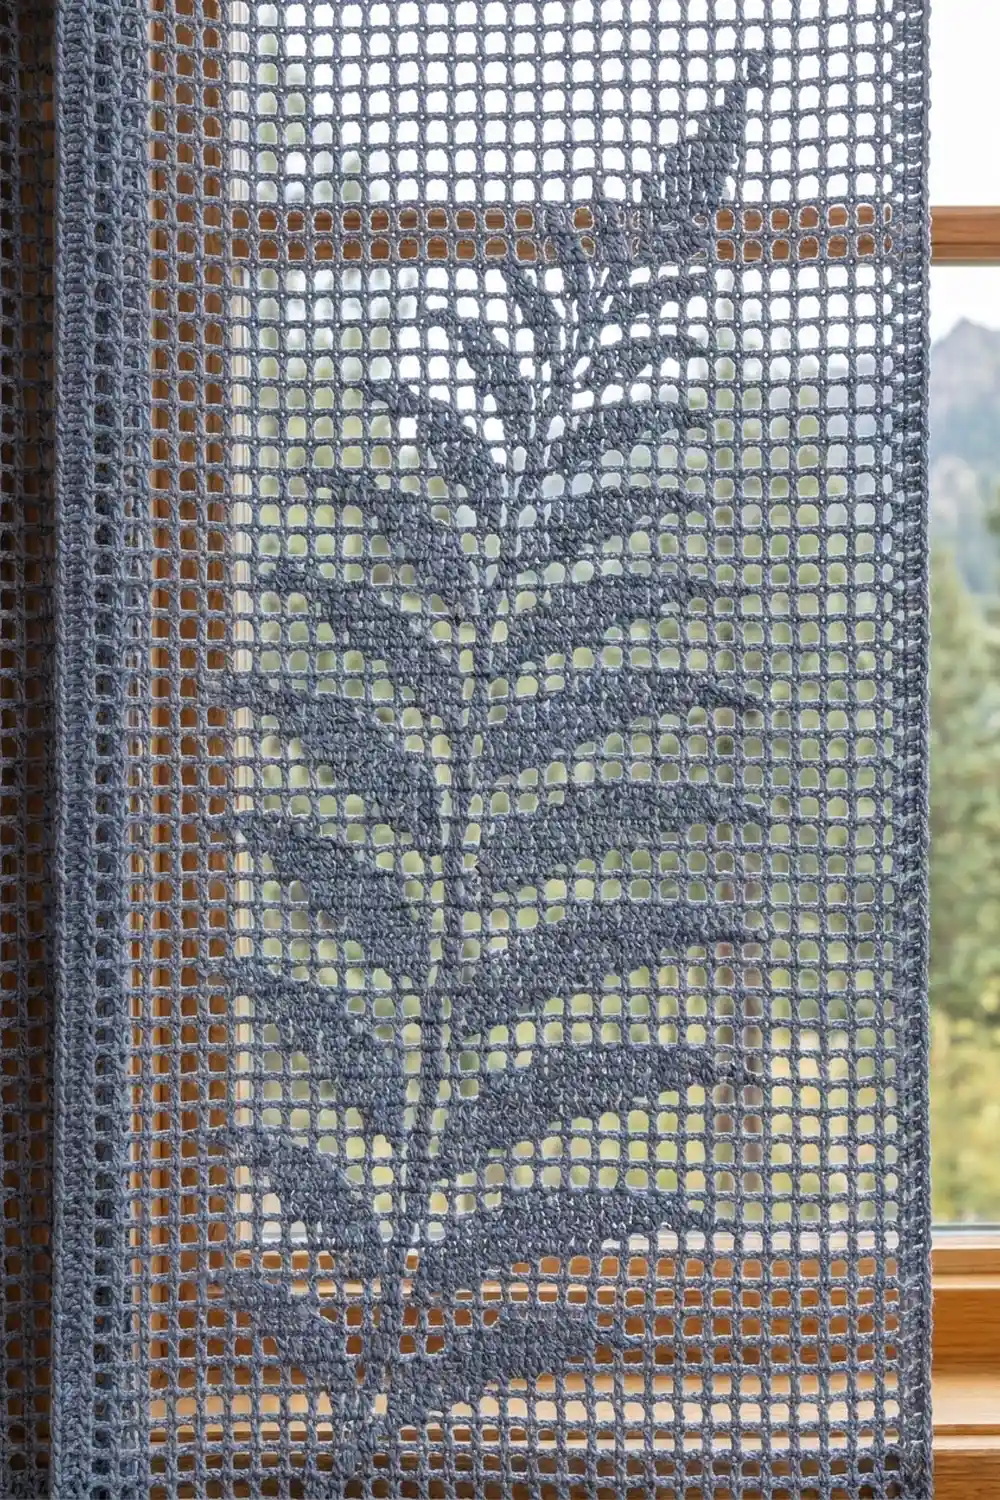
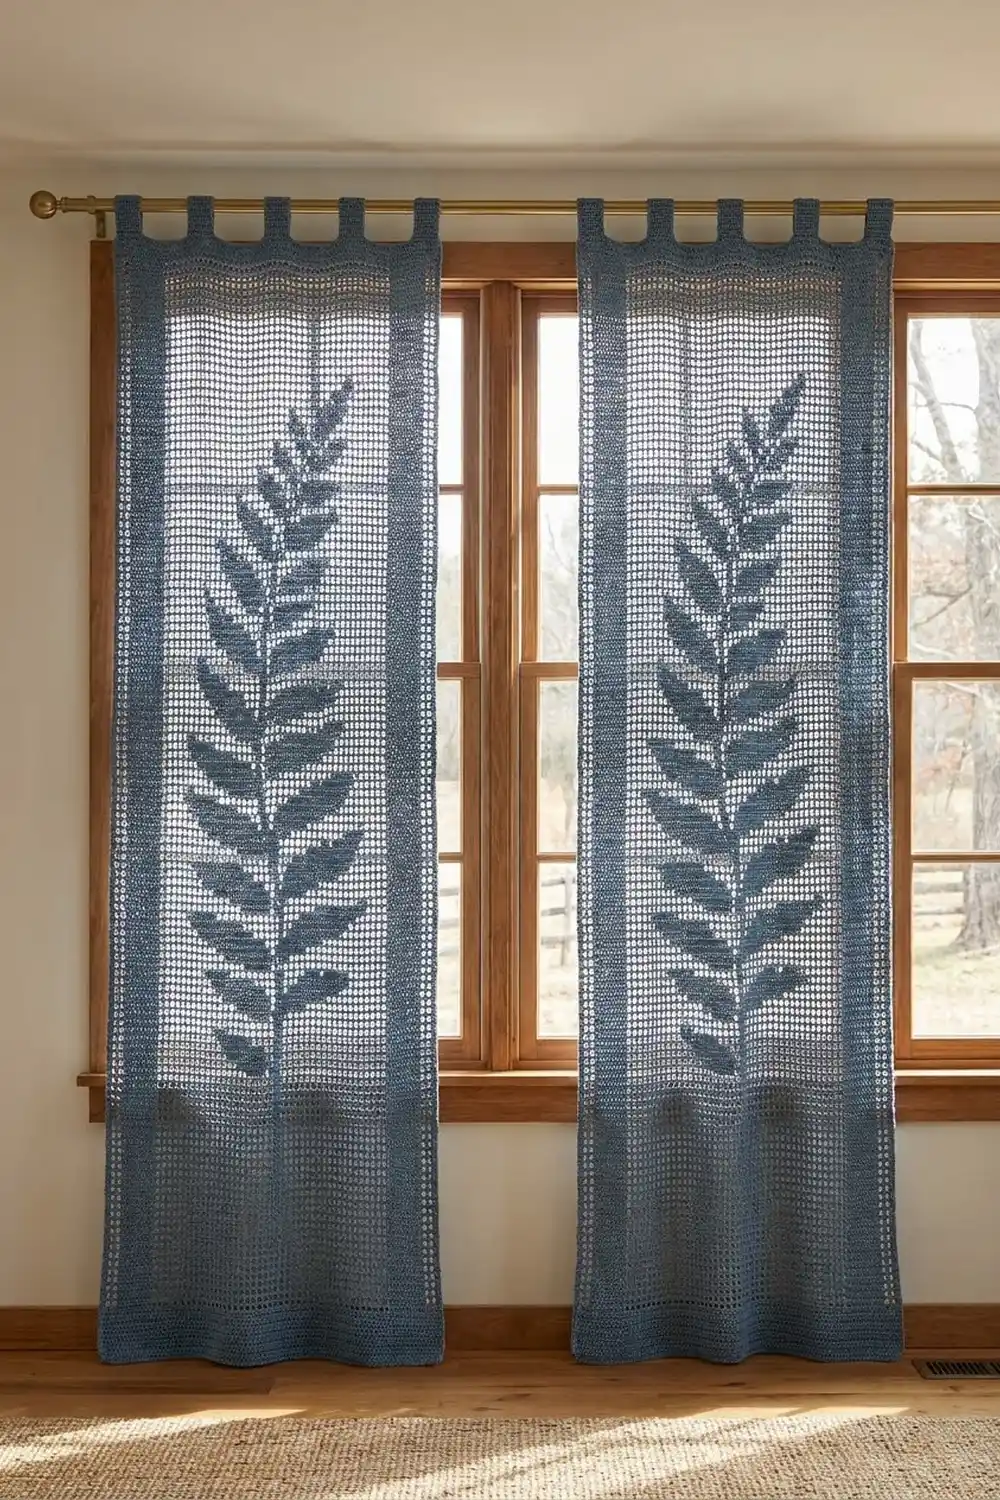
The Woodland Fern Curtain Panel is a tall, airy filet crochet curtain with one large fern climbing up its center. The open mesh lets light and the view come through. The fern is worked in solid blocks, so it reads as a soft, textured silhouette against the window.
The panel uses one color, a dusty denim blue sport-weight cotton. That keeps the look calm and cabin-like, and the fern shows up through texture alone. A solid frame of blocks runs around all four sides, and seven tabs along the top slide straight onto a curtain rod.
This pattern uses US crochet terms. The finished panel measures 29 in (73.7 cm) wide and 81 in (205.7 cm) long, not counting the tab loops. For a pair like the one in the photos, make two identical panels.
Construction is simple. You work the panel flat in filet rows from the bottom up, following a written block layout. Then you add a three-round single crochet border and work the tabs straight off the top edge. The whole panel stays one continuous piece, so the only sewing is tacking down the tab ends.
Finished Size and Construction
- Finished size: 29 in (73.7 cm) wide x 81 in (205.7 cm) long, plus tabs
- Skill level: Intermediate (the stitches are easy, but you need to count carefully)
- Terminology: US crochet terms
- Yarn weight: Sport (#2) cotton
- Hook: 3.5 mm (E-4)
- Number of pieces: 1 (a single panel worked in one piece)
- Layout: 56 columns x 160 rows of filet mesh and blocks
- Piece size before border: 28 in (71.1 cm) x 80 in (203.2 cm)
- Border depth: 0.5 in (1.3 cm) per side, 3 rounds of sc
- Tabs: 7 tabs, each about 1.8 in (4.6 cm) wide, folded into 3 in (7.6 cm) loops
Materials
Yarn: Choose a smooth sport-weight cotton or cotton blend with good stitch definition. Mercerized cotton drapes well and holds its shape when it hangs. Avoid fuzzy yarn, because it fills in the mesh holes and blurs the fern.
- Denim Blue: 350 g / about 1,050 m (7 balls of 50 g / 150 m) per panel
These quantities include a margin of about 15 percent for swatching and border work. For a pair of panels, double the amount and buy every ball from the same dye lot.
Tools:
- 3.5 mm (E-4) crochet hook
- Tapestry needle
- Stitch markers (at least 10)
- Measuring tape
- Rust-proof pins and a large blocking surface (a bed, or a clean floor covered with towels)
- Pencil and paper for tracking rows
Abbreviations (US Terms)
- ch = chain
- sc = single crochet
- dc = double crochet
- sl st = slip stitch
- sp = space
- st(s) = stitch(es)
- RS / WS = right side / wrong side
- rnd = round
Special stitches:
- Mesh (open square): ch 2, skip the next 2 sts (or the ch-2 sp), dc in the next dc.
- Block (solid square): 2 dc in the ch-2 sp below (or 1 dc in each of the next 2 dc), then dc in the next dc.
Every column is 3 sts wide: 2 middle sts (ch or dc) plus 1 closing dc. The ch-3 at the start of each row counts as the first dc. So every row has 1 + (56 x 3) = 169 sts, whatever mix of blocks and meshes it contains.
Gauge and Checkpoints
Filet gauge: 4 columns and 4 rows = 2 in (5.1 cm), so one square is 0.5 in (1.3 cm) wide and tall.
Border gauge: 24 sc and 24 rows = 4 in (10.2 cm), which is 6 sc and 6 rows per 1 in (2.5 cm).
Swatch first: Ch 39 and work 12 columns for 12 rows, alternating blocks and meshes in a checkerboard. Block it lightly. It should measure 6 in (15.2 cm) square. Because the panel is so long, small gauge errors add up fast. Being off by 1/16 in (0.2 cm) per row grows to 10 in (25.4 cm) over 160 rows.
Checkpoints (measured lying flat, lightly stretched):
- After Row 3: width 28 in (71.1 cm)
- After Row 20: height 10 in (25.4 cm)
- After Row 80: height 40 in (101.6 cm)
- After Row 160: 28 in x 80 in (71.1 x 203.2 cm)
- After the border: 29 in x 81 in (73.7 x 205.7 cm)
If too big: Go down 0.25 mm in hook size, or tighten your ch-2 spaces. Loose chains are the usual cause.
If too small: Go up 0.25 mm. If your width matches but your height runs short, pull up a slightly taller loop on each dc.
Panel Pattern
Column Numbering
Columns are numbered 1 to 56 from right to left, as seen from the RS. On odd (RS) rows you work from column 1 to column 56. On even (WS) rows you work from column 56 back to column 1. Placing a marker every 10 columns on the first row makes counting much easier.
Fixed frame on every row: Columns 1, 2, 55 and 56 are always blocks. They form solid side borders 1 in (2.5 cm) wide.
Stem: Columns 28 and 29, the exact center of the panel.
Foundation and Bottom Frame
Foundation: Ch 171.
Row 1 (RS): Dc in 4th ch from hook (the skipped 3 ch count as the first dc), dc in each ch across. (169 sts = 56 blocks)
Rows 2–3: Ch 3 (counts as dc), turn, dc in each st across. (169 sts = 56 blocks)
Open Field with Fern (Rows 4–157)
On every row: ch 3 and turn. Work blocks in the 2 frame columns where the row starts (columns 1–2 on RS rows, 56–55 on WS rows). Work the inner columns 3–54 as meshes, except where the layout below calls for blocks. End with blocks in the other 2 frame columns. Each row is 169 sts.
Rows 4–9: Frame blocks only; columns 3–54 are all meshes.
Rows 10–150: Blocks in columns 28–29 (stem) on every row, plus any leaflet blocks listed below.
Rows 151–157: Frame blocks only; all inner columns are meshes.
Leaflets
Each leaflet is 3 rows tall and steps outward and upward from the stem. This stepped shape gives the fronds their angled, feathery look. Leaflets alternate sides: Side A is to the left of the stem (columns 30 and up), and Side B is to the right (columns 27 and down). R is a leaflet’s reach, measured in columns out from the stem.
Leaflet blocks by size (leaflet row 1 is the lowest row):
| R | Leaflet row | Side A columns | Side B columns |
|---|---|---|---|
| 20 | 1 / 2 / 3 | 30–39 / 35–44 / 40–49 | 18–27 / 13–22 / 8–17 |
| 16 | 1 / 2 / 3 | 30–37 / 34–41 / 38–45 | 20–27 / 16–23 / 12–19 |
| 12 | 1 / 2 / 3 | 30–35 / 33–38 / 36–41 | 22–27 / 19–24 / 16–21 |
| 8 | 1 / 2 / 3 | 30–33 / 32–35 / 34–37 | 24–27 / 22–25 / 20–23 |
| 4 | 1 / 2 / 3 | 30–31 / 31–32 / 32–33 | 26–27 / 25–26 / 24–25 |
Leaflet placement:
| Tier | Side A rows | Side B rows | R |
|---|---|---|---|
| 1 | 16–18 | 22–24 | 20 |
| 2 | 28–30 | 34–36 | 20 |
| 3 | 40–42 | 46–48 | 20 |
| 4 | 52–54 | 58–60 | 16 |
| 5 | 64–66 | 70–72 | 16 |
| 6 | 76–78 | 82–84 | 16 |
| 7 | 88–90 | 94–96 | 12 |
| 8 | 100–102 | 106–108 | 12 |
| 9 | 112–114 | 118–120 | 8 |
| 10 | 124–126 | 130–132 | 8 |
| 11 | 136–138 | 142–144 | 4 |
Rows 10–15 have only the stem, which forms the bare base of the stalk. Rows 145–150 also have only the stem, which forms the fern’s thin tip.
Example, Row 16 (WS, worked from column 56 to column 1): Ch 3, block in cols 56–55, mesh in cols 54–40, block in cols 39–28 (leaflet cols 39–30 plus stem cols 29–28), mesh in cols 27–3, block in cols 2–1. (169 sts)
The fern covers columns 8–49 and rows 10–150, so it is about 21 in (53.3 cm) wide and 70.5 in (179.1 cm) tall.
Top Frame
Rows 158–160: Ch 3, turn, dc in each st across. (169 sts = 56 blocks)
Do not fasten off. The panel should now measure 28 in x 80 in (71.1 x 203.2 cm).
Border
The border evens out the edges and gives the tabs a firm base. Work it at the border gauge of 6 sc per 1 in (2.5 cm) in both directions.
Rnd 1 (RS): Ch 1 and turn so the RS faces you. Sc in each of the 169 sts along the top edge, then ch 2 for the corner. Working down the side, make 3 sc around the post of each row-end st: 160 rows x 3 = 480 sc. Ch 2. Along the bottom, sc in each of the 169 foundation ch loops. Ch 2. Work 480 sc up the other side. Ch 2, then sl st to the first sc. (Top 169, sides 480 each, bottom 169 = 1,298 sc plus 4 ch-2 corner sps)
Rnd 2: Ch 1, sc in each sc around, working (sc, ch 2, sc) in each corner sp. Sl st to join. Each corner adds 1 sc to each of its 2 sides. (Top and bottom: 169 + 2 = 171 sc each; sides: 480 + 2 = 482 sc each; total 1,306 sc)
Rnd 3: Repeat Rnd 2. (Top and bottom: 171 + 2 = 173 sc each; sides: 482 + 2 = 484 sc each; total 1,314 sc) Fasten off.
These per-side counts don’t include the ch-2 corner spaces.
Why the math works: The filet has 169 sts over 28 in, about 6 sts per inch, so 1 sc per st lies flat across the top and bottom. Each filet row is 0.5 in tall, so 3 sc per row-end also comes to 6 sc per inch. That matches the border gauge, so the sides won’t ruffle or pull in. Three rounds at 6 rows per inch add 0.5 in (1.3 cm) to each edge: 28 + 1 = 29 in wide and 80 + 1 = 81 in long.
Tabs
The top edge has 173 sc. You’ll place 7 tabs of 11 sc each (77 sts) with 6 gaps of 16 sc between them: 77 + 96 = 173. Number the top sts from the right corner, starting at #1. The tabs go on sts 1–11, 28–38, 55–65, 82–92, 109–119, 136–146 and 163–173. Put a marker on the first st of each tab before you start.
Each tab:
Row 1 (RS): Join yarn in the first marked st, ch 1, sc in the same st and in each of the next 10 sts. (11 sc)
Rows 2–36: Ch 1, turn, sc in each st across. (11 sc)
Fasten off, leaving a 12 in (30.5 cm) tail. The tab should measure about 1.8 in (4.6 cm) x 6 in (15.2 cm). Fold it to the WS and whipstitch the last row to the back of border Rnd 1, right behind the tab’s base. This makes a 3 in (7.6 cm) loop that fits rods up to 1.5 in (3.8 cm) across.
Final Blocking
- Weave in all ends through solid blocks or the border, never across open mesh.
- Soak the panel in cool water with a little mild detergent for 15 minutes.
- Gently press out the water without wringing, then roll the panel in towels to remove more moisture.
- Lay it flat and pin it to 29 in x 81 in (73.7 x 205.7 cm). Pin the corners first, then the midpoint of each side.
- Add pins along the long sides every 4 in (10.2 cm), keeping the edges perfectly straight.
- Use your fingers to square up the mesh holes in the open field. Lay a long ruler along a column of meshes to check that it runs straight up and down.
- Let it dry completely, usually 24–48 hours, then hang it. The cotton’s weight will smooth out any small remaining wobbles.
Final Quality-Control Checklist
- Every row has 169 sts (56 columns).
- Columns 1–2 and 55–56 are solid blocks from bottom to top.
- The stem runs straight up columns 28–29 from Row 10 to Row 150.
- There are 11 leaflets on each side, alternating sides and shrinking from R 20 to R 4.
- Border counts: 173 sc on the top and bottom, 484 sc on each side.
- All 7 tabs are evenly spaced, the same length and securely stitched down.
- Blocked size: 29 in x 81 in (73.7 x 205.7 cm).
Troubleshooting
The panel slants or the edges wander. You probably missed the turning ch-3 or the last dc of a row. Count to 169 every few rows.
The fern looks crooked. Your column count is off. Recount from the nearest marker and rip back to the last correct row.
The meshes look like rectangles instead of squares. Your rows are too short or your chains are too long. Pull up a taller dc loop, or work the chains more tightly.
The border ruffles along the sides. Make sure you worked exactly 3 sc per row-end, not 4. If it still ruffles, work 5 sc over every 2 row-ends instead.
The border pulls in along the sides. Work the 3 sc per row-end more loosely, or go up a hook size for the border only.
The tabs twist on the rod. Whipstitch each tab down across its full width, not just at the center.
Care
Hand wash in cool water, or machine wash on a delicate cycle inside a large mesh bag. Dry flat, reshaping to the blocked measurements, or hang the panel while it’s still slightly damp.
Final Notes
The measurement chain is short. One square is 0.5 in (1.3 cm), so 56 columns make 28 in (71.1 cm) and 160 rows make 80 in (203.2 cm). The 3-round border adds 0.5 in (1.3 cm) to each edge, bringing the panel to 29 in x 81 in (73.7 x 205.7 cm). If your swatch matches gauge and every row counts to 169, the fern will land exactly where it should.
Happy crocheting!