

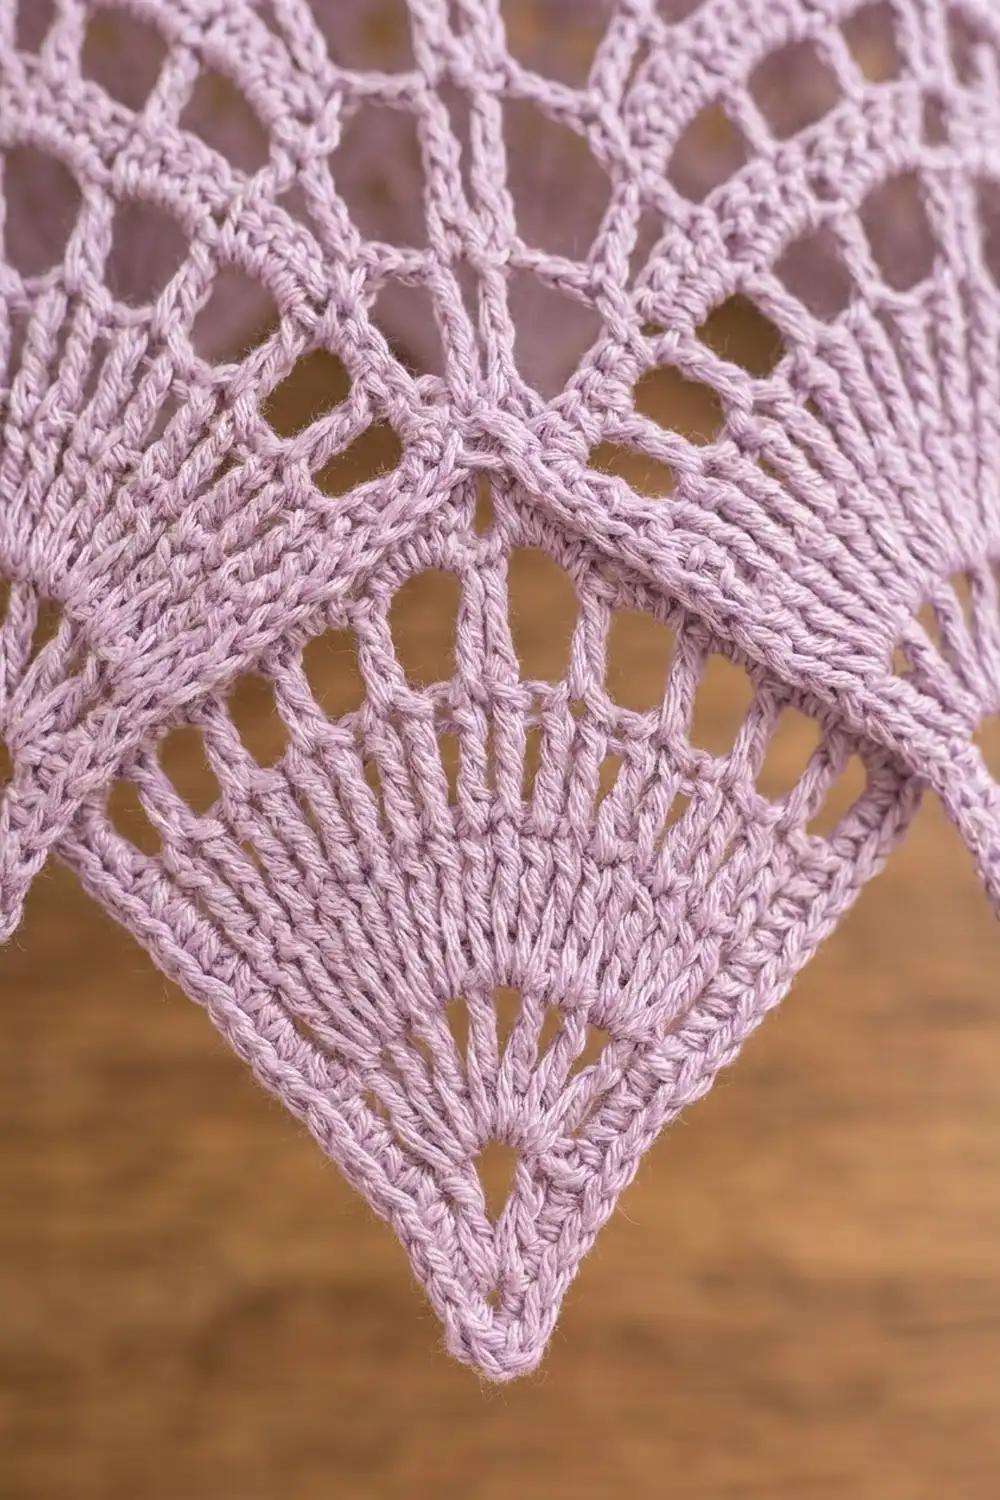
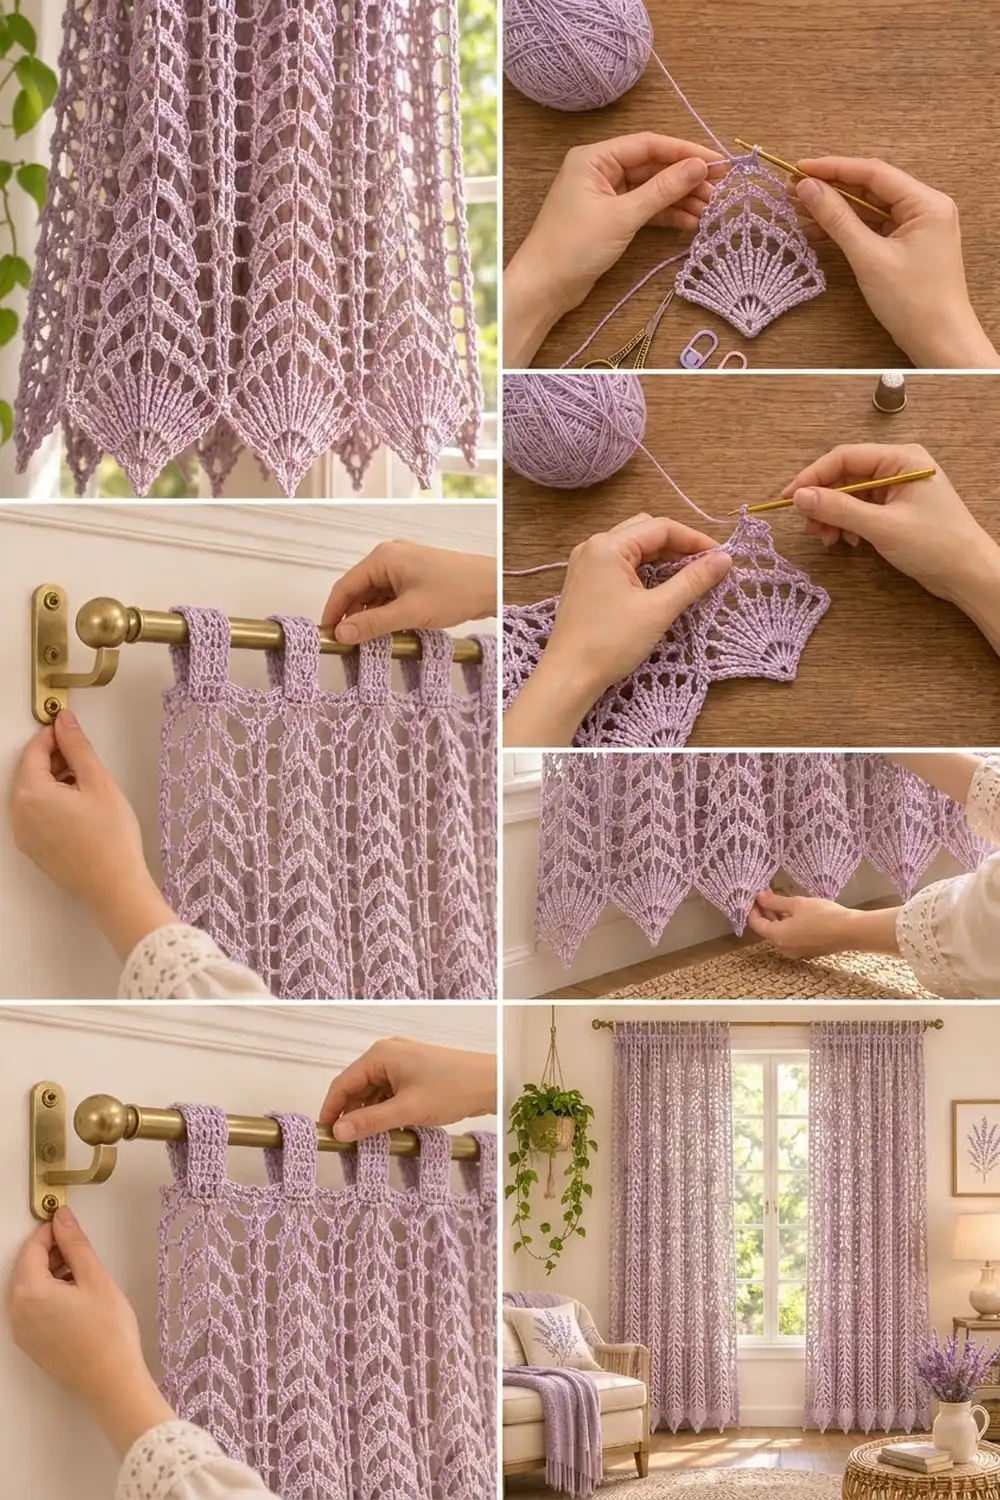
This curtain panel is made of tall columns of lace. Each column is filled with stacked arrow shapes and ends in a pointed fan at the hem. The whole panel is soft lavender, so light comes through the openwork and the panel still gives some privacy.
The style is cottage-inspired and calm. Thin vertical lines separate the lace columns, so the panel looks orderly. The pointed hem gives it a vintage feel. The pattern uses US crochet terms throughout.
The finished panel measures 36.75 in (93.3 cm) wide and 79.5 in (201.9 cm) long, not counting the tabs. Add 2 in (5.1 cm) for the tab loops, and the full hanging length is 81.5 in (207.0 cm). If you want a pair, like the two panels in the room photo, make the pattern twice.
Construction is simple. You work the panel in one piece from the top down: first a solid header, then the arrow lace rows, then a tapering fan point under each lace column. After that, one border row goes down both sides and around the points, and nine tabs are worked on the top edge and folded to the back.
Finished Size and Construction
- Finished size: 36.75 in x 79.5 in (93.3 cm x 201.9 cm), plus 2 in (5.1 cm) tab loops
- Skill level: Intermediate
- Terminology: US
- Yarn weight: DK (weight 3) cotton
- Hook: 4.0 mm (US G-6)
- Number of pieces: 1 panel (the tabs are worked onto the panel itself)
- Layout: 12 vertical lace columns side by side, each ending in 1 fan point
- Piece size: each column is 3 in (7.6 cm) wide
- Size before border: 36.25 in x 79.25 in (92.1 cm x 201.3 cm)
- Border depth: 0.25 in (0.6 cm)
Materials
Mercerized or matte cotton works best. It drapes well, shows the lace clearly, and does not stretch much while it hangs. Do not use acrylic or wool blends. Over a long drop they can grow lengthwise.
- Lavender DK cotton: 1,600 g, about 3,360 m (32 balls of 50 g / 105 m)
- 4.0 mm (US G-6) crochet hook
- Tapestry needle
- 4 to 6 locking stitch markers
- Scissors
- Measuring tape
- Rust-proof pins and a blocking surface big enough for half the panel
The yarn amount is for one panel and has a margin of about 10%. For a pair, buy twice as much, all from one dye lot.
Abbreviations (US Terms)
- ch – chain
- sl st – slip stitch
- sc – single crochet
- dc – double crochet
- tr – treble crochet
- sc2tog – single crochet 2 together: insert hook in next st or edge, pull up a loop, insert hook in following st or edge, pull up a loop, yarn over and pull through all 3 loops
- st(s) – stitch(es)
- sp – space
- RS / WS – right side / wrong side
Counting rule: In the lace rows, every dc and every chain counts as 1 stitch. Each row keeps all 145 positions, so a dc can land in a dc or in a chain of the row below. When a dc goes into a chain, work into the chain itself, not around it.
Gauge and Checkpoints
Gauge matters here. A small change in gauge adds up to many inches over a panel this size.
- Dc gauge: 16 dc and 8 rows = 4 in (10.2 cm)
- Lace gauge: 1 repeat (12 sts) = 3 in (7.6 cm) wide; 4 lace rows = 2 in (5.1 cm)
- Tr point rows: each row is about 0.75 in (1.9 cm) deep
- Sc gauge (tabs and border): 16 sc and 18 rows = 4 in (10.2 cm)
Test swatch first: Ch 27. Work Rows 1–4 and then 8 lace rows over 25 sts (2 repeats + 1). Then work 1 fan point over the first 13 sts. The lace area should be 6.25 in (15.9 cm) wide and 6 in (15.2 cm) tall, header included. The point should be 5.25 in (13.3 cm) deep. Wash and dry the swatch flat before you measure, because cotton lace often relaxes a little after its first soak.
Checkpoints:
- After Row 4: 36.25 in (92.1 cm) wide, 2 in (5.1 cm) tall
- After Row 36: 18 in (45.7 cm) tall
- After Row 148: 74 in (188.0 cm) tall
- After the points: 79.25 in (201.3 cm) tall
If your swatch is too big, go down 0.5 mm in hook size. If it is too small, go up 0.5 mm. Do not add or remove repeats to fix the width, because that changes the number of points. If the width is right but the length is off, keep the hook size. Measure the length at the checkpoints and expect blocking to correct about 1 in (2.5 cm).
Header
Ch 147.
Row 1 (RS): Dc in 3rd ch from hook and in each ch across. The skipped 2 ch do not count as a st. Turn. (145 dc)
Rows 2–4: Ch 3 (counts as dc), skip first st, dc in each st across, working the last dc in the top of the turning ch. Turn. (145 dc per row)
Checkpoint: 36.25 in (92.1 cm) wide and 2 in (5.1 cm) tall.
Arrow Lace Body
Each 12-st repeat is symmetric, so RS and WS rows read the same way. Every row begins with ch 3 (counts as dc at position 0) and ends with a dc in the top of the turning ch. Place a marker in every 12th st of Row 4 to show the column dividers.
Row 5 (Lace Row 1): Ch 3, ch 4, skip 4 sts, dc in each of next 3 sts, ch 4, skip 4 sts, dc in next st (divider); rep from * across. Turn. (per repeat 4 dc + 8 ch; row total 145 sts)*
Row 6 (Lace Row 2): Ch 3, ch 3, skip 3 sts, dc in next st, ch 1, skip 1 st, dc in next st, ch 1, skip 1 st, dc in next st, ch 3, skip 3 sts, dc in next st; rep from * across. Turn. (145 sts)*
Row 7 (Lace Row 3): Ch 3, ch 2, skip 2 sts, dc in next st, ch 2, skip 2 sts, dc in next st, ch 2, skip 2 sts, dc in next st, ch 2, skip 2 sts, dc in next st; rep from * across. Turn. (145 sts)*
Row 8 (Lace Row 4): Ch 3, ch 1, skip 1 st, dc in next st, ch 3, skip 3 sts, dc in next st, ch 3, skip 3 sts, dc in next st, ch 1, skip 1 st, dc in next st; rep from * across. Turn. (145 sts)*
In each column, the dc lines start together at the center (positions 5, 6, 7) and move outward 1 position per row (to 4 and 8, then 3 and 9, then 2 and 10). Each 4-row cycle therefore makes one arrow shape that points up. The center dc at position 6 stacks into a spine, and the dc at position 0 forms the divider line between columns.
Rows 9–148: Repeat Rows 5–8 another 35 times. That makes 36 arrow repeats in total, or 144 lace rows. (145 sts in every row)
Checkpoint: the panel is 74 in (188.0 cm) long. Row 148 is a WS row. Do not fasten off.
Fan Points
Make one point under each of the 12 columns. Each point is worked over 13 sts: positions 0 through 12 of its repeat. Neighboring points share the divider st between them.
Point 1, Row P1 (RS): Turn, ch 4 (counts as tr), ch 1, skip 1 st, tr in next st; rep from * 5 more times. Turn. (7 tr + 6 ch = 13 sts)*
Row P2: Sl st in first tr and in first ch-1 sp, ch 4 (counts as tr), ch 1, tr in next ch-1 sp; rep from * 4 more times. Turn. (6 tr + 5 ch = 11 sts)*
Row P3: Sl st in first tr and first ch-1 sp, ch 4, ch 1, tr in next ch-1 sp; rep from * 3 more times. Turn. (5 tr + 4 ch = 9 sts)*
Row P4: Work as P3, but rep from * only 2 more times. Turn. (4 tr + 3 ch = 7 sts)
Row P5: Work as P3, but rep from * only 1 more time. Turn. (3 tr + 2 ch = 5 sts)
Row P6: Sl st in first tr and first ch-1 sp, ch 4, ch 1, tr in next ch-1 sp. Turn. (2 tr + 1 ch = 3 sts)
Row P7: Sl st in first tr and in the ch-1 sp, ch 4. Fasten off. (1 st, the tip)
Each row sits half a step inside the row above it, so the tr spokes lean toward the tip and make a fan.
Points 2–12: With the RS facing, join yarn with a sl st in the same divider st where the previous point ended (position 12 of that repeat, which is position 0 of the next). Ch 4 (counts as tr), then work Row P1 from the * and continue through Row P7 as for Point 1.
Checkpoint: 12 points, each 3 in (7.6 cm) wide at the top and 5.25 in (13.3 cm) deep. The panel now measures 79.25 in (201.3 cm).
Tabs
With the RS facing, work across the foundation chain edge. The 145 sts split into 9 tabs of 9 sts and 8 gaps of 8 sts (9 x 9 + 8 x 8 = 145). Each tab is 2.25 in (5.7 cm) wide, and each gap is 2 in (5.1 cm).
Tab rows: Join yarn in the 1st st. Ch 1, sc in the same st and in each of the next 8 sts. Turn. (9 sc) Work 26 more rows of 9 sc, for 27 rows and 6 in (15.2 cm). Fasten off and leave a 12 in (30.5 cm) tail.
Skip 8 sts, join in the next st, and make the next tab the same way. Repeat until you have 9 tabs. The last tab ends on the last st.
Fold each tab to the WS. Sew its end along Row 4, 2 in (5.1 cm) below the top edge. Each loop stands 2 in (5.1 cm) tall and fits a rod up to 1.5 in (3.8 cm) across.
Border
Border gauge: 4 sc per 1 in (2.5 cm).
Border Row (RS): Join yarn at the top right corner. Work down the right side edge:
- Side edge: 2 sc in the side of each dc row, for 148 rows x 2 = 296 sc over 74 in (188.0 cm).
- Each point: 3 sc in the side of each tr row going down (7 x 3 = 21 sc), 3 sc in the tip, then 21 sc up the other side. That is 45 sc per point.
- Valleys: Between two points, work the last sc of one point and the first sc of the next point together as sc2tog. That is 11 valleys, and each one turns 2 sc into 1.
- Left side edge: 296 sc going up.
Bottom total: 12 x 45 − 11 = 529 sts. Border total: 296 + 529 + 296 = 1,121 sts. Fasten off.
Why the math works: At 4 sc per inch, 296 sc fills exactly 74 in on each side. Each slanted point edge is about 5.46 in (13.9 cm) long (5.25 in deep and 1.5 in out from center). 21 sc over that length is 3.85 sc per inch, which is close enough to lie flat. The 3 sc at each tip turn the corner, and the sc2tog at each valley keeps the inner corners from bunching. The border adds 0.25 in (0.6 cm) on each side and at the hem. The final size is 36.75 in x 79.5 in (93.3 cm x 201.9 cm).
Final Blocking
- Weave in all ends along the dc spines and dividers, where they will not show.
- Soak the panel in cool water for 20 minutes, then press out the water. Do not wring it.
- Roll it in towels to remove more water.
- Lay it flat and pin the side edges straight at 36.75 in (93.3 cm) apart.
- Pin each point tip so it hangs straight below its column, and pin each fan open.
- Check that the length is 79.5 in (201.9 cm). Do not stretch it longer, because cotton lace will drop a little more as it hangs.
- Leave it until it is completely dry.
Final Quality-Control Checklist
- 145 sts in every header and lace row
- 36 complete arrow repeats, all pointing up
- 12 points, each with rows of 13, 11, 9, 7, 5, 3, and 1 sts
- 9 tabs evenly spaced, each sewn at Row 4
- Border counts of 296 / 529 / 296
- Side edges straight and points even in depth
- Width 36.75 in (93.3 cm), length 79.5 in (201.9 cm)
Troubleshooting
- The arrows lean to one side: A dc is in the wrong position. Count chains and skips against the 12-st repeat, and check the markers.
- The row count drifts: You probably missed the turning-ch dc at the row end. Every row ends in the top of the ch-3.
- The points curl: Your tension on the tr rows is too tight. Loosen up, or block the points harder.
- The side edges ripple: Too many border sc. Use exactly 2 per dc row.
- The tabs are uneven: Recount the 9/8 split before you join each tab.
- The panel is too long after hanging: Take it down, rewet it, and dry it flat without stretching it.
Care
Hand wash the panel in cool water with mild soap and dry it flat. Reshape the points while it is damp, and do not tumble dry it.
Final Notes
The size of this panel comes from a chain of measurements: 12-st repeats at 3 in (7.6 cm) each give the 36.25 in (92.1 cm) width. 148 rows bring the length to 74 in (188.0 cm). The fan points add 5.25 in (13.3 cm), the border adds 0.25 in (0.6 cm), and the tabs add a 2 in (5.1 cm) loop. Check each stage as you reach it, and the finished panel will hang straight and even.
Happy crocheting!