

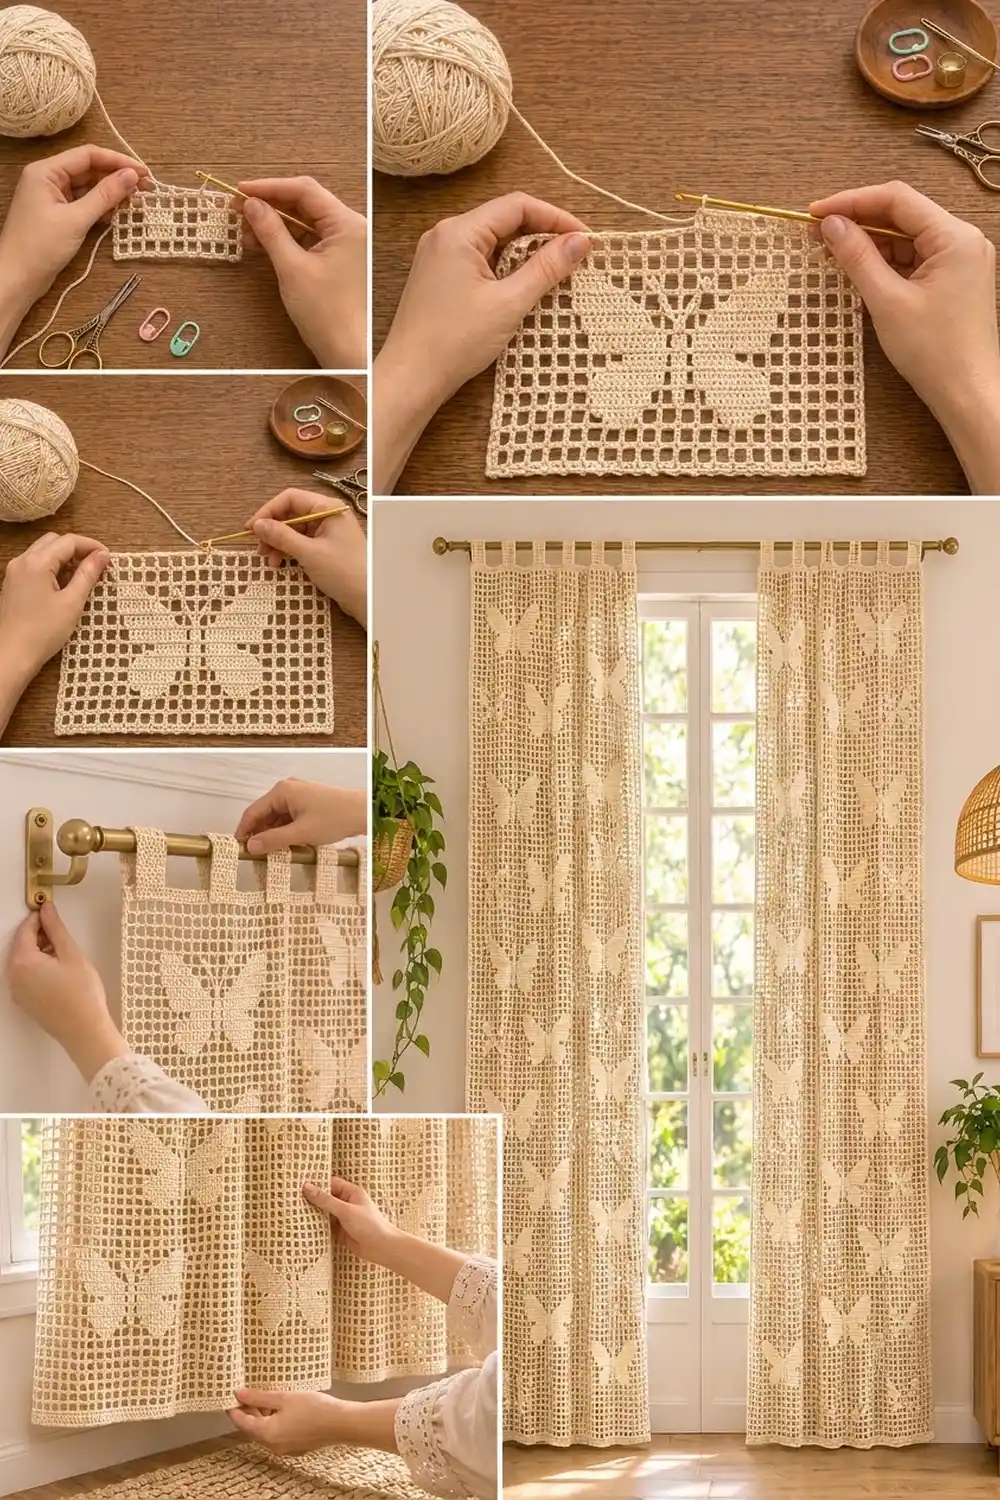
This tab-top curtain panel is worked as an open filet crochet grid with solid butterflies. When light comes through the window, the open squares glow and the butterflies show up as soft cream shapes.
The panel is a single color, a warm natural cream, so all of the pattern comes from texture. The butterflies are set in a staggered layout: two butterflies in one band, then one centered butterfly in the next, alternating up the panel. The style is cottage-boho, light, and simple to hang.
This pattern uses US crochet terms. The finished panel measures 36.25 in (92.1 cm) wide by 76 in (193.0 cm) long, not counting the tabs. Seven tabs add a 3 in (7.6 cm) loop above the top edge.
Construction is simple. You crochet the panel in one piece from the bottom up in filet mesh. Then you work a two-round single crochet border around the whole panel, and finally you work seven tab strips off the top edge, fold them to the back, and sew them down. For a matching pair, as seen at a full window, make a second identical panel.
Finished Size and Construction
- Finished size: 36.25 in x 76 in (92.1 cm x 193.0 cm), plus 3 in (7.6 cm) tab loops
- Skill level: Intermediate (easy stitches, careful counting)
- Terminology: US
- Yarn weight: Worsted (#4) cotton
- Hook: 5.5 mm (I-9)
- Number of pieces: 1 panel, with tabs worked onto it
- Layout: 47 meshes wide x 100 rows tall; 6 butterfly bands (2, 1, 2, 1, 2, 1 butterflies)
- Size before border: 35.25 in x 75 in (89.5 cm x 190.5 cm)
- Border depth: 0.5 in (1.3 cm) on every side
- One butterfly: 13 meshes x 11 rows = 9.75 in x 8.25 in (24.8 cm x 21.0 cm)
Materials
Choose a smooth worsted-weight cotton or cotton blend in natural or cream. Cotton holds the square grid shape well and blocks crisply. Avoid fuzzy yarns, because they blur the open mesh.
- Cream: about 650 g / 1,235 m (1,351 yd), based on a yarn with 190 m (208 yd) per 100 g
- 5.5 mm (I-9) crochet hook
- 4 locking stitch markers
- Tapestry needle
- Scissors
- Measuring tape
- Blocking pins and a large padded surface or clean floor area
The yarn amount includes a margin of about 20% for your swatch, a different tension, and weaving in ends. For a pair of panels, double everything.
Abbreviations (US Terms)
- ch – chain
- sc – single crochet
- dc – double crochet
- sk – skip
- sp – space
- st(s) – stitch(es)
- RS / WS – right side / wrong side
Special terms:
- Mesh (M): an open square made of ch 2 and 1 dc. Over an open mesh: ch 2, dc in next dc. Over a block: ch 2, sk 2 dc, dc in next dc.
- Block (B): a solid square made of 3 dc. Over an open mesh: 2 dc in ch-2 sp, dc in next dc. Over a block: dc in next 3 dc.
- Turning mesh: every row begins with ch 5 (counts as dc + ch 2), sk the first ch-2 sp or 2 dc, dc in next dc. Every row ends with the last dc in the 3rd ch of the turning ch-5.
Every mesh and every block uses 3 sts. Each row has 48 dc posts and 47 squares, for 142 sts in total. This count never changes.
Gauge and Checkpoints
Gauge: 4 meshes and 4 rows = 3 in (7.6 cm) in filet mesh. One square is 0.75 in (1.9 cm) wide and tall.
Test piece first: Ch 41. Work Row 1 as written below, but you will get 12 meshes. Work 7 more mesh rows (8 rows total). Lightly wet block and pin it square. It should measure 9 in (22.9 cm) wide x 6 in (15.2 cm) tall.
- Too big: go down a hook size, or tighten your chains.
- Too small: go up a hook size.
- Squares taller than wide: pull up your dc loops a little less, or try a shorter dc.
- Squares wider than tall: make your chains a little tighter.
Checkpoints for the panel (lightly stretched flat):
- After Row 4: 35.25 in (89.5 cm) wide x 3 in (7.6 cm) tall
- After Row 20: 15 in (38.1 cm) tall
- After Row 36: 27 in (68.6 cm) tall
- After Row 52: 39 in (99.1 cm) tall
- After Row 68: 51 in (129.5 cm) tall
- After Row 84: 63 in (160.0 cm) tall
- After Row 100: 75 in (190.5 cm) tall
Cotton filet grows a little when hung, so if you are within 1 in (2.5 cm) on length, carry on.
The Butterfly Motif
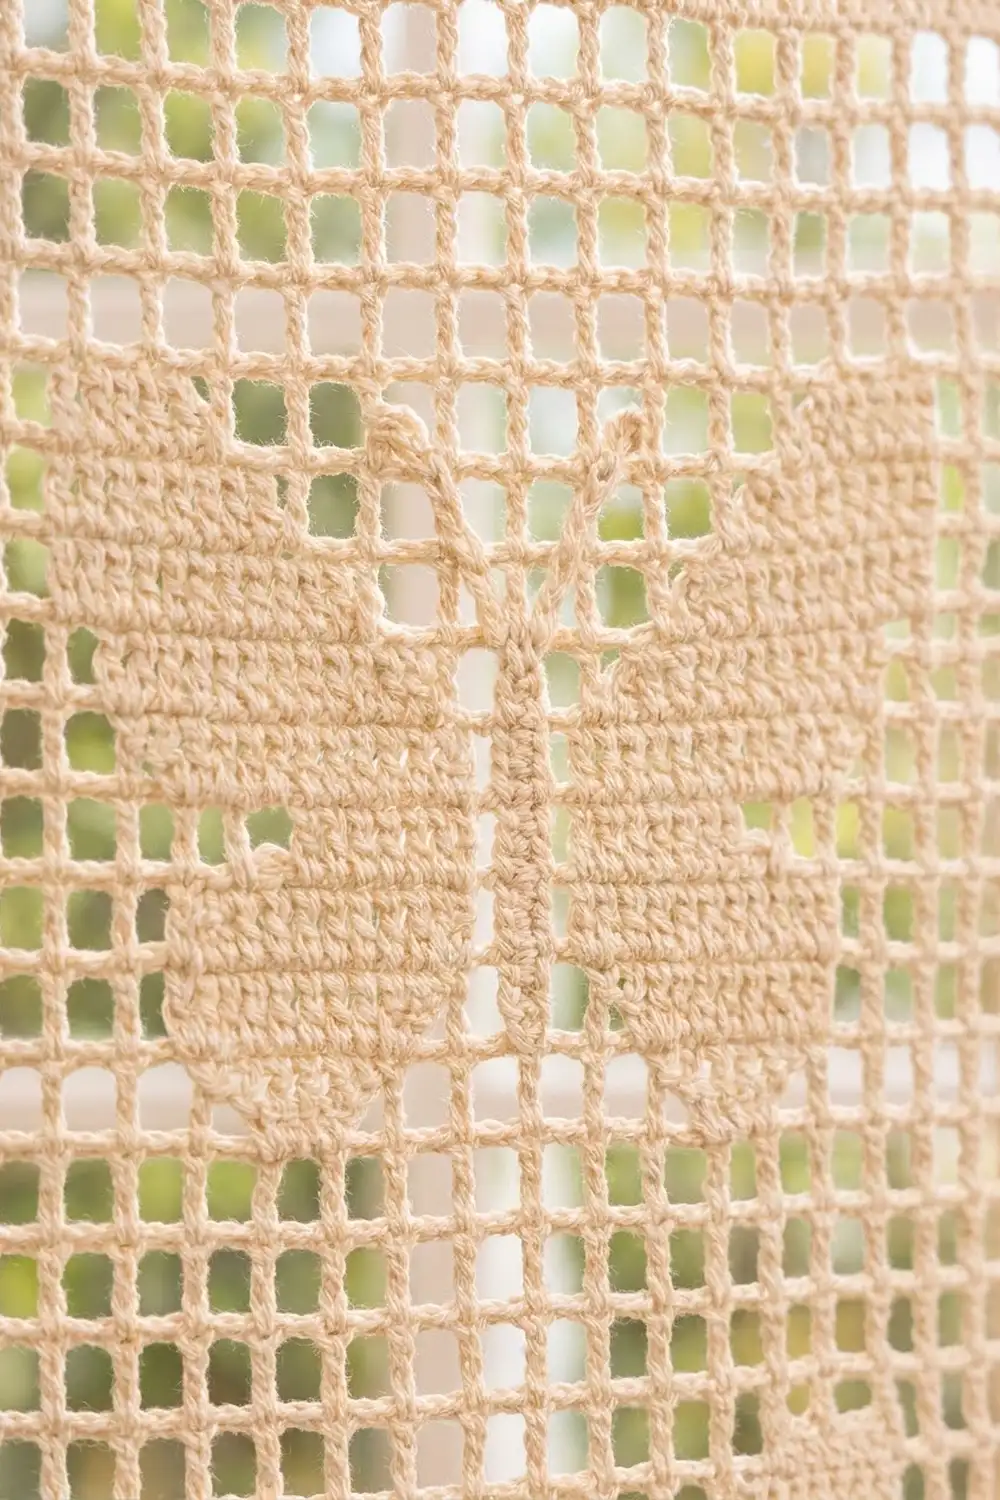
Each butterfly is 13 squares wide and 11 rows tall. It is symmetrical, so it reads the same on RS and WS rows. Read each motif row left to right, M = open mesh, B = block.
- Motif Row 1: M2, B2, M5, B2, M2 (lower wing tips)
- Motif Row 2: M1, B4, M1, B1, M1, B4, M1 (lower wings and tail)
- Motif Row 3: M1, B11, M1
- Motif Row 4: M2, B9, M2 (waist between wings)
- Motif Row 5: M1, B11, M1
- Motif Row 6: B13
- Motif Row 7: B13
- Motif Row 8: B5, M1, B1, M1, B5 (upper wings split from body)
- Motif Row 9: B4, M2, B1, M2, B4
- Motif Row 10: M1, B2, M3, B1, M3, B2, M1 (wing tops and head)
- Motif Row 11: M5, B1, M1, B1, M5 (antennae)
This gives the shape in the photo: rounded lower wings, larger upper wings, a solid body line down the center, and two antennae on top.
Panel Pattern
Foundation: Ch 146.
Row 1: Dc in 8th ch from hook (first mesh made), *ch 2, sk 2 ch, dc in next ch; rep from * across. Turn. (47 meshes; 48 dc posts; 142 sts)
Rows 2–4: Ch 5 (counts as dc + ch 2), sk ch-2 sp, dc in next dc, *ch 2, dc in next dc; rep from * across, working the last dc in the 3rd ch of the turning ch-5. Turn. (47 meshes; 142 sts)
Band Layouts
There are two band layouts. Each band is 11 motif rows followed by 5 plain mesh rows, so each band is 16 rows, or 12 in (30.5 cm).
Band A (two butterflies): For each of the 11 motif rows, work: M4, motif row (13 squares), M13, motif row (13 squares), M4. (4 + 13 + 13 + 13 + 4 = 47 squares)
Band B (one centered butterfly): For each of the 11 motif rows, work: M17, motif row (13 squares), M17. (17 + 13 + 17 = 47 squares)
Plain rows: Work as Rows 2–4.
Because both layouts are symmetrical, you can follow them the same way on every row in either direction. The first and last 4 squares are always open, so every row still begins with the turning mesh. Place a marker at the start of each butterfly on the first motif row of every band to keep your place.
Row by Row
- Rows 5–15: Band A, Motif Rows 1–11.
- Rows 16–20: Plain mesh.
- Rows 21–31: Band B, Motif Rows 1–11.
- Rows 32–36: Plain mesh.
- Rows 37–47: Band A, Motif Rows 1–11.
- Rows 48–52: Plain mesh.
- Rows 53–63: Band B, Motif Rows 1–11.
- Rows 64–68: Plain mesh.
- Rows 69–79: Band A, Motif Rows 1–11.
- Rows 80–84: Plain mesh.
- Rows 85–95: Band B, Motif Rows 1–11.
- Rows 96–100: Plain mesh.
Every row: 47 squares, 48 dc posts, 142 sts. Do not fasten off after Row 100.
The panel now has 9 butterflies: 2 + 1 + 2 + 1 + 2 + 1. It has a 3 in (7.6 cm) plain margin at the bottom and 3.75 in (9.5 cm) of plain mesh at the top and between each band.
Border
Border gauge: 4 sc and 4 sc rows = 1 in (2.5 cm). Along the top and bottom you work 1 sc per st, or 3 sc per square. Along the sides you work 3 sc per row. Each square is 0.75 in (1.9 cm) wide and each row is 0.75 in (1.9 cm) tall, so 3 sc per square matches 4 sc per inch in both directions. The border lies flat without ruffling or pulling in.
Round 1: Ch 1. Working across the top of Row 100: 3 sc in the first st (corner), sc in each of the next 140 sts (2 sc in each ch-2 sp plus 1 sc in each dc), 3 sc in the last st (corner). Working down the side: 3 sc around each row-end post, for 300 sc. Working along the bottom in the underside of the foundation chain: 3 sc in the first st (corner), sc in each of the next 140 sts, 3 sc in the last st (corner). Working up the second side: 300 sc. Sl st to the first sc.
Count: 140 + 140 (top and bottom between corners) + 300 + 300 (sides) + 12 (four 3-sc corners) = 892 sc. Mark the center sc of each corner.
Round 2: Ch 1, sc in each sc around, working 3 sc in each marked center corner sc. Sl st to the first sc. Move the markers up to the new corner centers.
Count: top and bottom between corners are now 142 each (140 + the 2 outer sc of the old corner groups). The sides are 302 each. Corners have 12. 142 + 142 + 302 + 302 + 12 = 900 sc, exactly 8 more than Round 1 (2 per corner).
Do not fasten off. The border adds 0.5 in (1.3 cm) on each side: 35.25 + 1 = 36.25 in (92.1 cm) wide, and 75 + 1 = 76 in (193.0 cm) long.
Tabs
The top edge has 144 sts from corner center to corner center (142 + 2 corner centers). You will work 7 tabs of 6 sts each with 6 gaps of 17 sts: 7 x 6 + 6 x 17 = 42 + 102 = 144. The two end tabs sit flush with the corners.
Every gap is 17 sts = 4.25 in (10.8 cm). Every tab is 6 sts = 1.5 in (3.8 cm) wide.
Tab Row 1: With the RS facing, join yarn in the first top corner center sc (or continue from the border), sc in the same st and in the next 5 sts. Turn. (6 sc)
Tab Rows 2–24: Ch 1, sc in each sc across. Turn. (6 sc)
Fasten off and leave a 12 in (30.5 cm) tail. The tab is 6 in (15.2 cm) long.
Skip 17 sts on the top edge, then join in the next st and repeat the tab. Work all 7 tabs.
Attaching the tabs: Fold each tab to the WS. Sew its last row across the back of the top border so that a 3 in (7.6 cm) loop stands above the panel. Use small whipstitches that do not show through on the RS. The loops fit rods up to 1.5 in (3.8 cm) across.
Final Blocking
- Weave in all ends inside block squares or along the border, never across open mesh.
- Soak the panel in cool water with a little wool or cotton wash for 15 minutes.
- Gently press out the water. Roll it in towels. Do not wring.
- Lay it flat on a padded surface. Pin the corners to 36.25 in x 76 in (92.1 cm x 193.0 cm).
- Pin along each side every 4 in (10.2 cm), keeping the border straight.
- Use a ruler to straighten the mesh columns. Gently open each square so it is 0.75 in (1.9 cm) wide and tall.
- Let it dry completely before you unpin it. Pin the tabs flat as well.
Final Quality-Control Checklist
- Each row has 47 squares and 142 sts.
- All 9 butterflies are complete, with antennae on top and symmetrical wings.
- Band A margins are 4 squares; Band B margins are 17 squares.
- Mesh columns run straight from bottom to top.
- Border Round 2 has 900 sc. The corners lie flat.
- There are 7 tabs, evenly spaced with 17 sts between them, all the same height.
- The panel measures 36.25 in x 76 in (92.1 cm x 193.0 cm).
Troubleshooting
- Square count drifts: You probably missed the turning ch-5 or skipped the last dc. Count dc posts every 5 rows (48).
- Butterfly looks off-center: Recount the outer margins on the first motif row. Band A should be M4, and Band B should be M17.
- Blocks bulge: Your dc in the ch-2 sp is too loose. Work blocks into the chain loops instead of the space.
- Panel is narrower at the top: Your tension tightened over time. Measure the width at every checkpoint and change the hook if needed.
- Border ruffles on the sides: Work 5 sc over every 2 rows instead of 3 per row.
- Border pulls in: Check that you work 3 sc around every row-end, not 2.
- Tabs lean: Sew them on with even width, straight down from their bases.
Care
Hand wash in cool water and dry flat, reshaping the squares while the panel is damp. Hang only when completely dry, because the weight of wet cotton can stretch it long.
Final Notes
The measurement chain is simple: 1 square = 0.75 in (1.9 cm). 47 squares x 100 rows give 35.25 in x 75 in (89.5 cm x 190.5 cm). The border adds 0.5 in (1.3 cm) on every side to reach 36.25 in x 76 in (92.1 cm x 193.0 cm). Seven tabs add 3 in (7.6 cm) loops on top. If your test piece is right, the panel will come out right too. Make a second panel to dress a full window like a gentle field of butterflies.
Happy crocheting!