

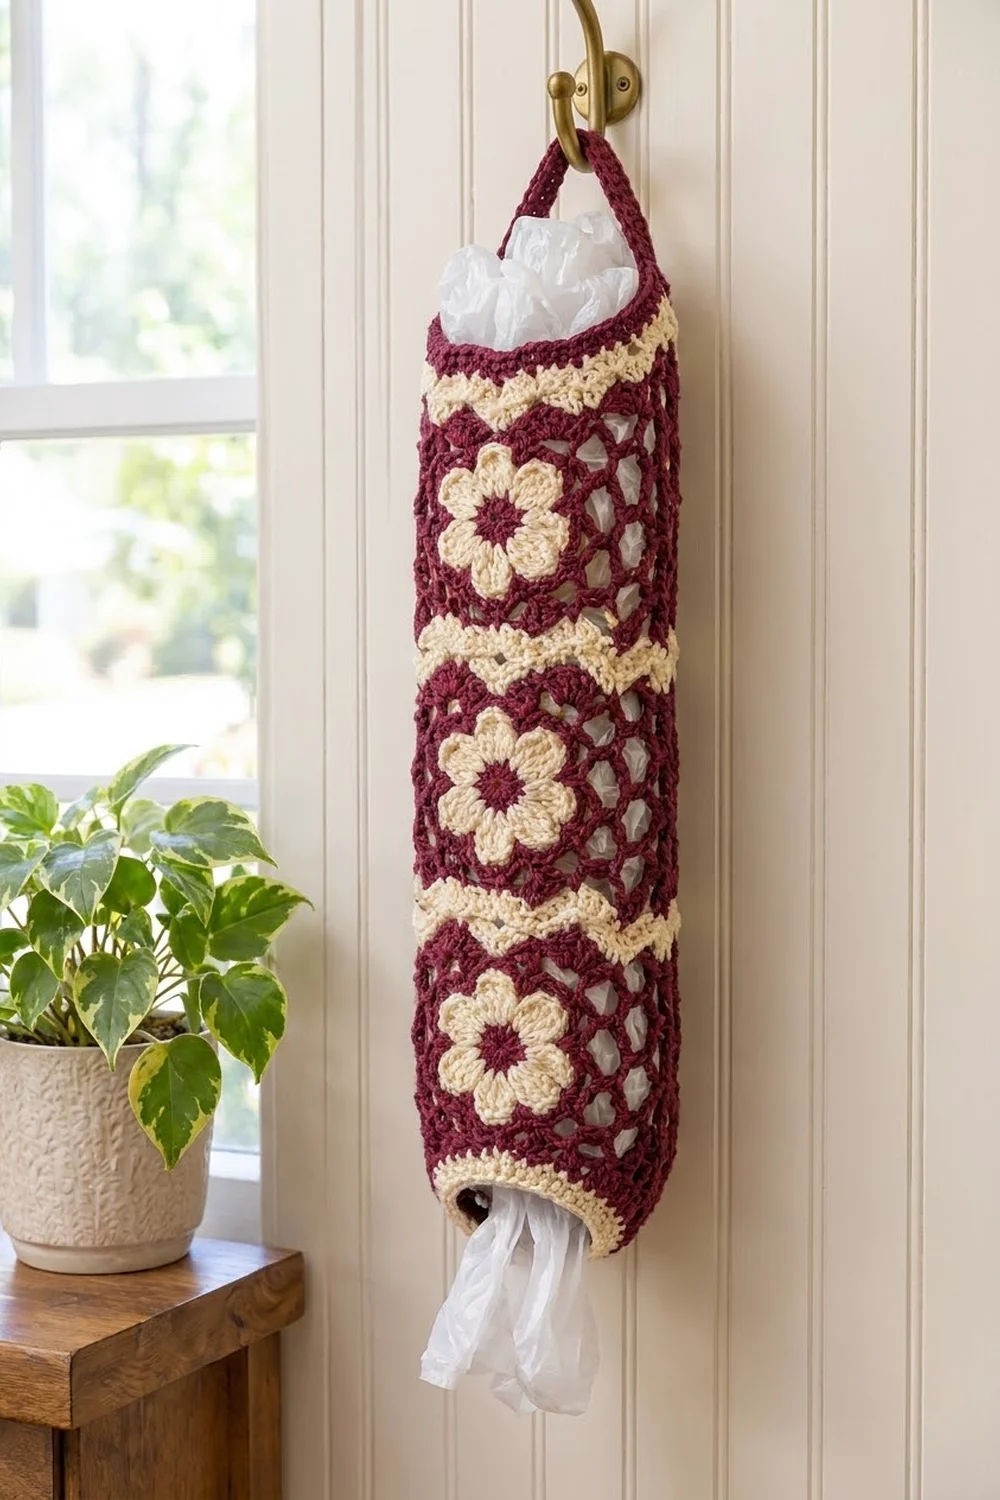
Plastic bags tend to multiply in kitchen drawers. This holder keeps them in one place and looks good doing it. The Bloom and Wave holder is a lacy burgundy tube with stacked cream flowers, and cream wave bands ripple around it between the tiers of flowers.
The palette is deep burgundy and soft cream. It looks warm and slightly vintage, and it fits a farmhouse kitchen, a pantry door, or a laundry room hook. You stuff bags in through the top and pull them out one at a time through the small cuffed opening at the bottom.
This pattern uses US crochet terms. The finished holder measures about 17.25 in (43.8 cm) long and 7 in (17.8 cm) wide when laid flat, or about 4.5 in (11.4 cm) across when round and filled. The handle adds about 6 in (15.2 cm) of strap.
To build it, you make twelve small square flower motifs and join them into three rings of four. Then you connect the rings with three-round wave bands. Last, you add a wave band, a tapered cuff and rim at each end, and finally the handle.
Finished Size and Construction
- Finished size: 17.25 in (43.8 cm) long × 7 in (17.8 cm) flat width, not counting the handle
- Circumference: 14 in (35.6 cm)
- Skill level: Intermediate
- Terminology: US
- Yarn weight: Worsted (#4) cotton
- Hook: 4.5 mm (US 7)
- Number of pieces: 12 flower motifs, plus edgings and a handle worked directly onto the tube
- Layout: 3 tiers × 4 motifs around
- Motif size: 3.5 in (8.9 cm) square
- Size before edgings: 13 in (33.0 cm) long (3 tiers plus 2 joining bands)
- Edging depth: top 2 in (5.1 cm), bottom 2.25 in (5.7 cm)
Materials
Yarn: Use a smooth worsted-weight cotton or cotton blend. Cotton holds its shape when the tube is packed with bags, and it doesn’t stretch out on the hook over time. Avoid fuzzy yarns, because they hide the petal shapes.
- Color A, burgundy: 110 g, about 209 m
- Color B, cream: 60 g, about 114 m
These quantities include a margin of roughly 15% for swatching and tails.
Tools:
– 4.5 mm (US 7) crochet hook
– Tapestry needle
– 8 locking stitch markers
– Scissors
– Measuring tape
– Blocking mat and rust-proof pins
– Spray bottle
Abbreviations (US Terms)
- ch – chain
- sl st – slip stitch
- sc – single crochet
- hdc – half double crochet
- dc – double crochet
- tr – treble crochet (yarn over twice)
- sc2tog – single crochet 2 together
- sp(s) – space(s)
- st(s) – stitch(es)
- RS / WS – right side / wrong side
Special stitch: sc around post. Insert the hook from front to back around the post of the stitch named, rather than into its top. Yarn over, pull up a loop, and finish the sc as usual. You use this in Round 4 to anchor the lattice behind the petals.
Gauge and Checkpoints
Gauge: 16 sc × 18 rows = 4 in (10.2 cm) in burgundy, using a 4.5 mm hook.
Make one complete motif before you start the rest. It is your real gauge swatch.
Motif checkpoints:
– After Round 3 (flower), the motif measures about 2.75 in (7.0 cm) across, petal tip to petal tip.
– After Round 5, it measures about 3 in (7.6 cm) square.
– After Round 6, it measures 3.5 in (8.9 cm) square, with 14 sc along each side.
If your motif is too big, go down half a hook size. If it is too small, go up half a size. A difference of 0.25 in (0.6 cm) per motif adds up to 1 in (2.5 cm) around the tube and 0.75 in (1.9 cm) of length.
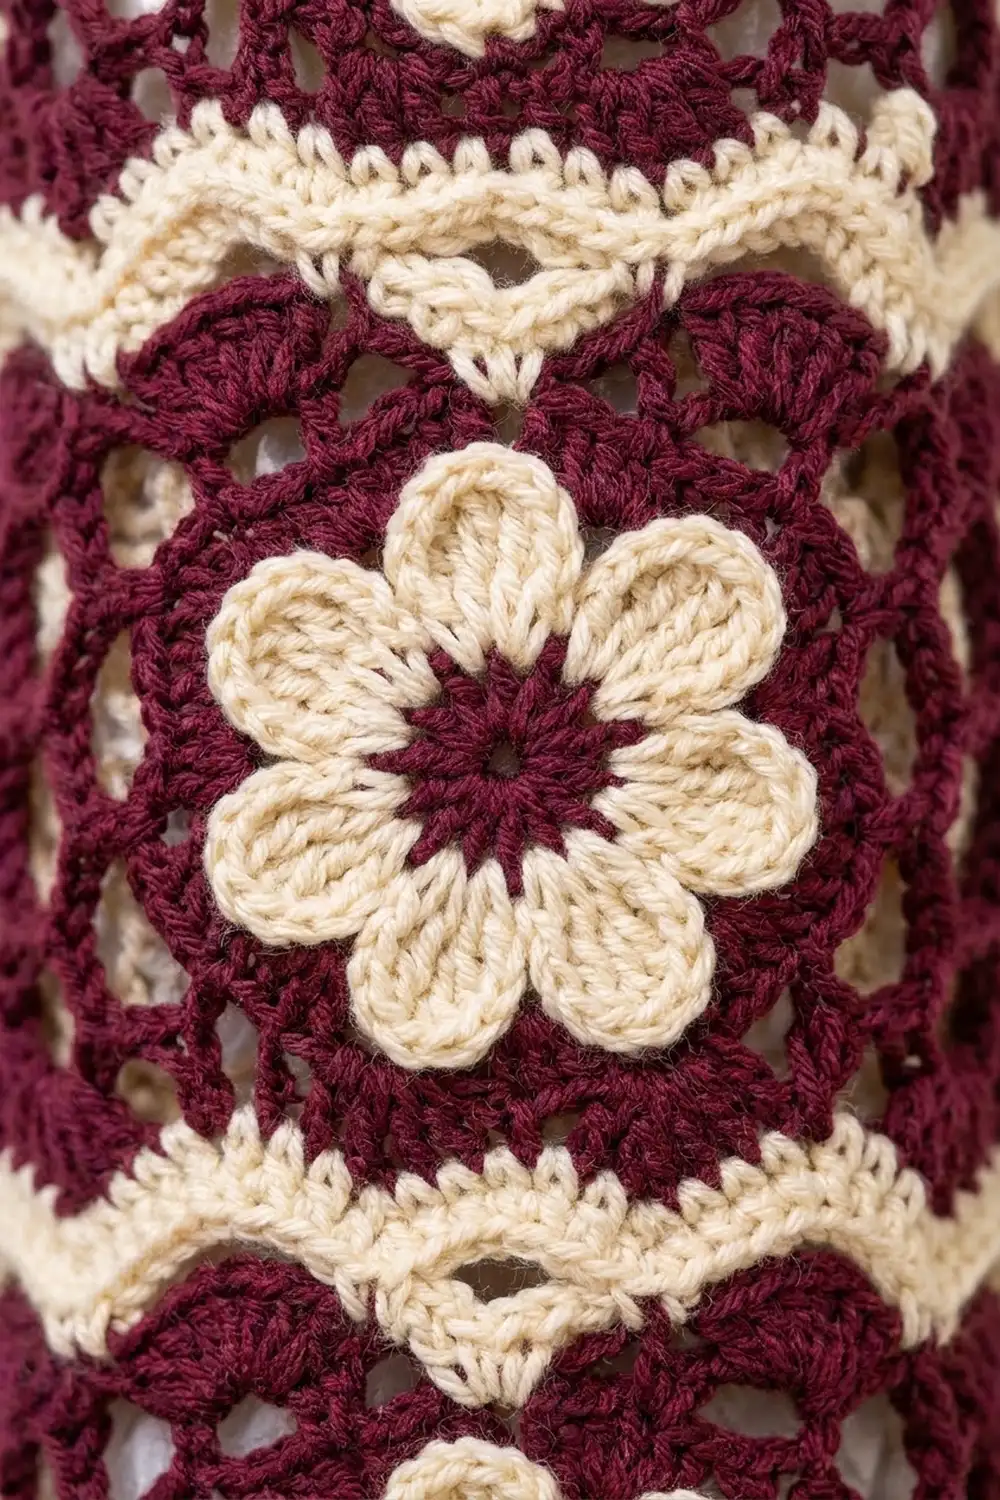
Flower Motif (make 12)
Round 1 (A, burgundy): Make a magic ring, ch 1, and work 12 sc in the ring. Join with a sl st to the first sc. Pull the ring closed. Fasten off. (12 sc)
Round 2 (B, cream): Join B with a sc in any sc. Ch 3, skip 1 sc, sc in the next sc; repeat from * 4 more times. Ch 3 and join with a sl st to the first sc. (6 sc, 6 ch-3 sps)
Round 3 (B): Sl st into the first ch-3 sp. In each ch-3 sp, work (sc, hdc, 3 dc, hdc, sc). Join with a sl st to the first sc and fasten off. (6 petals, 42 sts)
Round 4 (A): Join A with a sc in the center dc of any petal. Ch 3, sc around the post of the next Round 2 sc (behind the petals), ch 3, sc in the center dc of the next petal; repeat from * 4 more times. Ch 3, sc around the post of the last Round 2 sc, ch 3, and join with a sl st to the first sc. (12 sc, 12 ch-3 sps)
Round 5 (A): Sl st into the first ch-3 sp. Ch 3 (counts as a dc), then work (2 dc, ch 2, 3 dc) in the same sp for the first corner. Work 3 dc in each of the next 2 sps. (3 dc, ch 2, 3 dc) in the next sp, then 3 dc in each of the next 2 sps; repeat from * 2 more times. Join with a sl st to the top of the beginning ch-3. (48 dc, 4 ch-2 corner sps; 12 dc per side between corner sps)
The small gaps between the 3-dc groups make the open lattice around the flower.
Round 6 (A): Ch 1. Work 1 sc in each dc and (sc, ch 2, sc) in each corner sp. Join with a sl st and fasten off. (56 sc, 4 ch-2 corner sps)
Count check for Round 6: each side has 12 sc worked into the dc, plus 1 sc on each side of the corner chains. That makes 14 sc per side between ch-2 corner sps. In this pattern the corner ch-2 sps are not counted as stitches. 4 × 14 = 56 ✓
Weave in all tails now, while the motif is flat.
Make All Pieces
- 12 motifs, each using about 5 g of A and 2.5 g of B
- Total for the motifs: about 60 g of A and 30 g of B
Layout (rings, viewed from the front):
Top    → Tier 3:  [M] [M] [M] [M]  → joined into a ring
         Wave band (joins Tier 2 to Tier 3)
Middle → Tier 2:  [M] [M] [M] [M]  → joined into a ring
         Wave band (joins Tier 1 to Tier 2)
Bottom → Tier 1:  [M] [M] [M] [M]  → joined into a ring
Turn every motif the same way up, so the petals line up straight in each vertical column.
Joining
Motifs into rings
Hold two motifs RS together, with A. Working through the back loops of both layers, sl st into the corner ch-2 sp, then into each of the 14 sc, then into the next corner ch-2 sp. That gives 16 sl sts per seam, matched one stitch to one stitch. Fasten off.
Join four motifs into a strip this way. Then join the last free side of motif 4 to the first free side of motif 1 to close the ring. Make three rings.
Tension: Keep your sl sts as loose as your sc. A tight seam pinches the tube into ridges. If you need to, go up to a 5 mm hook for the seams.
Ring edge count: Each ring now has a top edge and a bottom edge of 4 × 14 = 56 sc. The corner ch-2 sps are bound into the seams, so skip them from here on. Never work into them.
Checkpoint: each ring is 14 in (35.6 cm) around and 3.5 in (8.9 cm) tall.
Wave bands (join the tiers)
Work these rounds into the 56 sc on the top edge of Tier 1, with RS facing. Place a marker at each seam.
Round A (B, cream wave): Join B with a sc in the first sc after any seam. Then work hdc, dc, tr, dc, hdc, and sc, so the first repeat is sc, hdc, dc, tr, dc, hdc, sc. Work sc, hdc, dc, tr, dc, hdc, sc over the next 7 sts; repeat from * 6 more times. Join with a sl st to the first sc. (56 sts = 8 waves, 2 per motif)
Round B (A, fill): Join A in the first st. Ch 4 (counts as a tr). Over the rest of the first repeat, work dc, hdc, sc, hdc, dc, tr. Work tr, dc, hdc, sc, hdc, dc, tr over the next 7 sts; repeat from * 6 more times. Join. (56 sts)
Round B puts a tall stitch over each short stitch, and the reverse, so the top edge becomes straight while the cream wave stays visible below it.
Round C (A, joining round): Hold the bottom edge of Tier 2 against Round B, WS together, with the seams lined up. Ch 1, then work 1 sc through each Round B st and the matching Tier 2 sc. Join. (56 sc)
Repeat Rounds A–C on the top edge of Tier 2 to attach Tier 3.
Checkpoint: each band is 1.25 in (3.2 cm) deep. The tube now measures 13 in (33.0 cm) long: 3 tiers of 3.5 in (8.9 cm) make 10.5 in (26.7 cm), plus two bands of 1.25 in (3.2 cm).
Border (Top and Bottom Edgings)
Border gauge: 4 sc per inch, which is 14 sc for each 3.5 in (8.9 cm) motif face. Every edging round starts from 56 sts, which is 4 faces × 14.
Top edging (on the top edge of Tier 3)
Rounds 1–2: Work Wave Band Rounds A and B. (56 sts; 14 per motif face)
Round 3 (A): Ch 1 and sc in each st. Join. (56 sc)
Round 4 (A, taper): Ch 1. Sc in the next 5 sts, sc2tog; repeat from * 7 more times. Join. Each motif face goes from 14 sts to 12. (8 repeats × 6 = 48 sc; 12 per motif face)
Rounds 5–6 (B): Join B. Ch 1 and sc in each st. Join. (48 sc) Fasten off after Round 6.
Checkpoint: the top opening is 12 in (30.5 cm) around, about 3.8 in (9.7 cm) across. The top edging is 2 in (5.1 cm) deep.
Bottom edging (on the foundation edge of Tier 1)
Turn the tube upside down and work into the 56 sc on the bottom edge of Tier 1.
Rounds 1–3: Work Wave Band Rounds A and B, then a plain round of 56 sc in A. (56 sts)
Round 4 (A): Ch 1. Sc in the next 2 sts, sc2tog; repeat from * 13 more times. Join. (14 × 3 = 42 sc; 10.5 per motif face)
Round 5 (A): Ch 1. Sc in the next st, sc2tog; repeat from * 13 more times. Join. (14 × 2 = 28 sc)
Rounds 6–8 (B): Ch 1 and sc in each st. Join. (28 sc) Fasten off.
Checkpoint: the bottom opening is 7 in (17.8 cm) around, about 2.25 in (5.7 cm) across. The bottom edging is 2.25 in (5.7 cm) deep. That opening is small enough to hold bags in place but lets one slide out with a light tug.
Handle
Flatten the top so that two motif columns face front. Join A with a sl st in the top-rim st at one side fold (st 1). Ch 30, and sl st into st 25, the opposite fold. Ch 1 and work 1 sc in each ch back across. (30 sc) Sl st into st 1 and fasten off.
The handle measures about 6 in (15.2 cm).
Why the math works: Every band and edging starts from the same 56 sts, which is 4 motifs × 14. The 7-st wave repeat fits that count exactly 8 times, so the waves line up evenly above every flower. The decreases are spread evenly around (8 for the top, 14 per round for the bottom), so the edgings taper smoothly instead of puckering at one spot.
Final Blocking
- Weave in any remaining tails, running them along the seams.
- Wet the holder with cool water and press out the excess in a towel. Don’t wring it.
- Slide a rolled towel or a cardboard tube about 4.5 in (11.4 cm) across inside it.
- Line up the motif columns straight, and ease each petal open with your fingertips.
- Lay the holder flat with the seams at the sides. Pin it to 7 in (17.8 cm) wide and 17.25 in (43.8 cm) long.
- Pin the wave peaks gently, so each cream band shows its ripples.
- Let it dry completely, then remove the pins.
Final Quality-Control Checklist
- [ ] There are 12 motifs, each 3.5 in (8.9 cm) square with 14 sc per side
- [ ] Each ring is 14 in (35.6 cm) around and has 56 sc on each edge
- [ ] Each wave band shows 8 waves (2 per motif face)
- [ ] The flower columns run straight from top to bottom
- [ ] The top rim has 48 sc and the bottom rim has 28 sc
- [ ] The handle is centered and attached at opposite folds
- [ ] All tails are woven in securely
- [ ] The finished length is 17.25 in (43.8 cm)
Troubleshooting
The waves are lopsided. You probably started Round A in the wrong place. Start in the first sc after a seam, and count 7 sts per repeat.
The band edge is wavy, not straight. Round B must put a tr over each sc and a sc over each tr. Check that the heights alternate correctly.
There are gaps at the seams. You may have worked into a corner ch-2 sp in a band round. Skip the corner sps at all seams.
The petals curl forward. Round 4 is too tight. Loosen the ch-3 loops or use a larger hook for that round.
The bottom opening is too loose. Add one more round of B, working sc 5, sc2tog around: 24 sts for a 28-st base.
The tube twists. Your seams aren’t aligned between tiers. Line up the seam markers before working Round C.
Care
Hand wash or machine wash on a gentle cold cycle inside a mesh bag. Reshape the holder while damp and lay it flat to dry.
Final Notes
The whole holder builds from one checked measurement. A 3.5 in (8.9 cm) motif with 14 sc per side makes a ring of 56 sts and 14 in (35.6 cm). Three rings plus two 1.25 in (3.2 cm) bands come to 13 in (33.0 cm). The top and bottom edgings add 2 in (5.1 cm) and 2.25 in (5.7 cm), for 17.25 in (43.8 cm) overall. Get the first motif right, and everything after it fits.
For a lighter look, swap the colors: cream lattice and wave fills with burgundy flowers.
Happy crocheting!