

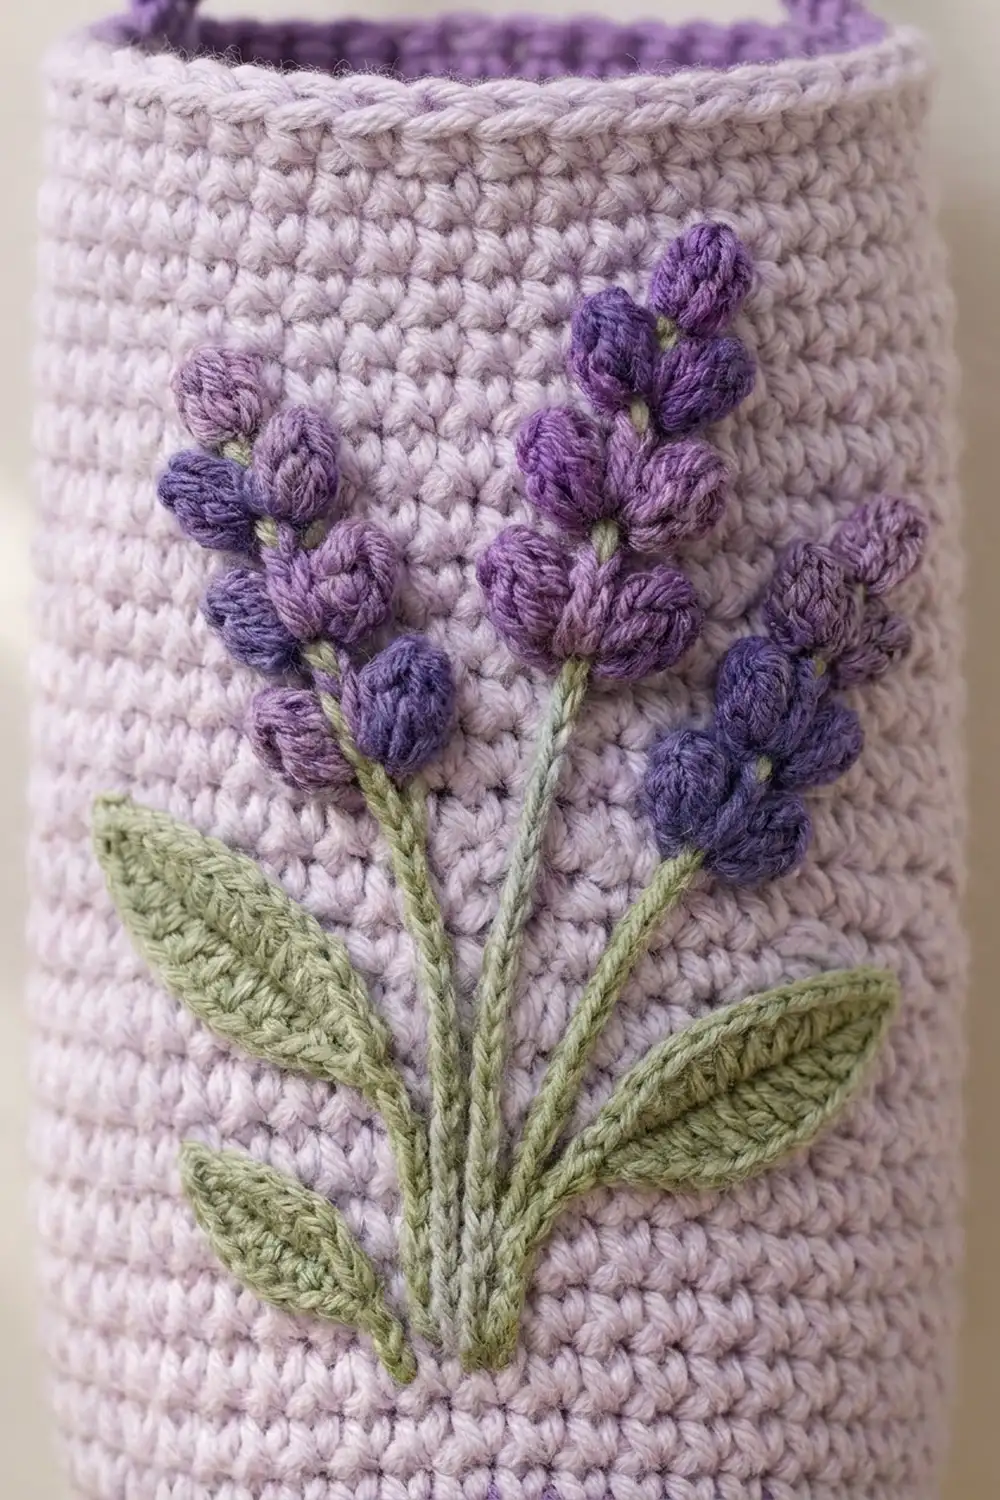
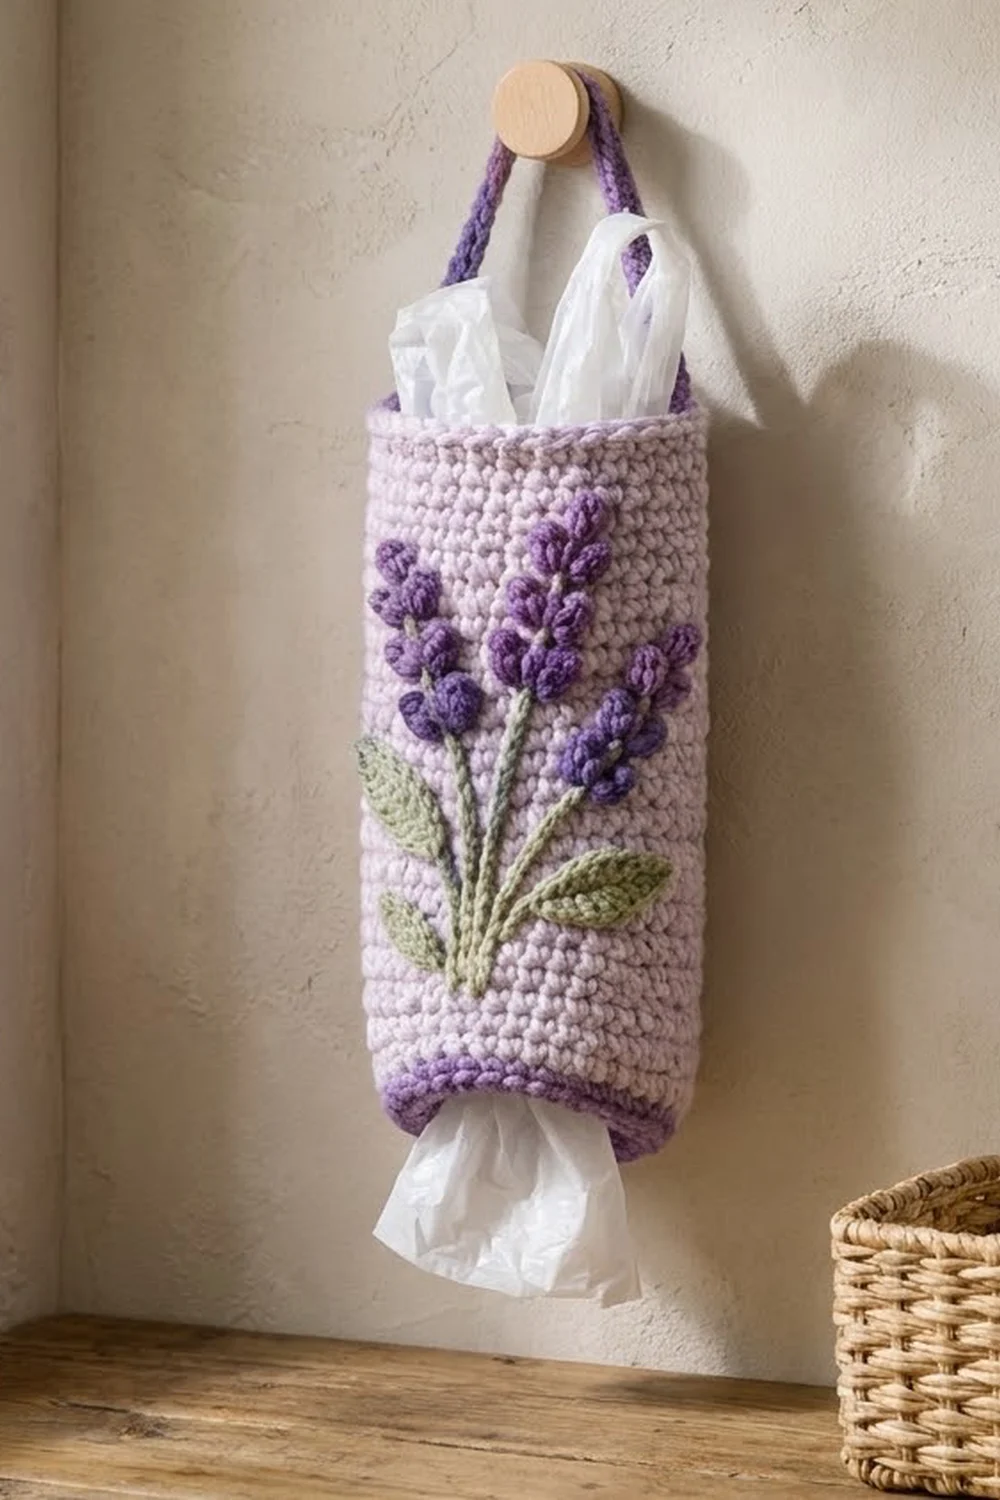
This hanging bag holder is a soft lavender tube with a sprig of raised lavender flowers on the front. You work the body in light lavender single crochet. A medium purple rim finishes the top and bottom, and a purple strap matches them. On the front, five flower spikes made of bobble stitches in medium and deep purple sit on sage green stems. Four pointed green leaves fan out at the base.
The style is calm and cottage-like, and the holder is useful too. You stuff plastic grocery bags in through the open top and pull them out one at a time through the narrower purple opening at the bottom. It hangs by its strap from a single peg or hook.
All instructions use US crochet terms. Not counting the strap, the finished tube is 5 in (12.7 cm) wide laid flat and 12 in (30.5 cm) tall. The bottom opening is 3.5 in (8.9 cm) across laid flat, and the strap is 9 in (22.9 cm) long.
The construction is simple. You chain a ring in purple and work the narrow bottom band. Then you switch to lavender, increase over three rounds, and work straight up in continuous rounds. Two purple rounds finish the top, and you work the strap straight onto the rim. The flowers, stems, and leaves are made separately and sewn on.
Finished Size and Construction
- Finished size: 5 in (12.7 cm) wide laid flat x 12 in (30.5 cm) tall, plus a 9 in (22.9 cm) strap
- Skill level: Easy-intermediate
- Terminology: US
- Yarn weight: Worsted (#4)
- Hook: 5.0 mm (H-8)
- Number of pieces: 1 tube body (strap worked on) plus 14 small sewn-on pieces
- Layout: A single upright tube with a lavender sprig centered on the front
- Body circumference: 40 sc = 10 in (25.4 cm)
- Size before top trim: 11.5 in (29.2 cm) tall after Round 52
- Top trim depth: 2 rounds, about 0.5 in (1.3 cm)
Materials
Use a smooth worsted weight cotton or cotton blend. Cotton holds its shape and keeps the bobbles crisp. Acrylic works too, but it may stretch over time once the holder is full of bags.
- Color A, light lavender (body): 75 g / 135 m
- Color B, medium purple (rims, strap, short spikes): 20 g / 36 m
- Color C, deep purple (long spikes): 10 g / 18 m
- Color D, sage green (stems, leaves): 10 g / 18 m
Tools:
- 5.0 mm (H-8) crochet hook
- Yarn needle
- Stitch marker
- Scissors
- Straight pins
- Measuring tape
The quantities include about 15 percent extra for your gauge swatch and sewing tails.
Abbreviations (US Terms)
- ch – chain
- sl st – slip stitch
- sc – single crochet
- hdc – half double crochet
- dc – double crochet
- st(s) – stitch(es)
- yo – yarn over
- rnd – round
Special stitch – bobble: [Yo, insert hook in st, yo and pull up a loop, yo and pull through 2 loops] 3 times in the same st, then yo and pull through all 4 loops on hook.
Gauge and Checkpoints
Gauge: 16 sc and 18 rnds = 4 in (10.2 cm) in sc worked in the round.
That works out to 4 sc per inch and 4.5 rnds per inch. Make a swatch of 20 sc worked in rows for 20 rows, then measure the center 4 in (10.2 cm).
Test the first stage before you go further. After Round 3, the purple ring should measure 7 in (17.8 cm) around, or 3.5 in (8.9 cm) laid flat.
Checkpoints:
- After Round 3: 3.5 in (8.9 cm) laid flat, about 0.7 in (1.8 cm) tall
- After Round 6: 5 in (12.7 cm) laid flat, about 1.3 in (3.3 cm) tall
- After Round 27: about 6 in (15.2 cm) tall
- After Round 52: about 11.5 in (29.2 cm) tall
- After Round 54: 12 in (30.5 cm) tall
If your tube is too wide, switch to a 4.5 mm hook. If it is too narrow, switch to a 5.5 mm hook. If the width is right but the height comes out too short or too tall, add or remove plain rounds in Rounds 7–52 instead of changing hooks.
Body
After the bottom band, you work the body in continuous rounds. Place a stitch marker in the first st of each round and move it up as you go.
Foundation: With B, ch 28. Join with a sl st to the first ch to form a ring, without twisting the chain.
Rnd 1: Ch 1, sc in each ch around, join with a sl st to the first sc. (28 sc)
Rnd 2: Ch 1, sc in each st around, join. (28 sc)
Rnd 3: Ch 1, sc in each st around, join with A. Fasten off B. (28 sc)
These three rounds form the firm purple bottom band. It stays narrower than the body so the bags don’t fall out.
Rnd 4: With A, ch 1, [sc in next 6 sts, 2 sc in next st] 4 times. Don’t join. From here on, work in continuous rounds. (32 sc)
Rnd 5: [Sc in next 7 sts, 2 sc in next st] 4 times. (36 sc)
Rnd 6: [Sc in next 8 sts, 2 sc in next st] 4 times. (40 sc)
Checkpoint: the tube now measures 5 in (12.7 cm) laid flat.
Rnds 7–52: Sc in each st around. (40 sc per round, 46 rounds)
At the end of Round 52, sl st in the next st to smooth the step up, then change to B.
The tube should now be about 11.5 in (29.2 cm) tall.
Appliqué Pieces
Leave a 10 in (25.4 cm) tail on every piece for sewing.
Long Flower Spikes (make 3 with C)
Ch 11.
Side 1: Working in the back bumps and starting in the 2nd ch from hook, [bobble in next ch, sl st in next ch] 5 times. (5 bobbles, 5 sl sts)
Side 2: Turn the piece to work along the other side of the foundation chain. [Bobble in next ch, sl st in next ch] 5 times. (5 bobbles, 5 sl sts)
Total: 20 sts, 10 bobbles. Sl st to the first st and fasten off.
Each long spike is about 2.5 in (6.4 cm) long. The bobbles alternate down both sides like clusters of lavender buds.
Short Flower Spikes (make 2 with B)
Ch 7.
Side 1: Starting in the 2nd ch from hook, [bobble in next ch, sl st in next ch] 3 times. (3 bobbles, 3 sl sts)
Side 2: Along the other side of the chain, [bobble in next ch, sl st in next ch] 3 times. (3 bobbles, 3 sl sts)
Total: 12 sts, 6 bobbles. Each short spike is about 1.5 in (3.8 cm) long.
Stems (make 5 with D)
Long stem (make 3): Ch 17. Sl st in the back bump of the 2nd ch from hook and in each ch across. (16 sl sts) Each is about 4 in (10.2 cm) long.
Short stem (make 2): Ch 11. Sl st in the back bump of the 2nd ch from hook and in each ch across. (10 sl sts) Each is about 2.5 in (6.4 cm) long.
Large Leaves (make 2 with D)
Ch 9.
Side 1: Starting in the 2nd ch from hook: sl st, sc, hdc, dc in each of next 2 chs, hdc, sc. (7 sts)
Tip: 3 sc in the last ch. (3 sts)
Side 2: Working along the other side of the chain: sc, hdc, dc in each of next 2 chs, hdc, sc, sl st. (7 sts)
Total: 17 sts. Join with a sl st to the first sl st. Each large leaf is about 2 in (5.1 cm) long.
Small Leaves (make 2 with D)
Ch 7.
Side 1: Starting in the 2nd ch from hook: sl st, sc, hdc, dc, hdc. (5 sts)
Tip: 3 sc in the last ch. (3 sts)
Side 2: Along the other side of the chain: hdc, dc, hdc, sc, sl st. (5 sts)
Total: 13 sts. Join and fasten off. Each small leaf is about 1.5 in (3.8 cm) long.
Top Trim, Bottom Rim, and Strap
These rounds act as the border for the tube. The border gauge is the same as the body gauge: 4 sc per inch.
The tube has no corners, so when you lay it flat, think of it as two flat sides. The top has 40 sts, which is 20 sts per side. The bottom has 28 sts, which is 14 sts per side. You don’t add corner stitches anywhere.
Top Rnd 53: With B, ch 1, sc in each st around, join with a sl st to the first sc. (40 sc, 20 per side)
Top Rnd 54: Ch 1, sc in each st around, join. (40 sc, 20 per side) Don’t fasten off.
Both trim rounds have 1 sc in each existing st and no extra sts. The count stays at 40, so the top stays 10 in (25.4 cm) around, or 5 in (12.7 cm) laid flat. The rim won’t ruffle or pull in.
Strap Row 1: Ch 36. Count 20 sts on from the joining st and sl st in that st, which is directly across the tube. Sl st in the next st. Turn. Sc in each ch across. (36 sc) Sl st in the st just before the one where the chain started.
Strap Row 2: Turn. Sc in each sc across. (36 sc) On the far side, sl st in the next unused st beside the first anchors. Fasten off and weave in the end.
The strap is 36 sc long, and 36 ÷ 4 = 9 in (22.9 cm). Two rows make it about 0.4 in (1.0 cm) wide. When the holder hangs, the strap rises about 3.5 in (8.9 cm) above the rim.
Bottom Rim: Turn the tube upside down and join B to the foundation chain. Sl st in each foundation loop around. (28 sl sts, 14 per side) Fasten off.
This round also has 1 st in each existing st and no extra sts. It firms up the bottom opening at 7 in (17.8 cm) around, or about 2.2 in (5.6 cm) across when round, so it doesn’t stretch out too fast.
Assembling the Lavender Sprig
Flatten the tube so the strap’s attachment points sit at the two side folds. The sprig goes in the center of the front.
- Pin the bottoms of the stems together at one point, 3 in (7.6 cm) above the bottom edge.
- Fan the 3 long stems upward: one straight up the center, one angled left, and one angled right.
- Place a short stem between the center stem and each side stem.
- Pin a long spike (C) to the top of each long stem and a short spike (B) to the top of each short stem.
- Pin one large leaf on each side near the base, angled outward. Pin one small leaf just above each large leaf.
The finished sprig is about 6.5 in (16.5 cm) tall. The top of the center spike should sit about 2.5 in (6.4 cm) below the top edge.
Sew everything down with the matching tails, using small whipstitches through the outer edges only. Stitch through the front wall of the tube only, with one hand inside so you don’t catch the back wall. Sew each spike down along its center line so the bobbles stay raised.
Final Blocking
- Fill the tube with a rolled towel so it holds a round shape.
- Mist it lightly with water. Don’t soak the bobbles.
- Shape the tube to 10 in (25.4 cm) around and 12 in (30.5 cm) tall.
- Pat the leaves flat and press the tips into points.
- Fluff each bobble with your fingertips.
- Lay the strap out straight and pin it to 9 in (22.9 cm).
- Let it dry completely before you take out the towel.
Final Quality-Control Checklist
- The tube measures 5 in (12.7 cm) laid flat and 12 in (30.5 cm) tall.
- The bottom band has 28 sts and the body has 40 sts.
- The top rim lies flat without ruffling.
- The strap is centered between the two side folds and firmly attached.
- The sprig is centered and isn’t sewn to the back wall.
- All 10 bobbles show on each long spike and all 6 on each short spike.
- All ends are woven in on the inside.
Troubleshooting
The tube twists or leans. Continuous sc rounds naturally twist a little. Block it firmly, or work the body in joined rounds with a ch 1 at the start of each.
The bottom opening stretches too much. Add a second sl st round in B to the bottom rim.
The bobbles flatten. Push them to the front as you sew, and only stitch along the center of each spike.
The leaves curl. Steam them lightly and pin them flat to dry before sewing.
The strap stretches. Use cotton, or add a third sc row to the strap.
The appliqué puckers the tube. Sew with loose stitches and keep a rolled towel inside while you sew.
Care
Hand wash in cool water and lay flat to dry, reshaping the tube while it’s damp. Don’t tumble dry, because heat can flatten the bobbles.
Final Notes
Every measurement in this holder comes from one gauge. At 4 sc per inch, the 28-sc bottom band gives a 7 in (17.8 cm) opening. Three increase rounds take it to 40 sc, which is 10 in (25.4 cm) around. At 4.5 rounds per inch, 54 rounds give 12 in (30.5 cm) of height. The trim rounds add no stitches, so the rims match the body exactly, and the 36-sc strap makes a 9 in (22.9 cm) hanging loop.
Check your gauge and measure at each checkpoint, and your holder will come out the right size. Happy crocheting!