

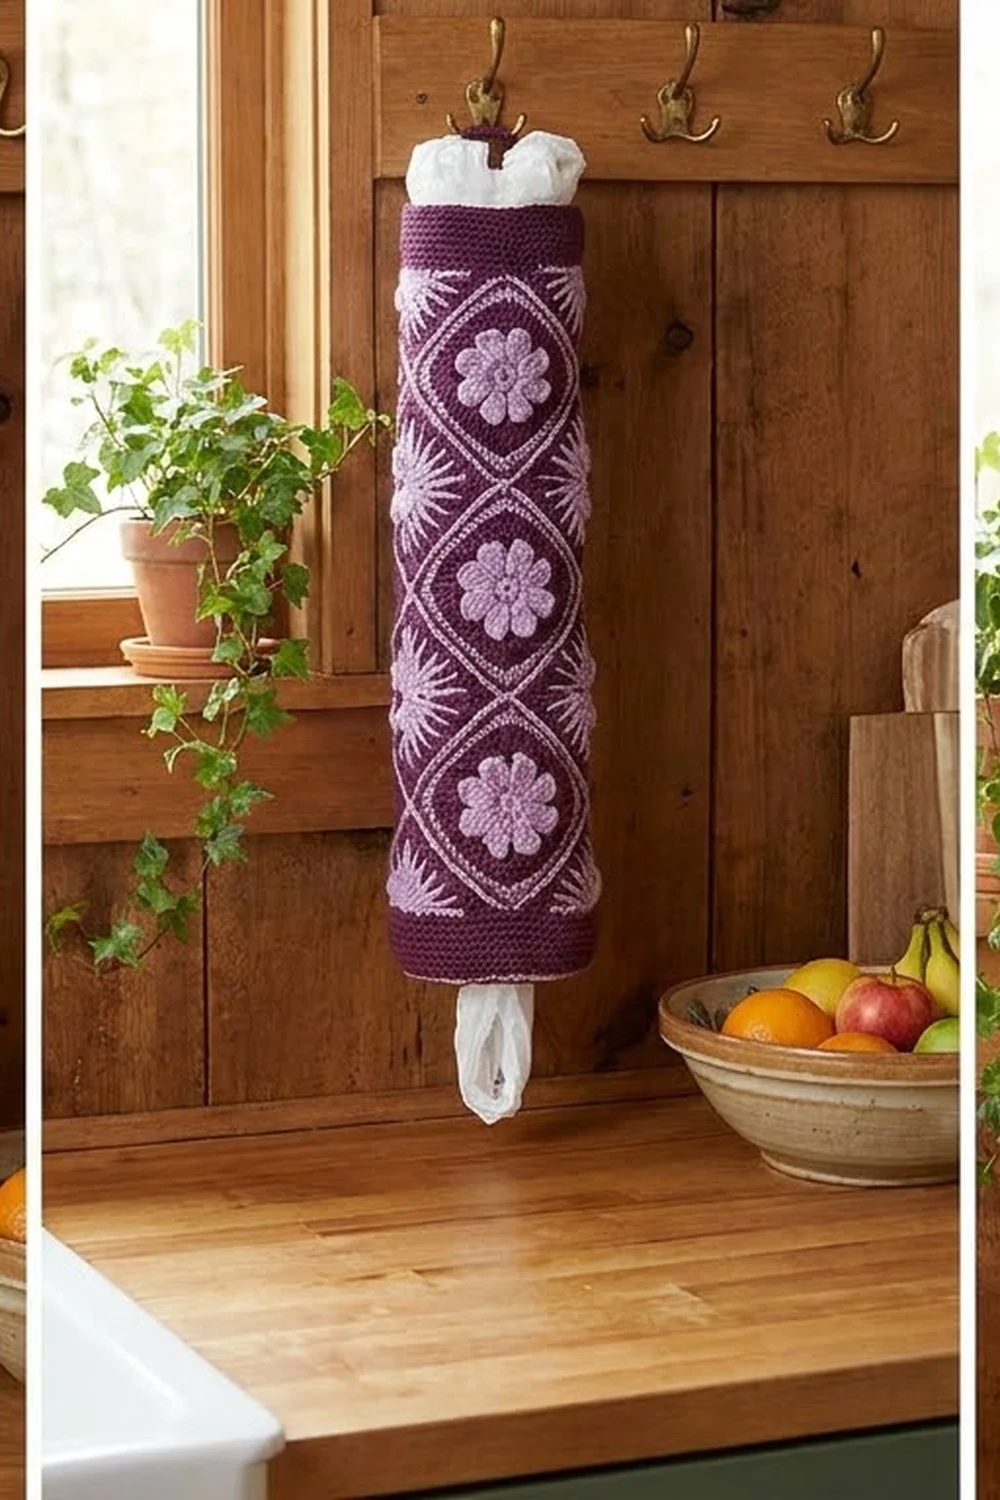
The Lavender Bloom Bag Holder is a tall, slim tube made of flower granny squares set on point, so each motif looks like a diamond. Every square has a raised lavender flower on a plum ground and a ring of lavender ridges that looks like a small sunburst. Plum outlines connect all the diamonds into one lattice.
The colors are deep plum and soft lavender, in a practical cottage-kitchen style. The holder hangs from a strap. You push bags in through the top and pull them out one at a time through the small opening at the bottom.
This pattern uses US crochet terms. The finished holder is 4.95 in (12.6 cm) wide when flat and 21.8 in (55.4 cm) long, plus a 6 in (15.2 cm) strap.
To make it, crochet 14 squares and 4 half-square triangles and join them edge to edge into a tube. Then work a top band with a strap and a bottom band that draws in to form the opening.
Finished Size and Construction
- Finished size: 4.95 in (12.6 cm) wide flat x 21.8 in (55.4 cm) long, plus a 6 in (15.2 cm) strap
- Skill level: Intermediate
- Terminology: US
- Yarn weight: #4 worsted
- Hook: 4.5 mm (US 7)
- Number of pieces: 14 squares + 4 triangles, joined into one tube
- Layout: 7 tiers of 2 squares each, set on point and offset by tier
- Piece size: 3.5 in (8.9 cm) square; diagonal 4.95 in (12.6 cm)
- Size before border: 4.95 in (12.6 cm) flat x 19.8 in (50.3 cm); circumference 9.9 in (25.1 cm)
- Border depth: 1 in (2.5 cm) at the top and 1 in (2.5 cm) at the bottom
Materials
Use a smooth worsted cotton or cotton blend. Cotton keeps its shape when the holder is stuffed full, and it shows the raised flowers clearly. Acrylic also works, but it stretches more in length.
- Color A, plum: 100 g (about 190 m)
- Color B, lavender: 70 g (about 135 m)
Tools:
- 4.5 mm (US 7) crochet hook
- Yarn needle
- Stitch markers (at least 4)
- Scissors
- Blocking mat, rust-proof pins, and a spray bottle or steamer
- A bath towel for final blocking
The quantities include a margin of about 15 percent for swatching and weaving in ends.
Abbreviations (US Terms)
- ch = chain
- sl st = slip stitch
- sc = single crochet
- hdc = half double crochet
- dc = double crochet
- FPdc = front post double crochet
- sc2tog = single crochet 2 together
- sp = space
- st(s) = stitch(es)
- RS / WS = right side / wrong side
Petal (special stitch): (hdc, 3 dc, hdc) all in the same stitch.
FPdc: Yarn over, insert the hook from front to back to front around the post of the stitch, and complete a dc.
Gauge and Checkpoints
Gauge: 15 sc = 3.5 in (8.9 cm). One finished square measures 3.5 in (8.9 cm) per side after light blocking.
Make one full square first and measure it at each checkpoint:
- After Round 2: 1.75 in (4.4 cm) from petal tip to petal tip
- After Round 4: 2.75 in (7.0 cm) per side
- After Round 5: 3.25 in (8.3 cm) per side
- After Round 6: 3.5 in (8.9 cm) per side
Stay within 0.125 in (0.3 cm) of each measurement. If your square is too big, go down half a hook size. If it’s too small, go up half a size. Don’t change any stitch counts, because the bands are based on 15 sts per side.
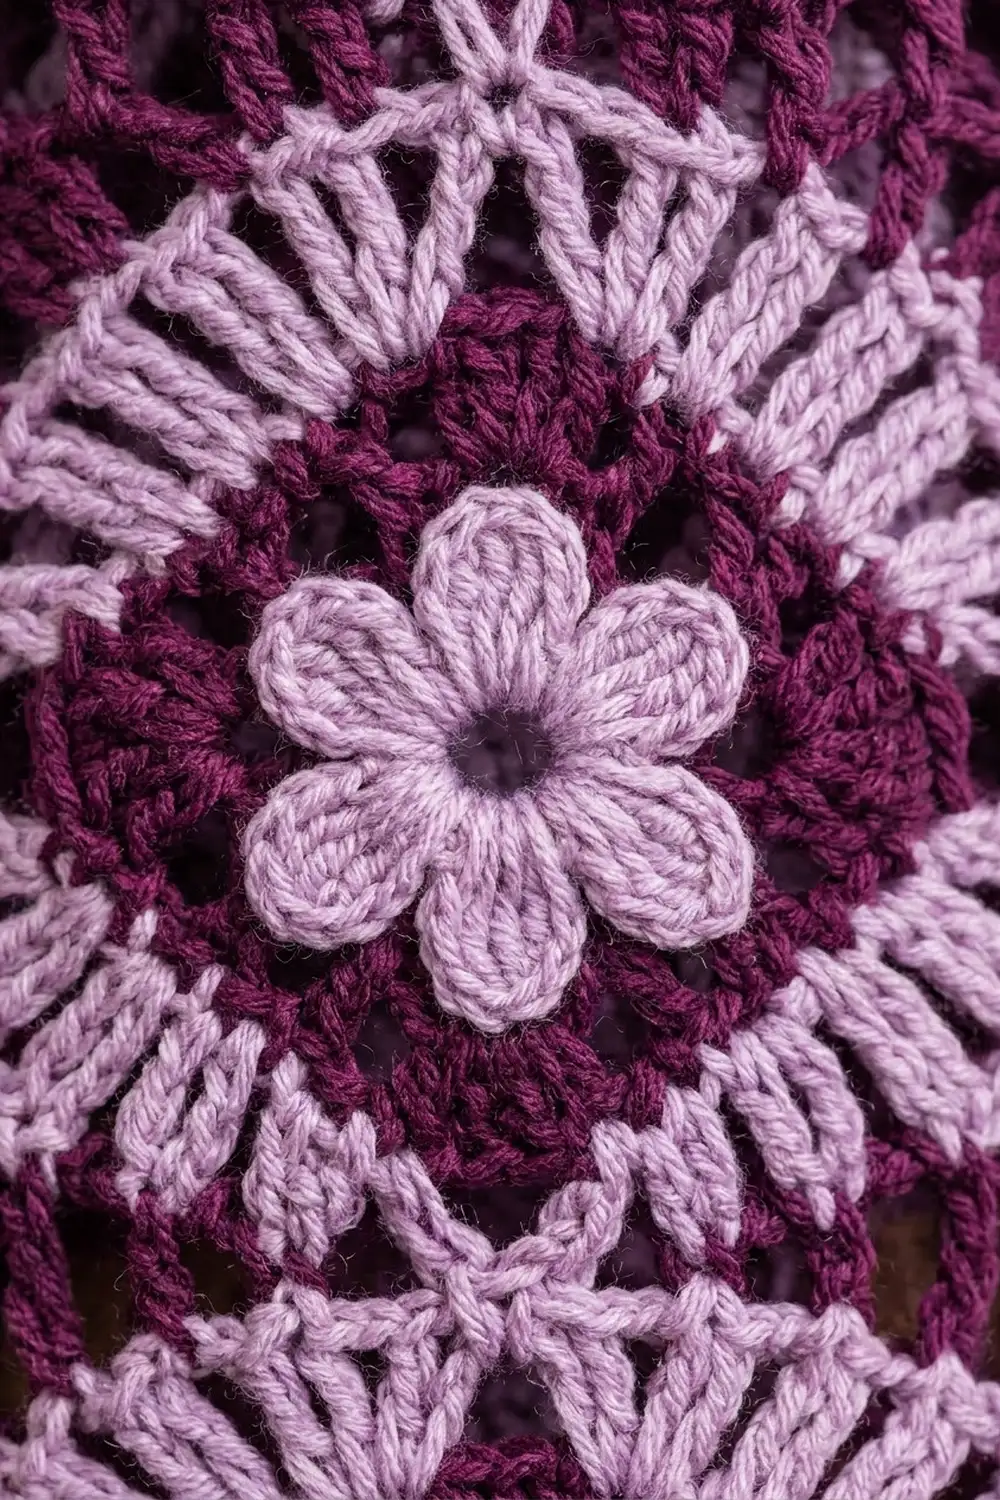
Flower Square (make 14)
Work in rounds with the RS facing. Do not turn.
Round 1 (B): Make a magic ring. Ch 1 and work 16 sc in the ring. Join with a sl st to the first sc. (16 sc)
Round 2 (B): *Sl st in the next sc, petal in the next sc; repeat from * 7 more times. Join with a sl st to the first sl st. (8 petals) Fasten off B.
Round 3 (A): Working behind the petals, join A with a sl st around the back of any sl st between petals. *Ch 4, sl st around the back of the next sl st between petals; repeat from * 7 more times, placing the last sl st in the joining st. (8 ch-4 loops) The petals now sit in front of the loops, which keeps the flower raised.
Round 4 (A): Sl st into the first ch-4 loop. Ch 3 (counts as dc), then (2 dc, ch 2, 3 dc) in the same loop to make a corner. *3 dc in the next loop (side), (3 dc, ch 2, 3 dc) in the next loop (corner); repeat from * 2 more times, then 3 dc in the last loop. Join to the top of the ch 3. (36 dc: 9 dc per side, plus 4 ch-2 corner sps) Fasten off A.
Each side gets 3 dc from one corner, 3 dc from the side loop, and 3 dc from the next corner, for a total of 9.
Round 5 (B): Join B in any corner ch-2 sp. Ch 3 (counts as dc), then (dc, ch 2, 2 dc) in the same sp. *FPdc around each of the next 9 dc, (2 dc, ch 2, 2 dc) in the corner sp; repeat from * 2 more times, then FPdc around each of the last 9 dc. Join to the top of the ch 3. (52 sts: 13 per side, plus 4 ch-2 corner sps) Fasten off B.
Each side has 2 corner dc, 9 FPdc, and 2 corner dc, for a total of 13. The raised FPdc ridges spread out from the flower and form the lavender sunburst frame.
Round 6 (A): Join A in any corner ch-2 sp. Ch 1, then (sc, ch 2, sc) in the same sp. *Sc in each of the next 13 sts, (sc, ch 2, sc) in the corner sp; repeat from * 2 more times, then sc in each of the last 13 sts. Join to the first sc. (60 sc: 15 per side, plus 4 ch-2 corner sps) Fasten off and leave a 6 in (15.2 cm) tail.
Each side has 1 corner sc, 13 sc, and 1 corner sc, for a total of 15. That count includes both corner sc. The ch-2 sps sit between the sides and are not counted.
Weave in the B tails. Pin each square to 3.5 in (8.9 cm), mist it, and let it dry before joining.
Half-Square Triangle (make 4)
The triangles fill the notches at the top and bottom of the tube. Each one is worked in rows, starting from the middle of the long edge. The two short legs match a square side, and the long edge becomes the base for the band.
Row 1 (A): Make a magic ring. Ch 3 (counts as dc), then (3 dc, ch 2, 4 dc) in the ring. Turn. (8 dc: 4 per leg)
Row 2 (A): Ch 3 (counts as dc), dc in the first st. Dc in each st to the corner, (2 dc, ch 2, 2 dc) in the ch-2 sp, dc in each st to the last st, then 2 dc in the top of the turning ch. Turn. (14 dc: 7 per leg)
Row 3 (B): Change to B. Ch 3, dc in the first st, dc to the corner, (2 dc, ch 2, 2 dc) in the ch-2 sp, dc to the last st, then 2 dc in the last st. Fasten off B. Do not turn. Rejoin A in the first st of the row. (20 dc: 10 per leg)
Row 4 (A): Ch 3, dc in the first st, dc to the corner, (2 dc, ch 2, 2 dc) in the ch-2 sp, dc to the last st, then 2 dc in the last st. Turn. (26 dc: 13 per leg)
Row 5 (A): Ch 1, 2 sc in the first st, sc to the corner, (sc, ch 2, sc) in the ch-2 sp, sc to the last st, then 2 sc in the last st. (30 sc: 15 per leg) Fasten off and leave a 6 in (15.2 cm) tail.
Each dc row adds 3 sts per leg: 1 end increase plus 2 corner dc. Row 5 adds 1 end increase plus 1 corner sc, so 13 + 2 = 15. The legs measure 3.5 in (8.9 cm), the long edge measures 4.95 in (12.6 cm), and the triangle is about 2.5 in (6.4 cm) tall.
Make All Pieces
- 14 squares: Rounds 1, 2, and 5 in B; Rounds 3, 4, and 6 in A
- 4 triangles: Rows 1, 2, 4, and 5 in A; Row 3 in B
In this layout, the tube is cut open and laid flat. The positions go around the tube, and the dots are empty places.
Position:   Front   Right   Back    Left
Top:          .       T1      .       T2
Tier 1:      S1       .      S2       .
Tier 2:       .      S3       .      S4
Tier 3:      S5       .      S6       .
Tier 4:       .      S7       .      S8
Tier 5:      S9       .      S10      .
Tier 6:       .      S11      .      S12
Tier 7:      S13      .      S14      .
Bottom:       .       T3      .       T4
Every square sits on point. Its two upper edges join the two squares diagonally above it, and its two lower edges join the two squares diagonally below it. The Left column wraps around and meets the Front column. From the front, you see 4 full diamonds down the center and a half-diamond at each side fold.
Joining
Method: Whipstitch with A and a yarn needle, going through the outer loops only. This leaves a thin, flat plum line on the RS.
Stitch-to-stitch logic: Lay two edges side by side with the RS facing up. Start in the matching corner ch-2 sps, join 15 sc to 15 sc one stitch at a time, and finish in the next pair of corner sps. Don’t add or skip any stitches. The triangle legs also have 15 sc, so they join the same way.
Order:
- Join S3 to the lower-right edge of S1 and the lower-left edge of S2.
- Join S4 to the lower-right edge of S2 and the lower-left edge of S1. This closes the first ring.
- Set each square of the next tier into the V between two squares above it, and join both of its upper edges. Continue down through Tier 7.
- Set T1 and T2 into the top notches with the long edge facing up, and T3 and T4 into the bottom notches with the long edge facing down. Join both legs of each triangle.
That’s 32 seams in total: 24 for the squares in Tiers 2 to 7 and 8 for the triangles.
Tension: Pull each stitch just snug enough to close the gap. If you pull too tight, the diamonds will pucker. Where four corners meet, take one extra stitch through all four ch-2 sps.
Checkpoint: Flatten the tube and measure it. It should be 4.95 in (12.6 cm) wide, 19.8 in (50.3 cm) long from the top long edges to the bottom long edges, and 9.9 in (25.1 cm) around.
Border
Border gauge: 42 sc around 9.9 in (25.1 cm), which is 21 sc per flat side. This matches the 15 sc = 3.5 in (8.9 cm) gauge.
Pick-up per unit: The long edge of each triangle has 10 row ends: 2 sc row ends and 8 dc row ends, with the magic ring in the center. Work 1 sc in each sc row end (2 sc), 2 sc in each dc row end (16 sc), and 2 sc in the ring (2 sc), for 20 sc. Add 1 sc in the square tip next to it, which gives 21 sc per unit. Each edge of the tube has 2 units, so 2 x 21 = 42.
Top Band
Round 1 (A): With the RS facing, join A at the tip of S1. Ch 1 and sc in the same tip. Pick up 20 sc along T1, 1 sc in the tip of S2, and 20 sc along T2. Join. (42 sc: 21 per flat side)
Round 2 (B): Join B. Ch 3 (counts as dc), then dc in each st around. Join. (42 dc) Fasten off B.
Round 3 (A): Join A. Ch 1, then sc in each st around. Join. (42 sc) Do not fasten off.
The band is 1 in (2.5 cm) deep.
Strap: Flatten the tube with S1 centered at the front. Mark the side folds at st 11 and st 32 of Round 3. Sl st across to st 11. Ch 26, sl st in st 32, then sl st in the next st. Turn. Sc in each of the 26 ch, sl st in st 11, and fasten off. The strap is 6 in (15.2 cm) long.
Bottom Band
Round 1 (A): Join A at the tip of S13. Ch 1 and sc in the tip. Pick up 20 sc along T3, 1 sc in the tip of S14, and 20 sc along T4. Join. (42 sc)
Round 2 (B): Ch 1, *sc in each of the next 5 sts, sc2tog; repeat from * 5 more times. Join. (36 sts) Fasten off B.
Round 3 (A): Join A. Ch 1, *sc in each of the next 4 sts, sc2tog; repeat from * 5 more times. Join. (30 sts)
Round 4 (A): Ch 1, *sc in each of the next 3 sts, sc2tog; repeat from * 5 more times. Join. (24 sts)
Round 5 (A): Ch 1, then sc in each st around. Join. (24 sc) Fasten off.
The opening is 5.6 in (14.2 cm) around, or about 1.8 in (4.6 cm) across. The band is 1 in (2.5 cm) deep.
Why the math works: The gauge is 15 sc per 3.5 in (8.9 cm), so the 4.95 in (12.6 cm) long edge of each triangle needs about 21 sc. Each pick-up unit gives exactly 21 sc. Because the count matches the edge length, the bands lie flat without ruffling or cupping.
Final Blocking
- Weave in all remaining tails along the seam lines.
- Roll a bath towel to about 3.2 in (8.1 cm) across.
- Slide the holder over the towel with the strap at the top.
- Mist or steam lightly. Don’t press, because pressing flattens the petals and the ridges.
- Shape each diamond by hand and line up the centers of S1, S5, S9, and S13.
- Check that the length is 21.8 in (55.4 cm).
- Let it dry completely before hanging.
Final Quality-Control Checklist
- 14 squares and 4 triangles, each with 15 sc per side or leg
- Every flower sits raised in front of the plum loops
- The FPdc ridges are on the RS of every square
- 32 seams, with no gaps at the four-corner points
- Flat width of 4.95 in (12.6 cm)
- Top band rounds have 42 sts each
- Bottom band ends with 24 sc
- Strap ends are secure at the side folds
- Total length of 21.8 in (55.4 cm), plus the 6 in (15.2 cm) strap
Troubleshooting
Square cups: Your Round 4 is too tight. Go up half a hook size for Rounds 4 and 5.
Square ruffles: Count Round 5. Each side needs exactly 9 FPdc.
Flower lies flat: The Round 3 sl sts must go behind the petals, not into their tops.
Gaps at the points: Add one more whipstitch through all the corner sps that meet there.
Top band flares: Recount your pick-up. Each unit should have exactly 21 sc.
Bottom opening too loose: Add a round of sc 2, sc2tog to bring it down to 18 sc.
Care
Hand wash in cool water and roll the holder in a towel to remove water. Dry it over a rolled towel to keep the tube shape, and don’t tumble dry.
Final Notes
The measurements build from one gauge:
- 15 sc make 3.5 in (8.9 cm), so each square has a 4.95 in (12.6 cm) diagonal.
- Two diagonals make the 9.9 in (25.1 cm) circumference.
- Four diagonals make the 19.8 in (50.3 cm) body.
- Two 1 in (2.5 cm) bands bring the total length to 21.8 in (55.4 cm).
- The bands start with 42 sc because each triangle unit gives 21.
To make the reversed version, swap the colors so the ground is lavender and the flowers are plum. All the stitch counts stay the same.
Happy crocheting!