

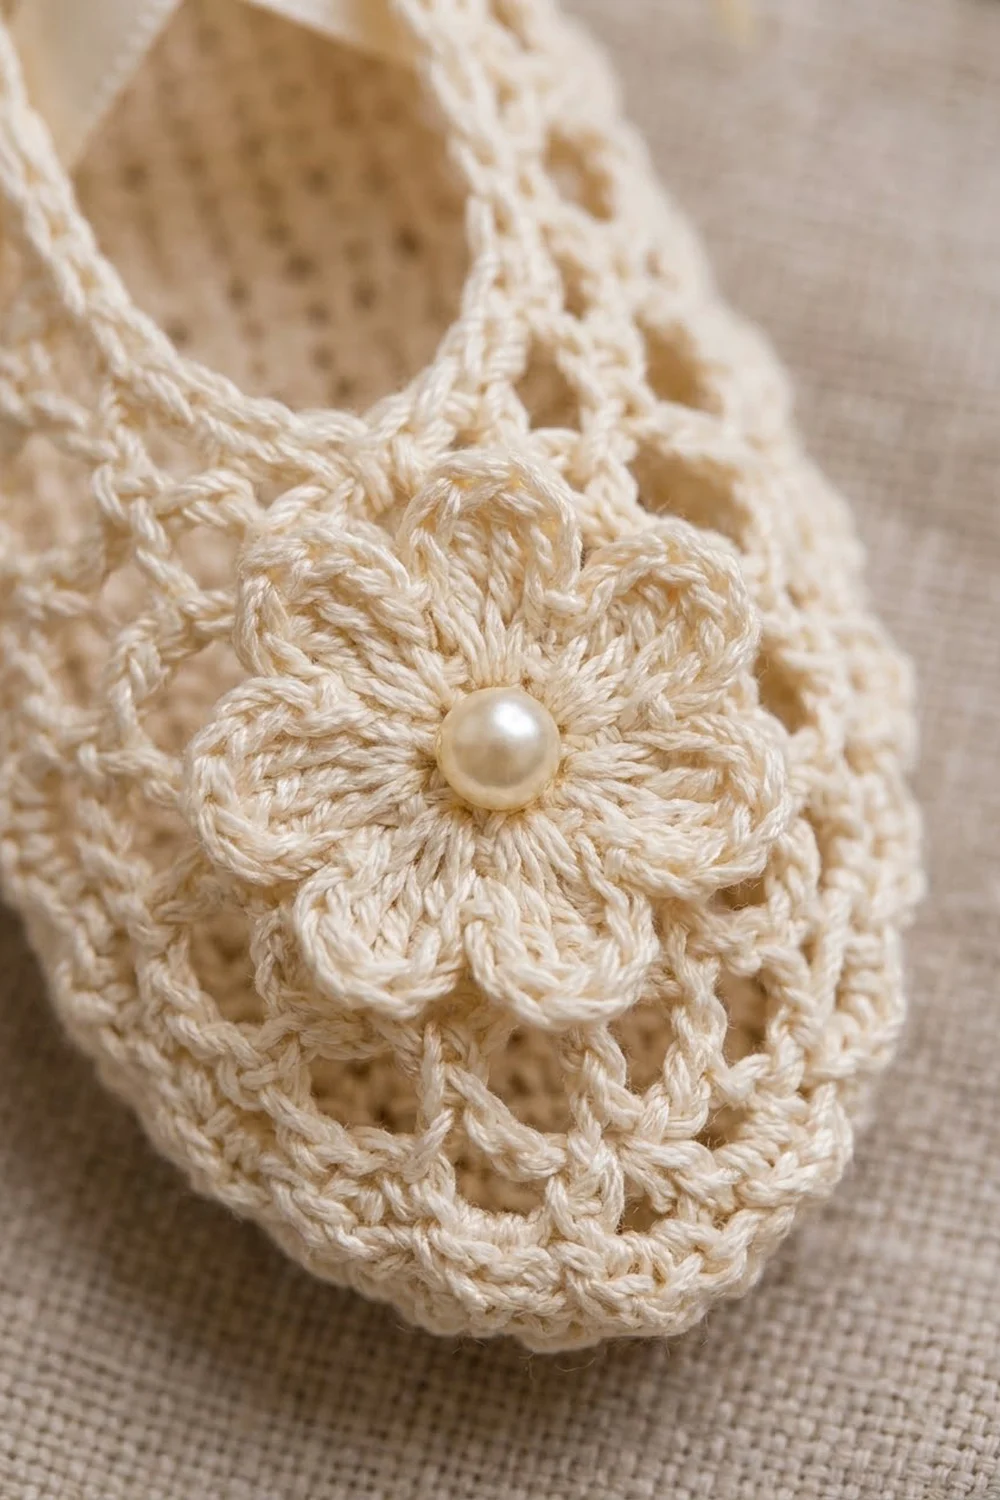
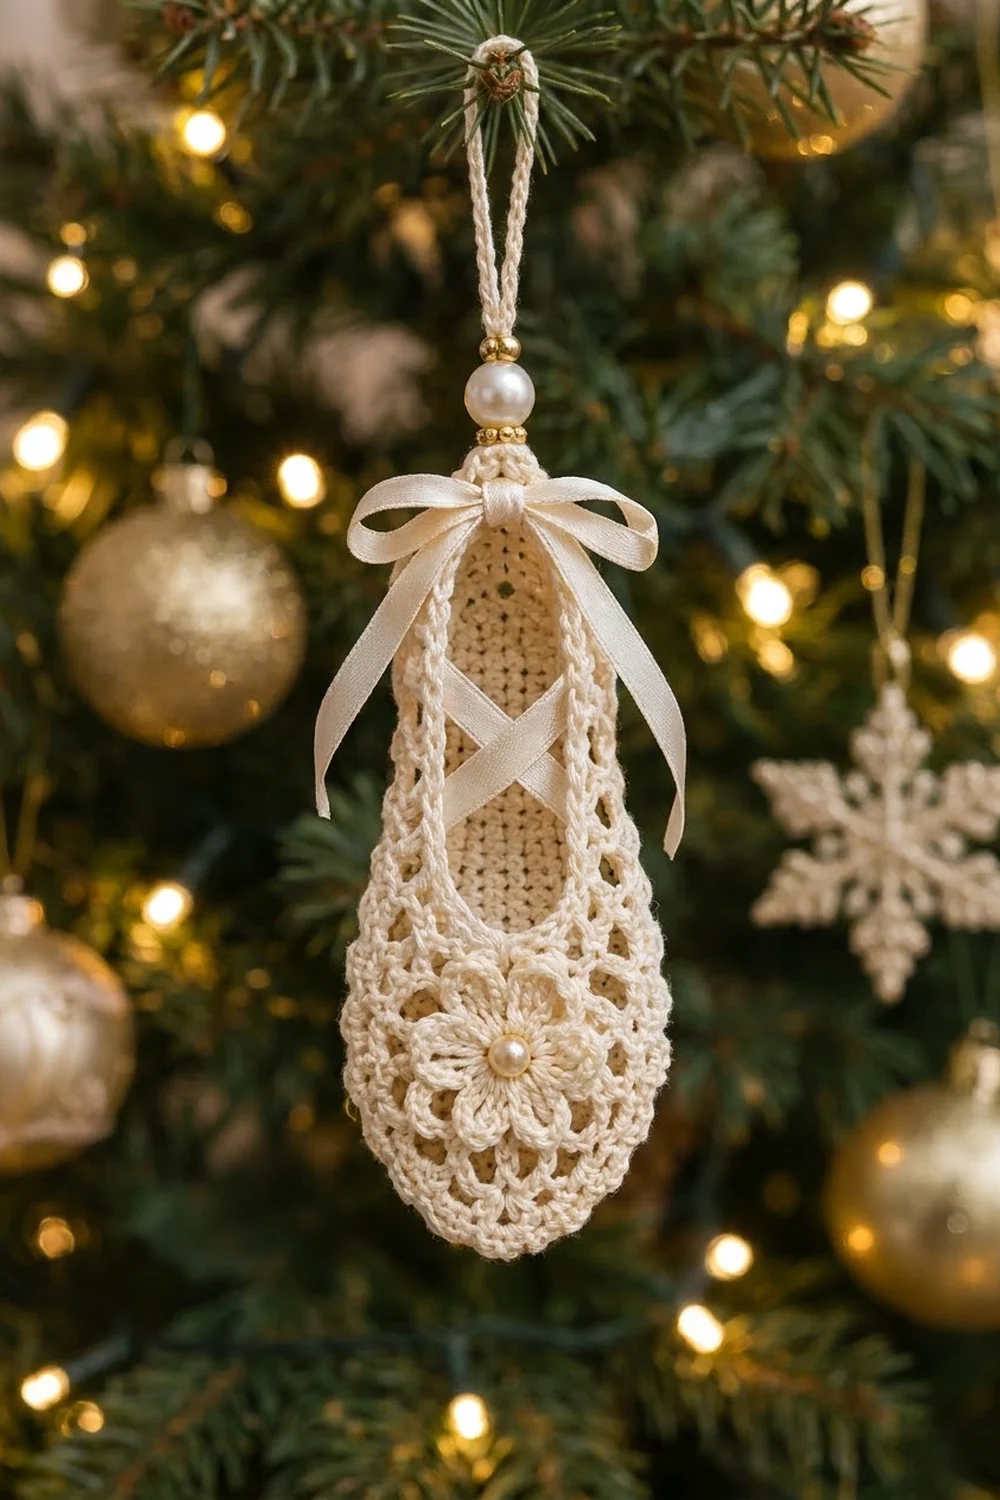
The Pearl Pointe Ballet Slipper is a small lace ornament. It has a solid sole, an open mesh upper, a rope-textured rim, and a six-petal flower with a pearl center on the toe. A satin ribbon crosses the opening and ties in a bow at the heel. The slipper hangs from a crocheted cord loop above a pearl bead.
Everything is soft ivory: the cotton thread, the satin ribbon and the pearls, with two small gold beads as accents. It looks vintage on a green tree and also works as a gift topper for a dancer.
This pattern uses US crochet terms. The finished slipper measures 3.8 in (9.7 cm) long, 1.5 in (3.8 cm) wide and 0.8 in (2.0 cm) tall at the sides. With the beads and hanging loop it is about 6.5 in (16.5 cm) long overall.
You start with an oval sole worked in rounds. A back-loop round turns the edge up, two mesh rounds form the sides, and four short rows build the toe cap (vamp). A two-round border finishes the opening, then you add the flower, ribbon and hanger.
Finished Size and Construction
- Finished size: 3.8 in (9.7 cm) long x 1.5 in (3.8 cm) wide x 0.8 in (2.0 cm) tall at the sides
- Overall length with hanger: about 6.5 in (16.5 cm)
- Skill level: Intermediate (thread crochet, rounds and short rows)
- Terminology: US
- Thread weight: Size 10 cotton crochet thread (lace weight)
- Hook: 1.75 mm steel hook
- Number of pieces: 1 slipper body + 1 small flower appliqué, made into one ornament
- Layout: single ornament, no joining
- Sole size: 3.8 in (9.7 cm) x 1.5 in (3.8 cm)
- Side height before border: 0.6 in (1.5 cm)
- Border depth: 0.2 in (0.5 cm), 2 rounds
Materials
Use mercerized size 10 cotton thread. It holds the lace shape well and takes starch evenly. Choose ivory rather than bright white so the thread matches the ribbon and pearls.
- Ivory size 10 cotton thread: 6 g (about 31 m / 34 yd)
- Ivory satin ribbon, 1/4 in (0.6 cm) wide: 20 in (50.8 cm)
- Pearl bead, 8 mm: 1 (hanger)
- Gold round beads, 3 mm: 2 (above and below the large pearl)
- Pearl bead, 4 mm: 1 (flower center)
Tools:
- 1.75 mm steel crochet hook
- Fine tapestry needle and a beading needle
- Ivory sewing thread
- Stitch markers (4)
- Scissors
- Fabric starch, blocking mat and rustproof pins
- Plastic wrap and cotton wool for shaping
The thread quantity includes a margin of about 20 percent for the swatch and tails.
Abbreviations (US Terms)
- ch – chain
- sl st – slip stitch
- sc – single crochet
- hdc – half double crochet
- dc – double crochet
- st(s) – stitch(es)
- sk – skip
- BLO – back loop only
- inc – 2 sc in the same st
- rnd(s) – round(s)
- RS – right side
Special stitch – reverse single crochet (rev sc): Work from left to right (right-handed). Insert the hook into the next st to the right, yarn over, pull up a loop, yarn over and pull through both loops. This makes the twisted, rope-like rim.
Gauge and Checkpoints
Gauge: 10 sc and 10 rows = 1 in (2.5 cm) with a 1.75 mm hook.
The sole is your test piece. Make it first and check it before you start the upper.
Checkpoints:
- Foundation chain: 24 working ch measure about 2.4 in (6.1 cm).
- After Rnd 1: about 2.6 in (6.6 cm) long and 0.3 in (0.8 cm) wide.
- After Rnd 4: about 3.2 in (8.1 cm) long and 0.9 in (2.3 cm) wide.
- After Rnd 7: 3.8 in (9.7 cm) long and 1.5 in (3.8 cm) wide, lying flat.
- After Rnd 10: sides stand about 0.6 in (1.5 cm) tall.
- After the vamp: the toe cap covers about 1 in (2.5 cm) of the toe end.
If the sole is too big, change to a 1.5 mm hook. If it is too small, change to a 2 mm hook.
Sole
Each round starts with ch 1 (does not count as a st) and ends with a sl st to the first sc. The heel stitches are split between the start and end of every round. Counts are shown as heel (start) + side A + toe + side B + heel (end).
Foundation: Ch 25.
Rnd 1: Sc in 2nd ch from hook (heel), sc in next 22 ch (side A), 3 sc in last ch (toe). Working along the other side of the chain, sc in next 22 ch (side B), 2 sc in last ch (heel), join. (50 sts: 1 + 22 + 3 + 22 + 2)
Rnd 2: Inc in first st, sc in next 22 sts, inc in each of next 3 sts, sc in next 22 sts, inc in each of last 2 sts, join. (56 sts: 2 + 22 + 6 + 22 + 4)
Rnd 3: Sc in first st, inc in next st, sc in next 22 sts, (sc in next st, inc) 3 times, sc in next 22 sts, (sc in next st, inc) 2 times, join. (62 sts: 3 + 22 + 9 + 22 + 6)
Rnd 4: Sc in next 2 sts, inc, sc in next 22 sts, (sc in next 2 sts, inc) 3 times, sc in next 22 sts, (sc in next 2 sts, inc) 2 times, join. (68 sts: 4 + 22 + 12 + 22 + 8)
Rnd 5: Sc in next 3 sts, inc, sc in next 22 sts, (sc in next 3 sts, inc) 3 times, sc in next 22 sts, (sc in next 3 sts, inc) 2 times, join. (74 sts: 5 + 22 + 15 + 22 + 10)
Rnd 6: Sc in next 4 sts, inc, sc in next 22 sts, (sc in next 4 sts, inc) 3 times, sc in next 22 sts, (sc in next 4 sts, inc) 2 times, join. (80 sts: 6 + 22 + 18 + 22 + 12)
Rnd 7: Sc in next 5 sts, inc, sc in next 22 sts, (sc in next 5 sts, inc) 3 times, sc in next 22 sts, (sc in next 5 sts, inc) 2 times, join. (86 sts: 7 + 22 + 21 + 22 + 14)
Each round adds 3 sts at each end, so both ends stay round. The heel has 21 sts (7 + 14) and the toe has 21 sts. The toe tip is the 11th toe st, which is st 40 of the round.
Upper
Rnd 8 (turning round): Ch 1, sc in BLO of each st around, join. (86 sts)
The unworked front loops form a neat ridge where the sole meets the sides.
Rnd 9 (mesh): Ch 1, sc in first st, (ch 4, sk 1 st, sc in next st) 42 times, ch 4, sk last st, join to first sc. (43 ch-4 loops)
The sc anchors land on the odd-numbered sts. Loop 20 spans sts 39 to 41, so it is centered on the toe tip. Mark it.
Rnd 10 (mesh): Sl st in first 2 ch, ch 1, sc in same loop, (ch 4, sc in next loop) 42 times, ch 4, join to first sc. (43 ch-4 loops)
The sc worked into Rnd 9 Loop 20 is the toe-tip sc. Move the marker to it and fasten off. The sides now stand about 0.6 in (1.5 cm) tall.
Vamp (Toe Cap)
The vamp is worked in short rows over the 12 Rnd 10 loops centered on the toe. Counting Rnd 10 loops from the round start, the toe-tip sc sits between Loop 19 and Loop 20. Work into Loops 14 to 25 (6 loops on each side).
Row 1 (RS): Join with sc in Rnd 10 Loop 14, (ch 4, sc in next loop) 11 times, ending in Loop 25, turn. (12 sc, 11 ch-4 loops)
The 6th new loop sits over the toe-tip sc, with 5 loops on each side.
Row 2: Sl st in first 2 ch, ch 1, sc in same loop, (ch 4, sc in next loop) 10 times, turn. (11 sc, 10 ch-4 loops)
Row 3: Sl st in first 2 ch, ch 1, sc in same loop, (ch 4, sc in next loop) 9 times, turn. (10 sc, 9 ch-4 loops)
Row 4: Sl st in first 2 ch, ch 1, sc in same loop, (ch 4, sc in next loop) 8 times. (9 sc, 8 ch-4 loops) Fasten off.
Each row starts and ends half a loop in, so the vamp loses 1 loop per row and curves over the toe. Row 4 lies across the top of the foot, about 1.6 in (4.1 cm) wide.
Border
Border gauge: 2 sc per ch-4 loop and 2 sc per vamp row-end.
Rnd 1: With RS facing, join with sc in the first free Rnd 10 loop after the vamp (Loop 26). Work around the opening:
- Free mesh (sides and heel): 2 sc in each free Rnd 10 loop (Loops 26 to 43 and 1 to 13): 31 loops x 2 = 62 sc
- First vamp edge: 2 sc in each of 4 row-ends = 8 sc
- Vamp top: 2 sc in each Row 4 loop: 8 loops x 2 = 16 sc
- Second vamp edge: 2 sc in each of 4 row-ends = 8 sc
Join to first sc. (94 sts: 62 + 8 + 16 + 8)
Rnd 2: Ch 1, rev sc in each st around, join. (94 rev sc) Fasten off.
Why the math works: each ch-4 loop spans 2 sts of Rnd 8, which is 0.2 in (0.5 cm) at gauge. Two sc also measure 0.2 in (0.5 cm), so the rim lies true along the sides and heel. Each vamp row-end is about 0.25 in (0.6 cm) tall, so 2 sc there pull the vamp corners in slightly and the opening hugs the slipper. Rnd 2 keeps the same 94 sts, so it adds depth but no width.
Flower Appliqué
Foundation: Ch 4, sl st to first ch to form a ring.
Rnd 1: Ch 1, 12 sc in ring, join. (12 sts) It measures about 0.4 in (1.0 cm) across.
Rnd 2: Ch 1, sc in first st, ch 3, sk 1 st, (sc in next st, ch 3, sk 1 st) 5 times, join. (6 sc, 6 ch-3 loops)
Rnd 3: In each ch-3 loop work (sc, hdc, 3 dc, hdc, sc), join. (42 sts, 6 petals of 7 sts)
Fasten off, leaving a 10 in (25.4 cm) tail. The flower measures about 1 in (2.5 cm) across.
Sew the 4 mm pearl to the center. Center the flower on the vamp, about 0.5 in (1.3 cm) back from the toe tip. Sew it down through the Rnd 2 sc so the petals stay free.
Hanger, Beads and Ribbon
Hanger cord: Ch 45, sl st in back bump of 2nd ch from hook and each ch across. (44 sl sts) The cord is about 4.5 in (11.4 cm) long. Fold it in half and thread both ends through a gold bead, the 8 mm pearl and the second gold bead. Sew the ends to the heel center at the border. The loop above the beads is about 2.25 in (5.7 cm) tall.
Ribbon: At both vamp corners, pass the ribbon from the inside to the outside so its middle stays hidden under the vamp edge. Cross the ends once over the middle of the opening to make the X. On the opposite side, weave each end through a side mesh loop about 0.75 in (1.9 cm) from the heel. Bring both ends to the heel center below the beads, tie a bow, and trim the tails at an angle.
Final Blocking
- Weave in all thread ends but don’t trim them close yet.
- Untie the bow, or keep the ribbon dry while you work.
- Dip the slipper in medium-strength starch and squeeze out the excess in a towel.
- Stuff it firmly with cotton wool wrapped in plastic wrap. Shape the toe round.
- Pin the sole flat and check 3.8 in (9.7 cm) by 1.5 in (3.8 cm).
- Ease the sides up to 0.8 in (2.0 cm) and open each mesh loop with a pin tip.
- Let it dry completely, at least 12 hours.
- Remove the stuffing, trim the ends, and retie the bow.
Final Quality-Control Checklist
- Sole is 3.8 in (9.7 cm) x 1.5 in (3.8 cm) and lies flat.
- Rnd 8 ridge is even all the way around.
- Rnds 9 and 10 each have 43 loops.
- Vamp is centered on the toe tip, with 11, 10, 9 and 8 loops in Rows 1 to 4.
- Border Rnds 1 and 2 each have 94 sts.
- Sides are 0.8 in (2.0 cm) tall.
- Flower is centered and the pearl is secure.
- Ribbon X is centered and the bow is balanced.
- Ornament hangs straight.
Troubleshooting
Sole cups at the ends: Your increases are too tight. Go up a hook size or loosen your tension at the toe and heel.
Sole ruffles: You have extra sts. Check each round against the counts above.
Vamp sits off-center: Recount the Rnd 10 loops and confirm that Row 1 starts in Loop 14.
Rim flares: Work 2 sc per row-end, not 3. Check that Border Rnd 1 has 94 sts.
Slipper looks floppy: Starch it again with a stronger mix.
Slipper tilts when hung: Move the hanger exactly to the heel center.
Care
Hand wash gently in cool water, then re-starch and reshape it over plastic-wrapped cotton wool. Store it flat in tissue paper.
Final Notes
The measurement chain is short. At 10 sc per 1 in (2.5 cm), the 86-st sole measures 3.8 in (9.7 cm) x 1.5 in (3.8 cm). Rnd 8 keeps 86 sts and turns the edge up. Two mesh rounds of 43 loops build 0.6 in (1.5 cm) sides. The vamp narrows from 11 to 8 loops over the toe. The border works 2 sc per loop and per row-end for 94 sts, which brings the sides to 0.8 in (2.0 cm).
Happy crocheting!