

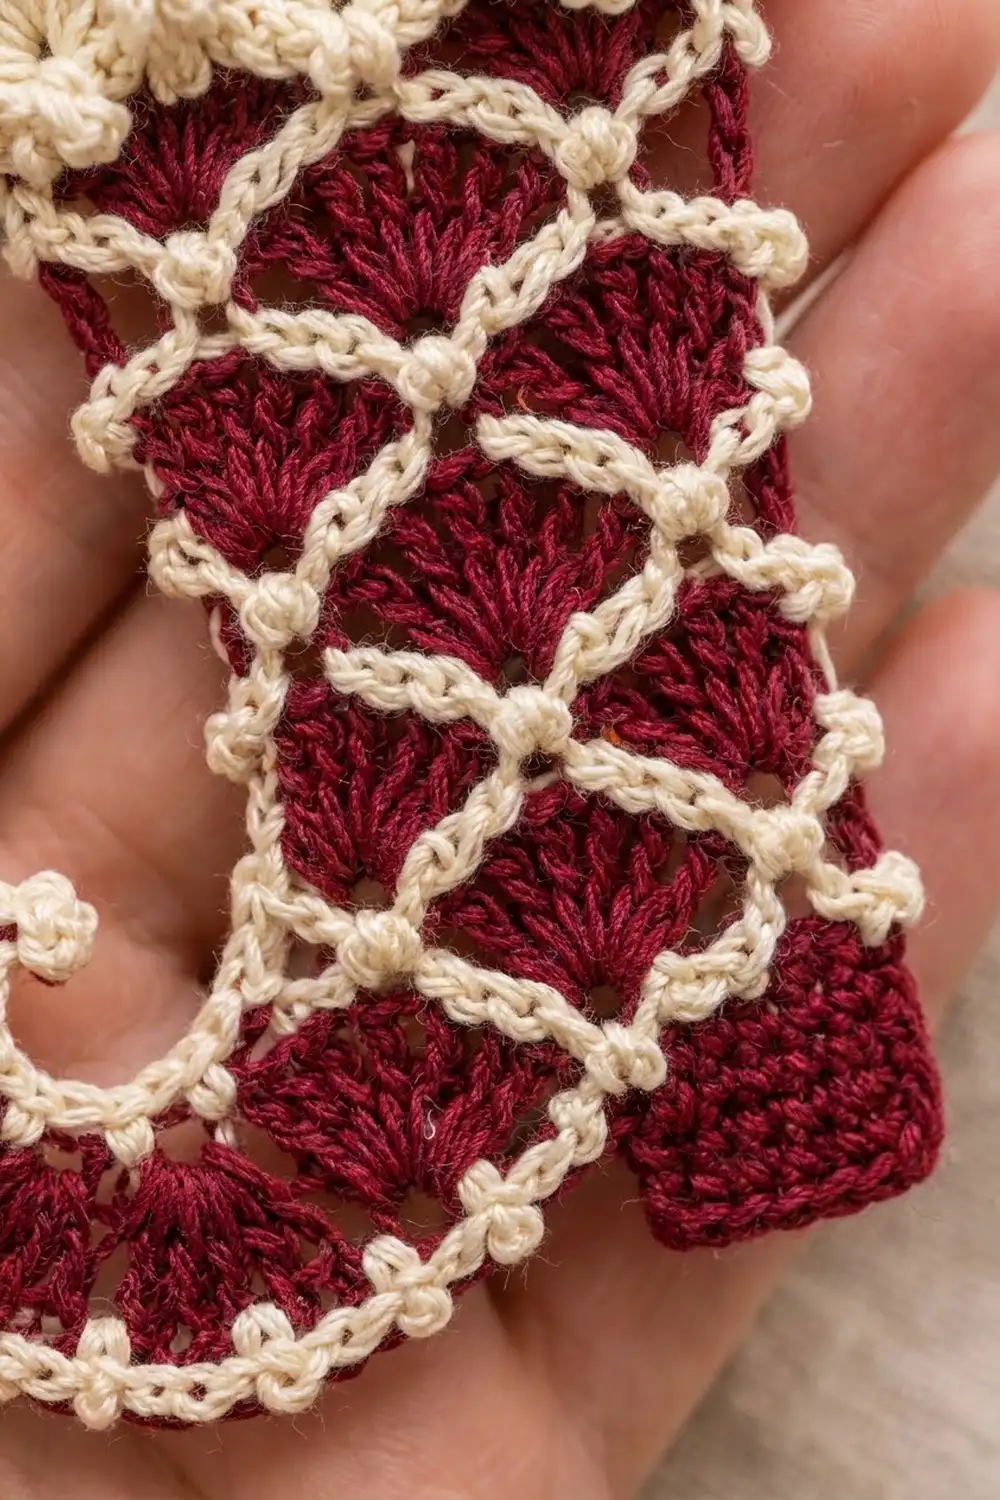
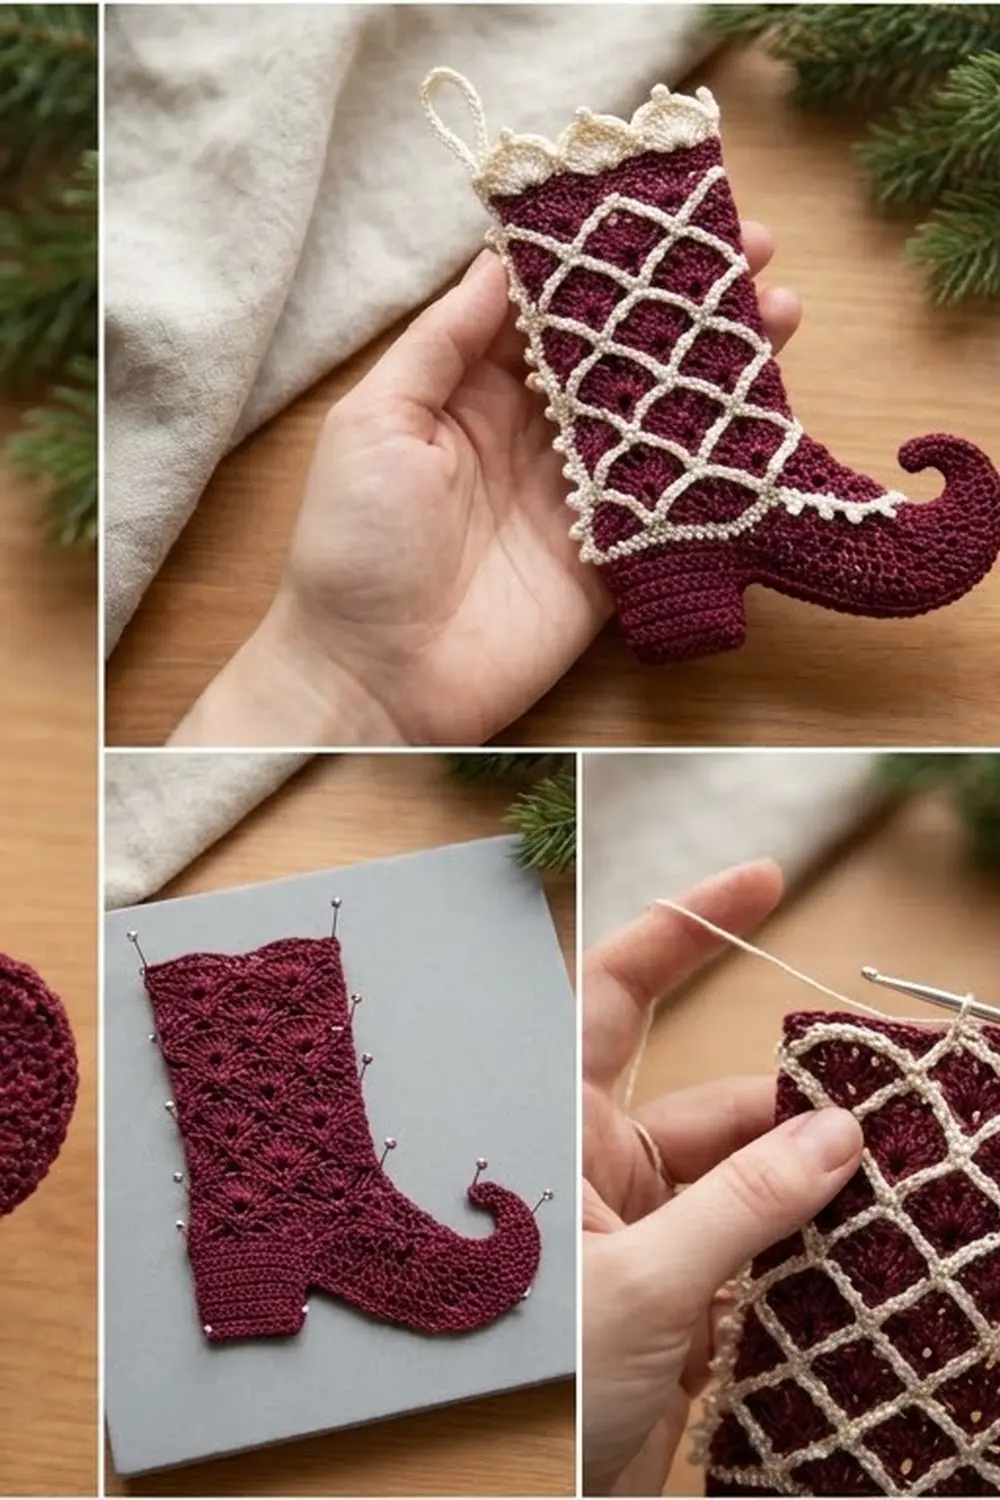
This little elf boot is a lacy ornament that looks finer than it is to make. The leg and foot are burgundy fans set inside a soft net. A cream lattice with tiny picot dots is worked over the net, so the boot looks almost like a stained-glass window.
The colors are classic Christmas: deep burgundy for the boot and creamy ivory for the lattice, outline, cuff, and hanging loop. The toe curls up into an elf-style spiral, and a small solid heel balances the shape.
This pattern uses US crochet terms. The finished ornament measures about 4.5 in (11.4 cm) tall from cuff top to heel bottom, about 5.5 in (14.0 cm) including the loop, and about 4 in (10.2 cm) wide at the foot.
You’ll work the boot flat in one piece. The leg is crocheted from the top down, a chain extends the foot toward the toe, and a few rows of single crochet form the heel. Then you add the toe curl, the cream lattice overlay, the picot border, the shell cuff, and the loop.
Finished Size and Construction
- Finished size: 4 in wide × 4.5 in tall (10.2 × 11.4 cm), plus a 1 in (2.5 cm) loop
- Skill level: Intermediate
- Terminology: US
- Yarn weight: Size 3 mercerized cotton crochet thread (Lace / #0)
- Hook: 2.0 mm
- Number of pieces: 1 (single ornament, no joining)
- Layout: Flat boot silhouette, toe pointing to one side
- Leg width before border: 2.3 in (5.8 cm), 25 sts
- Foot width before border: 3.8 in (9.7 cm), 41 sts
- Size before border: 3.8 in wide × 3.9 in tall (9.7 × 9.9 cm), body plus heel
- Border depth: 1/8 in (0.3 cm) per edge
- Cuff height: 0.5 in (1.3 cm)
Materials
Choose a smooth mercerized cotton thread. It shows the fans clearly and holds a crisp shape after blocking.
- Burgundy: about 8 g / 34 m
- Cream: about 6 g / 25 m
These quantities include a margin of roughly 20% for a gauge swatch and weaving in ends.
Tools:
– 2.0 mm crochet hook
– Tapestry needle
– Scissors
– Blocking mat and rustproof pins
– Spray bottle
– Optional: light spray starch
Abbreviations (US Terms)
- ch – chain
- sl st – slip stitch
- sc – single crochet
- hdc – half double crochet
- dc – double crochet
- sk – skip
- sp – space
- st(s) – stitch(es)
- RS / WS – right side / wrong side
Special stitches:
– Fan: 7 dc in the same st or sp.
– Half fan: 4 dc at a row edge (the turning ch-3 counts as the first dc when stated).
– Picot: ch 3, sl st in 3rd ch from hook.
Gauge and Checkpoints
Gauge: 1 fan repeat (8 sts) = 0.75 in (1.9 cm). One fan row plus one net row = 0.5 in (1.3 cm).
Test first by working Rows 1–5 of the leg. The swatch should measure 2.3 in (5.8 cm) wide × 1.1 in (2.8 cm) tall. You can keep this swatch and keep going as the real piece.
Checkpoints:
– After Row 9 (leg done): 2.3 in wide × 2.1 in tall (5.8 × 5.3 cm)
– After Row 14 (foot done): 3.8 in wide × 3.5 in tall (9.7 × 8.9 cm)
– After the heel: 3.9 in (9.9 cm) total height
– After the border and cuff: 4 in × 4.5 in (10.2 × 11.4 cm)
If your piece is too big, go down to a 1.75 mm hook. If it’s too small, go up to a 2.25 mm hook. Change the hook, not the stitch counts, because the border and cuff math depends on them.
Leg (Burgundy)
Work the leg from the top edge downward. Turn at the end of every row.
Foundation: Ch 26.
Row 1 (RS): Sc in 2nd ch from hook and in each ch across. Turn. (25 sc)
Row 2 (fan row): Ch 3 (counts as dc), 3 dc in first sc, sk 3 sc, sc in next sc, sk 3 sc, fan in next sc, sk 3 sc, sc in next sc; rep from * once more, sk 3 sc, 4 dc in last sc. Turn.
(25 sts: half fan, sc, fan, sc, fan, sc, half fan = 4 + 1 + 7 + 1 + 7 + 1 + 4)
Row 3 (net row A): Ch 1, sc in first dc, ch 5, sc in 4th dc of next fan, ch 5, sc in 4th dc of next fan, ch 5, sc in top of turning ch. Turn.
(4 sc, 3 ch-5 sps)
Row 4 (fan row): Ch 1, sc in first sc, fan in next ch-5 sp, sc in next sc; rep from * twice more. Turn.
(25 sts: 4 sc + 21 dc)
Row 5 (net row B): Ch 1, sc in first sc, ch 2, sc in 4th dc of next fan, ch 5, sc in 4th dc of next fan; rep from * once more, ch 2, sc in last sc. Turn.
(5 sc, 2 ch-2 sps, 2 ch-5 sps)
Row 6 (fan row): Ch 3 (counts as dc), 3 dc in ch-2 sp, sc in next sc, fan in next ch-5 sp, sc in next sc; rep from * once more, 3 dc in ch-2 sp, dc in last sc. Turn.
(25 sts: 1 + 3 + 1 + 8 + 8 + 3 + 1)
Rows 7–9: Repeat Rows 3–5. Don’t turn after Row 9.
Row 9 ends at the front edge of the leg, which is the side the toe will point toward. Check the leg: 2.3 × 2.1 in (5.8 × 5.3 cm).
Foot (Burgundy)
Extension chain: At the end of Row 9, ch 19. Turn.
Row 10 (fan row): 3 dc in 4th ch from hook (the skipped 3 ch count as a dc, which makes a half fan), sk 3 ch, sc in next ch, sk 3 ch, fan in next ch, sk 3 ch, sc in next ch, sk 3 ch. Now continue across the leg: fan in the last sc of Row 9 (at the base of the chain), sk the ch-2 sp, sc in next sc, fan in next ch-5 sp, sc in next sc; rep from * once more, 3 dc in ch-2 sp, dc in last sc. Turn.
(41 sts: 13 over the chain + 28 over the leg)
Row 11 (net row A): Ch 1, sc in first dc, ch 5, sc in 4th dc of next fan; rep from * 3 more times, ch 5, sc in top of turning ch. Turn.
(6 sc, 5 ch-5 sps)
Row 12 (fan row): Ch 1, sc in first sc, fan in next ch-5 sp, sc in next sc; rep from * 4 more times. Turn.
(41 sts: 6 sc + 35 dc)
Row 13 (net row B): Ch 1, sc in first sc, ch 2, sc in 4th dc of next fan, ch 5, sc in 4th dc of next fan; rep from * 3 more times, ch 2, sc in last sc. Turn.
(7 sc, 4 ch-5 sps, 2 ch-2 sps)
Row 14 (fan row): Ch 3 (counts as dc), 3 dc in ch-2 sp, sc in next sc, fan in next ch-5 sp, sc in next sc; rep from * 3 more times, 3 dc in ch-2 sp, dc in last sc. Turn.
(41 sts: 1 + 3 + 1 + 32 + 3 + 1)
Row 14 ends at the back (heel) edge. Checkpoint: 3.8 × 3.5 in (9.7 × 8.9 cm).
Heel (Burgundy)
Row 15: Ch 1, sc in each of the first 9 sts. Turn, leaving the remaining 32 sts unworked. (9 sc)
Rows 16–18: Ch 1, sc in each sc across. Turn. (9 sc)
Fasten off. The heel is a solid block about 0.8 in wide × 0.4 in tall (2.0 × 1.0 cm).
Toe Curl (Burgundy)
Join burgundy with a sl st at the top of the beginning ch-3 of Row 10, which is the upper toe corner.
Ch 13. Working back along the chain: 2 sc in 2nd ch from hook and in each of the next 3 ch, 2 hdc in each of the next 4 ch, 3 dc in each of the last 4 ch, then sl st in the toe corner. Fasten off. (28 sts along the curved outer edge)
The increases make the strip twist into a spiral. Coax it to curl up and back toward the leg.
Cream Lattice Overlay
The lattice wraps each burgundy net row in cream. With the RS facing, work each net row separately: join, work across, and fasten off. Work 5 sc around each ch-5 by inserting the hook into the same space the fan above was worked into, slipping between the fan’s dc where needed.
Rows 3 and 7 (leg, type A): Join cream with a sc in first sc, 5 sc around ch-5, sc in next sc, picot, 5 sc around next ch-5; rep from * once more, sc in last sc.
(19 sc, 2 picots)
Rows 5 and 9 (leg, type B): Join with a sc in first sc, 2 sc around ch-2, sc in next sc, picot, 5 sc around next ch-5; rep from * once more, sc in next sc, picot, 2 sc around ch-2, sc in last sc.
(19 sc, 3 picots)
Row 11 (foot, type A): Join with a sc in first sc, 5 sc around ch-5, sc in next sc, picot, 5 sc around next ch-5; rep from * 3 more times, sc in last sc.
(31 sc, 4 picots)
Row 13 (foot, type B): Join with a sc in first sc, 2 sc around ch-2, sc in next sc, picot, 5 sc around next ch-5; rep from * 3 more times, sc in next sc, picot, 2 sc around ch-2, sc in last sc.
(31 sc, 5 picots)
Leave the tails at the edges. The border will cover them.
Border (Cream)
Border gauge: about 10 sc = 1 in (2.5 cm) along the edge.
The border is worked in one pass around the outline, from the top back corner of the leg to the top front corner. The top edge is left free for the cuff.
Pass 1 (sc count): Join cream at the top back corner. Work sc as follows:
- Back edge (Rows 1–14 row ends): 1 sc in Row 1, 3 sc per fan row, 2 sc per net row = 34 sc
- Heel back edge (Rows 15–18): 1 per row = 4 sc
- Heel bottom: 3 sc in first st, sc in next 7 sts, 3 sc in last st = 13 sc
- Heel front edge: 4 sc
- Sole (32 unworked Row 14 sts): sc in next 31 sts, 3 sc in last st (toe corner) = 34 sc
- Toe edge (Rows 14–10 row ends): 13 sc
- Curl: sc in each of the 28 outer sts, 1 sc in tip ch, sc in each of the 12 free ch loops = 41 sc
- Instep (free loops of extension ch 4–19): 16 sc
- Front leg edge (Rows 9–1 row ends): 12 for fan rows + 8 for net rows + 1 for Row 1 = 21 sc
Total: 34 + 4 + 13 + 4 + 34 + 13 + 41 + 16 + 21 = 180 sc
In practice, work the picots as you go: sc in next 3 sc positions, picot, continuing the count around corners. That gives 180 sc and 60 picots. Fasten off.
Why the math works: a fan row is about 3 sc tall and a net row about 2 sc tall, so 3 and 2 sc per row end keep the edge flat. Each 3-sc corner adds 2 sc to turn the corner. Since 180 divides evenly by 3, the picots stay evenly spaced all the way around.
Cuff (Cream)
With the RS facing, join cream in the first free loop of the foundation ch at the back top corner.
Row 1: Ch 1, sc in each of the 25 free loops. Turn. (25 sc)
Row 2: Ch 1, sc in first sc, sk 3 sc, 7 dc in next sc, sk 3 sc, sc in next sc; rep from * twice more. Turn.
(25 sts: 4 sc + 21 dc, 3 shells)
Row 3: Ch 1, sc in first sc, sc in next 4 dc, picot, sc in next 3 dc, sc in next sc; rep from * twice more.
(25 sc, 3 picots)
Don’t fasten off. The cuff is 0.5 in (1.3 cm) tall.
Hanging Loop (Cream)
Sl st across to the center of the middle shell, at the base of its picot. Ch 24, then sl st in the same st. Work 30 sc over the ch-24 loop and sl st to the base. Fasten off.
The loop stands about 1 in (2.5 cm) tall.
Final Blocking
- Weave in all ends along the border and cuff.
- Soak the ornament in cool water, then press it gently in a towel.
- Pin it to the mat at 4 in wide × 4.5 in tall (10.2 × 11.4 cm).
- Pin the leg straight at 2.5 in (6.4 cm) wide including the border.
- Open each fan and pin the lattice into even diamonds.
- Pin the three cuff shells upright and the loop straight.
- Shape the toe curl into a spiral, pinning its tip back toward the leg.
- Mist with starch if you like, then let it dry completely before unpinning.
Final Quality-Control Checklist
- Leg is 25 sts and the foot is 41 sts.
- Every fan has exactly 7 dc.
- The lattice has 2, 3, 2, 3, 4, and 5 picots on Rows 3, 5, 7, 9, 11, and 13.
- The border has 180 sc and 60 picots.
- The cuff has 3 even shells.
- The curl spirals upward, not down.
- The finished size is 4 × 4.5 in (10.2 × 11.4 cm).
Troubleshooting
- Fans look crowded: Check that you’re skipping 3 sts on each side of every fan and sc.
- Leg is narrowing: You may be missing the turning ch-3 at the end of fan rows. It counts as a stitch.
- Border ruffles: Use 2 sc on net rows instead of 3.
- Border pulls in: Loosen your tension, or go up a hook size for the border only.
- Curl lies flat: Wet it, twist it tighter, and pin it while it dries.
- Lattice is hard to see: Pull each cream sc snug so it fully covers the burgundy chain.
Care
Hand wash in cool water and lay flat to dry. Reshape and re-block if needed, and store flat between seasons.
Final Notes
The measurement chain is simple. A gauge of 8 sts = 0.75 in (1.9 cm) gives a 25-st leg of 2.3 in (5.8 cm) and a 41-st foot of 3.8 in (9.7 cm). Fourteen body rows reach 3.5 in (8.9 cm), and the heel brings it to 3.9 in (9.9 cm). Then the 1/8 in (0.3 cm) border and 0.5 in (1.3 cm) cuff finish at 4 × 4.5 in (10.2 × 11.4 cm).
Check each stage and your boot will come out right. Happy crocheting!