

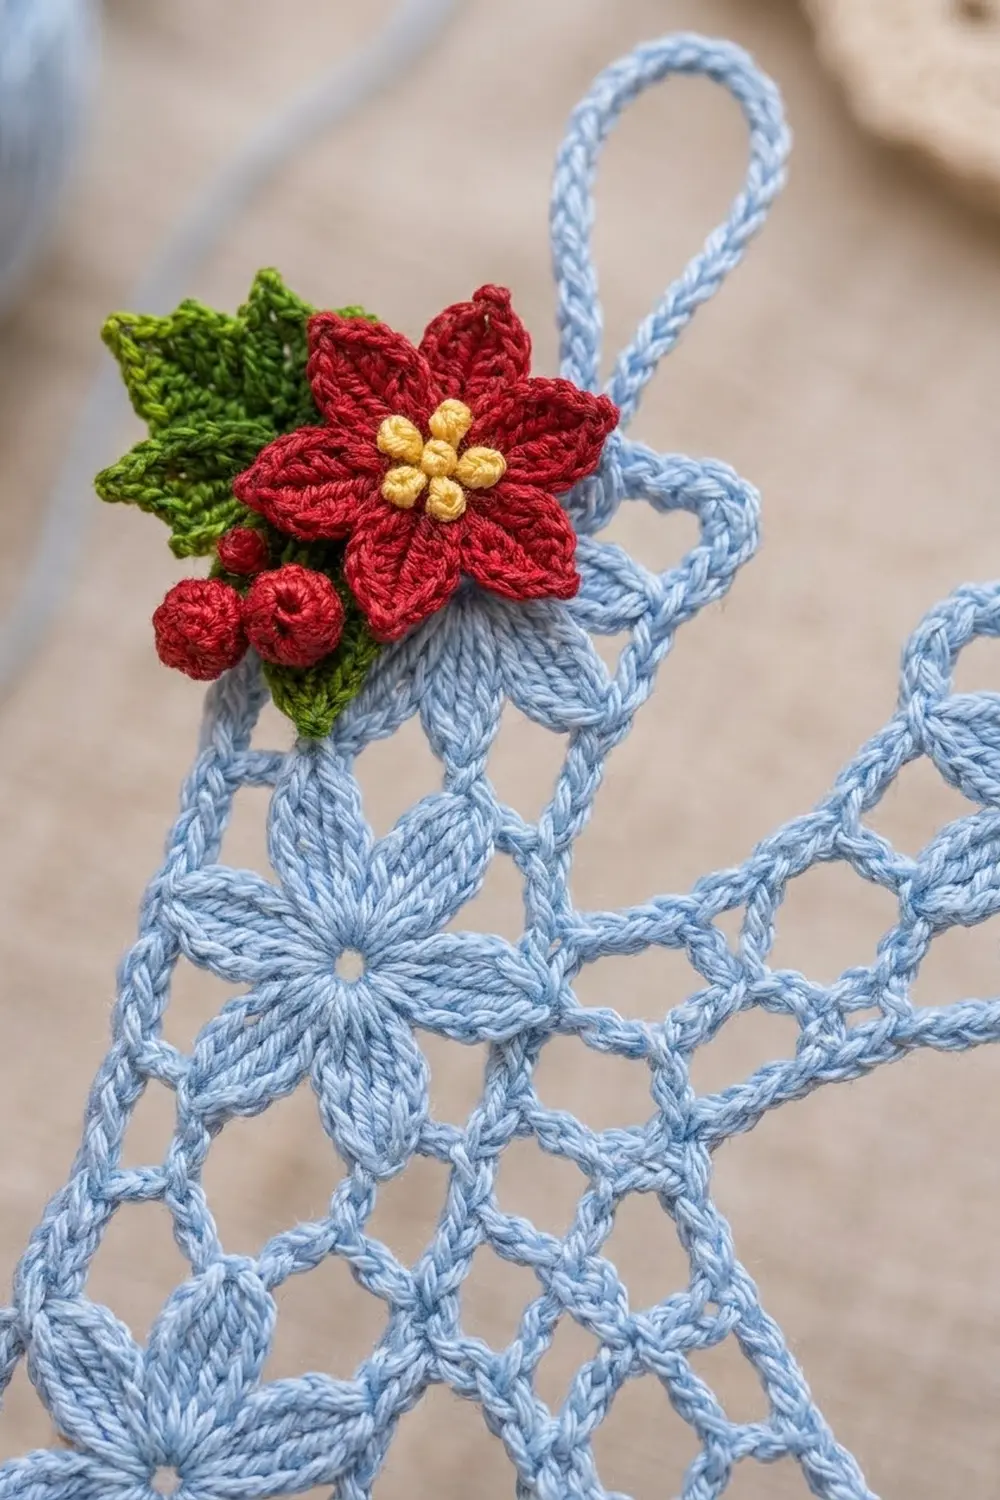
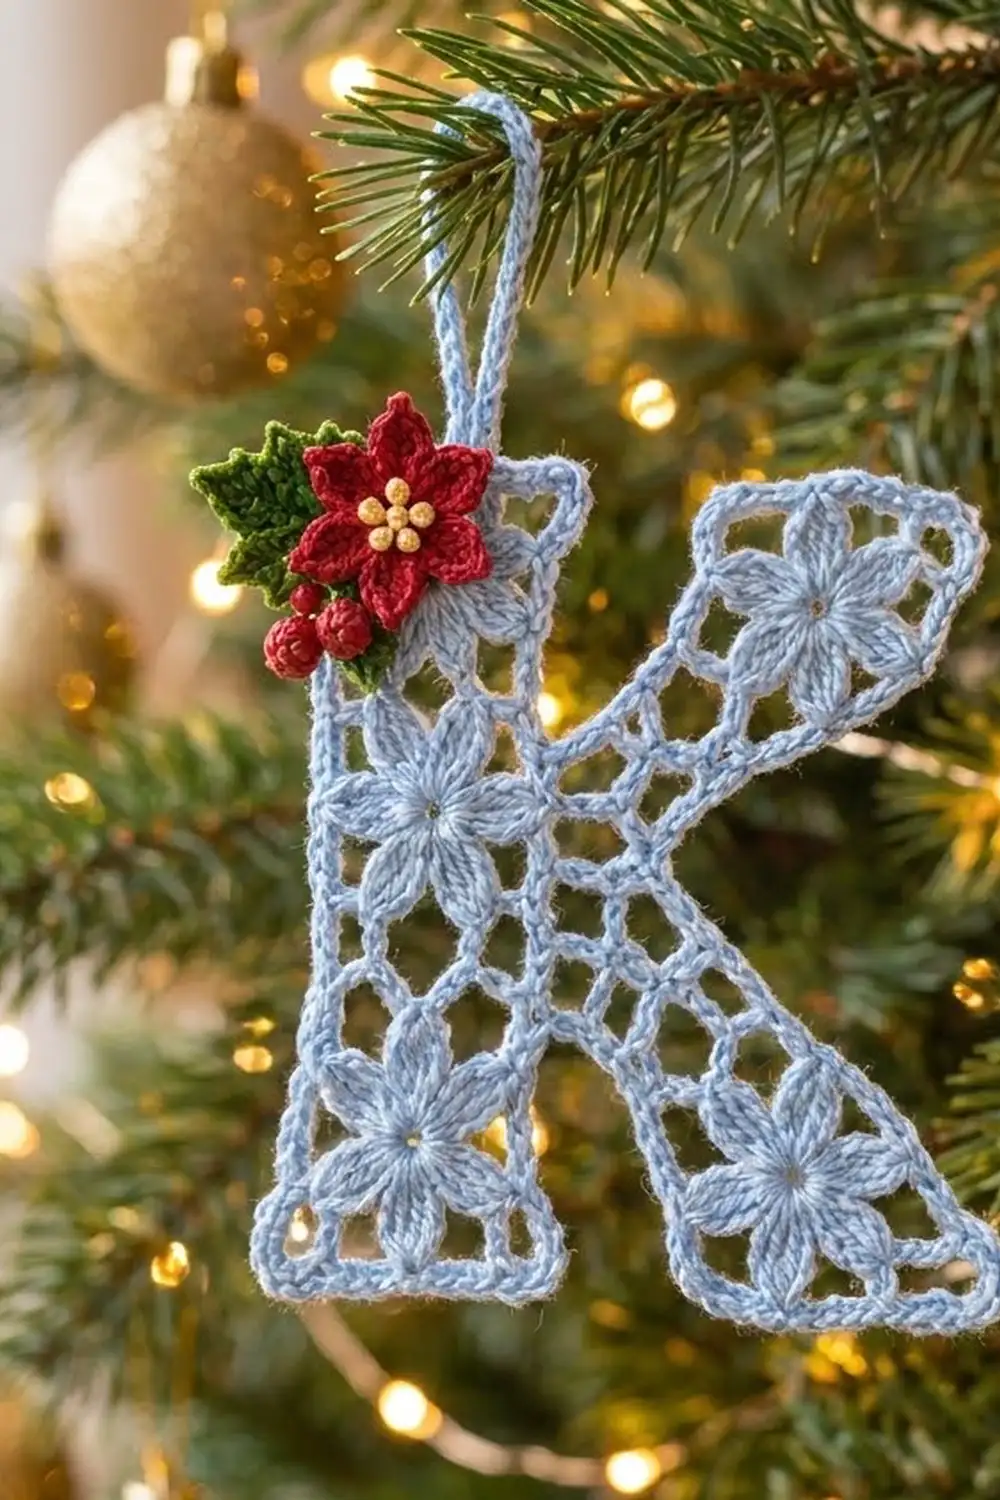
This lacy letter K ornament pairs icy light blue thread with a bright little poinsettia. Every part of the letter is built from small square lace motifs. Five of them hold a six-petal flower, and one open mesh motif sits where the stem meets the two diagonals. A twisted crab-stitch edge outlines the letter, and a loop at the top lets it hang.
The only other colors are on the appliqué in the top-left corner: a red two-layer poinsettia with a yellow knotted center, two green leaves, and three red berries.
The pattern uses US crochet terms. The finished letter measures 4.9 in (12.4 cm) tall and 4.9 in (12.4 cm) wide. With the loop, it is about 6.2 in (15.7 cm) tall.
Here is the construction in short. You make six square motifs and join them on a 3 x 3 grid. Then you work a two-round border. In the border’s first round, chain bridges cross the grid corners, which turns the stepped arms into smooth diagonals. Last, you add the loop, block the ornament, and sew on the appliqué.
Finished Size and Construction
- Finished size: 4.9 x 4.9 in (12.4 x 12.4 cm), plus a 1.3 in (3.3 cm) loop
- Skill level: Intermediate
- Terminology: US
- Yarn weight: Size 3 cotton crochet thread (Lace, category 0)
- Hook: 2.25 mm (US B-1)
- Number of pieces: 6 lace motifs (5 flower, 1 mesh), plus 6 appliqué pieces
- Layout: 3 x 3 grid with 3 empty cells
- Piece size: 1.5 x 1.5 in (3.8 x 3.8 cm), 17 sc per side
- Size before border: 4.5 x 4.5 in (11.4 x 11.4 cm)
- Border depth: 0.2 in (0.5 cm), 2 rounds
Materials
Use mercerized cotton thread. It gives crisp stitches and stiffens well with starch. Match the gauge rather than the weight on the label.
- Light blue: 15 g (about 70 m) for the motifs, border, and loop
- Red: 3 g (about 14 m) for the poinsettia and berries
- Green: 2 g (about 9 m) for the leaves
- Yellow: 1 g (about 4 m) for the flower center
Tools:
- 2.25 mm (US B-1) hook
- Tapestry needle and a fine sewing needle
- Blocking board and rustproof pins
- Spray starch or fabric stiffener
- Small scissors
These quantities include a margin of about 20% for swatching and weaving in ends.
Abbreviations (US Terms)
- ch: chain
- sl st: slip stitch
- sc: single crochet
- hdc: half double crochet
- dc: double crochet
- tr: treble crochet
- sc2tog: single crochet 2 together
- rev sc: reverse single crochet (crab stitch)
- sp(s): space(s)
- sk: skip
- MR: magic ring
- RS / WS: right side / wrong side
Special stitch: 3-tr cluster (cl). Yarn over twice and insert the hook into the stitch. Pull up a loop, then [yarn over and pull through 2 loops] twice. Repeat from * 2 more times in the same stitch, so you have 4 loops on the hook. Yarn over and pull through all 4 loops.
Beginning cluster (beg cl). Ch 4, then work a 2-tr cluster in the same stitch. It is made the same way as the 3-tr cluster, but with only 2 repeats.
Gauge and Checkpoints
Make one flower motif first and measure it. The gauge is one motif = 1.5 in (3.8 cm) square, with 17 sc per side.
Checkpoints for the test motif:
- After Round 1: 0.5 in (1.3 cm) across
- After Round 2: 1.0 in (2.5 cm) from petal tip to petal tip
- After Round 4: 1.5 in (3.8 cm) per side, after gentle steaming
If your motif is bigger than 1.6 in (4.1 cm), switch to a 2.0 mm hook. If it is smaller than 1.4 in (3.6 cm), switch to a 2.5 mm hook.
Flower Motif (Make 5)
Use light blue. Join each round with a sl st unless the pattern says otherwise.
Round 1: MR, ch 3 (counts as dc), work 11 dc in the ring, and sl st to the top of the ch-3. (12 dc)
Round 2 (petals): Beg cl in the same stitch, ch 3, sk next dc. Cl in next dc, ch 3, sk next dc. Repeat from * 4 more times, then sl st to the top of the beg cl. (6 clusters, 6 ch-3 sps)
Round 3 (frame loops): This round uses 12 anchor points, alternating between 6 cluster tops and 6 ch-3 sps.
- Ch 1. Work (sc, ch 3, sc) in the top of the beg cl [corner], ch 5, sc in next ch-3 sp, ch 5, sc in next cl, ch 5.
- (Dc, ch 3, dc) in next ch-3 sp [corner], ch 5, sc in next cl, ch 5, sc in next ch-3 sp, ch 5.
- (Sc, ch 3, sc) in next cl [corner], ch 5, sc in next ch-3 sp, ch 5, sc in next cl, ch 5.
- (Dc, ch 3, dc) in next ch-3 sp [corner], ch 5, sc in next cl, ch 5, sc in next ch-3 sp, ch 5, and sl st to the first sc.
(16 stitches, 12 ch-5 loops, 4 ch-3 corner sps)
The corners worked into ch-3 sps use dc so they sit as high as the corners worked on cluster tops. This keeps the square even.
Round 4 (square frame): Sl st into the next ch-3 sp. Ch 1 and work (sc, ch 2, sc) in the same sp. Work 5 sc in each of the next 3 ch-5 loops, then (sc, ch 2, sc) in the next ch-3 sp. Repeat from * 2 more times. Work 5 sc in each of the last 3 ch-5 loops and sl st to the first sc. Fasten off. On 2 of the motifs, leave a 10 in (25.4 cm) tail for seaming.
Per side: 1 corner sc + 15 sc + 1 corner sc = 17 sc. Total: 68 sc and 4 ch-2 corner sps.
Mesh Motif (Make 1)
This open spoke motif fills the junction where the arm and leg meet the stem. Use light blue.
Round 1: Work as for Round 1 of the Flower Motif. (12 dc)
Round 2 (spokes): Ch 4 (counts as tr), ch 3, sk next dc. Tr in next dc, ch 3, sk next dc. Repeat from * 4 more times, then sl st to the 4th ch of the beginning ch-4. (6 tr, 6 ch-3 sps)
Rounds 3–4: Work as for the Flower Motif, using the tr tops in place of the cluster tops. (68 sc, 17 per side, 4 ch-2 corner sps)
The mesh motif should also measure 1.5 in (3.8 cm).
Poinsettia Appliqué
Large layer (red): MR, ch 1, work 5 sc in the ring, and sl st to the first sc. (5 sc) Ch 6. Sl st in the 2nd ch from the hook, sc in the next ch, hdc in the next ch, and dc in the next 2 ch. Sl st in the next sc of the ring. Repeat from * 4 more times. (5 petals) This layer is about 1.1 in (2.8 cm) across.
Small layer (red): MR, ch 1, work 5 sc in the ring, and sl st to the first sc. (5 sc) Ch 5. Sl st in the 2nd ch from the hook, sc in the next ch, hdc in the next ch, and dc in the next ch. Sl st in the next sc. Repeat from * 4 more times. (5 petals)
Stack the small layer on top of the large layer so its petals sit between the large petals, and sew the layers together through the center. With yellow, make 5 French knots in a tight cluster in the center.
Leaf (green, make 2):
- Ch 8. Sl st in the 2nd ch from the hook, then work sc, hdc, dc, dc, and hdc in the next 5 ch.
- Work (sc, ch 2, sc) in the last ch to make the tip.
- Turn the piece and work along the other side of the chain: hdc, dc, dc, hdc, and sc in the next 5 ch, then sl st in the last ch.
(14 stitches and a ch-2 tip) Each leaf is about 0.8 in (2.0 cm) long.
Berry (red, make 3): MR, ch 1, work 6 sc in the ring, and sl st to the first sc. (6 sc) Sc2tog 3 times. (3 sts) Push the tails inside and close the berry. Each berry is about 0.3 in (0.8 cm) across.
Make All Pieces
- Light blue: 5 flower motifs and 1 mesh motif
- Red: 1 large poinsettia layer, 1 small layer, and 3 berries
- Green: 2 leaves
- Yellow: 5 French knots, worked during assembly
Lay the motifs out RS up:
         Col 1   Col 2   Col 3
Row 1:   [F1]    [ - ]   [F4]
Row 2:   [F2]    [ M ]   [ - ]
Row 3:   [F3]    [ - ]   [F5]
F1–F3 form the stem, M is the mesh junction, F4 is the upper arm, and F5 is the lower leg.
Joining
Hold two motifs WS together and work each seam from the RS. This makes a neat raised ridge.
Straight seams (3 seams: F1–F2, F2–F3, F2–M):
- Sl st through both matching corner ch-2 sps.
- Sl st through both loops of each matching pair of sc. There are 17 pairs, including the corner sc.
- End with a sl st through the next pair of corner ch-2 sps.
(19 sl st per seam) The seam joins stitch to stitch: sc 1 meets sc 1 and sc 17 meets sc 17. Nothing is skipped or added.
Corner ties (4 ties): Each tie joins one corner sp to another. Work sl st, ch 1, and sl st through both corner sps, then fasten off.
- M’s top-right corner to F4’s bottom-left corner
- M’s bottom-right corner to F5’s top-left corner
- F1’s bottom-right corner to M’s top-left corner
- F3’s top-right corner to M’s bottom-left corner
Tension: Keep the slip stitches as loose as the sc they go into. If a seam puckers, take it out and redo it with a larger hook.
Checkpoint: The joined grid should measure 4.5 x 4.5 in (11.4 x 11.4 cm) across its outer edges.
Border
Border gauge: 17 sc = 1.5 in (3.8 cm), the same as the motifs. Each bridge is ch 12, about 1.1 in (2.8 cm), which spans the diagonal between the centers of two edges. “Sc 9” means the center sc of a 17-sc side.
Round 1 (sc and bridges): With RS facing, join light blue at F1’s top-left corner. Work 1 sc in each sc. At each outer (convex) corner, ch 2 and skip the corner sp. Work nothing into joined corner sps at the seams or ties. Work around clockwise as follows:
- F1: 17 sc along the top edge, ch 2, then 17 sc along the right edge.
- M: 9 sc along the top edge, from the left corner to sc 9. Ch 12 [bridge 1].
- F4: 9 sc along the left edge, from sc 9 up to the corner. Ch 2, 17 sc along the top, ch 2, 17 sc along the right, ch 2. Then 9 sc along the bottom edge, from the corner to sc 9. Ch 12 [bridge 2].
- M: 1 sc in sc 9 of the right edge. Ch 12 [bridge 3].
- F5: 9 sc along the top edge, from sc 9 to the corner. Ch 2, 17 sc along the right, ch 2, 17 sc along the bottom, ch 2. Then 9 sc along the left edge, from the corner up to sc 9. Ch 12 [bridge 4].
- M: 9 sc along the bottom edge, from sc 9 to the left corner.
- F3: 17 sc along the right edge, ch 2, 17 sc along the bottom edge, ch 2.
- Stem left side: 51 sc (17 each for F3, F2, and F1). Ch 2 and sl st to the first sc.
Count: 34 (F1) + 9 (M) + 52 (F4) + 1 (M) + 52 (F5) + 9 (M) + 34 (F3) + 51 (stem) = 242 sc. The round also has 4 bridges of 12 ch each (48 ch) and 10 ch-2 corner sps.
The stem’s left side is 3 motifs x 17 sc = 51 sc. A single exposed motif edge is 1 x 17 = 17 sc. No stitches are added at the seams.
Round 2 (crab stitch): Ch 1. Working from left to right, rev sc in each sc and in each bridge chain. Work 2 rev sc in each corner ch-2 sp. Sl st to the first rev sc and fasten off.
Count: (242 sc + 48 ch, worked 1 per existing stitch = 290) + (10 corners x 2 extra = 20) = 310 rev sc.
Why the math works: Every motif edge keeps its 17 stitches. Each bridge has exactly the chain length a 1.1 in (2.8 cm) diagonal needs, so it lies flat without pulling. Bridges 2 and 3 meet at the center of M’s right edge, which forms the inner angle of the K.
Hanging loop: Join light blue in the center rev sc of F1’s top edge. Ch 30 and sl st in the same stitch. Work 36 sc into the loop, sl st, and fasten off. The loop stands about 1.3 in (3.3 cm) tall.
Final Blocking
- Weave in all ends along the sc frames, never along the bridges.
- Soak the ornament in cool water, then roll it in a towel to remove the excess water.
- Pin it RS up at all 10 outer corners, then at the 4 bridge anchors.
- Check that the letter measures 4.9 x 4.9 in (12.4 x 12.4 cm) overall, with each square 1.5 in (3.8 cm).
- Pin each petal outward and ease each bridge into a straight line.
- Spray with starch and let the ornament dry completely.
- Unpin it. Sew the leaves behind the left side of the poinsettia and the berries below and to its left. Then stitch the whole group over F1’s top-left corner with matching thread.
Final Quality-Control Checklist
- Every motif has 17 sc per side and 4 ch-2 corners.
- All 3 seams have 19 sl st each and lie flat.
- All 4 corner ties are secure.
- Border Round 1 has 242 sc, 48 bridge ch, and 10 corners.
- Border Round 2 has 310 rev sc.
- The letter is 4.9 in (12.4 cm) square and the loop is centered.
- The appliqué is secure and the yellow center is visible.
Troubleshooting
- Motif isn’t square: Check the dc corners in Round 3, and pin the corners when blocking.
- Petals cup: Work the ch-3 sps in Round 2 more loosely.
- Bridges sag: Use ch 11 instead. Round 2 becomes (242 + 44) + 20 = 306.
- Bridges pull: Use ch 13 instead. Round 2 becomes (242 + 52) + 20 = 314.
- Seams ripple: Rework them with a larger hook.
- Ornament is floppy: Add another coat of starch.
Care
Hand wash in cool water, reshape, and dry flat, adding starch again if needed. Store the ornament flat between sheets of tissue paper.
Final Notes
Each measurement in this pattern builds on the one before:
- Each motif has 17 sc per side and measures 1.5 in (3.8 cm).
- The joined grid measures 4.5 in (11.4 cm).
- Border Round 1 has 242 sc and four ch-12 bridges.
- Border Round 2 has 310 crab stitches.
- The finished letter measures 4.9 in (12.4 cm).
Check each measurement as you go, and the K will block flat and even.
Happy crocheting!