

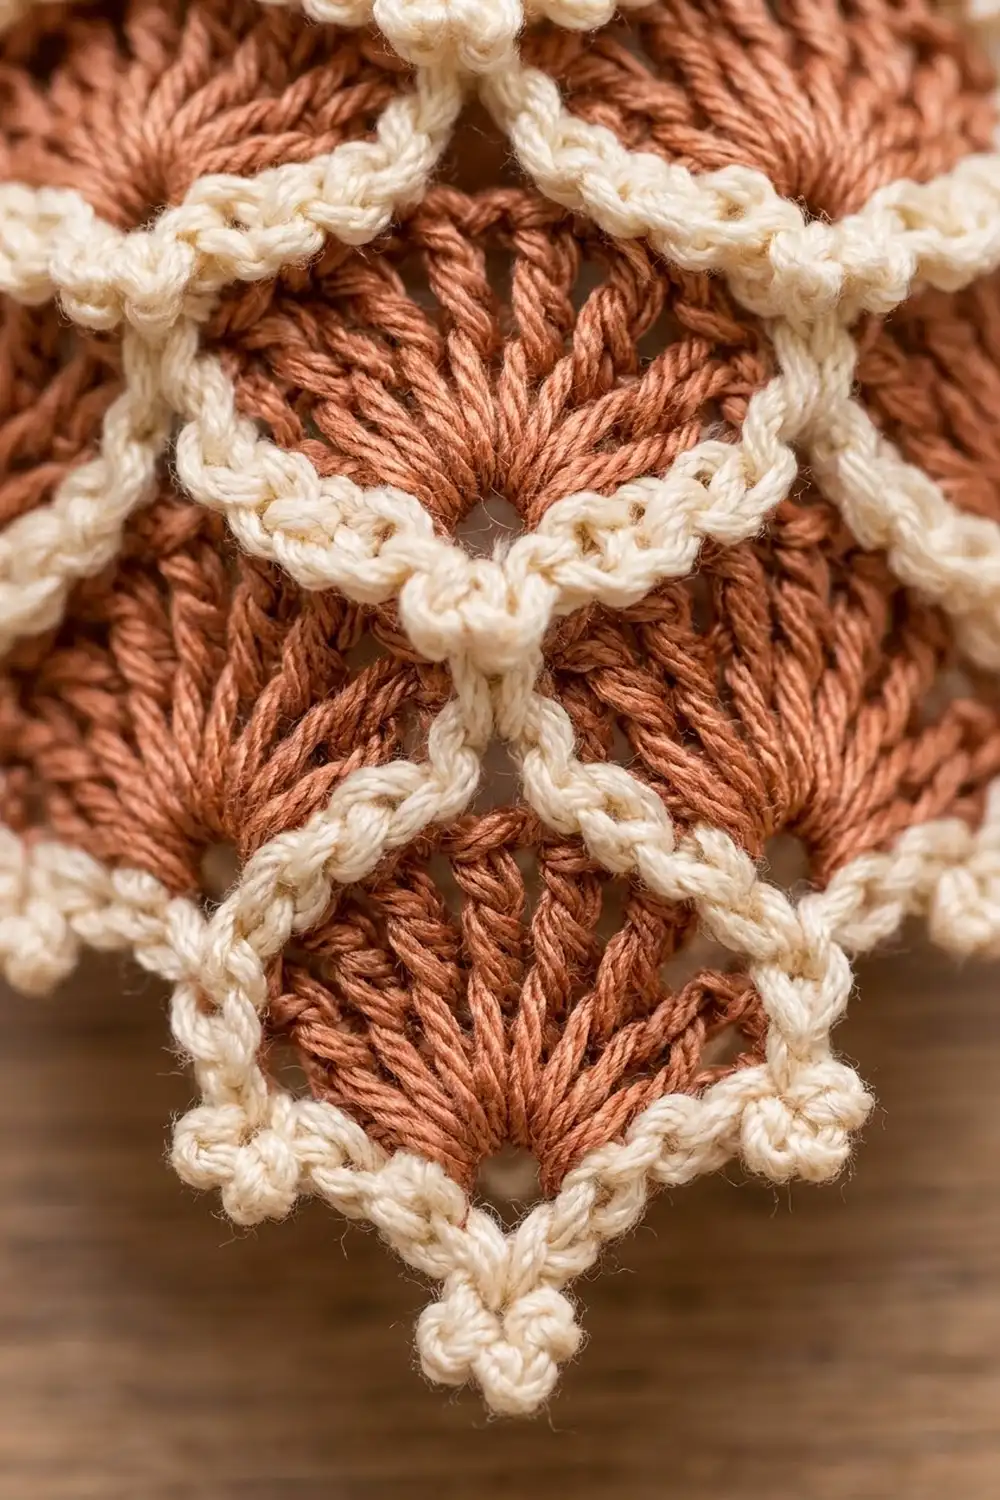
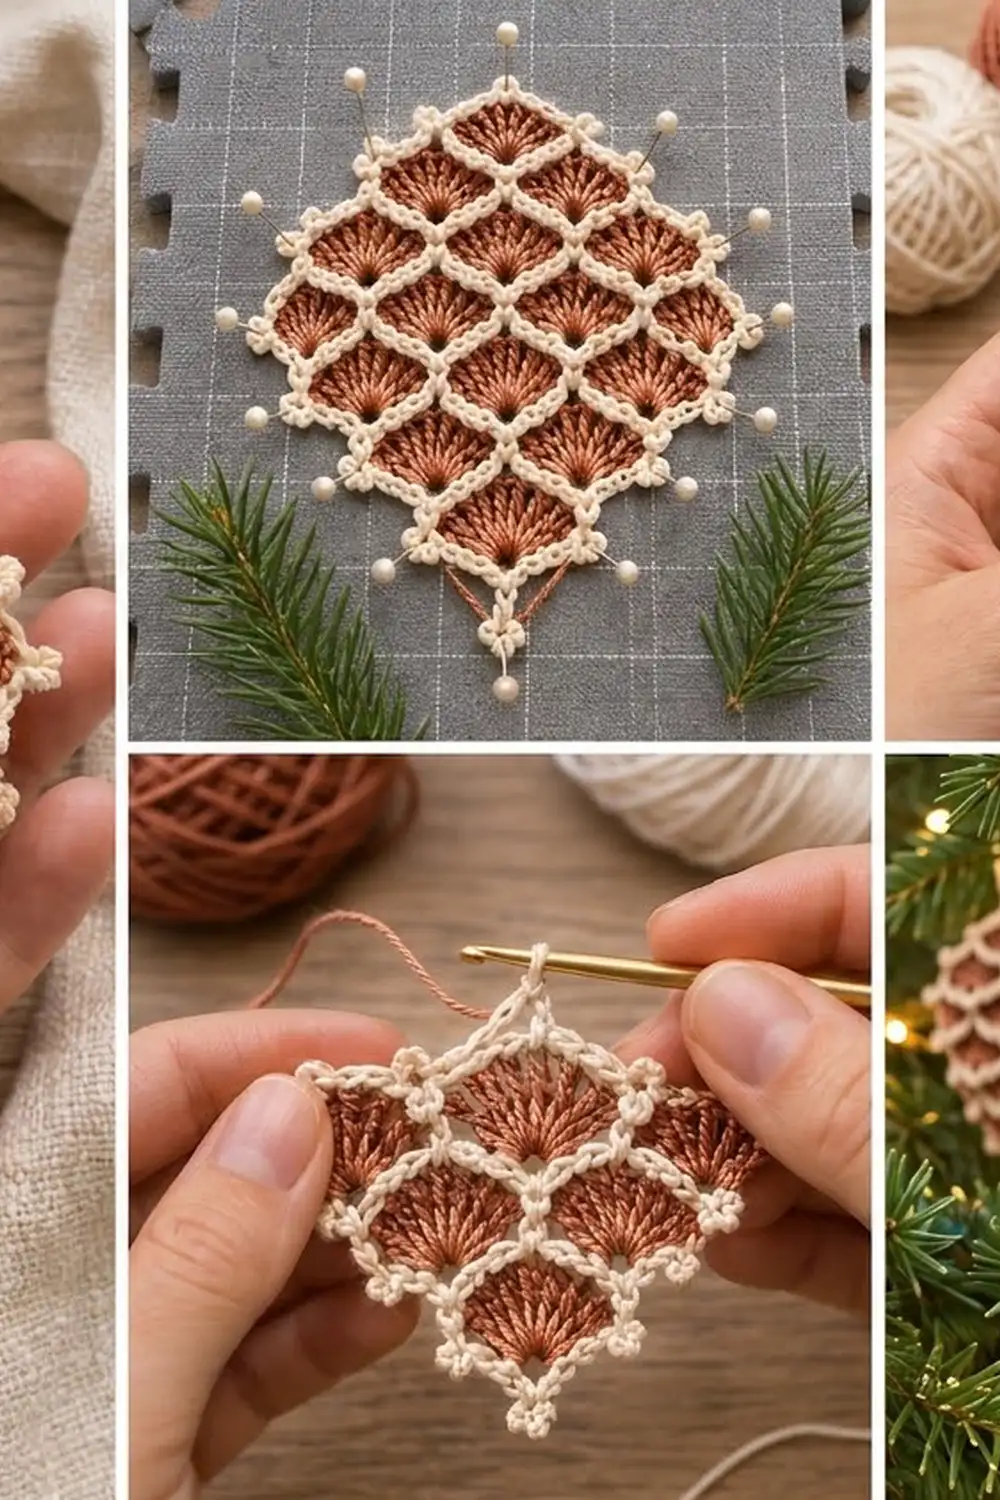
This pinecone ornament is a single flat piece covered in fan-shaped scales. Copper fans are stacked in offset tiers, and every scale is outlined in cream, so the fabric reads like a pinecone dusted with frost. Small cream picots sit at the bottom tip and along the outer points. A cream crocheted loop at the top lets it hang from a branch.
The palette is two colors: a warm copper (terracotta) for the fans and a soft cream for the outlines, border, and loop. The style is rustic and a little vintage. It suits a natural Christmas tree, a gift tag, or a window garland of single ornaments.
The pattern uses US crochet terms. The finished ornament measures 3.5 in wide x 4 in tall (8.9 cm x 10.2 cm) without the loop. The loop adds 1.5 in (3.8 cm), so it hangs 5.5 in (14.0 cm) long.
The construction is easy to follow. You crochet the copper fan fabric in 7 rows from the bottom tip upward, so every fan opens toward the top. Next, you add cream surface single crochet lines along the top of each row to outline the scales. Last, you work a 2-round cream border with picots and finish with the hanging loop.
Finished Size and Construction
- Finished size: 3.5 in x 4 in (8.9 cm x 10.2 cm), plus 1.5 in (3.8 cm) loop
- Skill level: Intermediate
- Terminology: US crochet terms
- Yarn weight: DK / light (weight 3) cotton or cotton blend
- Hook: 3.5 mm (US E/4)
- Number of pieces: 1
- Layout: single motif, 7 rows of fans in a 1-2-3-2-3-2-1 tier pattern (14 fans)
- Piece size before border: 3 in wide x 3.5 in tall (7.6 cm x 8.9 cm)
- Border depth: 0.25 in (0.6 cm) per side, not counting picots
Materials
Choose a smooth, mercerized cotton or cotton blend in DK weight. Cotton holds the fan shape crisply and shows the cream outlines clearly. A fuzzy or very soft yarn will blur the scales.
- Copper / terracotta (Color A): 6 g, about 14 m (15 yd)
- Cream (Color B): 6 g, about 14 m (15 yd)
These quantities include a margin of about 25% for gauge differences and weaving in ends. One standard ball of each color will make many ornaments.
Tools:
- 3.5 mm (US E/4) crochet hook
- Tapestry needle
- Scissors
- Stitch markers (2-3)
- Blocking mat, rust-proof pins, and a spray bottle
- Ruler or tape measure
Abbreviations (US Terms)
- ch – chain
- sl st – slip stitch
- sc – single crochet
- dc – double crochet
- st(s) – stitch(es)
- RS – right side
- yo – yarn over
Fan: 7 dc worked into the same stitch.
Surface sc (surface single crochet): Hold the yarn behind the work. Insert the hook from front to back through the fabric, yo on the back, and pull a loop to the front. For each following stitch, insert the hook from front to back at the next point, yo, pull up a loop, then yo and pull through both loops on the hook. This makes a raised line on the RS.
Picot: Ch 3, sl st in the 3rd ch from the hook.
Gauge and Checkpoints
Gauge is not critical for an ornament, but it controls the final size. Make one test ornament first, and measure it at each checkpoint below.
Base gauge: One fan (Row 1) measures 1 in (2.5 cm) wide across its top and 0.5 in (1.3 cm) tall.
Checkpoints:
- After Row 1: 1 in wide x 0.5 in tall (2.5 cm x 1.3 cm)
- After Row 3: 3 in wide x 1.5 in tall (7.6 cm x 3.8 cm)
- After Row 5: 3 in wide x 2.5 in tall (7.6 cm x 6.4 cm)
- After Row 7: 3 in wide x 3.5 in tall (7.6 cm x 8.9 cm)
- After outline lines: no change in size
- After the border: 3.5 in x 4 in (8.9 cm x 10.2 cm)
If your piece is too big: Change to a 3.0 mm hook (US C/2 or D/3) and work the dc a little tighter.
If your piece is too small: Change to a 4.0 mm hook (US G/6).
A difference of 0.25 in (0.6 cm) in height is acceptable. Only change hooks if Row 3 is off by more than that.
Copper Fan Fabric
Work in rows with Color A. A ch 3 at the beginning of a row counts as the first dc. Rows 2, 3, and 5 grow wider, and Rows 4, 6, and 7 step back inward. That creates the lobed pinecone outline.
Row 1 (1 fan): Ch 4, 6 dc in the 4th ch from the hook. Turn. (7 sts: the skipped ch counts as 1 dc, plus 6 dc)
The base of this fan is the bottom tip of the pinecone.
Row 2 (2 fans): Ch 3, 6 dc in the first st (fan made). Skip 2 dc, sc in the next dc (the center of Row 1’s fan). Skip 2 dc, 7 dc in the top of the turning ch. Turn. (15 sts: 2 fans + 1 sc)
Row 3 (3 fans): Ch 3, 6 dc in the first st. Skip 2 dc, sc in the next dc (center of fan). Skip 3 dc, 7 dc in the next sc. Skip 3 dc, sc in the next dc (center of fan). Skip 2 dc, 7 dc in the top of the turning ch. Turn. (23 sts: 3 fans + 2 sc)
Checkpoint: 3 in (7.6 cm) wide.
Row 4 (2 fans): Sl st in the first 4 sts. Ch 1, sc in the same st (center of the first fan). Skip 3 dc, 7 dc in the next sc, skip 3 dc, sc in the next dc (center of fan). Repeat from * once more. Leave the last 3 sts unworked. Turn. (17 sts: 2 fans + 3 sc)
Row 5 (3 fans): Ch 3, 6 dc in the first sc. Skip 3 dc, sc in the next dc (center of fan), skip 3 dc, 7 dc in the next sc. Repeat from * once more. Turn. (23 sts: 3 fans + 2 sc)
Row 6 (2 fans): Repeat Row 4. (17 sts: 2 fans + 3 sc)
Row 7 (1 fan): Sl st in the first 5 sts. Ch 1, sc in the same st (center of the first fan). Skip 3 dc, 7 dc in the next sc. Skip 3 dc, sc in the next dc (center of fan). Leave the last 4 sts unworked. Fasten off. (9 sts: 1 fan + 2 sc)
The top fan sits at the center top, under where the loop will go. Weave in the Color A ends on the wrong side.
Total fans: 1 + 2 + 3 + 2 + 3 + 2 + 1 = 14.
Cream Scale Outlines
Work each outline line with Color B in surface sc, RS facing, from right to left. Each line runs along the top edge of one row, just below the stitches of the row above. Work 1 surface sc per stitch of the lower row. These lines form the cream arcs over every fan and the V-shapes between them.
Begin each line with a slip knot held on the wrong side. Pull the first loop through and start the surface sc. Fasten off at the end of each line and leave a 4 in (10.2 cm) tail.
- Line 1 (top of Row 1): across all 7 sts. (7 surface sc)
- Line 2 (top of Row 2): across all 15 sts. (15 surface sc)
- Line 3 (top of Row 3): from the 4th st to the 20th st only, where Row 4 is attached. (17 surface sc)
- Line 4 (top of Row 4): across all 17 sts. (17 surface sc)
- Line 5 (top of Row 5): from the 4th st to the 20th st only. (17 surface sc)
- Line 6 (top of Row 6): from the 5th st to the 13th st only, where Row 7 is attached. (9 surface sc)
Total: 82 surface sc. The border outlines the unworked edge stitches of Rows 3, 5, and 6 instead, so no edge gets a double line.
Keep the surface sc loose enough that the fabric does not pucker. Lay the piece flat after each line. If it cups, rework that line with a looser tension.
Border
Work the border with Color B, RS facing, in rounds.
Border gauge: 2 sc fit along each dc row end, and 1 sc fits on top of each exposed stitch. Two rounds of sc add 0.25 in (0.6 cm) on every side.
Round 1: Join Color B at the bottom tip (the base of the Row 1 fan). Ch 1, work 3 sc in the tip. Work up the first side as follows:
- Row 1 end: 2 sc
- Row 2 end: 2 sc
- Row 3 end: 2 sc
- Row 3 exposed sts: 1 sc in each of 3 sts (3 sc)
- Row 4 end: 2 sc
- Row 5 end: 2 sc
- Row 5 exposed sts: 1 sc in each of 3 sts (3 sc)
- Row 6 end: 2 sc
- Row 6 exposed sts: 1 sc in each of 4 sts (4 sc)
- Row 7 end: 2 sc
Side total: 24 sc.
Across the top of Row 7: 1 sc in each of the first 4 sts, 3 sc in the center dc, 1 sc in each of the last 4 sts (11 sc). Place a marker in the center sc of the 3-sc group.
Work down the second side in reverse order, again with 24 sc. Sl st to the first sc.
Round 1 total: 3 (tip) + 24 + 11 (top) + 24 = 62 sc.
Round 2: Ch 1, sc in each sc around, adding a picot after these sc:
- The center sc of the 3-sc tip (1 picot)
- On each side, the 2nd sc of the Row 1, Row 2, Row 3, Row 5, and Row 7 ends (5 picots per side, 10 total)
Sl st to the first sc. Do not fasten off.
Round 2 total: 62 sc + 11 picots.
Why the math works: A dc is about as tall as 2 sc, so 2 sc per row end keeps each side flat. Each exposed stitch top gets exactly 1 sc, so the outward lobes don’t ruffle. The 3 sc at the tip and top center turn the sharp points without pulling them in. Both sides have exactly 24 sc, so the ornament stays symmetrical. Round 2 adds no extra sc, which keeps the border depth even. The picots stick out past the edge and are not counted in the 0.25 in (0.6 cm) border depth.
Hanging loop: Sl st along Round 2 to the marked center top sc. Ch 18, sl st in the same sc to form a loop. Work 22 sc over the chain loop, packing the stitches so they cover it fully. Sl st in the base sc. Fasten off and weave in.
The finished loop stands 1.5 in (3.8 cm) tall.
Final Blocking
- Weave in all ends on the wrong side, hiding them behind stitches of the same color where possible.
- Pin the ornament RS up on a blocking mat at 3.5 in x 4 in (8.9 cm x 10.2 cm).
- Put one pin at the bottom tip, one at the top center, and one at each outer lobe point.
- Pin each picot so it points outward.
- Spray with water until the piece is damp but not soaked.
- Shape each fan gently with your fingertips so the dc rays spread evenly.
- Leave the piece to dry completely, at least 4-6 hours.
- Unpin it, then hang it by the loop from a clothespin for an hour so the loop dries straight.
Final Quality-Control Checklist
- 14 copper fans in a 1-2-3-2-3-2-1 arrangement
- Every fan has 7 dc
- 6 cream outline lines (82 surface sc total), with no puckering
- Border Round 1 has 62 sc, with 24 sc on each side
- 11 picots: 1 at the tip and 5 on each side
- Size is 3.5 in x 4 in (8.9 cm x 10.2 cm)
- Loop is 1.5 in (3.8 cm) and centered over the top fan
- All ends are secure and hidden
Troubleshooting
Fans curl or cup. The dc are too tight for the fan. Go up 0.5 mm in hook size, or block more firmly.
The piece leans to one side. Check that each fan was worked into the correct sc. Count 23 sts on Rows 3 and 5, and 17 sts on Rows 4 and 6.
Outline lines pucker. Your surface sc is too tight. Pull each loop up a little taller, or use a hook 0.5 mm larger for the outlines only.
Border ruffles. You probably worked more than 2 sc per row end. Recount against the 24-sc side total.
Border pulls in at the lobes. You skipped an exposed stitch. Work 1 sc in every exposed top.
Loop twists. Wet-block the loop and let it dry while it hangs straight.
Care
Hand wash in cool water with mild soap, press out the water in a towel, and dry flat. Reshape the fans while damp.
Final Notes
The measurement chain is short and easy to check. One fan is 1 in x 0.5 in (2.5 cm x 1.3 cm). Seven rows build a 3 in x 3.5 in (7.6 cm x 8.9 cm) piece. The cream outlines add no size. The 0.25 in (0.6 cm) border brings it to 3.5 in x 4 in (8.9 cm x 10.2 cm), and the 1.5 in (3.8 cm) loop gives a total hanging length of 5.5 in (14.0 cm). If Row 3 matches its checkpoint, the rest will follow.
Make one in the copper and cream shown, then try forest green with cream or gold with white for a mixed set on your tree.
Happy crocheting!