

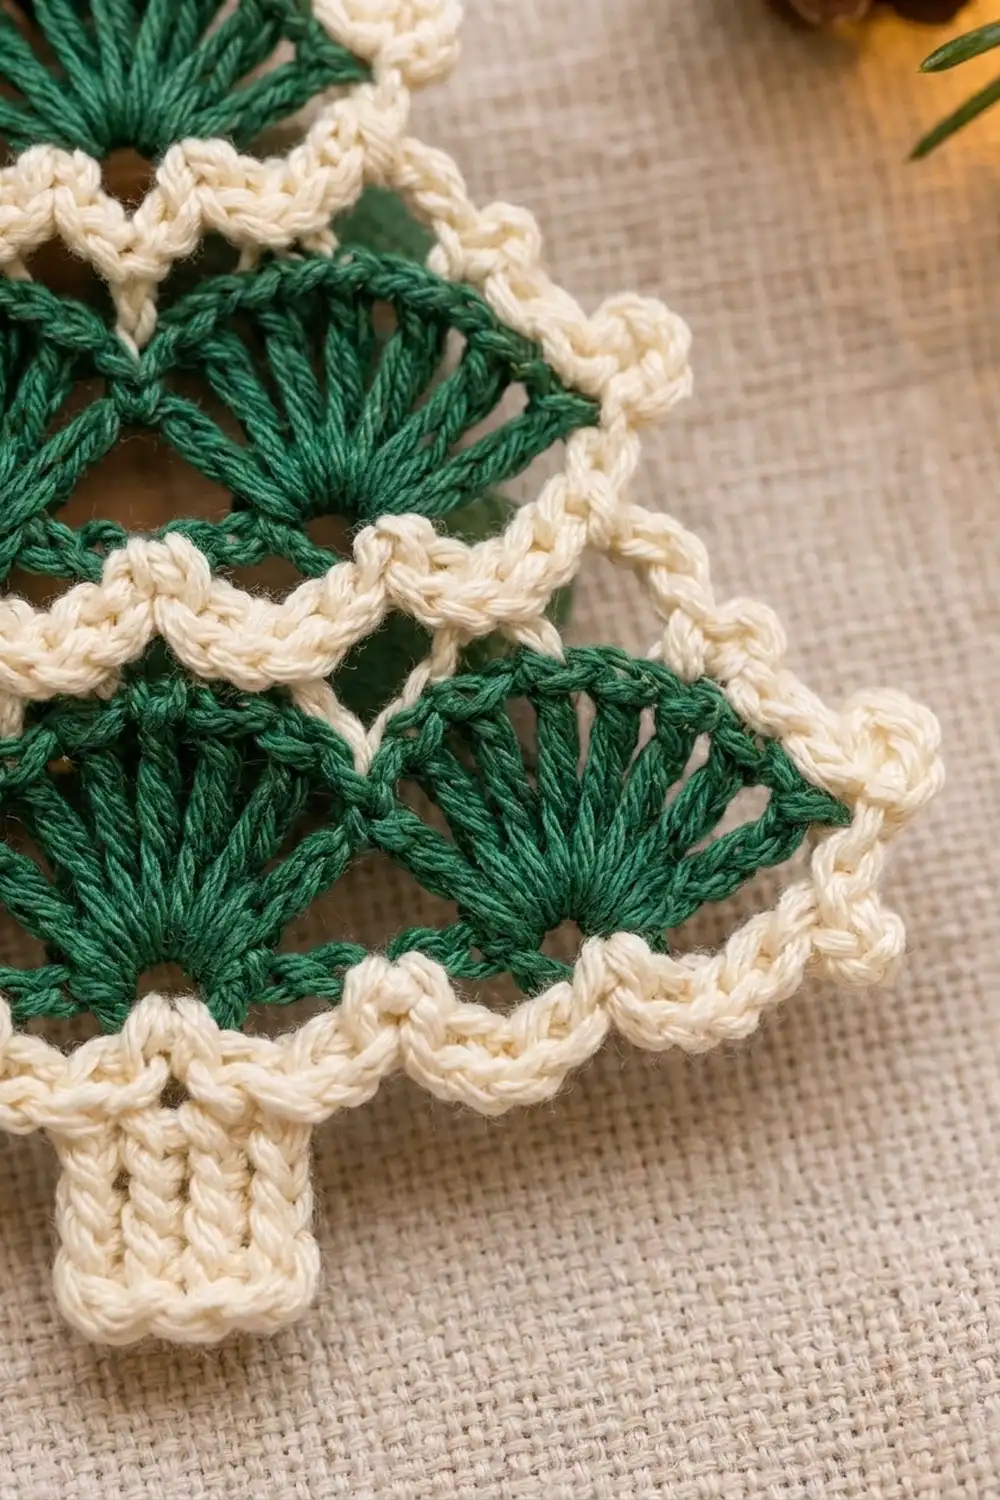
This little tree ornament is built from dark green fan shells stacked into three tiers: three fans at the bottom, two in the middle and one at the top. A crisp ivory border with picots outlines the whole tree. Two lacy ivory bands cross the tree between the tiers, and it finishes with a small ridged trunk and a sturdy hanging loop.
The look is classic and a little vintage, like a lace doily cut into a tree shape. Deep evergreen and warm cream are the only two colors. That keeps it elegant on a real tree, tied to a gift or hung in a window.
This pattern uses US crochet terms. The finished ornament measures 3.75 in (9.5 cm) wide and 4 in (10.2 cm) tall from apex to trunk. With the hanging loop, it is 5 in (12.7 cm) tall.
You work the green body flat in five rows, from the bottom up. Each shell row is followed by a chain row that sets the base for the next, narrower tier. After light blocking you add a two-round cream border, the two cream tier bands, the trunk and the loop.
Finished Size and Construction
- Finished size: 3.75 in (9.5 cm) wide × 4 in (10.2 cm) tall without the loop; 5 in (12.7 cm) with the loop
- Skill level: Easy-intermediate
- Terminology: US crochet terms
- Yarn weight: Fine (#2) mercerized cotton
- Hook: 2.5 mm
- Number of pieces: 1 (single ornament)
- Layout: 3 tiers of shells (3 + 2 + 1), stepped triangle
- Green body size before border: 3.25 in (8.3 cm) wide × 2.5 in (6.4 cm) tall
- Border depth: 0.25 in (0.6 cm) per side
- Trunk: 0.625 in (1.6 cm) wide × 0.75 in (1.9 cm) long
- Hanging loop: 1.25 in (3.2 cm) drop
Materials
Choose a smooth mercerized cotton in fine (#2) weight, about 155 m per 50 g. Mercerized cotton shows the fan stitches clearly and holds its shape after blocking. Avoid fuzzy or very stretchy yarns, because the picots and the diamond openings will blur.
- Dark green: 6 g / 19 m
- Ivory/cream: 5 g / 16 m
These quantities include a margin of about 25% for your gauge swatch and weaving in ends.
Tools:
– 2.5 mm crochet hook
– Tapestry needle
– Scissors
– Blocking mat and rust-proof pins
– Spray bottle with water
– Ruler or tape measure
– Optional: fabric stiffener for a very firm ornament
Abbreviations (US Terms)
- ch – chain
- sl st – slip stitch
- sc – single crochet
- dc – double crochet
- sp – space
- st(s) – stitch(es)
- RS – right side
Shell: 9 dc worked into the same stitch or chain.
Picot: ch 3, sl st in 3rd ch from hook.
Gauge and Checkpoints
Gauge is not critical for an ornament, but these checkpoints keep your tree in proportion. The first ornament you make is your test piece, so measure as you go.
- After Row 1: 3.25 in (8.3 cm) wide and 0.75 in (1.9 cm) tall, measured from foundation to the top center of a shell.
- After Row 3: 1.625 in (4.1 cm) tall.
- After Row 5: 2.5 in (6.4 cm) tall. Each tier after the first adds 0.875 in (2.2 cm).
- After border Round 2: 3.75 in (9.5 cm) wide × 3 in (7.6 cm) tall, not counting the trunk or loop.
Too big? Go down to a 2.25 mm hook, or tighten your foundation chain.
Too small? Go up to a 2.75 mm hook. Check that your shells are not pulled tight at their base.
A difference of 0.125 in (0.3 cm) is fine. Anything larger will change how the border picots line up visually.
Green Tree Body
Work in rows with dark green. Every shell sits in a single stitch, so the dc fan out upward from one base point.
Foundation: Ch 26.
Row 1 (RS): Sc in 2nd ch from hook. Skip 3 ch, shell in next ch, skip 3 ch, sc in next ch. Repeat from * 2 more times. Turn.
Count: 4 sc + 27 dc = 31 sts (3 shells).
Each repeat uses 8 chains. The first sc uses 1 chain and 1 chain is the turning chain: 1 + 1 + (3 × 8) = 26 ✓.
Row 2: Sl st in first sc and in next 4 dc. Sc in next dc (5th dc, the center of the shell). Ch 7, sc in center (5th) dc of next shell. Repeat from * once more. Turn. Leave the rest of the row unworked.
Count: 3 sc + 2 ch-7 sps.
The ch-7 spans the distance between the centers of the shells and sags slightly. This creates the small diamond openings between the fans.
Row 3: Ch 1, sc in first sc. Shell in 4th ch of next ch-7, sc in next sc. Repeat from * once more. Turn.
Count: 3 sc + 18 dc = 21 sts (2 shells).
The shell goes into the middle chain, so each middle-tier fan rises from a point centered above the gap between two bottom fans.
Row 4: Sl st in first sc and in next 4 dc. Sc in next dc (center of the shell), ch 7, sc in center dc of next shell. Turn.
Count: 2 sc + 1 ch-7 sp.
Row 5: Ch 1, sc in first sc, shell in 4th ch of ch-7, sc in last sc.
Count: 2 sc + 9 dc = 11 sts (1 shell).
Fasten off and weave in ends. The center (5th) dc of this shell is the apex of the tree.
Body checkpoint: 3.25 in (8.3 cm) wide × 2.5 in (6.4 cm) tall. Pin the body flat into the triangle and mist it lightly. Let it dry before you add the border; the fans are much easier to edge once they lie flat.
Border
The border is worked in cream with RS facing. It outlines the stepped silhouette. The outer half of each edge shell forms that tier’s side slope.
Border gauge: 8 sc = 1 in (2.5 cm) along the straight bottom edge. Two rounds of sc add 0.25 in (0.6 cm) on every side.
Round 1
Join cream at the bottom right corner, in the foundation chain that holds the end sc of Row 1.
- Bottom right corner group: 3 sc in this foundation chain.
- Bottom edge: Sc in each of the next 23 foundation chains.
- Bottom left corner group: 3 sc in the last foundation chain.
Left side (20 sc), from bottom to apex:
– Tier 1: 3 sc around the post of the outer dc of the shell. Sc in the tops of the next 3 dc (or into the sl sts on them). Sc in the end sc of Row 3. (7 sc)
– Tier 2: 3 sc around the post of the outer dc of the shell. Sc in the next 3 dc. Sc in the end sc of Row 5. (7 sc)
– Tier 3: 3 sc around the post of the outer dc of the shell. Sc in the next 3 dc. (6 sc)
Apex group: 3 sc in the center dc of the top shell.
Right side (20 sc): Work as for the left side in reverse order: Tier 3 (6 sc), Tier 2 (7 sc), Tier 1 (7 sc).
Sl st in first sc to join.
Count: 3 corner groups × 3 sc = 9, bottom 23, sides 2 × 20 = 40. Total 72 sc.
Why the math works: The foundation has 25 chains past the turning chain. The two end chains hold the corner groups, which leaves 23 for the bottom edge. Each tier side uses the same 3 + 3 pattern: 3 sc to wrap the slanted outer post and 3 sc across the exposed outer half of the shell top. One connecting sc then steps in to the next tier. The center dc of each tier shell is where the next tier’s sc sits, so nothing is counted twice: 7 + 7 + 6 = 20 per side.
Round 2
Number the Round 1 stitches to place the picots. Start with the stitch after the apex center sc and go down the left side:
- 1 = last stitch of the apex group
- 2–21 = left side
- 22–24 = left corner group
- 25–47 = bottom
- 48–50 = right corner group
- 51–70 = right side
- 71 = first stitch of the apex group
- 72 = apex center
Join cream in stitch 1. Ch 1. Sc in next 3 sts, picot. Repeat around, sc in every stitch, with these two exceptions:
- At stitch 36 (bottom center), work sc only, without a picot. This keeps the trunk area smooth.
- At stitch 72 (apex center), work sc only, without a picot. The loop goes here.
Sl st in first sc to join. Fasten off.
Count: 72 sc + 22 picots. That is 7 picots on each side, 1 at each bottom corner and 6 along the bottom.
Why the math works: 72 stitches divide evenly into 24 groups of 3. Leaving out the apex and bottom-center picots gives 22. Stitch p mirrors stitch 72 − p, so the picots fall symmetrically on the left and right sides.
Border checkpoint: 3.75 in (9.5 cm) wide × 3 in (7.6 cm) tall.
Cream Tier Bands
These bands sit across the base of the middle and top tiers. They cover the green ch-7 rows and give the tree its frosted look. Work with RS facing, wrapping the sc around the chains.
Band 1 (over Row 2): Join cream with sc around the first sc of Row 2. Over the next ch-7, work (2 sc, picot) 3 times, then 2 sc. Sc around the next sc. Repeat the ch-7 section once more, then sc around the last sc. Fasten off.
Count: 3 + 16 = 19 sc + 6 picots.
Band 2 (over Row 4): Join cream with sc around the first sc of Row 4. Over the ch-7, work (2 sc, picot) 3 times, then 2 sc. Sc around the last sc. Fasten off.
Count: 2 + 8 = 10 sc + 3 picots.
Wrap the sc loosely around the chain. If you work them too tight, the diamond openings close up and the fans buckle.
Trunk
Join cream in stitch 34 of border Round 2, which is the bottom stitch 2 places before center.
Row 1: Ch 1, sc in stitches 34–38. Turn. (5 sc)
Rows 2–6: Ch 1, sc in back loop only of each sc. Turn. (5 sc each row)
Working in the back loop forms the ridged texture. Fasten off.
Trunk checkpoint: 0.625 in (1.6 cm) wide × 0.75 in (1.9 cm) long.
Hanging Loop
Join cream with sl st in the apex center sc of Round 2. Ch 20, then sl st in the same stitch to form a loop. Ch 1 and work 30 sc into the loop. Sl st in the apex stitch and fasten off.
The loop should drop 1.25 in (3.2 cm) above the apex, which brings the total height to 5 in (12.7 cm).
Final Blocking
- Weave in all ends along stitches of the same color.
- Lay the ornament RS up on a blocking mat.
- Pin the three outer corners first: the apex and both bottom corners. Check 3.75 in (9.5 cm) across the bottom.
- Pin each tier step. Push the outer shell tips outward so the stepped silhouette looks crisp.
- Gently open each diamond space with a pin tip.
- Use a pin to lift out every picot on the border and the bands.
- Straighten the trunk and pin it square.
- Mist the ornament until it is damp but not soaked. If you are using stiffener, apply it now.
- Let it dry completely, ideally for 12 hours, before you unpin it.
Final Quality-Control Checklist
- [ ] The tiers hold 3, 2 and 1 shells, each with 9 dc
- [ ] Every fan spreads upward from a single base point
- [ ] There are diamond openings between neighboring fans
- [ ] Border Round 1 totals 72 sc
- [ ] Border Round 2 has 22 picots, placed symmetrically
- [ ] Band 1 has 6 picots and Band 2 has 3 picots
- [ ] The trunk is 5 sts wide and 6 rows long, centered under the tree
- [ ] The finished size is 3.75 in (9.5 cm) × 4 in (10.2 cm)
- [ ] The loop is firm and centered at the apex
- [ ] All ends are secure and hidden
Troubleshooting
Shells curl or cup. Your dc are too short or your foundation is too tight. Use a looser foundation chain and block flat.
Middle-tier fans lean sideways. The shell probably went into the wrong chain. Count the chains and work it into the 4th ch of the ch-7.
The tree pulls narrower at the second tier. The ch-7 is too tight. Chain more loosely, or go up a hook size for the chain rows only.
The border ruffles along the sides. You are probably working more than 3 sc around each outer post. Recount to 20 sc per side.
The border puckers at the corners. Make sure each corner gets 3 sc in the same stitch.
Picots are lopsided. Recount Round 1 to 72 sc before you start Round 2.
The trunk is off-center. Count 33 stitches from stitch 1 and join in stitch 34.
The bands close up the diamond openings. Work the sc looser, around the chain only. Do not work them into the shell base.
Care
Hand wash in cool water with mild soap and roll the ornament in a towel to remove excess water. Reshape it and pin it flat to dry. Store it flat or hanging so the picots stay crisp.

Final Notes
The measurement chain is short and easy to follow:
- Row 1 is 3.25 in (8.3 cm) wide.
- After Row 5, the green body is 2.5 in (6.4 cm) tall.
- The border brings it to 3.75 in (9.5 cm) × 3 in (7.6 cm).
- The trunk adds 0.75 in (1.9 cm), for 4 in (10.2 cm) in total.
- The hanging loop brings it to 5 in (12.7 cm).
If you hit each checkpoint, the stitch counts take care of the rest: 31, 21 and 11 stitches through the tiers, then 72 sc around the border. Make one for every branch, or make a single one to tuck into a holiday card.
Happy crocheting!