

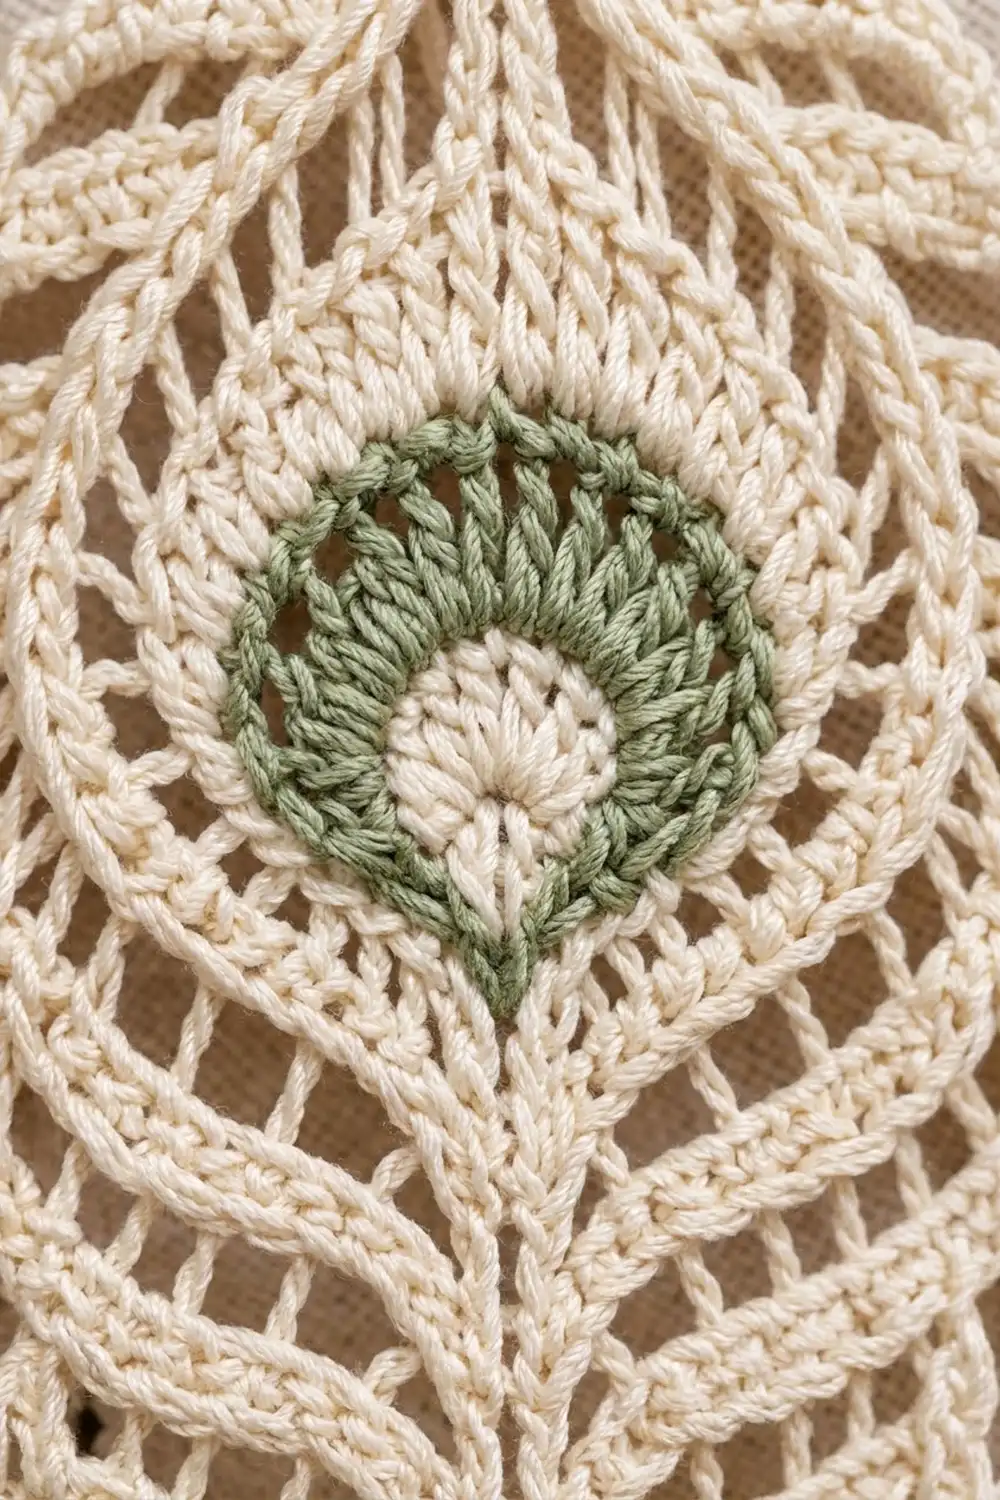
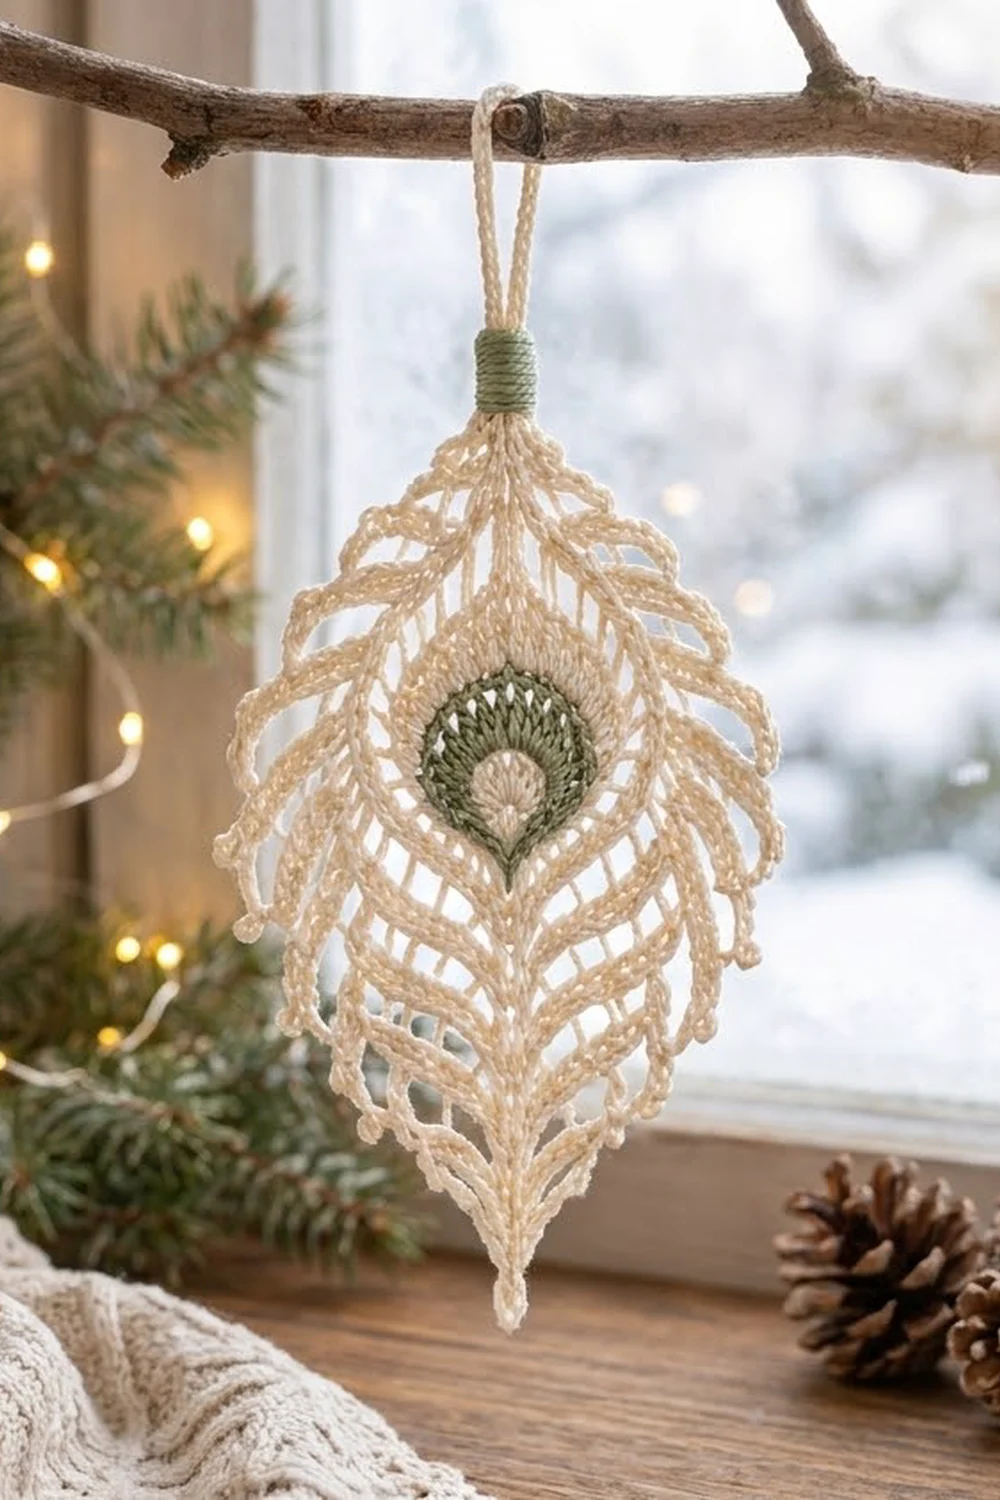
The Frosted Plume is a lacy peacock feather ornament worked in soft cream thread with a small sage green “eye.” It has a pointed oval shape with a short tip at the top and a longer one at the bottom. Open treble ribs fan out like feather barbs, and tiny picots dot the edge.
The colors are quiet: cream for the body and frame, and sage green for the eye ring. The ornament suits a tree, a window, or a gift. Hang one on its own, or make a few and string them along a branch.
This pattern uses US crochet terms. The finished ornament measures 3 in (7.6 cm) wide and 5 in (12.7 cm) long, not counting the hanging loop. With the loop, it is about 6.25 in (15.9 cm) long.
It is a single piece worked in joined rounds. You start with a round eye and frame it as a teardrop with a point at each end. Then you add two rounds of openwork barbs and finish with a picot border. The crocheted hanging loop and its wrapped collar go on last.
Finished Size and Construction
- Finished size: 3 in (7.6 cm) wide x 5 in (12.7 cm) long, plus a 1.25 in (3.2 cm) loop
- Skill level: Intermediate
- Terminology: US crochet terms
- Yarn weight: Size 3 crochet thread (super fine)
- Hook: 2.25 mm (B-1)
- Number of pieces: 1
- Layout: Single ornament, worked in the round from the center out
- Piece size: 3 in x 5 in (7.6 cm x 12.7 cm)
- Size before border: 2.5 in x 4.5 in (6.4 cm x 11.4 cm)
- Border depth: 0.25 in (0.6 cm) on every edge
Materials
Use size 3 mercerized cotton crochet thread. Mercerized cotton holds its shape after blocking, shows stitch detail clearly, and has the soft sheen you see in the photo. Avoid fuzzy or very stretchy yarns, because the open barbs will sag.
- Cream (Color A): 10 g, about 40 m
- Sage green (Color B): 2 g, about 8 m
These quantities include a margin for your gauge test and tails. One ornament uses noticeably less than the full amount.
Pick a green that is clearly darker than the cream but still soft. A very bright green will overpower the quiet look of the feather.
Tools
- 2.25 mm (B-1) crochet hook
- Tapestry needle with an eye large enough for size 3 thread
- 2 stitch markers
- Scissors
- Blocking mat or folded towel, rustproof pins, and a spray bottle
- Optional: fabric stiffener or a light starch spray
Abbreviations (US Terms)
- ch: chain
- sl st: slip stitch
- sc: single crochet
- dc: double crochet
- tr: treble crochet
- sp(s): space(s)
- st(s): stitch(es)
- MR: magic ring
- sk: skip
- [ ] x N: repeat the steps in brackets N times
Special stitch (picot): Ch 3, then sl st in the 3rd ch from the hook. The picot makes the small dot along the edge and does not count as a stitch.
Gauge and Checkpoints
Gauge matters more than usual here, because the border math depends on the size of each round. Make the eye (Rounds 1–3) as your test piece first. Measure it, and only continue when it matches.
- Gauge: After Round 3, the eye measures 1.5 in (3.8 cm) across.
- Border gauge: 8 sc = 1 in (2.5 cm) along the finished edge.
Checkpoints (measured lying flat, before blocking)
- After Round 1: about 0.6 in (1.5 cm) across
- After Round 2: about 1.1 in (2.8 cm) across
- After Round 3: 1.5 in (3.8 cm) across
- After Round 4: 1.75 in (4.4 cm) wide x 2.25 in (5.7 cm) tall, tips included
- After Round 5: 2 in (5.1 cm) wide x 3.25 in (8.3 cm) tall
- After Round 6: 2.5 in (6.4 cm) wide x 4.5 in (11.4 cm) tall
- After Round 7: 3 in (7.6 cm) wide x 5 in (12.7 cm) tall
If your eye is too big, go down to a 2.0 mm hook. If it is too small, go up to a 2.5 mm hook. Change hooks instead of forcing your stitches tighter or looser, because forced tension makes the barbs uneven. Make a new eye with the new hook and measure again.
Measure the later rounds by gently easing the piece flat, without stretching. The open rounds relax a little, so a difference of 0.125 in (0.3 cm) is fine.
Pattern
The Eye
Round 1 (Cream): Make a MR. Ch 3 (counts as dc), then work 11 dc into the ring. Pull the ring closed and sl st to the top of the beginning ch-3. (12 dc) Fasten off.
The center should lie flat with no gap in the middle. If you see a hole, pull the tail tighter before you weave it in.
Round 2 (Sage green): Join green with a sl st in any st. Ch 3 (counts as dc), dc in the same st, then work 2 dc in each remaining st around. Sl st to the top of the beginning ch-3. (24 dc) Fasten off.
These 24 dc stand like spokes and form the green ring around the cream center.
Round 3 (Cream): Join cream with a sl st in any st. Ch 1, [sc in next st, 2 sc in next st] x 12. Sl st to the first sc. (36 sc) Do not fasten off.
Measure now: the eye should be 1.5 in (3.8 cm) across. This is your main gauge check.
The Teardrop Frame
Place a marker in the sc you joined into. This stitch becomes the bottom tip of the feather. The stitch directly across from it, 18 stitches away, becomes the top tip.
Round 4 (Cream, conversion round): Ch 1. Work (sc, ch 3, sc) in the first st for the bottom point. Sc in the next 17 sts. Work (sc, ch 3, sc) in the next st for the top point. Sc in the next 17 sts. Sl st to the first sc.
Count: 36 sc (1 in each existing st) + 2 extra sc at the points = 38 sc, plus 2 ch-3 point sps. Each side has 17 sc between the point stitches.
The Barbs
Round 5 (Cream, arch round): Sl st into the bottom ch-3 sp. Ch 1, then work (sc, ch 5, sc) in the same sp.
Side 1: [Ch 4, sk 2 sc, sc in next sc] x 6, ch 4, sk 1 sc.
Top point: (Sc, ch 5, sc) in the top ch-3 sp.
Side 2: [Ch 4, sk 2 sc, sc in next sc] x 6, ch 4, sk 1 sc. Sl st to the first sc.
Count: 16 sc, 14 ch-4 sps (7 per side), 2 ch-5 point sps.
Why it fits: between the two ch-3 sps, each side holds 19 sc (1 point sc + 17 side sc + 1 point sc). The repeat uses 6 x 3 = 18 of them, and the final skip uses the last one, so 18 + 1 = 19.
Round 6 (Cream, rib round): Sl st into the bottom ch-5 sp. Ch 4 (counts as tr), then work (2 tr, ch 7, 3 tr) in the same sp. The long ch-7 makes the longer bottom tip.
Side 1: Ch 1, [(tr, ch 2, tr) in next ch-4 sp, ch 1] x 7.
Top point: (3 tr, ch 3, 3 tr) in the top ch-5 sp.
Side 2: Ch 1, [(tr, ch 2, tr) in next ch-4 sp, ch 1] x 7. Sl st to the top of the beginning ch-4.
Count: 40 tr total (6 at each point + 14 on each side), 14 ch-2 sps, 16 ch-1 sps, 1 ch-7 sp, 1 ch-3 sp.
Each (tr, ch 2, tr) group opens into a V that leans outward from the eye. Seven V’s on each side give the barbs their feathered look. Gently pull the piece from tip to tip and the oval shape will settle in.
Measure now: 2.5 in (6.4 cm) wide x 4.5 in (11.4 cm) tall. This is your size before the border. Do not fasten off.
Border
The border is one round of sc with picots. It firms up the open barbs and adds the dotted edge.
Border gauge: 8 sc = 1 in (2.5 cm). After this round, each long side of the oval measures about 5.25 in (13.3 cm) along its curve.
Round 7 (Cream, picot border): Ch 1, sc in the same st as the join and in the next 2 tr. (3 sc)
Bottom point: (4 sc, picot, 4 sc) in the ch-7 sp. Sc in the next 3 tr.
Side 1: Sc in the ch-1 sp, [sc in next tr, (sc, picot, sc) in next ch-2 sp, sc in next tr, sc in next ch-1 sp] x 7.
Top point: Sc in the next 3 tr, 3 sc in the ch-3 sp, sc in the next 3 tr. Place a marker in the middle sc of the 3 sc at the top.
Side 2: Sc in the ch-1 sp, [sc in next tr, (sc, picot, sc) in next ch-2 sp, sc in next tr, sc in next ch-1 sp] x 7. Sl st to the first sc.
Count: 40 sc (1 in each tr) + 55 sc worked into spaces = 95 sc, plus 15 picots.
The 55 sc in the spaces break down like this:
- 16 ch-1 sps x 1 sc = 16
- 14 ch-2 sps x 2 sc = 28
- 8 sc in the ch-7 sp
- 3 sc in the ch-3 sp
That gives 16 + 28 + 8 + 3 = 55.
Per side: 3 sc (bottom point tr) + 1 sc + 35 sc (7 repeats of 5) + 3 sc (top point tr) = 42 sc and 7 picots. The point spaces add 8 sc at the bottom and 3 sc at the top. Check: 42 + 42 + 8 + 3 = 95.
Why the math works: each side runs about 5.25 in (13.3 cm). At 8 sc per 1 in (2.5 cm), that edge needs 5.25 x 8 = 42 sc, which is exactly what each side holds. The picots sit on top of the sc and don’t change the count, so the edge lies flat without ruffling or cupping.
Hanging Loop
Do not fasten off after Round 7. Sl st into the marked middle sc at the top.
Loop: Ch 20, then sl st in the same top sc. Turn, and work 28 sc into the ch-20 loop. Sl st into the top sc again.
Fasten off, leaving a 12 in (30.5 cm) tail. Thread the tail onto a tapestry needle and wrap it tightly 8 to 10 times around the base of the loop, just above the top point. Pass the needle up under the wraps, then back down through the center to lock them. This makes the small rounded collar at the top of the feather. The loop should stand about 1.25 in (3.2 cm) tall.
Final Blocking
- Weave in all ends inside sc stitches so they don’t show through the open barbs. Leave any end you still need for shaping.
- Soak the ornament in cool water for 5 minutes, then press out the water in a towel. Do not wring it.
- Lay it face up on a blocking mat. Pin the bottom tip and the top tip first, so the piece measures 5 in (12.7 cm) from tip to tip.
- Pin the widest point on each side so the ornament measures 3 in (7.6 cm) across.
- Pin each picot outward, working from the top down on both sides, so the barbs open evenly into V’s.
- Shape the eye into a smooth circle with your fingertips. It should still measure about 1.5 in (3.8 cm).
- For a stiffer ornament, spray lightly with starch or brush on diluted fabric stiffener now.
- Let it dry completely, usually 12 to 24 hours, before you remove the pins.
Final Quality-Control Checklist
- The ornament measures 3 in (7.6 cm) x 5 in (12.7 cm), not counting the loop.
- The eye has a cream center and a complete green ring, with no gaps.
- Round 4 has 38 sc, and the two point spaces sit directly across from each other.
- Each side has 7 open V-ribs, matching the other side.
- The bottom tip is longer than the top tip.
- The border has 95 sc and 15 picots: 7 picots on each side and 1 at the bottom tip.
- The edge lies flat with no ruffling or cupping.
- The loop stands about 1.25 in (3.2 cm), and the wrapped collar is tight.
- All ends are woven in and trimmed close.
Troubleshooting
The eye ruffles. Your dc are too loose for the stitch count. Go down a hook size, or check that Round 2 has exactly 24 dc.
The eye cups. Round 2 may have fewer than 24 dc, or Round 3 fewer than 36 sc. Recount and redo the round.
The ornament looks round instead of oval. The point stitches in Round 4 aren’t directly across from each other. Count 18 stitches from the marker to the top point before you work Round 4.
One side has more V’s than the other. You probably skipped the wrong number of sc in Round 5. Each side needs exactly 7 ch-4 arches.
The border waves. You worked extra sc into the spaces. Recount the side: it should hold 42 sc.
The border pulls tight. You skipped a ch-1 space. Each ch-1 sp gets 1 sc.
The loop is floppy. Work the 28 sc more firmly, or add a light starch after blocking.
Care
Hand wash in cool water with mild soap, press out the water in a towel, then reshape and pin flat to dry. Store the ornament flat or hanging, away from anything heavy that could crush the barbs.
Final Notes
The whole ornament depends on one chain of measurements:
- The eye sets the gauge at 1.5 in (3.8 cm).
- The teardrop frame grows it to 1.75 in x 2.25 in (4.4 cm x 5.7 cm).
- The arch round reaches 2 in x 3.25 in (5.1 cm x 8.3 cm).
- The rib round brings it to 2.5 in x 4.5 in (6.4 cm x 11.4 cm).
- The picot border adds 0.25 in (0.6 cm) on every edge, for a finished 3 in x 5 in (7.6 cm x 12.7 cm) feather.
If each checkpoint matches, the border counts work out and the edge lies flat. Check the eye carefully and keep the points lined up, and the rest will follow.
Happy crocheting!