

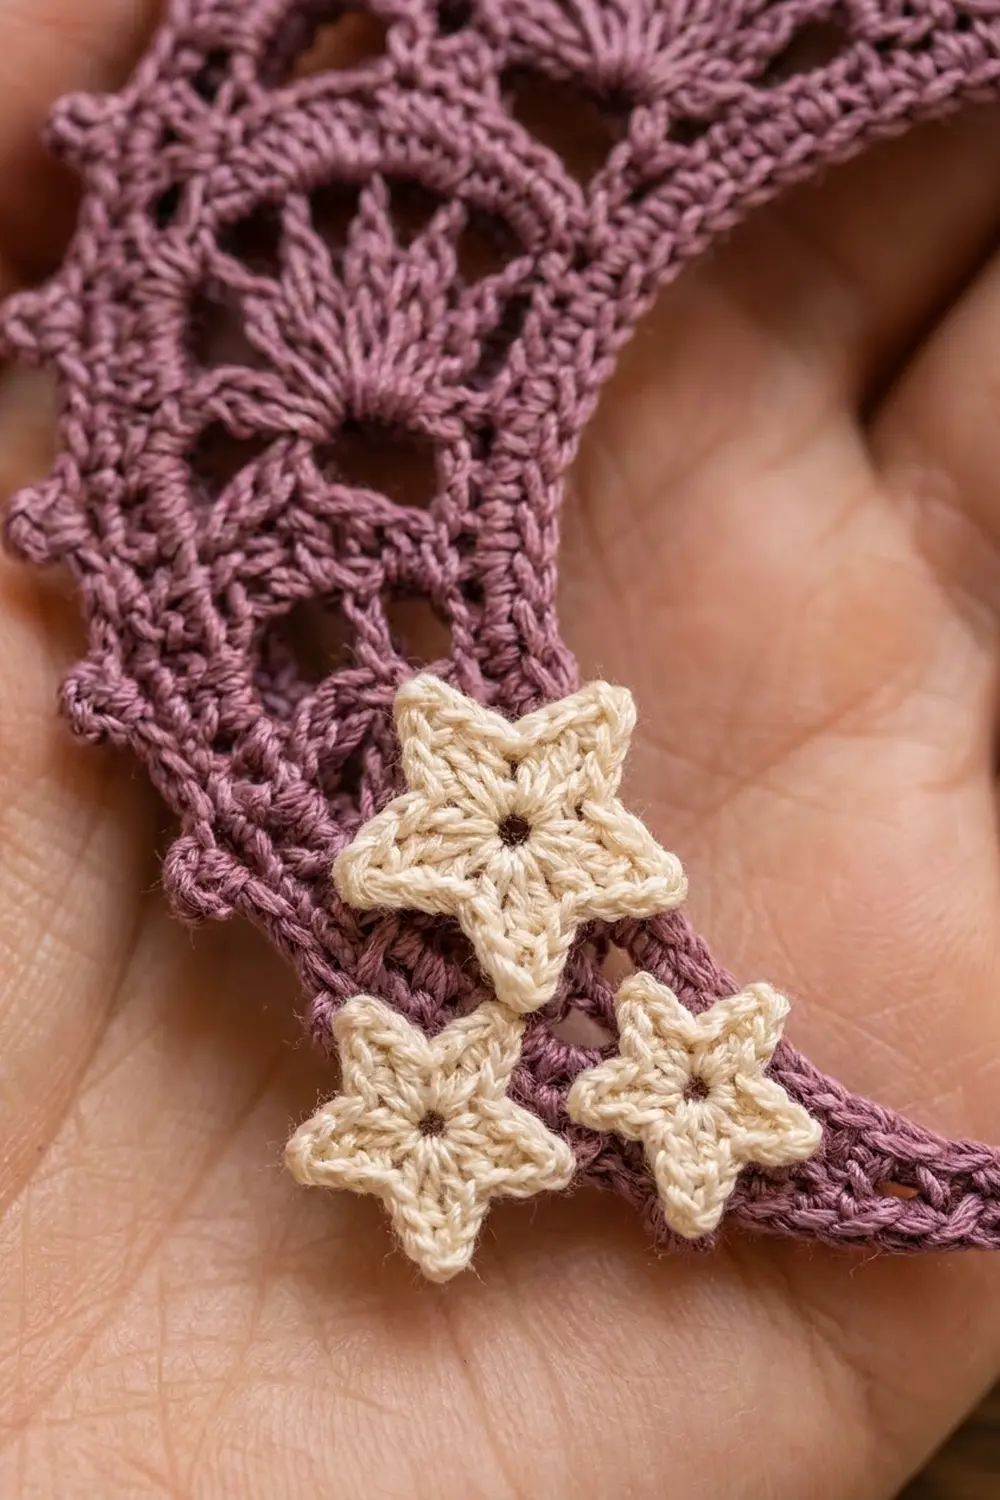
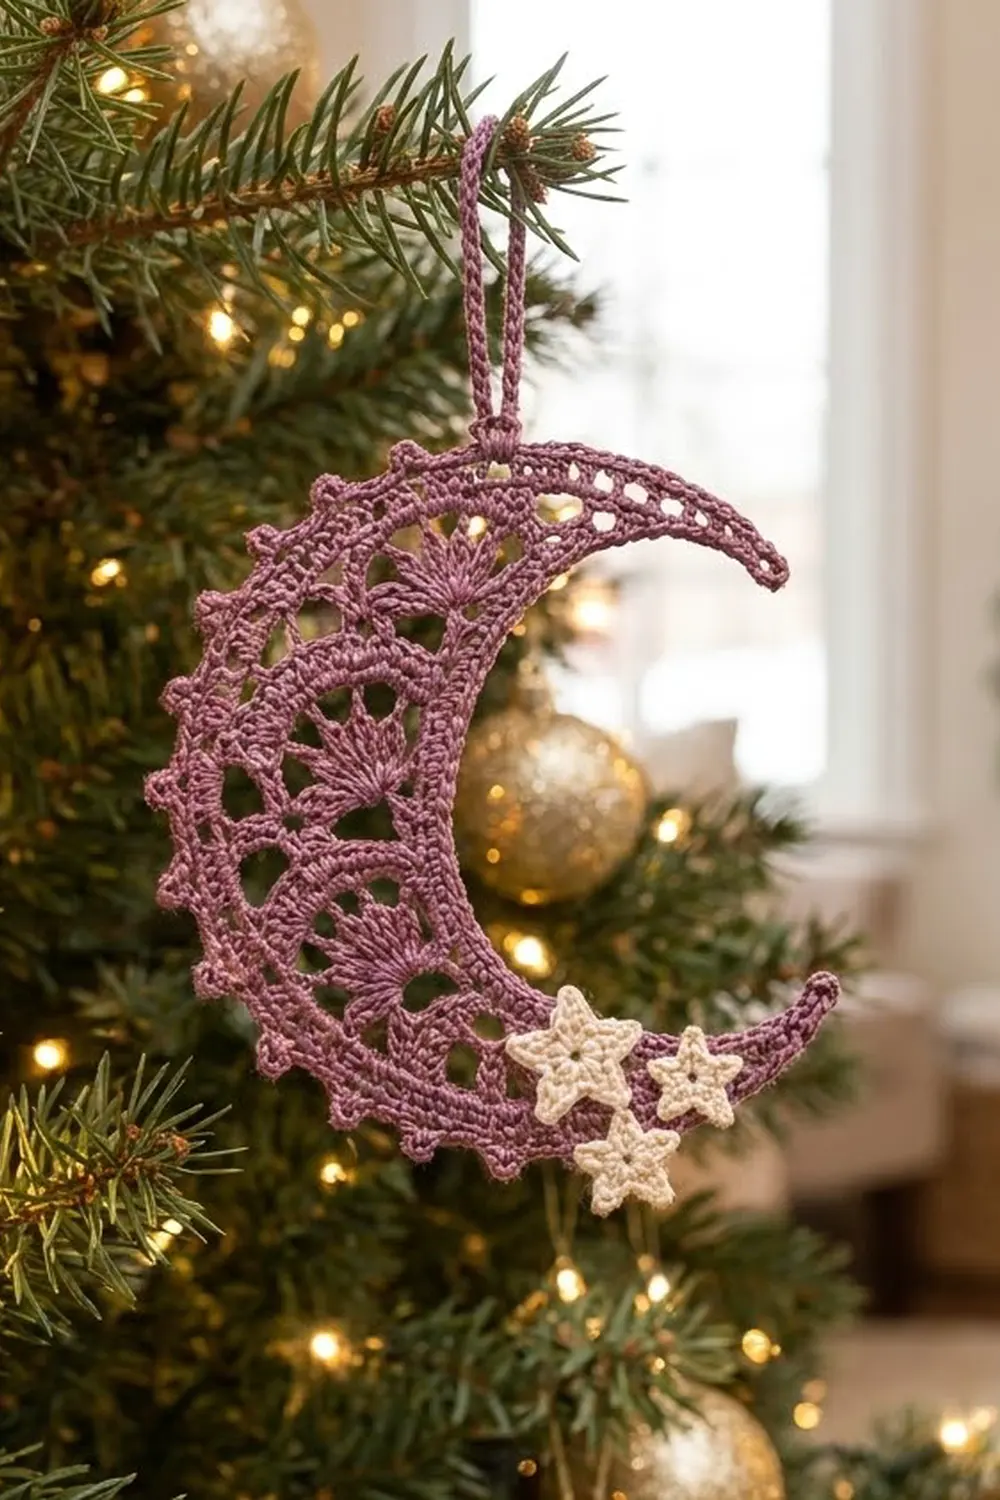
The Lunelace Crescent is a small lace moon ornament with a lot of detail. Five treble crochet fans sit along the curve, a picot edge runs from tip to tip, and three cream stars are clustered at the lower point.
The moon is worked in a dusty mauve-plum cotton thread and the stars are soft cream. The two colors read as gentle and a little vintage, so the ornament works on a Christmas tree, a window, a gift tag or a nursery mobile.
This pattern uses US crochet terms. The finished moon is about 5.5 in (14.0 cm) tall and 3.75 in (9.5 cm) wide. The band is 1.5 in (3.8 cm) deep at its widest, and the hanging loop adds about 1.25 in (3.2 cm).
The construction is simple: five rows worked flat, back and forth. You start with a straight chain that becomes the inner curve. Graded stitch heights and increases in the center bend the strip into a crescent as you work outward. A picot row finishes the outer edge, and then you add a hanging loop and three sewn-on stars.
Finished Size and Construction
- Finished size: 5.5 in (14.0 cm) tall x 3.75 in (9.5 cm) wide, not including the loop
- Skill level: Intermediate
- Terminology: US crochet terms
- Yarn weight: Size 3 cotton crochet thread
- Hook: 1.75 mm (US steel size 5)
- Number of pieces: 1 crescent, plus 3 small star appliqués sewn on
- Layout: Single crescent, with the stars clustered near the lower tip
- Inner edge length: 7.5 in (19.1 cm) along the curve
- Size before border (after Row 4): band 1.25 in (3.2 cm) deep at the center
- Border depth (Row 5 picots): 0.25 in (0.6 cm)
Materials
Yarn: Use a smooth, mercerized cotton thread in size 3. Mercerized cotton shows the lace clearly, blocks crisply and holds the curve. Avoid fuzzy or very stretchy fibers, because the fans will lose their shape.
- Mauve-plum (Color A): 12 g, about 20 m, for the moon and loop
- Cream (Color B): 3 g, about 5 m, for the three stars
These amounts include a margin of about 25% for swatching and weaving in ends.
Tools:
– 1.75 mm (US steel size 5) crochet hook
– Tapestry needle with a sharp point
– Small scissors
– Blocking board or foam mat
– Rustproof pins
– Spray bottle, plus optional light spray starch
– Stitch marker
Abbreviations (US Terms)
- ch – chain
- sl st – slip stitch
- sc – single crochet
- hdc – half double crochet
- dc – double crochet
- tr – treble crochet
- sk – skip
- sp – space
- st(s) – stitch(es)
Special stitches:
- Fan: Work (tr, ch 1) 6 times, then tr, all into the same stitch. That makes 7 tr and 6 ch-1 spaces.
- Picot: Ch 3, then sl st in the 3rd ch from the hook.
Gauge and Checkpoints
Gauge: 16 sc = 2 in (5.1 cm), which is 8 sc per inch.
Make one test piece before you start. Ch 17, work sc in the 2nd ch from the hook and across (16 sc), then work 3 more rows of sc. Measure across the middle without stretching.
Checkpoints during the moon:
- After Row 1: the straight strip measures 7.5 in (19.1 cm).
- After Row 2: the strip has started to curve, and the center is 0.5 in (1.3 cm) deep.
- After Row 3: the center depth is 1 in (2.5 cm), and the fans spread without cupping.
- After Row 4: the center depth is 1.25 in (3.2 cm).
- After Row 5: the center depth is 1.5 in (3.8 cm) including the picots.
If your piece is too big, go down to a 1.5 mm hook. If it is too small, go up to a 2.0 mm hook. If your Row 1 is within 0.25 in (0.6 cm) of 7.5 in (19.1 cm), keep going. Blocking will even out small differences.
The Moon
Use Color A. Turn at the end of each row. The turning ch 1 does not count as a stitch.
Row 1 (inner edge): Ch 61. Sc in the 2nd ch from the hook and in each ch across. (60 sc)
This row is the smooth, solid inner curve of the moon.
Row 2 (shaping row): Ch 1, turn. Work these sections in order:
- Sl st in the first 3 sts.
- Sc in the next 6 sts.
- Hdc in the next 6 sts.
- Dc in the next 4 sts.
- [2 dc in the next st, dc in the next st] 11 times.
- Dc in the next 4 sts.
- Hdc in the next 6 sts.
- Sc in the next 6 sts.
- Sl st in the last 3 sts.
(71 sts: 3 sl st, 6 sc, 6 hdc, 41 dc, 6 hdc, 6 sc, 3 sl st)
The center 30 stitches of Row 1 become 41 dc: 8 plain dc plus 11 increases that each make 3 dc (8 + 33 = 41). Each tip has 15 stitches. The short stitches at the ends and the tall, increased stitches in the middle are what bend the strip into a crescent.
Row 3 (fan row): Ch 1, turn.
- Sl st in the first 3 sts.
- Sc in the next 6 sts.
- Hdc in the next 6 sts. That covers the 15 tip stitches.
- Sc in the next dc. This is the first anchor.
- [Sk 3 sts, Fan in the next st, sk 3 sts, sc in the next st] 5 times.
- Hdc in the next 6 sts.
- Sc in the next 6 sts.
- Sl st in the last 3 sts.
(5 fans, 6 anchor sc, 15 tip sts at each end)
Check the count: 15 + 1 + (5 x 8) + 15 = 71 stitches used, which matches Row 2. The fans are spaced evenly, with the first and last fan sitting 4 stitches from the end anchors.
Row 4 (arch row): Ch 1, turn.
- Sl st in the first 3 sts.
- Sc in the next 12 sts.
- Sc in the first anchor sc.
- [Sc in the first tr of the next fan, (sc in the ch-1 sp, sc in the next tr) 6 times, sc in the next anchor sc] 5 times.
- Sc in the next 12 sts.
- Sl st in the last 3 sts.
(101 sts: 15 at each tip and 71 sc across the fans)
Each fan becomes 13 sc on top (7 tr + 6 spaces), plus 1 sc for its anchor, so each repeat makes 14 sc. Across the fans that gives 1 + (5 x 14) = 71. This solid row frames the fans and gives the outer edge a firm base for the picots.
Do not fasten off. Continue straight into the border.
Border
Border gauge: One picot about every 5 sc. Each picot sticks out about 0.25 in (0.6 cm).
Row 5 (picot edge): Ch 1, turn.
- First tip: sl st in the first 3 sts, sc in the next 6 sts, picot, sc in the next 6 sts. (15 sts, 1 picot)
- Fan section: sc in the next st, [sc in the next 5 sts, picot] 14 times. (71 sc, 14 picots)
- Second tip: sc in the next 6 sts, picot, sc in the next 6 sts, sl st in the last 3 sts. (15 sts, 1 picot)
Total: 101 sts and 16 picots. Fasten off, leaving a 6 in (15.2 cm) tail.
Why the math works: The fan section has 71 stitches, which is 1 + (14 x 5). One plain sc starts the section, then 14 groups of 5 sc each end in a picot, so the picots land evenly across all five fans. Each tip has 15 stitches. One picot sits in the middle of the 12 sc, and the 3 slip stitches at the point stay smooth so the tip comes to a clean point. Because Row 5 works one stitch into each of the 101 stitches of Row 4, no stitches are added or lost, and the outer curve lies flat.
Inner edge: No border is needed. Row 1 is the finished inner curve.
Hanging Loop
Hold the moon so the upper tip points right, with the outer curve on the left. Count the picots from the upper tip, counting the tip picot as number 1. Join Color A with a sl st in the sc just after the 3rd picot.
- Ch 20 and sl st in the same st to form the loop.
- Turn the work and work 26 sc over the ch-20 loop so the chain is fully covered.
- Sl st in the same base st and fasten off.
The finished loop stands about 1.25 in (3.2 cm) tall and is solid and firm, as in the photos. Weave the ends back into the loop base.
Stars (Make 3)
Use Color B.
Round 1: Ch 4 and sl st to the first ch to form a ring. Ch 1 and work 10 sc in the ring. Join with a sl st to the first sc. (10 sc)
The ring leaves the small open center you can see in each star.
Round 2: [Ch 4, sl st in the 2nd ch from the hook, sc in the next ch, hdc in the next ch, sk the next sc, sl st in the next sc] 5 times. (5 points)
Each point uses 2 sc from Round 1, and 5 x 2 = 10, so the round closes evenly. Fasten off, leaving an 8 in (20.3 cm) tail for sewing. Each star measures about 0.75 in (1.9 cm) from point to point.
Placement: Lay the moon right side up with the lower tip pointing right.
- Star 1: On the band about 1.25 in (3.2 cm) up from the lower tip, covering Rows 2–4.
- Star 2: Closer to the tip, just touching one point of Star 1.
- Star 3: Tucked below and between the first two, slightly overlapping the picot edge.
The stars sit side by side in a single layer, touching at their points but not stacked. Use small, hidden stitches through the Round 1 ring and the base of each point to sew them on. Keep the stitches inside the moon’s solid sc and dc so they don’t show in the lace.
Final Blocking
- Weave in all the ends along solid rows, never through the open fans.
- Soak the moon and the attached stars in cool water for 5 minutes. Press out the water gently in a towel and do not wring.
- Lay the moon on the board. Pin the inner curve into a smooth arc so the tips are about 5.5 in (14.0 cm) apart.
- Pin the center of the outer curve so the band is 1.5 in (3.8 cm) deep.
- Pin each fan spoke straight, then pin each picot outward.
- Pin both tips to a sharp point.
- Mist with light starch if you like, and let it dry completely, at least 8 hours.
- Unpin and check that it still measures 5.5 in (14.0 cm) by 3.75 in (9.5 cm).
Final Quality-Control Checklist
- Row 1 has 60 sc and the inner curve is smooth.
- There are exactly 5 fans, each with 7 tr.
- Row 4 has 101 sts.
- There are 16 picots: 1 on each tip and 14 across the fans.
- The tips come to clean, matching points.
- The loop is solid, centered on its base stitch and firmly anchored.
- The 3 stars are flat, all 5 points are sharp, and the centers are open.
- No ends or sewing stitches show on the front.
- The finished size is within 0.25 in (0.6 cm) of the target.
Troubleshooting
The crescent won’t curve and stays almost straight. You probably missed some of the 11 increases in Row 2. Recount for 41 dc.
The fans ruffle or cup. Your tension is loose on the tall stitches. Go down a hook size, or chain more tightly in the ch-1 spaces.
The fans look squeezed. Make sure you skipped exactly 3 sts on each side of every fan.
The tips curl. Block them flat with starch and pin right at the sl sts.
The picots look uneven. Count the 5 sc between each picot again. The fan section must total 71 sc.
The stars pucker. Your sewing stitches are pulled too tight. Loosen them and sew only through the ring and the base of each point.
The loop twists. Spread the 26 sc evenly around the chain before joining.
Care
Hand wash in cool water with a mild soap, press out the water in a towel and dry flat. Re-starch the ornament and pin it again if it softens after a season of storage.
Final Notes
Each row builds on the measurements of the one before it. Row 1 sets the 7.5 in (19.1 cm) inner curve. Row 2 bends the strip with 71 graded stitches, and Row 3 places 5 fans across the 41 center dc. Row 4 closes the fans into 101 solid stitches. Row 5 adds 16 picots and brings the moon to 5.5 in (14.0 cm) by 3.75 in (9.5 cm). Check your measurement at each stage, block carefully and finish with the three cream stars.
Happy crocheting!