

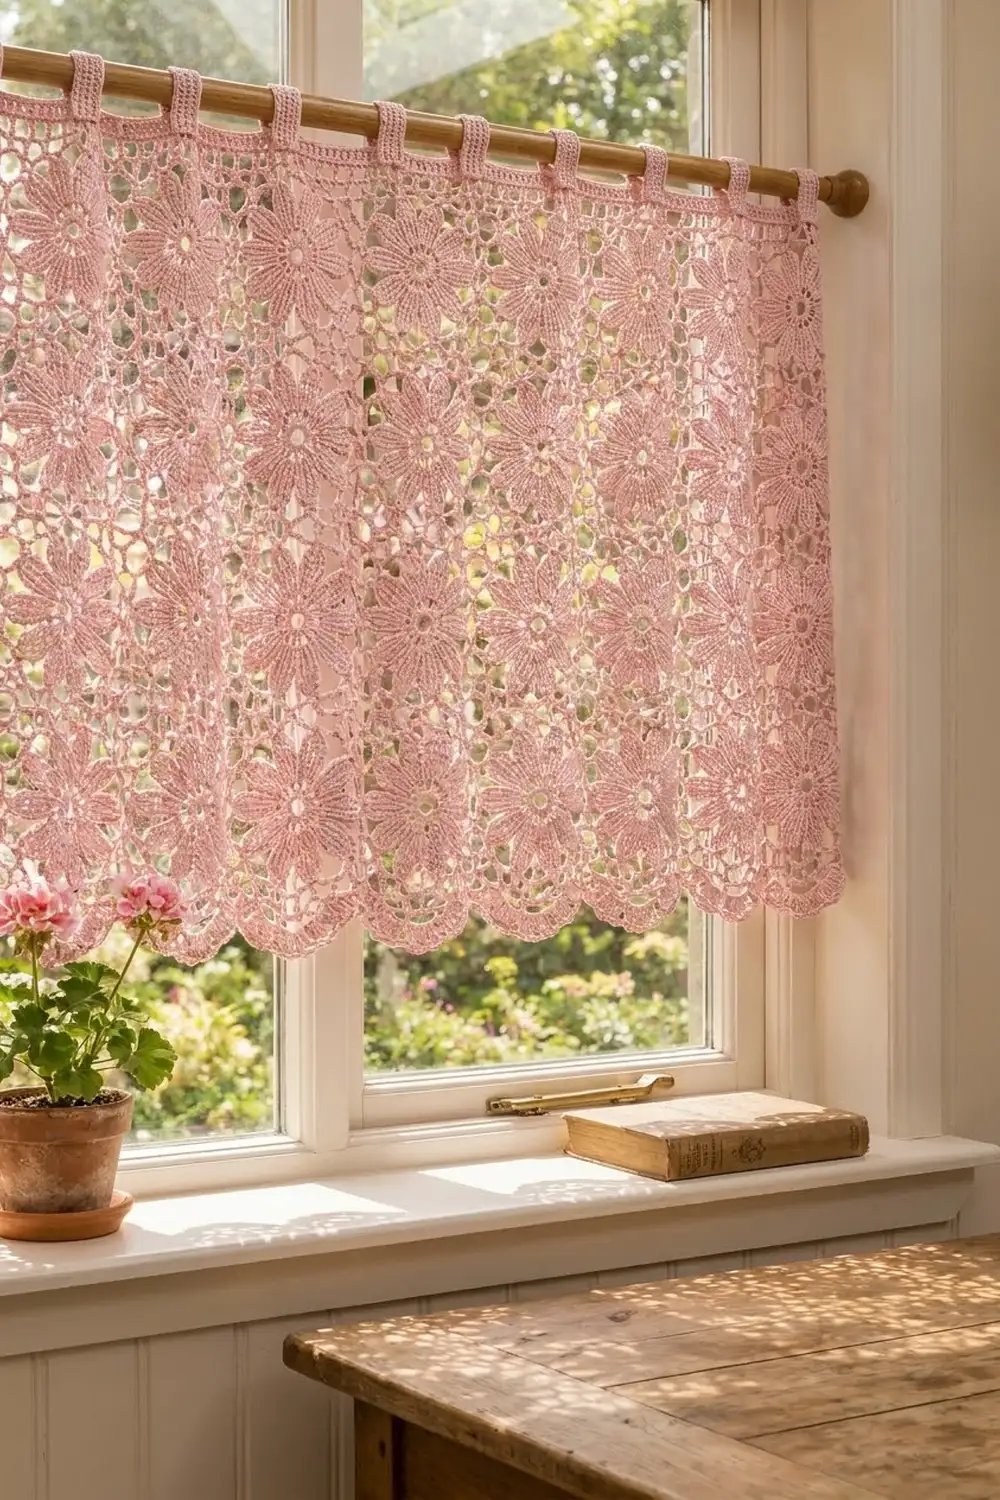
The Rose Daisy Café Curtain is a light, lacy window panel made of square flower motifs. Each motif has a twelve-petal daisy with an open center ring inside a chain-mesh frame. When the motifs are joined, they form a soft grid that lets daylight through.
It is worked in one dusty rose cotton for a calm, vintage cottage look. A solid header band with tab tops slides onto a wooden rod, and small scallops finish the lower edge.
This pattern uses US crochet terms. The finished curtain measures 40.4 in wide x 22.9 in tall (102.6 cm x 58.2 cm), not counting the tab loops.
You will make 32 identical motifs and join them 8 across and 4 down with a flat slip stitch seam. Then you add one border round, a four-row header with nine tabs, and a scalloped bottom edge.
Finished Size and Construction
- Finished size: 40.4 in x 22.9 in (102.6 cm x 58.2 cm), plus tab loops
- Skill level: Intermediate
- Terminology: US crochet terms
- Yarn weight: Sport weight (#2) cotton
- Hook: 3.5 mm (E-4)
- Number of pieces: 32 square flower motifs, joined into one panel
- Layout: 8 motifs across x 4 motifs down
- Motif size: 5 in x 5 in (12.7 cm x 12.7 cm), 25 sts per side
- Size before border: 40 in x 20 in (101.6 cm x 50.8 cm)
- Border depth: 0.2 in (0.5 cm) on the sides; 1.7 in (4.3 cm) at the top including the header; 1.2 in (3.0 cm) at the bottom including the scallops
Materials
Choose a smooth mercerized or combed cotton in sport weight. Cotton keeps stitches crisp, blocks well, and hangs straight. Avoid fuzzy or stretchy yarns: they blur the petals and let the panel sag.
- Dusty Rose: 350 g, about 1,050 m (7 balls of 50 g / 150 m)
These quantities include a margin of about 20 percent for your gauge swatch and differences in tension.
Tools:
- 3.5 mm (E-4) crochet hook
- Tapestry needle
- Stitch markers (at least 4)
- Scissors and measuring tape
- Rust-proof pins and blocking mats
- Spray bottle
Abbreviations (US Terms)
- ch: chain
- sl st: slip stitch
- sc: single crochet
- dc: double crochet
- tr: treble crochet (yo twice, insert hook, pull up a loop, [yo, pull through 2] three times)
- sk: skip
- sp(s): space(s)
- st(s): stitch(es)
- RS / WS: right side / wrong side
- rep: repeat
Petal shell: (3 tr, ch 3, 3 tr) in the same space.
Scallop shell: 9 dc in the same stitch.
Gauge and Checkpoints
Base gauge: 20 sc x 24 rows = 4 in (10.2 cm) in rows of sc.
The motif is the real gauge test. Make one motif first, block it lightly, and measure it before you make the rest.
Checkpoints for one motif:
- After Round 1: about 1.25 in (3.2 cm) across
- After Round 3: about 2.5 in (6.4 cm) across
- After Round 4: about 3.5 in (8.9 cm) across, tip to tip
- After Round 5: about 4.25 in (10.8 cm) across
- After Round 6: about 4.75 in (12.1 cm) square
- After Round 7: 5 in (12.7 cm) square, 25 sts per side
Too big: go down to a 3.25 mm hook, or work your chains more snugly.
Too small: go up to a 3.75 mm hook. If each motif is 0.25 in (0.6 cm) off, the panel ends up 2 in (5.1 cm) off across 8 motifs, so fix it now.
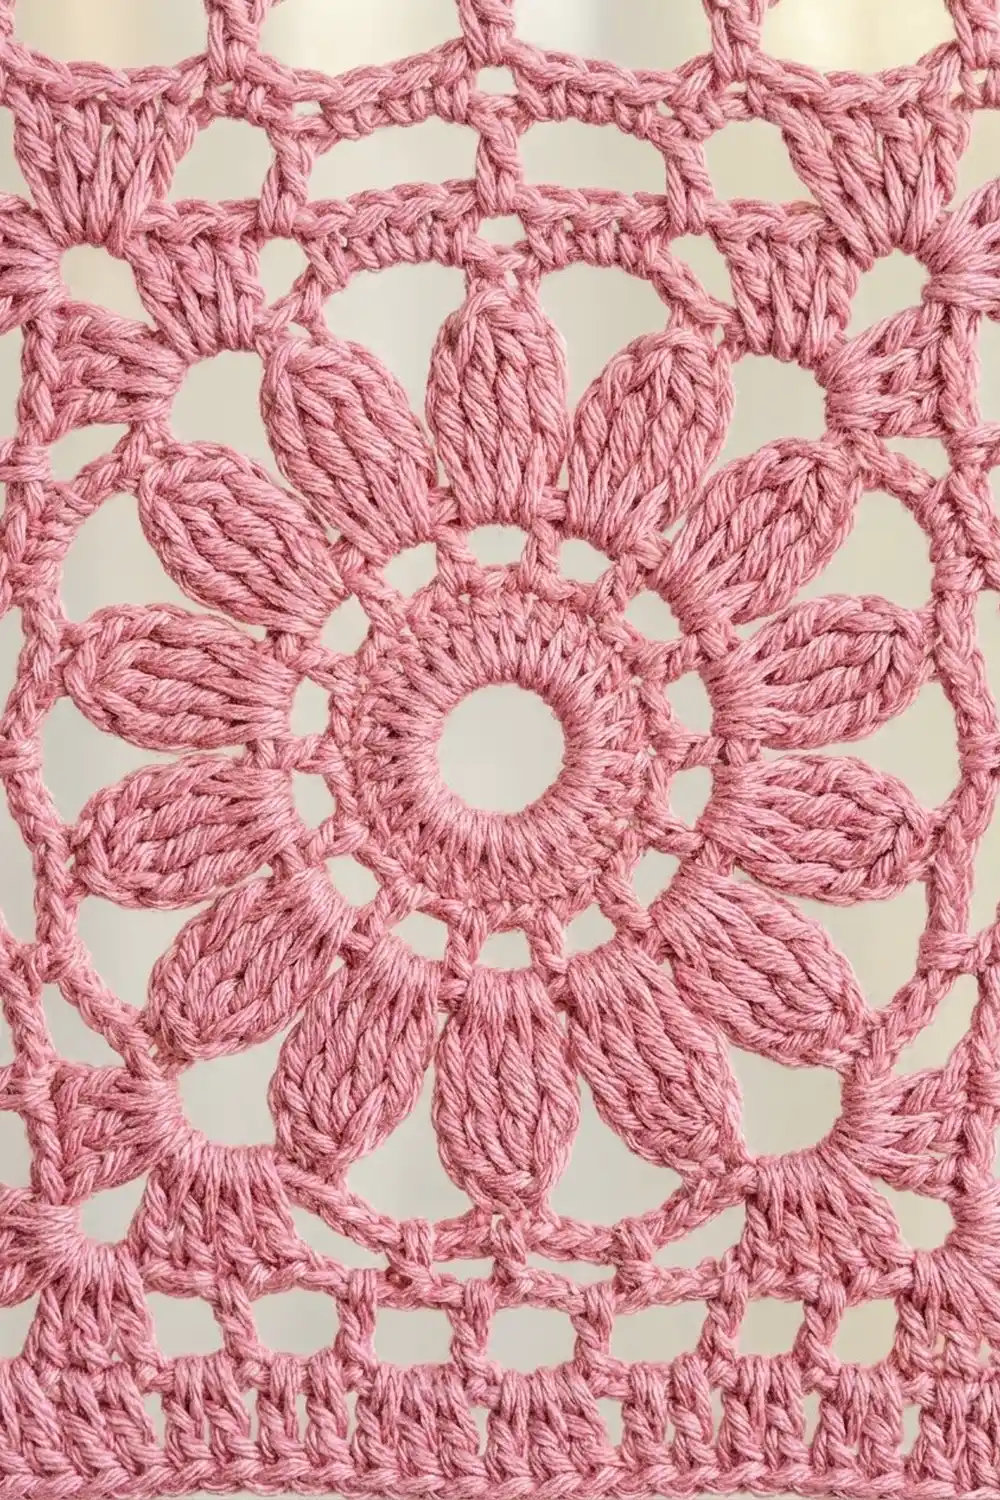
Flower Motif (make 32)
Ch 6 and sl st to the first ch to form a ring.
Round 1: Ch 3 (counts as dc), 23 dc in ring, sl st to top of beg ch-3. (24 dc)
Round 2: Ch 5 (counts as dc + ch 2), sk next dc, *dc in next dc, ch 2, sk next dc; rep from * 10 more times, sl st to 3rd ch of beg ch-5. (12 dc, 12 ch-2 sps)
This round makes the ring of small holes around the open center.
Round 3: Sl st in first ch-2 sp, ch 3 (counts as dc), (dc, ch 2, 2 dc) in same sp, *(2 dc, ch 2, 2 dc) in next ch-2 sp; rep from * 10 more times, sl st to top of beg ch-3. (12 shells: 48 dc, 12 ch-2 sps)
Round 4: Sl st in next dc and in first ch-2 sp, ch 4 (counts as tr), (2 tr, ch 3, 3 tr) in same sp, sc in the gap between this shell and the next Round 3 shell, *petal shell in next ch-2 sp, sc in next gap between shells; rep from * 10 more times, sl st to top of beg ch-4. (12 petals: 72 tr, 12 ch-3 tips, 12 sc)
The sc between the shells pulls the petals apart, so you get twelve separate, rounded petals.
Round 5: Sl st in next 2 tr and in first ch-3 tip, ch 1, sc in same sp, *ch 6, sc in next ch-3 tip; rep from * 10 more times, ch 6, sl st to first sc. (12 sc, 12 ch-6 loops)
Round 6 (squaring): Sl st in first ch-6 loop, ch 4 (counts as tr), (2 tr, ch 3, 3 tr) in same loop for the first corner, *[ch 5, sc in next ch-6 loop] twice, ch 5, (3 tr, ch 3, 3 tr) in next ch-6 loop; rep from * 2 more times, [ch 5, sc in next ch-6 loop] twice, ch 5, sl st to top of beg ch-4. (4 corners: 24 tr, 4 ch-3 corner sps, 8 sc, 12 ch-5 loops, which is 3 loops per side)
Round 7 (trim): Ch 1, sc in same st and in next 2 tr, 3 sc in corner ch-3 sp, sc in next 3 tr, *5 sc in each of next 3 ch-5 loops (sk the sc between loops), sc in next 3 tr, 3 sc in corner ch-3 sp, sc in next 3 tr; rep from * 2 more times, 5 sc in each of last 3 ch-5 loops, sl st to first sc.
Count: 24 sc worked 1 per tr + 72 sc worked into spaces (12 in corner sps, 60 in side loops) = 96 sc.
Mark the middle sc of each 3-sc corner as the corner st. Each side has: corner st, 1 sc, 3 sc, 15 sc, 3 sc, 1 sc, corner st = 25 sts per side, including both corner sts. Check: 4 sides x 24 sts (each corner counted once) = 96.
Fasten off, leaving a 6 in (15.2 cm) tail, and weave in the ends.
Make All Pieces
Make 32 motifs in Dusty Rose. Lightly block each one to 5 in x 5 in (12.7 cm x 12.7 cm) before joining.
Layout grid (8 across x 4 down):
Row 1:  M  M  M  M  M  M  M  M   (top, header side)
Row 2:  M  M  M  M  M  M  M  M
Row 3:  M  M  M  M  M  M  M  M
Row 4:  M  M  M  M  M  M  M  M   (bottom, scallop side)
All motifs are identical. Keep the RS facing up for every motif.
Joining
Method: a flat slip stitch seam through the back loops.
Hold two motifs RS together with the edges lined up. Starting at the corner sts, sl st through the back loop of each matching pair.
Stitch-to-stitch logic: each side has 25 sts, so you work exactly 25 sl sts per motif side, one per matched pair, from corner st to corner st. Don’t add chains at the seams and don’t skip any stitches.
Order:
- Join each horizontal row of motifs into a strip of 8. Each short seam is 25 sl sts.
- Join the 4 strips along their long edges. Each long seam is 8 x 25 = 200 sl sts. Where four corners meet, carry straight across without extra chains.
Tension: keep your sl sts as loose as your sc. Tight joins pucker and shorten the panel. If you need to, use a hook one size up for joining only.
Checkpoint: the joined panel should measure 40 in x 20 in (101.6 cm x 50.8 cm). The top and bottom edges each have 8 x 25 = 200 sts, and each side edge has 4 x 25 = 100 sts.
Border
Border gauge: the border uses the same 5 sc per 1 in (2.5 cm) as the motif edge. Each border stitch sits on one motif stitch, so the edges stay flat.
Border Round 1 (all around)
With RS facing, join yarn in the top-right corner st. Ch 1, (sc, ch 2, sc) in corner st, sc in each st to next outer corner st, (sc, ch 2, sc) in corner st; rep around, sl st to first sc. Fasten off.
Count: the panel edge has 2 x 200 + 2 x 100 – 4 shared outer corner sts = 596 sts. You work 1 sc into each of them, plus 1 extra sc at each of the 4 corners, for 600 sc + 4 ch-2 corner sps.
Counted between the ch-2 corner sps, that is 200 sc on the top, 200 on the bottom, and 100 on each side. This matches 8 x 25 and 4 x 25 exactly, because each outer corner st becomes one sc on each side of its ch-2 sp.
Header (top edge, worked in rows)
With RS facing, join yarn in the first sc after the top-right ch-2 corner sp. Work across the 200 top sts only.
Row 1 (RS): Ch 3 (counts as dc), dc in each st across, turn. (200 dc)
Row 2: Ch 4 (counts as dc + ch 1), sk next st, *dc in next st, ch 1, sk next st; rep from * 97 more times, dc in each of last 2 sts, turn. (101 dc + 99 ch-1 sps = 200 sts)
Row 3: Ch 3 (counts as dc), dc in each dc and each ch-1 sp across, ending in 3rd ch of turning ch, turn. (200 dc)
Row 4: Ch 1, sc in each st across. (200 sc) Fasten off.
The header is about 1.5 in (3.8 cm) deep.
Tabs (make 9)
The tabs sit on Row 4: 9 tabs of 8 sts each, with 8 gaps of 16 sts. Check: 9 x 8 + 8 x 16 = 72 + 128 = 200.
Tab Row 1: With RS facing, join yarn in the first st of a tab section, ch 1, sc in same st and next 7 sts, turn. (8 sc)
Tab Rows 2–18: Ch 1, sc in each st across, turn. (8 sc)
Each tab is 1.6 in (4.1 cm) wide x 3 in (7.6 cm) long. Fasten off, leaving a 12 in (30.5 cm) tail. Skip 16 sts and work the next tab. Tab 1 starts on st 1, and Tab 9 ends on st 200.
Fold each tab to the WS and whipstitch its last row to the WS of Header Row 1. Each loop fits a rod up to 1.25 in (3.2 cm) in diameter.
Scalloped Bottom Edge
With RS facing, join yarn in the first sc after the bottom-right ch-2 corner sp. Work across the 200 bottom sts as 8 sections of 25 sts, one section under each motif.
Scallop Row: Ch 1, *sc in first st of section, [sk 3 sts, scallop shell in next st, sk 3 sts, sc in next st] 3 times; rep from * across all 8 sections. Fasten off.
Each section uses 1 + 3 x 8 = 25 sts. At each seam, the last sc of one section and the first sc of the next sit side by side and form a neat valley.
Count: 8 sections x (4 sc + 27 dc) = 8 x 31 = 248 sts, or 24 scallops. Each scallop is about 1.7 in (4.3 cm) wide and 1 in (2.5 cm) deep.
Why the math works: every border row sits on the 200 sts that come straight from 8 motifs x 25 sts. The tab layout divides 200 evenly, and the 8-st scallop repeat fits each 25-st motif edge exactly, so you never have to fudge a stitch.
Final Blocking
- Weave in any remaining ends along the seams or inside the header.
- Soak the curtain in cool water for 15 minutes, then press out the water in a towel. Don’t wring it.
- Lay it flat, RS up, on blocking mats.
- Pin the corners of the motif area to 40 in x 20 in (101.6 cm x 50.8 cm).
- Pin along each seam line so every motif is 5 in (12.7 cm) square.
- Pin the petal tips out evenly and smooth the chain loops.
- Pin the header straight, and pin each scallop tip into an even curve.
- Check the full size: 40.4 in x 22.9 in (102.6 cm x 58.2 cm).
- Let it dry completely before unpinning.
Final Quality-Control Checklist
- 32 motifs, each 5 in (12.7 cm) square with 25 sts per side
- Every daisy shows 12 separate petals and an open center ring
- Seams lie flat, with 25 sl sts per motif side
- Border Round 1 has 200 / 100 / 200 / 100 sts per side
- The header has 4 rows of 200 sts and a straight top edge
- 9 tabs, evenly spaced and securely sewn
- 24 scallops, 3 under each bottom motif
- Final size is 40.4 in x 22.9 in (102.6 cm x 58.2 cm)
Troubleshooting
Motif cups: the Round 5 or 6 chains are too short. Add 1 ch per loop.
Motif ruffles: the chains are too long. Remove 1 ch per loop or go down a hook size.
Petals merge: place the Round 4 sc in the gap between Round 3 shells, not in a stitch.
Wrong side count: recount Round 7. Each side needs 1 + 3 + 15 + 3 + 1 sts between the corner sts.
Seams pucker: join with a larger hook.
Header flares or pulls in: confirm that Row 1 has exactly 200 dc.
Scallops curl: pin them firmly while they are damp.
Care
Hand wash in cool water with mild soap, then dry flat, reshaping the petals and scallops while damp. Keep the curtain out of harsh, direct sun for long periods so the rose color stays soft.
Final Notes
The whole curtain follows one measurement chain. One motif is 5 in (12.7 cm) with 25 sts per side. Eight motifs across give 200 sts and 40 in (101.6 cm). Four motifs down give 100 sts and 20 in (50.8 cm). The border keeps those counts and adds 0.2 in (0.5 cm) on every edge. The header adds 1.5 in (3.8 cm) at the top and the scallops add 1 in (2.5 cm) at the bottom, for 40.4 in x 22.9 in (102.6 cm x 58.2 cm). If your first motif measures right, everything after it falls into place.
Happy crocheting!