

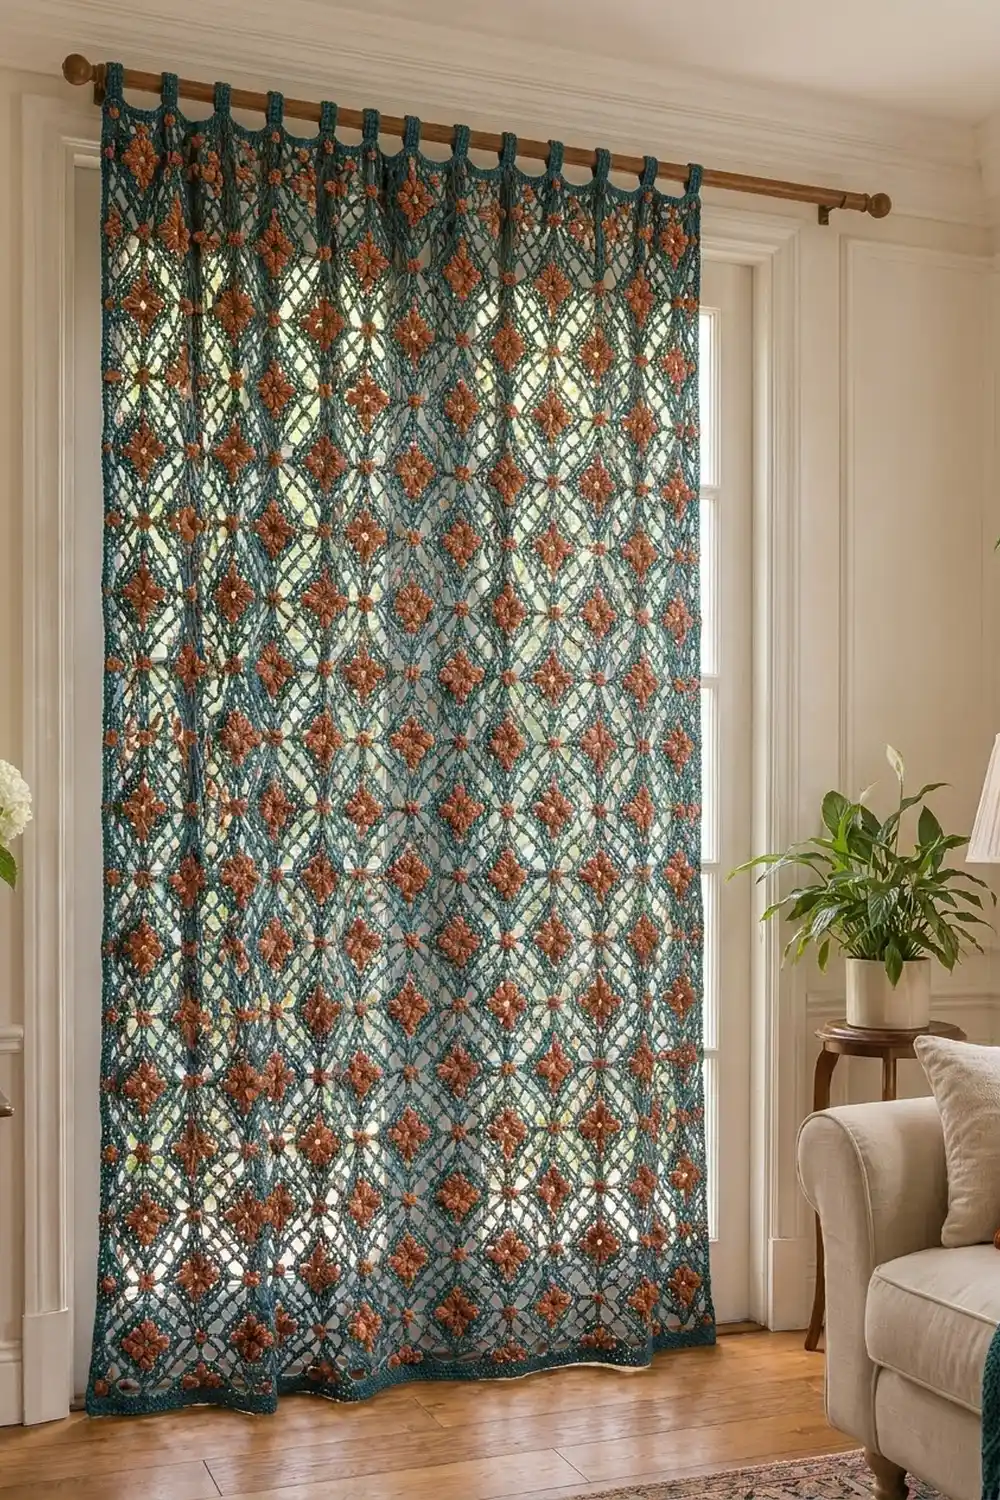
The Terracotta Trellis Curtain is an open, airy panel made from small lace squares. Each square has a raised rust-orange puff flower in the middle, framed by deep teal chain mesh. When the squares are joined, the mesh lines form a diagonal diamond lattice, and the window light shows through it.
It uses just two colors. Deep teal is for the mesh, border and tabs. Warm rust is for the flowers and for the small puff dots where four squares meet. The style is bohemian with a vintage touch.
This pattern uses US crochet terms. Before the tabs, the panel measures 45.5 in wide x 84 in long (115.6 cm x 213.4 cm). The tabs add 3 in (7.6 cm), for a total hanging length of 87 in (221.0 cm).
The construction is modular. You make 120 identical squares and join them flat in a grid 8 squares wide and 15 squares tall. Then you add a rust puff at each inner junction, work a 3-round border and sew 9 tab loops to the top edge.
Finished Size and Construction
- Finished size: 45.5 in x 84 in (115.6 cm x 213.4 cm), plus 3 in (7.6 cm) tabs
- Skill level: Intermediate
- Terminology: US crochet terms
- Yarn weight: Worsted (#4), cotton or cotton blend
- Hook: US H-8 (5.0 mm)
- Number of pieces: 120 squares + 9 tabs
- Layout: 8 squares wide x 15 squares tall
- Square size: 5.5 in x 5.5 in (14.0 cm x 14.0 cm), blocked
- Size before border: 44 in x 82.5 in (111.8 cm x 209.6 cm)
- Border depth: 0.75 in (1.9 cm) on each side
Materials
Use a smooth worsted-weight cotton or cotton-blend yarn. Cotton keeps the puff stitches crisp and blocks well. It also stretches less than acrylic when a long panel hangs for months. Pick a teal dark enough to stand out against daylight. The quantities below assume about 180 m per 100 g.
- Color A, deep teal: 1,500 g (about 2,700 m) for squares, border and tabs
- Color B, rust/terracotta: 450 g (about 810 m) for flowers and junction puffs
These quantities include a margin of roughly 10%. Buy all of each color from the same dye lot.
Tools:
- US H-8 (5.0 mm) crochet hook
- Tapestry needle
- Stitch markers
- Scissors
- Tape measure
- Blocking mats, rust-proof pins and a spray bottle
Abbreviations (US Terms)
- ch – chain
- sl st – slip stitch
- sc – single crochet
- sp – space
- st(s) – stitch(es)
- yo – yarn over
- BLO – back loop only
- RS / WS – right side / wrong side
- rev sc – reverse single crochet (crab stitch)
Puff stitch (puff): Work (yo, insert hook in st or sp, yo and pull up a loop about 0.5 in / 1.3 cm tall) 3 times. Yo and pull through all 7 loops on the hook, then ch 1 to close. The closing ch 1 is part of the puff and is not counted as a separate stitch.
Gauge and Checkpoints
Gauge: After blocking, one square measures 5.5 in (14.0 cm) per side with 21 sc per side. That is about 3.8 sc per inch (2.5 cm). In plain sc rows, aim for 15 sc and 16 rows = 4 in (10.2 cm).
Make one full square, wet-block it and measure it before you make the other 119. Check these points as you go:
- After Rnd 2: flower about 2 in (5.1 cm) across
- After Rnd 4: about 3.75 in (9.5 cm) from side to side
- After Rnd 5: about 4.75 in (12.1 cm) from side to side
- After Rnd 6, blocked: 5.5 in (14.0 cm) per side
If your square is too big, go down to a US 7 (4.5 mm) hook. If it is too small, go up to a US I-9 (5.5 mm) hook. Keep the chain loops relaxed but even. Being off by 0.25 in (0.6 cm) per square adds up to 2 in (5.1 cm) across the width and 3.75 in (9.5 cm) down the length.
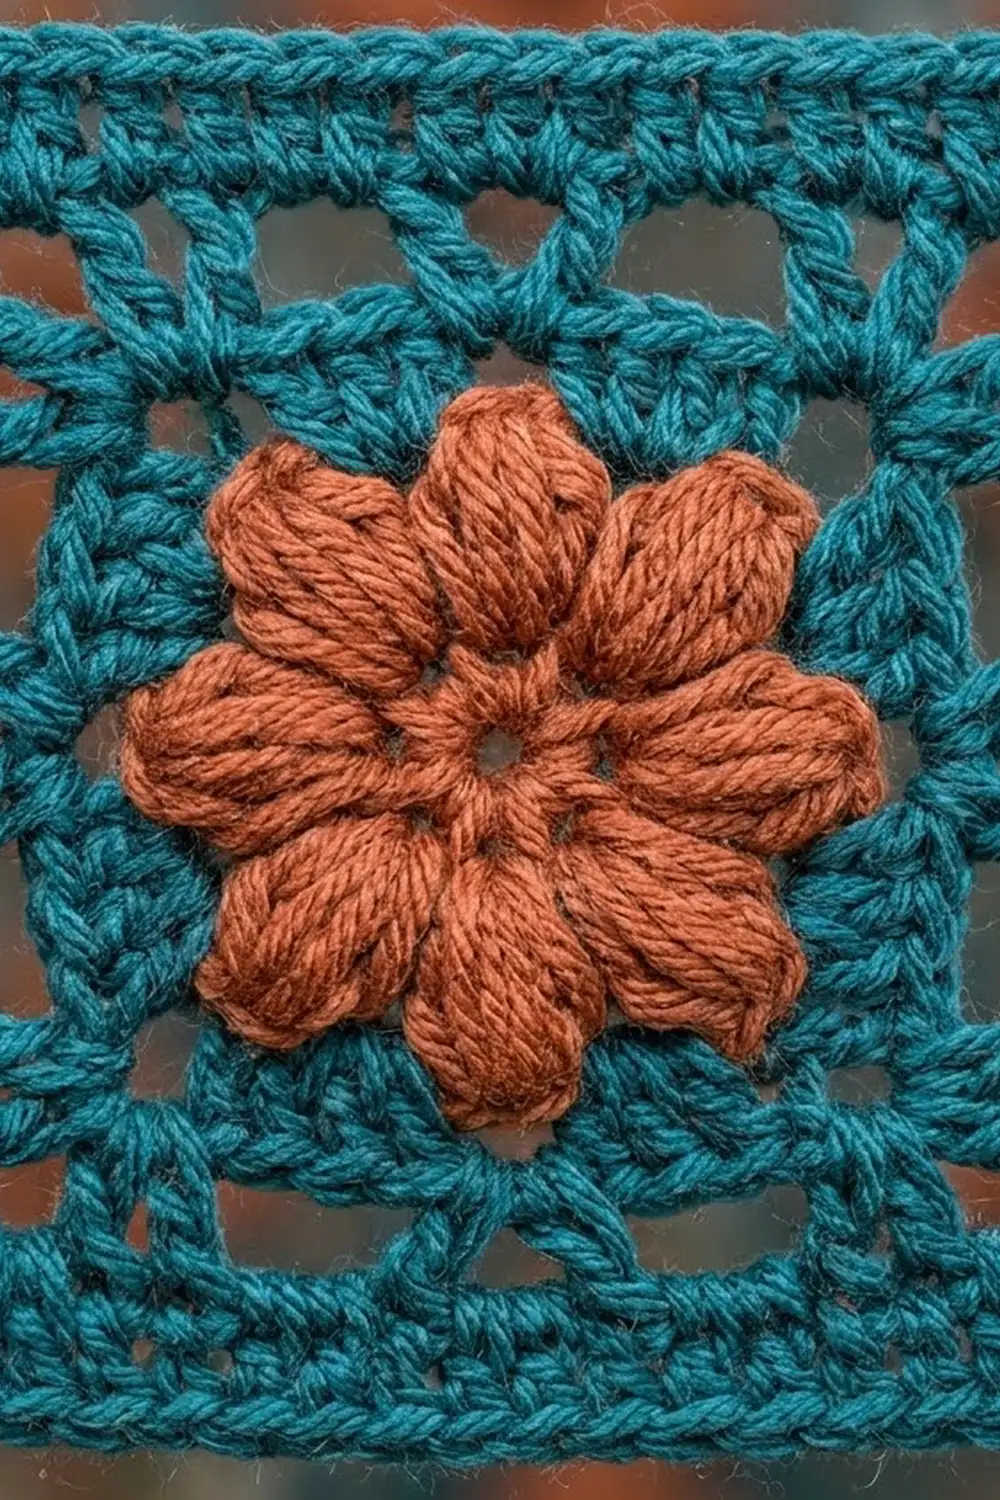
Square (Make 120)
Flower Center (Color B, Rust)
Rnd 1: Make a magic ring. Ch 1, 8 sc in ring, sl st in first sc to join. Pull the ring closed. (8 sc)
Rnd 2: Ch 2 (does not count as a st), puff in same st as join, ch 3, puff in next sc, ch 3; rep from * 6 more times. Sl st in top of first puff to join. Fasten off. (8 puffs, 8 ch-3 sps)*
The eight puffs are the raised petals. Push them gently toward the RS so the flower domes a little.
Mesh Frame (Color A, Teal)
Rnd 3: With RS facing, join Color A with a sl st in any ch-3 sp. Ch 1, sc in same sp, ch 5, sc in next ch-3 sp, ch 5; rep from * 6 more times. Sl st in first sc to join. (8 sc, 8 ch-5 loops)*
Rnd 4: Sl st in first ch-5 loop. Ch 1, sc in same loop, ch 5, (sc, ch 7, sc) in next loop for the corner, ch 5, sc in next loop, ch 5, (sc, ch 7, sc) in next loop, ch 5; rep from * 2 more times. Sl st in first sc to join. (12 sc, 8 ch-5 loops, 4 ch-7 corner loops)*
The square now has 4 corners and 2 ch-5 loops on each side between them.
Rnd 5: Sl st in first ch-5 loop. Ch 1, sc in same loop, ch 5, (sc, ch 7, sc) in ch-7 corner loop, ch 5, sc in next ch-5 loop, ch 5, sc in next ch-5 loop, ch 5, (sc, ch 7, sc) in ch-7 corner loop, ch 5, sc in next ch-5 loop, ch 5; rep from * 2 more times. Sl st in first sc to join. (16 sc, 12 ch-5 loops, 4 ch-7 corner loops)*
Each side now has 3 ch-5 loops between the corners. Once the squares are joined, these diagonal chain lines form the trellis.
Rnd 6: Ch 1. Work into the loops only and skip every sc of Rnd 5. 5 sc in next ch-5 loop, (3 sc, ch 2, 3 sc) in ch-7 corner loop, 5 sc in each of next 2 ch-5 loops; rep from * 3 more times. Sl st in first sc to join. Fasten off and weave in the ends. (84 sc, 4 ch-2 corner sps)*
Count per side: 3 + 5 + 5 + 5 + 3 = 21 sc per side. In this pattern, the corner ch-2 spaces are separate from the side count. They are not stitches and are not part of the 21.
Check: 4 sides x 21 sc = 84 sc. ✓
Make All Pieces
Make 120 squares in total. Each square uses Color B for Rnds 1–2 and Color A for Rnds 3–6.
- Color A (teal): about 9 g per square, about 1,080 g for all 120
- Color B (rust): about 3 g per square, about 360 g for all 120
Block every square to 5.5 in (14.0 cm) before joining. Pinning them in batches of 12 on a gridded mat saves time.
Layout grid (8 columns x 15 rows, all squares identical; • = junction puff between rows):
S   S   S   S   S   S   S   S     Row 1 (top)
  •   •   •   •   •   •   •
S   S   S   S   S   S   S   S     Row 2
  •   •   •   •   •   •   •
        ... repeat ...
S   S   S   S   S   S   S   S     Row 15 (bottom)
Junction puffs go where 4 squares meet: (8 − 1) x (15 − 1) = 7 x 14 = 98 puffs.
Joining
Method: Flat slip-stitch join through the back loops, using Color A.
Lay two blocked squares side by side, RS up, with the edges touching. Join Color A with a sl st through both corner ch-2 sps. Then sl st through the BLO of each matching pair of sc, 1 sl st per pair, for 21 sl sts. Finish with 1 sl st through both of the next corner ch-2 sps. That makes 23 sl sts per seam.
Stitch-to-stitch logic: Every square has exactly 21 sc per side, so each stitch lines up with its partner. You don’t add or skip any stitches, so the seam lies flat and adds almost no width.
Order: Join the squares into 15 horizontal rows of 8. Then join the rows to each other with long seams. Work every seam in the same direction so the ridges match.
Tension: Make your sl sts as loose as the sc they join. Tight seams pucker the mesh and shorten the curtain. If you need to, use a hook one size larger for joining only.
Junction puffs (Color B): With RS facing, join Color B with a sl st in the center point where 4 corner ch-2 sps meet. Ch 2, work a puff into the same point, sl st into the same point and fasten off. Weave the tails to the WS along a seam. Repeat at all 98 junctions.
Size checkpoint: The joined panel should measure 44 in x 82.5 in (111.8 cm x 209.6 cm). Lay it flat and measure in three places each way.
Border
Border gauge: The border has the same gauge as the squares: about 3.8 sc and 4 rounds per inch (2.5 cm). Three rounds give 0.75 in (1.9 cm).
Rnd 1 (Color A): With RS facing, join Color A in the top-right outer corner ch-2 sp. Ch 1, 3 sc in the corner sp. Work 1 sc in each sc along the edges. At each seam, skip the two joined corner ch-2 sps and don’t work a stitch there. Work 3 sc in each of the other 3 outer corner sps. Sl st in first sc to join.
- Top and bottom: 8 squares x 21 sc = 168 sc each between the corner groups
- Left and right sides: 15 squares x 21 sc = 315 sc each between the corner groups
- Corners: 3 sc each; mark the center sc of each group
Total: 168 + 168 + 315 + 315 + (4 x 3) = 978 sc
Rnd 2: Ch 1, sc in each st around, with 3 sc in each marked corner center st. Move the markers up. Sl st in first sc to join.
- Top and bottom: 172 sc each between corner center sts (Rnd 1 had 170 there, plus 1 new sc on each side of each corner)
- Left and right sides: 319 sc each between corner center sts
- Corners: 1 center st each
Total: 172 + 172 + 319 + 319 + 4 = 986 sc (978 + 8 corner increases). ✓
Rnd 3: Ch 1, rev sc in each st around, with no increases. Sl st in first st to join and fasten off. (986 rev sc)
Why the math works: Rnd 1 puts one sc on top of each square’s edge sc, so the border keeps the same 3.8 sts per inch as the squares. Skipping the corner spaces at the seams stops the edge from rippling. Adding 2 sc at each corner every round keeps the corners square. The border adds 0.75 in (1.9 cm) on every side, taking the panel from 44 in x 82.5 in (111.8 cm x 209.6 cm) to 45.5 in x 84 in (115.6 cm x 213.4 cm).
Tabs (Make 9)
Row 1 (Color A): Ch 8, sc in 2nd ch from hook and in each ch across, turn. (7 sc)
Rows 2–24: Ch 1, sc in each st across, turn. (7 sc)
Fasten off, leaving a 16 in (40.6 cm) tail. Each tab measures about 1.8 in x 6 in (4.6 cm x 15.2 cm).
Placement: Fold each tab in half to make a 3 in (7.6 cm) loop. Sew both ends to the WS of the top border, overlapping it by about 0.75 in (1.9 cm). Place one tab at each top corner, flush with the side edge, and center one over each of the 7 vertical seams. That gives 9 tabs spaced 5.5 in (14.0 cm) apart, in line with the square grid.
Final Blocking
- Weave in all remaining ends, following the seams where you can.
- Soak the curtain in cool water with a little gentle wash for 15 minutes.
- Press the water out gently without wringing, then roll the curtain in towels.
- Lay it flat, RS up, on a clean floor or on blocking mats.
- Pin the edges to 45.5 in x 84 in (115.6 cm x 213.4 cm). Pin the corners first, then the midpoints, then every 4 in (10.2 cm).
- Straighten each seam line with your hands so the lattice runs true.
- Fluff each puff flower with your fingertips.
- Leave it to dry completely, for at least 24 hours, before you unpin it.
Final Quality-Control Checklist
- 120 squares, each 5.5 in (14.0 cm) per side with 21 sc per side
- All seams worked through the BLO, 23 sl sts each, lying flat
- 98 rust junction puffs, all secure
- Border: Rnd 1 = 978 sc, Rnd 2 = 986 sc, Rnd 3 = 986 rev sc
- Panel measures 45.5 in x 84 in (115.6 cm x 213.4 cm)
- 9 tabs, each forming a 3 in (7.6 cm) loop, evenly spaced
- All ends woven in and trimmed
Troubleshooting
Squares come out different sizes. Your chain loops are changing length. Count every chain and check each square against a 5.5 in (14.0 cm) template.
The flower looks flat. Pull the puff loops up taller, to about 0.5 in (1.3 cm), and keep the ch-3 spaces loose.
Seams pucker. Your sl sts are too tight. Rework the seam with a larger hook.
The border ruffles. You probably worked into the seam corner spaces. Recount Rnd 1: 168 sc across the top and bottom, 315 sc down each side.
The border pulls in. Your rev sc round is too tight. Work it with a hook one size larger.
The curtain grows longer when hung. Cotton relaxes over time. Re-block it and always dry it flat.
Care
Hand wash in cool water with a mild detergent and dry flat to keep the shape. Never hang the curtain while it is wet, because the weight will stretch the mesh.
Final Notes
The whole curtain depends on one chain of measurements. With 21 sc per side, each square is 5.5 in (14.0 cm). Eight squares across give 44 in (111.8 cm), and 15 squares down give 82.5 in (209.6 cm). The 0.75 in (1.9 cm) border brings the panel to 45.5 in x 84 in (115.6 cm x 213.4 cm). The 3 in (7.6 cm) tabs then make the hanging length 87 in (221.0 cm). Get your first square right and every later stage will work out.
Happy crocheting!