

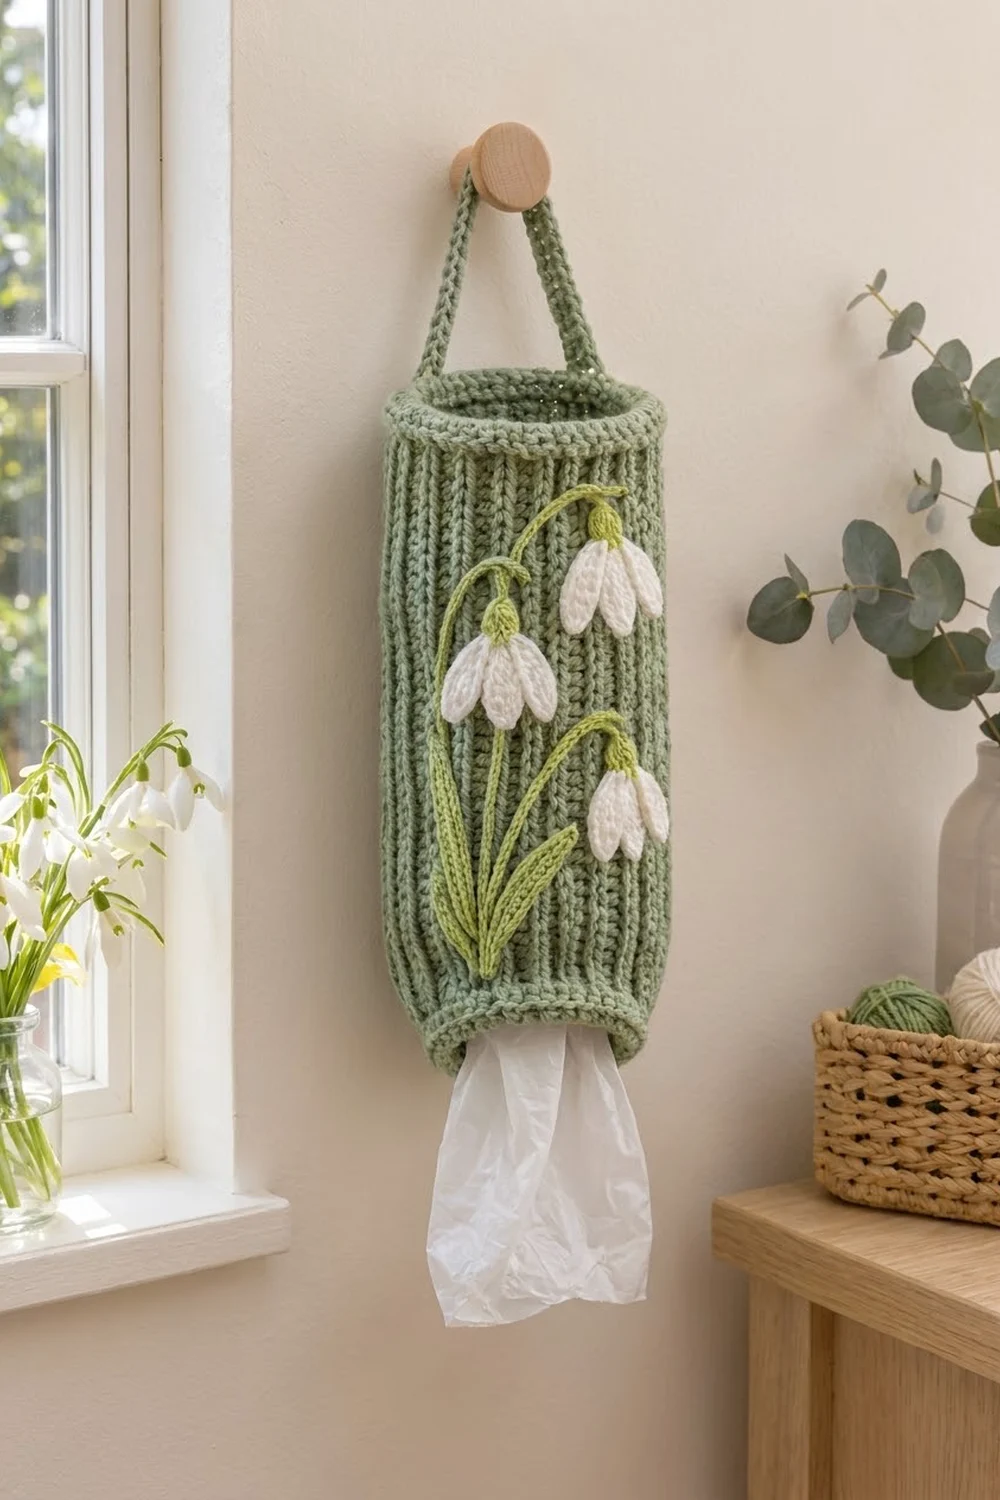
This Spring Snowdrop Bag Holder is a tall ribbed tube that hangs from a wall peg and keeps plastic grocery bags tidy. You push bags in at the top and pull them out one at a time through the bottom opening.
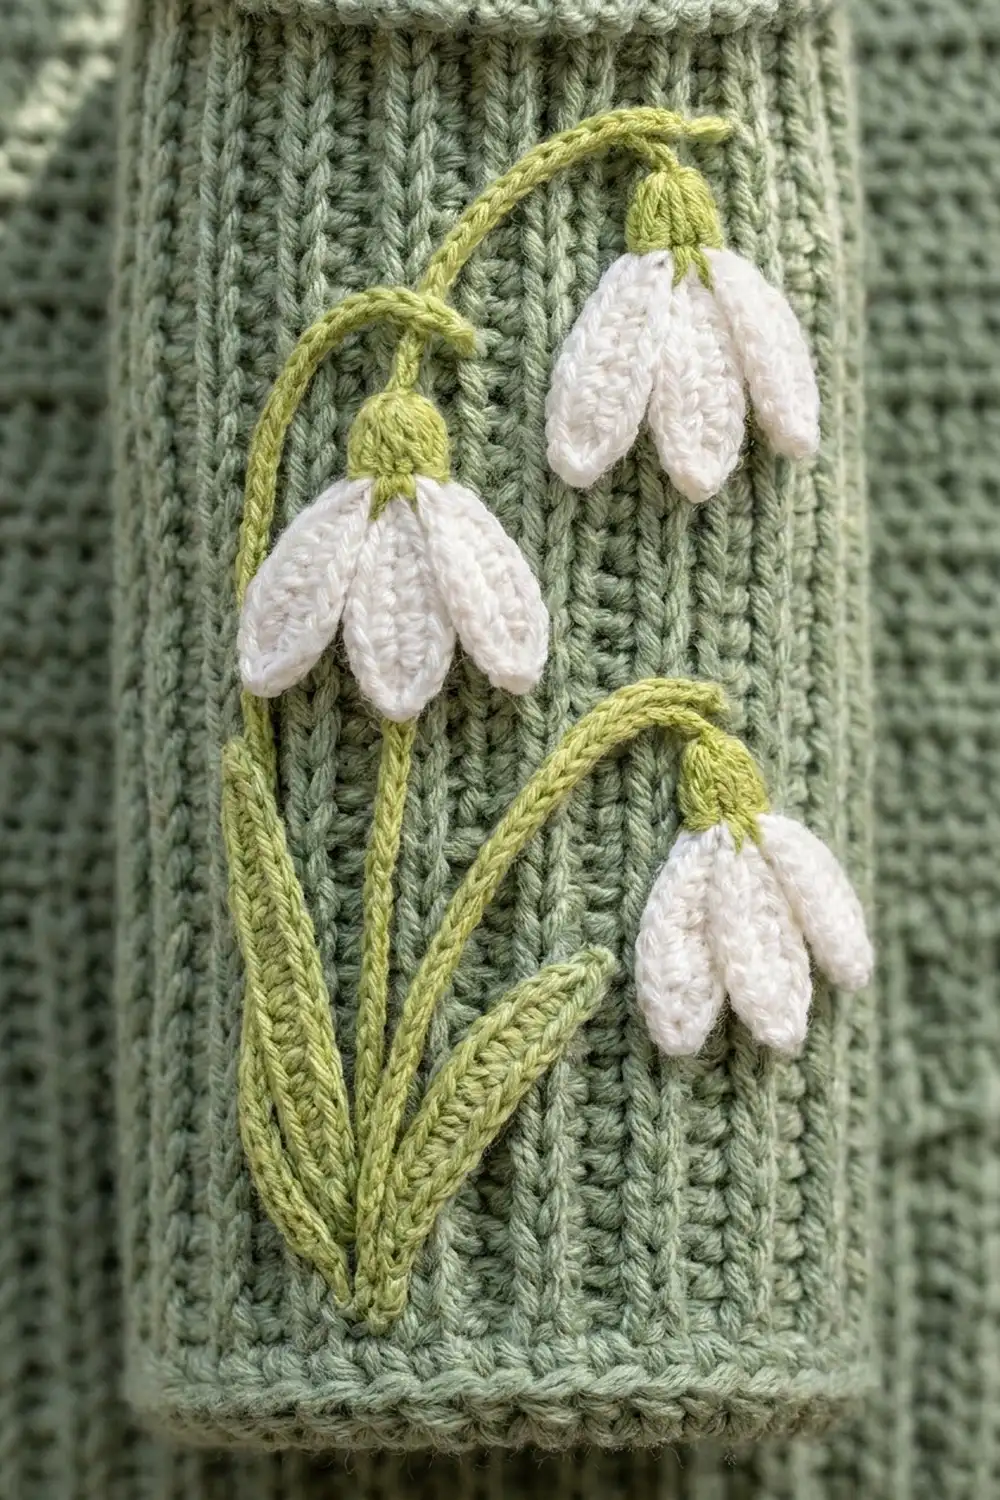
The body is worked in soft sage green with vertical post-stitch ribs that look almost knitted. Three white snowdrop flowers with spring-green caps hang from curved stems, with two long leaves on either side. The style is calm, botanical and fresh, and it suits a kitchen or laundry corner.
All instructions use US crochet terms. The finished holder is 13 in (33.0 cm) around, 6.5 in (16.5 cm) wide when flat and 18 in (45.7 cm) tall, plus a 7 in (17.8 cm) hanging strap.
You crochet one seamless tube from the bottom up. It starts with a single crochet band, then ribbed rounds, then a top band and the strap. The snowdrops and leaves are small appliqué pieces that you sew on at the end.
Finished Size and Construction
- Finished size: 6.5 in (16.5 cm) wide when flat, 13 in (33.0 cm) around, 18 in (45.7 cm) tall
- Strap: 1 in (2.5 cm) wide, 7 in (17.8 cm) long
- Skill level: Easy-intermediate (front and back post stitches, simple appliqué)
- Terminology: US
- Yarn weight: Worsted (#4)
- Hook: 5.0 mm (H-8)
- Number of pieces: 1 seamless body with strap, plus 17 small appliqué pieces (9 petals, 3 caps, 3 stems, 2 leaves)
- Layout: Appliqués grouped on the front of the tube
- Height before the top band: 17 in (43.2 cm)
- Top band depth: 1 in (2.5 cm)
Materials
Choose a smooth worsted cotton or cotton-acrylic blend. Cotton keeps the ribs crisp and doesn’t stretch out under the weight of the bags. The amounts below assume about 170 m per 100 g.
- Sage green (main): 120 g, about 204 m
- White (petals): 15 g, about 26 m
- Spring green (caps, stems, leaves): 20 g, about 34 m
Quantities include a margin of about 15 percent for gauge swatches and sewing tails.
Tools:
– 5.0 mm (H-8) crochet hook
– 4.5 mm and 5.5 mm hooks for gauge adjustments (optional)
– Tapestry needle
– 4 stitch markers
– Rustproof pins
– Measuring tape
– Spray bottle and blocking mat
Abbreviations (US Terms)
- ch: chain
- sl st: slip stitch
- sc: single crochet
- hdc: half double crochet
- dc: double crochet
- FPdc: front post double crochet
- BPdc: back post double crochet
- st(s): stitch(es)
- rnd(s): round(s)
FPdc: Yarn over and insert the hook from front to back to front around the post of the stitch below. Yarn over and pull up a loop, then (yarn over, pull through 2 loops) twice.
BPdc: Yarn over and insert the hook from back to front to back around the post of the stitch below. Finish it like a regular dc.
Gauge and Checkpoints
Make a small swatch before you start the tube. Post-stitch ribbing pulls in, so your regular dc gauge won’t tell you how wide the ribbing will be.
- Rib gauge: 16 sts and 8 rnds = 4 in (10.2 cm) in FPdc/BPdc ribbing
- Sc gauge: 16 sts and 16 rnds = 4 in (10.2 cm)
- Chain gauge (appliqués): 4 ch = 1 in (2.5 cm)
Checkpoints:
– After Rnd 4: 13 in (33.0 cm) around, band height 1 in (2.5 cm)
– After Rnd 12: total height 5 in (12.7 cm)
– After Rnd 36: total height 17 in (43.2 cm)
– After Rnd 40: total height 18 in (45.7 cm)
If your tube is too big, use a hook 0.5 mm smaller. If it’s too small, use a hook 0.5 mm larger. Rip back and restart instead of adding or skipping stitches, because the rib pattern needs an even count of 52.
Body
Work the body in joined rounds from the bottom up, without turning. The ch 1 or ch 2 at the start of each round does not count as a stitch.
Bottom Band
With sage green, ch 52. Join with a sl st to the first ch, taking care not to twist the chain.
Rnd 1: Ch 1, sc in each ch around, sl st to first sc. (52 sts)
Rnds 2–4: Ch 1, sc in each st around, sl st to first sc. (52 sts)
Place a marker in the first stitch. Check that the band measures 13 in (33.0 cm) around and 1 in (2.5 cm) tall.
Ribbed Body
Rnd 5 (conversion round): Ch 2, dc in each st around, sl st to first dc. (52 dc + 0 added = 52 sts)
Rnd 6: Ch 2, *FPdc around next st, BPdc around next st; repeat from * 26 times in total, sl st to first FPdc. (52 sts: 26 FPdc, 26 BPdc)
Rnds 7–36: Ch 2, *FPdc around next FPdc, BPdc around next BPdc; repeat from * around, sl st to first FPdc. (52 sts)
Work each FPdc around an FPdc and each BPdc around a BPdc every round, so the ribs stack in straight vertical columns. You’ll see 26 raised ribs, 13 on each side when the tube is flattened.
The ribbed section is 32 rounds (Rnds 5–36). At 2 rnds per inch, that’s 16 in (40.6 cm). With the bottom band, the tube now measures 17 in (43.2 cm). Don’t fasten off.
Snowdrop Appliqués
Leave a 10 in (25.4 cm) tail on every piece for sewing.
Petals (make 9, white)
Each petal is a pointed teardrop worked around both sides of a short chain.
Ch 6.
Rnd 1: Sc in 2nd ch from hook, hdc in next ch, dc in next 2 ch, hdc in next ch, 3 sc in last ch. Working along the other side of the chain: hdc in next ch, dc in next 2 ch, hdc in next ch, sc in last ch, sl st to first sc. (13 sts)
Each petal is about 1.25 in (3.2 cm) long and 0.6 in (1.5 cm) wide. The 3-sc end is the rounded tip. The sl st end is the top, where the cap sits.
Caps (make 3, spring green)
Make a magic ring.
Rnd 1: Ch 1, 6 sc in ring, sl st to first sc. (6 sts) Pull the ring tight.
Each cap is about 0.5 in (1.3 cm) across.
Stems (make 3, spring green)
Each stem is a chain with a row of sl sts worked back along the back bumps.
- Stem A (tallest): Ch 44, sl st in the back bump of 2nd ch from hook and each ch across. (43 sl sts) About 11 in (27.9 cm).
- Stem B (middle): Ch 36, sl st back as above. (35 sl sts) About 9 in (22.9 cm).
- Stem C (shortest): Ch 28, sl st back as above. (27 sl sts) About 7 in (17.8 cm).
Leaves (make 2, spring green)
Ch 26.
Rnd 1: Sc in 2nd ch from hook, hdc in next 3 ch, dc in next 16 ch, hdc in next 3 ch, sc in next ch, 3 sc in last ch. Working along the other side: sc in next ch, hdc in next 3 ch, dc in next 16 ch, hdc in next 3 ch, sc in last ch, sl st to first sc. (24 + 3 + 24 = 51 sts)
Each leaf is about 6.5 in (16.5 cm) long and 1 in (2.5 cm) wide. The foundation chain forms a natural center vein.
Assembling Each Flower
- Lay 3 petals side by side with their tops touching and their tips fanning slightly apart.
- Tuck the two outer petals under the center petal so they overlap it by about 0.25 in (0.6 cm).
- Sew the three tops together with a few whipstitches.
- Sew a cap over the joined tops so it covers all three petal ends.
Top Band and Strap (Border)
The top band is the border of the tube. It firms up the opening and gives the strap a stable base.
Border gauge: 16 sc and 16 rnds = 4 in (10.2 cm).
Top Band
Rnd 37 (conversion round): Ch 1, sc in each st around, sl st to first sc. (52 sc + 0 added = 52 sts)
Rnds 38–40: Ch 1, sc in each st around, sl st to first sc. (52 sts)
Flatten the tube so the round join is at the left fold. Sts 1–26 are on the front and sts 27–52 are on the back, which gives 26 sts per side and 52 in total.
Why the math works: 52 sc at 16 sts per 4 in equals exactly 13 in (33.0 cm), the same as the ribbed section, so the band neither flares nor gathers. Four sc rounds at 16 rnds per 4 in add exactly 1 in (2.5 cm), which brings the total height to 18 in (45.7 cm). Don’t fasten off.
Strap
Row 1: Ch 1, sc in st 52, then sc in sts 1, 2 and 3 (the 4 sts centered on the left fold). Turn. (4 sts)
Rows 2–28: Ch 1, sc in each st across, turn. (4 sts)
The strap is 28 rows long, which is 7 in (17.8 cm) at 4 rows per inch. It is 4 sts wide, which is 1 in (2.5 cm). Fasten off, leaving a 12 in (30.5 cm) tail.
Arch the strap over the opening. Sew the last row to sts 25–28 at the opposite fold, on the inside of the top band.
Strap edging: Join sage green at the base of one long side of the strap. Work 1 sl st in each row end along the edge (28 sl sts per side). Repeat on the other long side. The edging smooths the edges and stops the strap from stretching.
Final Blocking
- Weave in all the tails on the body.
- Slide a rolled towel inside the tube so it holds a round shape 13 in (33.0 cm) around.
- Mist it with water until it is damp but not soaked.
- Smooth the ribs straight with your hands and check that the height is 18 in (45.7 cm).
- Pin each petal and leaf flat on a mat and mist them. Pin the petal tips into neat points.
- Let everything dry completely.
- Lay the tube flat, front side up, and position the appliqués:
- Place the bases of the leaves and stems together near the center, about 2 in (5.1 cm) above the bottom edge.
- Run Stem A upward and curve the top 1 in (2.5 cm) over into a hook. Place Stem B to the right and Stem C lower and farther right, and curve their tops the same way.
- Angle one leaf to the left of the stems and one to the right.
- Hang a flower from the hooked end of each stem so the bell points down.
- Pin everything in place and slide a piece of cardboard inside the tube. Sew each piece on with small stitches that go through the outer loops of the tube only.
Final Quality-Control Checklist
- The tube is 13 in (33.0 cm) around at the bottom band, middle and top band
- Height is 18 in (45.7 cm) without the strap
- 26 straight ribs with no twisting or skipped columns
- The strap is 7 in (17.8 cm) long, 1 in (2.5 cm) wide and firmly sewn at both folds
- 3 flowers, each with 3 petals and 1 cap
- The stems curve at the top so the bells hang down
- No appliqué stitches show on the inside of the tube
- All tails are woven in and trimmed
Troubleshooting
The ribs spiral around the tube. The join is drifting. Always sl st into the first FPdc, and start each round with an FPdc around that same stitch.
The tube flares at the top band. Your sc is looser than your ribbing. Use a 4.5 mm hook for Rnds 37–40.
The tube is less than 13 in (33.0 cm) around. Post stitches pull in more if you crochet tightly. Switch to a 5.5 mm hook and restart.
The petals curl. Pin them flat while blocking, or work the dc stitches more loosely.
The stems twist. Work the sl sts into the back bumps only, and block the stems straight before you shape the curve.
Bags fall out of the bottom. Add one more sc round to the bottom band with a 4.5 mm hook to make the opening slightly smaller.
Care
Hand wash in cool water with mild soap, then reshape the tube and lay it flat to dry. Don’t tumble dry, because the appliqués may pull loose.
Final Notes
The whole design depends on one chain of measurements. A rib gauge of 16 sts per 4 in (10.2 cm) turns 52 sts into a tube 13 in (33.0 cm) around. Thirty-two ribbed rounds at 2 rnds per inch give 16 in (40.6 cm) of body. Two sc bands of 1 in (2.5 cm) each bring the height to 18 in (45.7 cm), and a 7 in (17.8 cm) strap hangs it on the wall.
Check each stage against these numbers and your finished holder will come out the right size. Then add your snowdrops, hang it up, and enjoy a little bit of spring every time you grab a bag.
Happy crocheting!