

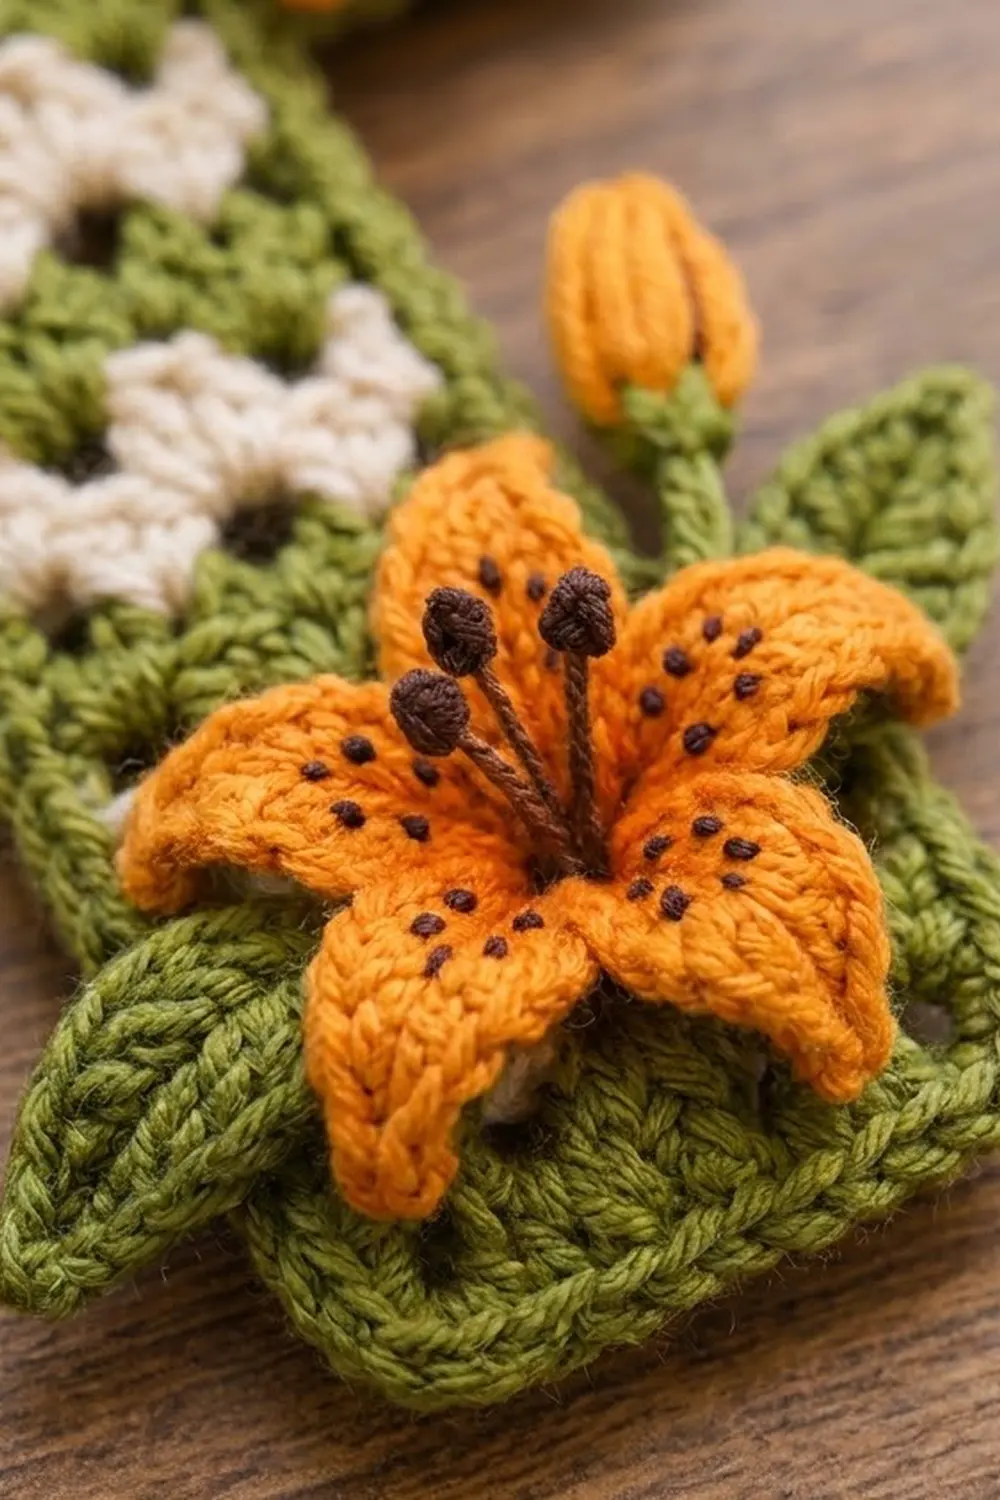
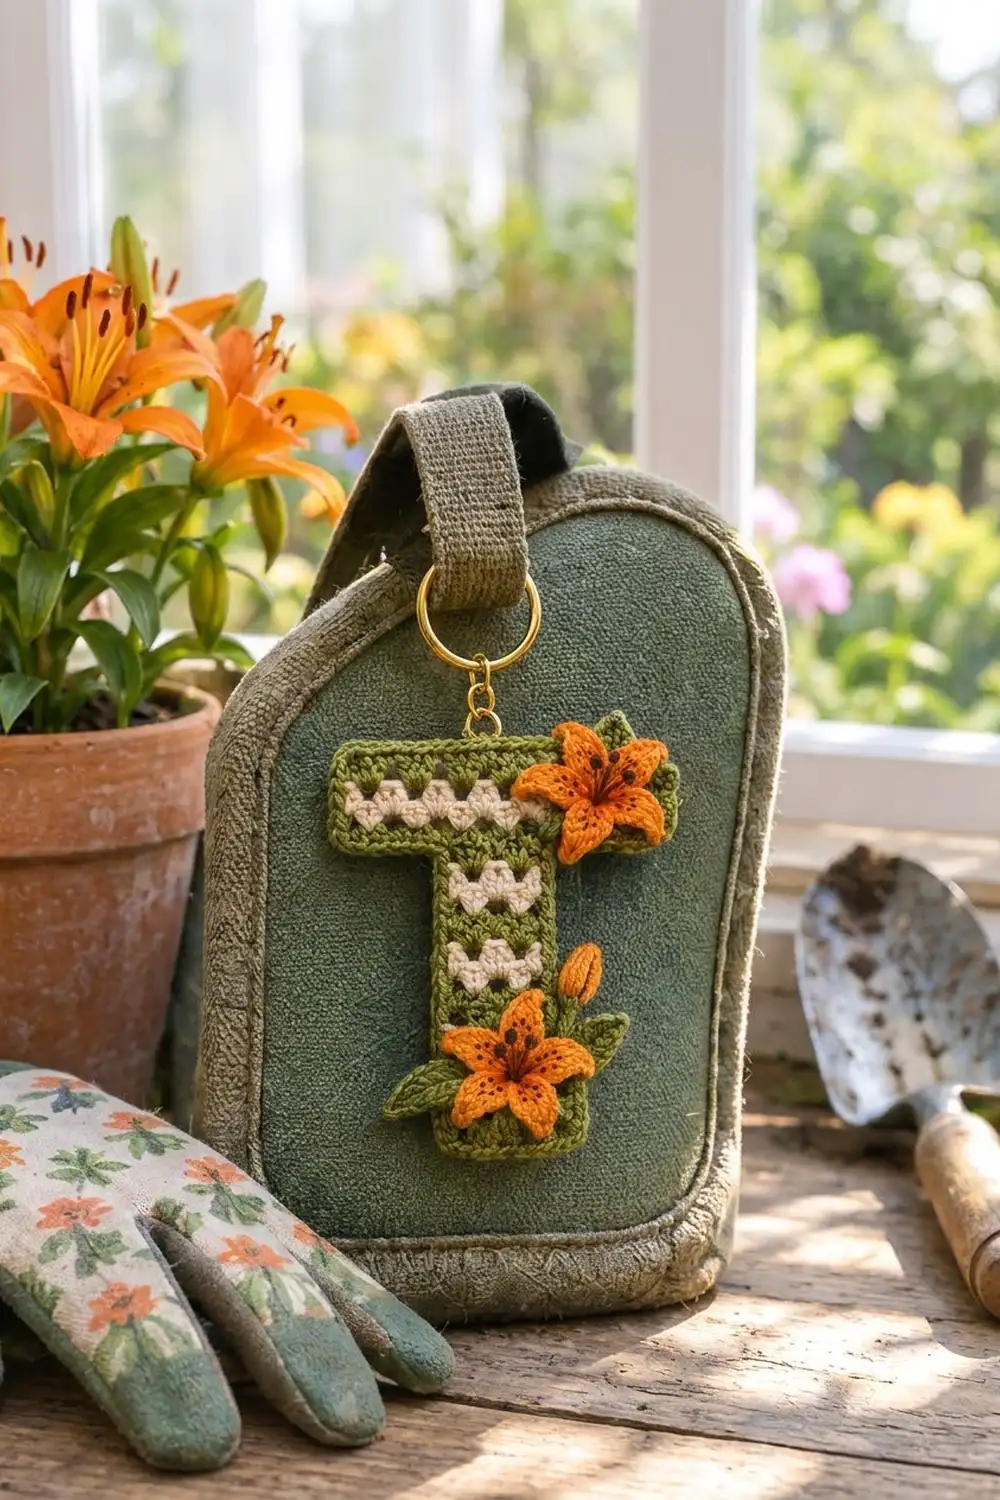
This little letter T is made for garden bags, key rings and gift tags. The letter is olive green with crisp cream V-clusters, and two bright orange tiger lilies with brown speckles sit on top of it. The result is cheerful and personal, and the size is just right for a keychain.
The palette has four colors: olive green, cream, orange and a dark brown for the embroidery. The style is cottage-garden. Clean, structured stripes form the letter and the softer flowers add dimension.
This pattern uses US crochet terms throughout. The finished keychain measures 3.67 in (9.3 cm) wide by 4.0 in (10.2 cm) tall.
The letter is one piece worked in rows. You start with the crossbar from the top edge down, then work the stem directly off the center stitches of the crossbar. One round of single crochet edges the whole T. You then crochet the lilies, leaves and bud separately and sew them on.
Finished Size and Construction
- Finished size: 3.67 in (9.3 cm) wide x 4.0 in (10.2 cm) tall
- Skill level: Easy-Intermediate
- Terminology: US
- Yarn weight: DK / light (3) cotton
- Hook: 2.75 mm (US C-2)
- Number of pieces: 1 main T, plus 7 small appliqués (2 lilies, 4 leaves, 1 bud)
- Layout: single letter, worked in one piece
- Crossbar before border: 3.33 in (8.5 cm) x 1.0 in (2.5 cm)
- Stem before border: 1.33 in (3.4 cm) wide x 2.67 in (6.8 cm) long
- Size before border: 3.33 in (8.5 cm) wide x 3.67 in (9.3 cm) tall
- Border depth: 0.17 in (0.4 cm), one round of sc
Materials
Mercerized cotton gives the sharpest clusters and holds up to everyday handling. Choose a DK cotton of about 100 m per 50 g.
- Olive green: 7 g, about 14 m (letter, border, leaves, bud stem)
- Cream: 2 g, about 4 m
- Orange: 3 g, about 6 m
- Dark brown: 1 g, about 2 m (embroidery)
These quantities include a margin for swatching and tails.
Tools:
- 2.75 mm (US C-2) hook
- Tapestry needle and a sharp embroidery needle
- 1 in (2.5 cm) gold split keyring with short chain and jump ring
- Small flat-nose pliers
- Stitch markers
- Rustproof pins, blocking board and spray bottle
- Scissors and ruler
Abbreviations (US Terms)
- ch – chain
- sl st – slip stitch
- sc – single crochet
- hdc – half double crochet
- dc – double crochet
- sc2tog – single crochet 2 together
- st(s) – stitch(es)
- sp – space
- cl – 2-dc cluster
- RS / WS – right side / wrong side
Special stitches
- 2-dc cluster (cl): *Yo, insert hook in st, yo, pull up a loop, yo, pull through 2 loops; repeat from * once more in the same st, then yo and pull through all 3 loops.
- V-cluster (V-cl): (cl, ch 1, cl) all in the same st.
- 3-dc cluster: Like the cl, but work the bracketed part 3 times, then pull through all 4 loops.
Gauge and Checkpoints
Gauge: 12 sc and 12 sc rows = 2 in (5.1 cm), which is 6 sc and 6 rows per 1 in (2.5 cm). One V-cluster row is 0.33 in (0.8 cm) tall. One V-cluster row plus one sc row is 0.5 in (1.3 cm).
Test first: Treat the crossbar as your gauge test. After Row 4 it should measure 3.33 in (8.5 cm) wide x 1.0 in (2.5 cm) tall.
Checkpoints:
- After Row 4 (crossbar): 3.33 in x 1.0 in (8.5 x 2.5 cm)
- After Row 12: stem 2.0 in (5.1 cm) long
- After Row 16: whole T 3.33 in wide x 3.67 in tall (8.5 x 9.3 cm)
- After border: 3.67 in x 4.0 in (9.3 x 10.2 cm)
If your crossbar is too big by more than 0.1 in (0.3 cm), change to a 2.5 mm hook. If it is too small, change to a 3.0 mm hook. Remake the crossbar before you continue.
Color-Change Method
Each cream row is one V-cluster row, worked on its own:
- Finish the green row. Drop the green loop but do not cut it.
- Do not turn. Join cream at the edge where that green row began, and work the cream row in the same direction.
- Fasten off cream, leaving a 4 in (10.2 cm) tail. You are now back beside the waiting green loop.
- Pick up green, ch 1, turn, and work the next sc row.
The cream tails get hidden under the border later.
Crossbar
Foundation: With green, ch 22.
Row 1 (green): V-cl in the 5th ch from hook. The 4 skipped ch count as a dc plus 1 skipped ch. Skip 2 ch, V-cl in next ch; repeat from * 5 more times. Skip 1 ch, dc in the last ch. (7 V-cl, 2 dc; the row covers 20 st positions.) Ch 1, turn.
Row 2 (green): Sc in the first dc. Sc in first cl of V, sc in ch-1 sp, sc in second cl; repeat from * 6 more times. Sc in the top of the beginning ch. (23 sc)
Wait: check this before going on. Seven V-cl at 3 sc each is 21 sc, plus 2 end sc, which makes 23. Twenty positions only hold 6 V-cl spaced 3 apart, so correct Row 1 as follows.
Row 1, corrected (green): V-cl in the 5th ch from hook. Skip 2 ch, V-cl in next ch; repeat from * 4 more times. Skip 1 ch, dc in the last ch. (6 V-cl, 2 dc.) Check the count: 4 skipped ch, plus 1 ch for the first V-cl, plus 5 repeats of 3 ch, plus 1 skipped ch, plus 1 last ch, is 22 ch. Ch 1, turn.
Row 2 (green): Sc in the first dc. Sc in first cl, sc in ch-1 sp, sc in second cl; repeat from * 5 more times. Sc in the top of the beginning ch. (20 sc: 1 + 18 + 1) Drop green.
Row 3 (cream): Do not turn. Join cream with a sl st in the first sc at the edge where Row 2 began, and ch 3 (counts as dc). Skip 1 st, V-cl in next st. Skip 2 sts, V-cl in next st; repeat from * 4 more times. Skip 1 st, dc in the last st. (6 V-cl, 2 dc) Fasten off cream.
Row 4 (green): Pick up green, ch 1, turn. Work as Row 2. (20 sc) Fasten off.
Checkpoint: 3.33 in x 1.0 in (8.5 x 2.5 cm).
Stem
Hold the crossbar so that Row 4 is the bottom edge, with its tops facing down.
Row 5 (green): Skip the first 6 sts of Row 4. Join green with a sl st in the 7th st, then ch 1 and sc in the same st. Sc in each of the next 7 sts. (8 sc) This leaves 6 sts unworked at each end for the arms.
Row 6 (cream): Use the color-change method: join cream at the edge where Row 5 began, and ch 3 (counts as dc). Skip 1 st, V-cl in next st, skip 2 sts, V-cl in next st, skip 1 st, dc in last st. (2 V-cl, 2 dc) Fasten off cream.
Row 7 (green): Ch 1, turn. Sc in first dc, sc in first cl, sc in ch-1 sp, sc in second cl twice, sc in top of ch-3. (8 sc: 1 + 6 + 1)
Rows 8, 10 and 12 (cream): Work as Row 6.
Rows 9 and 11 (green): Work as Row 7. (8 sc)
Checkpoint after Row 12: stem 2.0 in (5.1 cm) long.
Row 13 (green): Work as Row 7. (8 sc)
Rows 14–16 (green): Ch 1, turn, sc in each st. (8 sc) Do not fasten off. Keep the loop on a marker for the border.
The plain green rows at the bottom give the lower lily a solid base.
Checkpoint: stem 2.67 in (6.8 cm) long; T is 3.33 in x 3.67 in (8.5 x 9.3 cm). Weave in the green ends now. Lay the cream tails along the side edges so the border can cover them.
Border
Border gauge:
- Along the stitch tops: 1 sc per st.
- Along the row ends: 1 sc per sc row and 2 sc per V-cluster row.
- Outer corners: 3 sc in one corner stitch.
- Inner corners: sc2tog.
Round 1 (green): Pick up the loop, ch 1, and work around the T in order. Work over the cream tails as you go.
- Bottom of stem: 3 sc in the first st (corner), sc in the next 6 sts, 3 sc in the last st (corner). (12 sc)
- Stem side: Up the row ends of Rows 15 to 6: 1 sc in each sc-row end and 2 sc in each V-row end. (14 sc: 6 sc rows x 1 + 4 V rows x 2)
- Inner corner: Sc2tog, with the first leg in the end of Row 5 and the second leg in the nearest free st of Row 4. (1 st)
- Arm underside: Sc in the next 4 free sts of Row 4, then 3 sc in the end st (corner). (7 sc, plus the inner sc2tog = 8 sts)
- Arm side: Up the row ends of Rows 3 to 1: 2 + 1 + 2. (5 sc)
- Top edge: Work along the opposite loops of the foundation chain: 3 sc in the first loop (corner), sc in the next 18 loops, 3 sc in the last loop (corner). (24 sc)
- Other arm side: Down Rows 1 to 3. (5 sc)
- Other arm underside: 3 sc in the end st of Row 4 (corner), sc in the next 4 sts. (7 sc)
- Other inner corner: Sc2tog over the next free st and the end of Row 5. (1 st, so the underside totals 8 sts)
- Other stem side: Down Rows 6 to 15. (14 sc)
Sl st to the first sc. (90 sts total: 12 + 14 + 8 + 5 + 24 + 5 + 8 + 14) Fasten off and weave in the end.
Why the math works: The gauge is 6 sc and 6 rows per inch. One sc per stitch keeps the width true, and 1 sc per sc row (0.17 in, 0.4 cm) or 2 sc per V row (0.33 in, 0.8 cm) keeps the edges true. The 3-sc corners turn the 90-degree outer corners without pulling. The sc2tog removes bulk at the two inner corners. Every free stitch is used exactly once: the top has 20 loops (2 corners + 18), each arm underside has 6 free sts (1 corner + 4 + 1 in sc2tog), and the stem bottom has 8 sts (2 corners + 6).
Checkpoint: 3.67 in x 4.0 in (9.3 x 10.2 cm).
Appliqués
Tiger Lilies (make 2, orange)
- Rnd 1: Make a magic ring, ch 1, and work 6 sc in the ring. Pull the ring closed and sl st to the first sc. (6 sc)
- Rnd 2 (petals): Ch 5, sl st in 2nd ch from hook, hdc in next ch, dc in next ch, hdc in last ch, sl st in next sc of Rnd 1; repeat from * 5 more times. (6 petals of 4 sts each)
- Fasten off and leave an 8 in (20.3 cm) tail for sewing.
Each petal is about 0.6 in (1.5 cm) long. The finished lily is about 1.4 in (3.6 cm) across.
Leaves (make 4, green)
- Ch 6. Working in the back bumps: sc in 2nd ch from hook, hdc in next ch, dc in next ch, hdc in next ch, sc in last ch. (5 sts)
- Ch 2 for the tip. Working along the opposite loops: sc, hdc, dc, hdc, sc. (5 sts)
- Sl st to the first sc. Fasten off and leave a 6 in (15.2 cm) tail.
Each leaf is about 0.8 in (2.0 cm) long.
Bud (make 1)
- With orange, ch 4. Work a 3-dc cluster in the 4th ch from hook, then ch 1 and fasten off. The bud is about 0.5 in (1.3 cm) long.
- Join green at the base of the bud, ch 6, and fasten off. This chain is the stem.
Embroidery
Use dark brown on the sharp needle:
- Stamens: On each lily, make 5 straight stitches about 0.4 in (1.0 cm) long that fan out from the center. Finish each one with a French knot.
- Speckles: Add 2 to 3 tiny straight stitches on each petal.
Assembly
- Top lily: Pin it over the right end of the crossbar so that two petals extend about 0.25 in (0.6 cm) past the top-right corner. Tuck 2 leaves behind its upper-right petals.
- Bottom lily: Pin it over the lower stem, centered on Rows 13–16. Place a leaf on each side, angled outward.
- Bud: Lay the bud stem along the right side of the stem, above the lower lily.
- Whipstitch each piece in place through the center and the petal bases only, so the tips stay free.
Final Blocking
- Lightly mist the T until it is just damp.
- Pin the T to 3.67 in x 4.0 in (9.3 x 10.2 cm) on a grid board. Pin the 6 outer corners first, then the center of each edge.
- Check that both arms extend the same distance, 1.0 in (2.5 cm) each before the border, and that the stem is straight.
- Let it dry completely. Do this before you sew on the appliqués, or redo it after removing them.
- After assembly, steam the lilies lightly from above without touching them. Shape each petal tip with your fingers so it curls slightly backward.
- Open the jump ring with pliers. Pass it through the border and Row 1 above the center of the stem, catching 2 stitches, then close it firmly.
Final Quality-Control Checklist
- [ ] Rows 2 and 4 each have 20 sc, and every stem sc row has 8 sc.
- [ ] There are 6 V-cl in each crossbar V row and 2 V-cl in each stem V row.
- [ ] Six free stitches remain on each arm underside.
- [ ] The border totals 90 sts and lies flat.
- [ ] Finished size is 3.67 in x 4.0 in (9.3 x 10.2 cm), within 0.1 in (0.3 cm).
- [ ] No cream tails show along the edges.
- [ ] The lily petal tips are free, and all embroidery is secure.
- [ ] The jump ring is closed with no gap.
Troubleshooting
- The crossbar ruffles: Your V-clusters are too loose. Go down a hook size, or tighten the ch-1 at the center of each V.
- The stem is off-center: Recount the skipped stitches. You need 6 free stitches on each side of Row 4.
- The border flares along the stem: Check that you put 1 sc, not 2, in each sc-row end.
- The border cups: Check the 3-sc corners and the 2 sc in each V-row end.
- The inner corners gape: Work the sc2tog more firmly, or add a hidden stitch with the tail.
- The lily petals curl too much: Pin them flat while damp and let them dry.
Care
Hand wash in cool water with a mild soap. Press out the water in a towel, reshape the piece and dry it flat away from heat.
Final Notes
The measurements build on each other:
- The gauge is 6 sc per 1 in (2.5 cm).
- That gives a crossbar of 3.33 in x 1.0 in (8.5 x 2.5 cm).
- Adding the stem brings the T to 3.33 in x 3.67 in (8.5 x 9.3 cm).
- A 0.17 in (0.4 cm) border brings it to 3.67 in x 4.0 in (9.3 x 10.2 cm).
Check each stage and the lilies will sit exactly where they should.
Happy crocheting!