

The Honeycomb Trio is a hanging toilet paper holder with three hexagon pockets stacked one above the other. Each pocket has an open honeycomb mesh front, a solid band at the bottom, and a cream rim. The strip hangs from a natural wooden ring, so you can put it on a towel hook or a door hook.
The holder uses two colors. Warm mustard gold is used for the back strip, the pocket bases, and the honeycomb mesh. Cream is used for the pocket rims and for the outline along each pocket’s sides.
This pattern uses US crochet terms. The finished strip is about 8.8 in (22.4 cm) wide and 24.6 in (62.5 cm) long. From the bottom edge to the top of the ring, it is about 28 in (71.1 cm).
First you make three solid hexagon back panels in rows. The ladder bars and the hanger are worked directly onto these panels. Next you make three mesh pockets and sew everything together. Last, you add a two-round border and fold the hanger strap over the wooden ring.
Finished Size and Construction
- Finished size: about 8.8 in (22.4 cm) x 24.6 in (62.5 cm), plus hanger and ring
- Skill level: Intermediate
- Terminology: US
- Yarn weight: Worsted (#4) cotton
- Hook: 5.0 mm (H-8)
- Number of pieces: 6 (3 hexagon back panels and 3 pockets), plus 1 wooden ring
- Layout: 1 column of 3 hexagons, joined by ladder bars
- Piece size: each back hexagon is 8 in (20.3 cm) from point to point and 7.3 in (18.5 cm) tall
- Size before border: 8 in (20.3 cm) x 24.2 in (61.5 cm)
- Border depth: about 0.4 in (1.0 cm)
Materials
Choose a smooth worsted-weight cotton or cotton blend with about 190 m per 100 g. Don’t use stretchy acrylic for the back panels, because a long strip holding three rolls will stretch over time.
- Mustard gold: 150 g (about 285 m)
- Cream: 30 g (about 57 m)
- 5.0 mm (H-8) crochet hook
- 1 wooden ring, 2.5 in (6.4 cm) outside diameter
- Tapestry needle
- 2 stitch markers
- Scissors
- Measuring tape
- Blocking mats and rust-proof pins
These yarn amounts include about 25% extra to allow for your gauge swatch and for differences in tension.
Abbreviations (US Terms)
- ch – chain
- sc – single crochet
- sc2tog – single crochet 2 together
- sl st – slip stitch
- rev sc – reverse single crochet (crab stitch)
- st(s) – stitch(es)
- sp – space
- RS / WS – right side / wrong side
Special stitches
- Increase row: Ch 1, 2 sc in the first st, sc in each st up to the last st, 2 sc in the last st. This adds 2 sts.
- Decrease row: Ch 1, sc2tog, sc in each st up to the last 2 sts, sc2tog. This removes 2 sts.
- Honeycomb growth row: Turn, ch 1, sc in the first sc, ch 3, sc in the first ch-3 sp, ch 3, sc in the next ch-3 sp; repeat from * across all sps, ch 3, sc in the last sc. Each row has 1 more ch-3 sp than the row before.
- Reverse sc: Work from left to right if you are right-handed. Insert the hook in the next st to the right, yarn over, pull up a loop, yarn over, and pull through both loops.
Gauge and Checkpoints
The gauge is 16 sc x 18 rows = 4 in (10.2 cm). That is 4 sts and 4.5 rows per inch.
Make one back hexagon before you start any other piece. Check these measurements:
- Row 1: 16 sts = 4 in (10.2 cm)
- After Row 17: 32 sts = 8 in (20.3 cm) wide, and 3.8 in (9.7 cm) tall
- After Row 33: 7.3 in (18.5 cm) tall
On your first pocket, check these measurements:
- After Row 6: 29 sts = 7.25 in (18.4 cm) wide, and 1.3 in (3.3 cm) tall
- After Row 12: the mesh is about 2.7 in (6.9 cm) tall
- Finished pocket: the top is 40 sts = 10 in (25.4 cm) wide, and the pocket is about 4.7 in (11.9 cm) tall
If your hexagon is too big, use a hook one size smaller. If it is too small, use a hook one size larger. Check your row gauge too. If your rows are too tall, the slanted sides will be too steep and the border will not lie flat.
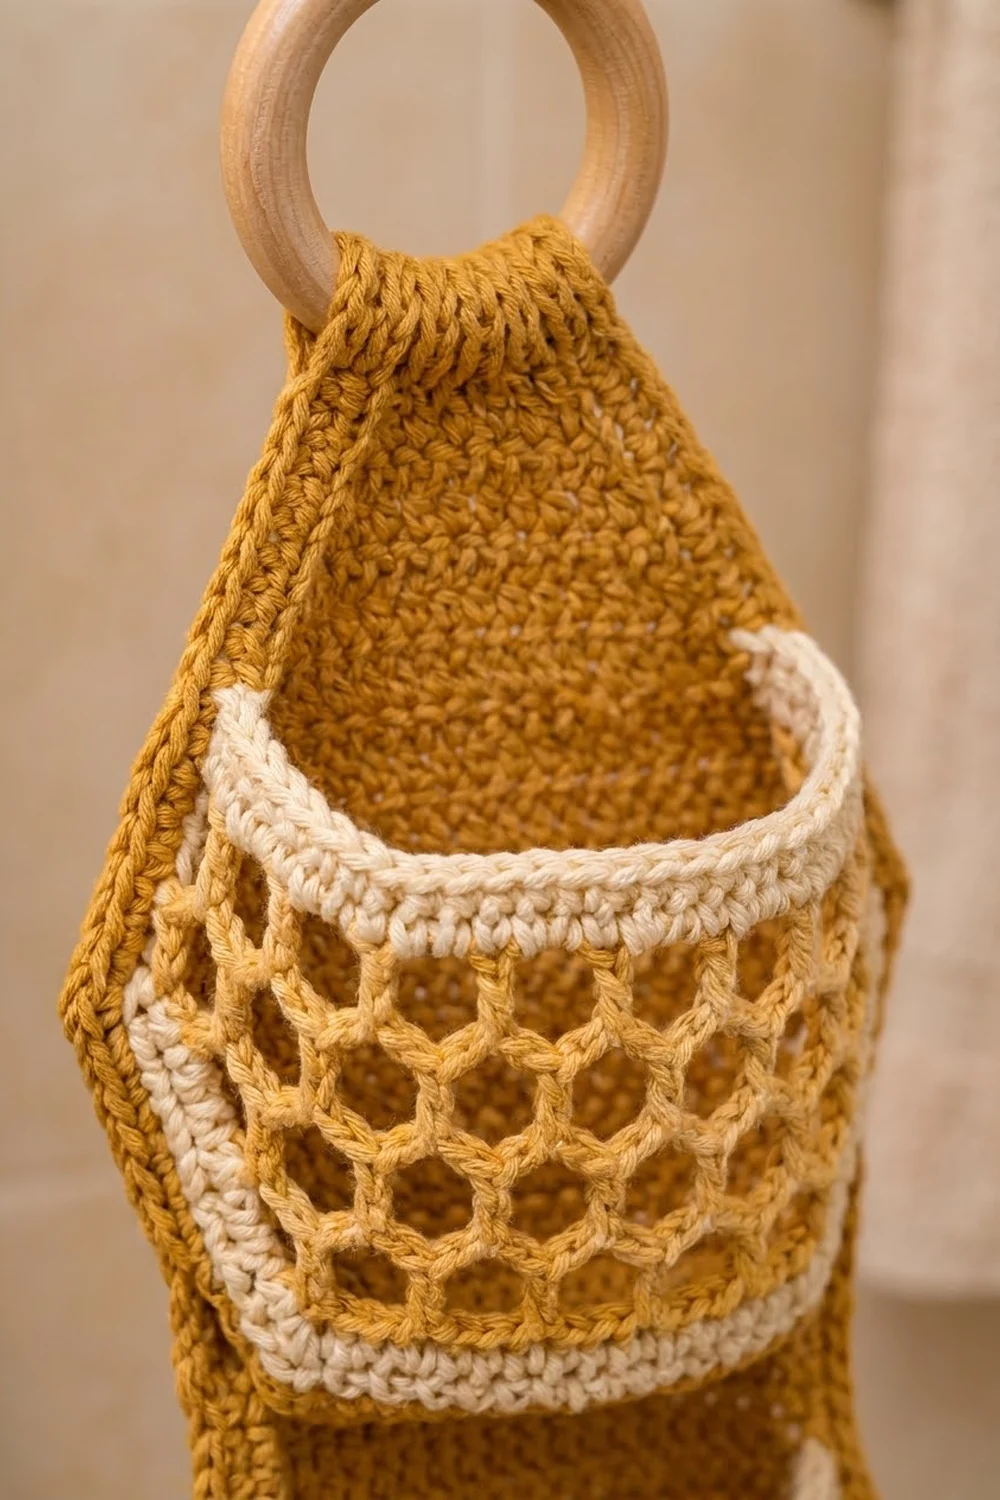
Back Hexagon Panel (Make 3)
Use mustard. Each panel has a straight top, a straight bottom, and a point on each side.
Row 1 (RS): Ch 17. Sc in the 2nd ch from the hook and in each ch across. (16 sts)
Row 2: Work an increase row. (18 sts)
Row 3: Ch 1, sc in each st across. (18 sts)
Rows 4–17: Repeat Rows 2–3 seven more times. The increase rows give these counts: Row 4: 20 sts, Row 6: 22, Row 8: 24, Row 10: 26, Row 12: 28, Row 14: 30, Row 16: 32. Row 17 is a plain row. (32 sts)
Row 17 forms the side points. Put a marker in the end of Row 17 on each side.
Row 18: Work a decrease row. (30 sts)
Row 19: Ch 1, sc in each st across. (30 sts)
Rows 20–33: Work a decrease row on every even row and a plain row on every odd row. The counts are Row 20: 28 sts, Row 22: 26, Row 24: 24, Row 26: 22, Row 28: 20, Row 30: 18, Row 32: 16. Row 33 is plain. (16 sts)
Fasten off. This panel is Panel C. Panels A and B get more steps.
Hanger (Panel A only)
Keep the RS facing and continue from Row 33.
Triangle Rows 1–6: Work a decrease row on every row. The counts are 14, 12, 10, 8, 6, and 4 sts.
Strap Rows 7–20: Ch 1, sc in each st across. (4 sts in each of 14 rows, about 3.1 in / 7.9 cm long)
Fasten off and leave a 12 in (30.5 cm) tail.
Ladder Bars (Panels A and B)
Turn the panel upside down. You will work into the free loops of the foundation chain.
Bar 1: Join mustard in the first foundation st. Ch 1 and sc in the first 4 sts. Work 4 more rows of 4 sc, for 5 rows in total. Fasten off and leave a 10 in (25.4 cm) tail.
Bar 2: Skip the next 8 sts. Join in st 13 and work across sts 13–16 the same way as Bar 1.
Each bar is 1 in (2.5 cm) wide and about 1.1 in (2.8 cm) long. The 8 skipped sts between the bars leave the open ladder gap.
Pocket (Make 3)
Use mustard for Rows 1–12 and cream for the rest of the pocket.
Solid Base
Row 1 (RS): Ch 24. Sc in the 2nd ch from the hook and in each ch across. (23 sts)
Row 2: Work an increase row. (25 sts)
Row 3: Ch 1, sc across. (25 sts)
Row 4: Work an increase row. (27 sts)
Row 5: Ch 1, sc across. (27 sts)
Row 6: Work an increase row. (29 sts)
Honeycomb Mesh
Row 7 (set-up): Turn, ch 1, sc in the first st, ch 3, skip 1 st, sc in the next st; repeat from * 13 more times. (14 ch-3 sps)
This uses 1 + (14 x 2) = 29 sts, so it fits the row exactly.
Rows 8–12: Work the honeycomb growth row 5 times. The counts are Row 8: 15 sps, Row 9: 16, Row 10: 17, Row 11: 18, Row 12: 19. On the last yarn over of Row 12, change to cream.
The mesh gets 1 space wider on every row. This makes the front of the pocket wider than the back, so it opens into a bowl.
Cream Rim
Row 13 (conversion row): Turn, ch 1, sc in the first sc, 2 sc in each of the 19 ch-3 sps, sc in the last sc. The count is (2 x 19 = 38) + (1 sc in each end sc = 2) = 40 sts.
Rows 14–15: Ch 1, sc in each st across. (40 sts)
Side Edging
Don’t fasten off. Ch 1, turn the pocket 90 degrees, and work down the left side.
- Left side: 21 sc. Work 1 sc in each of the 3 rim rows, 2 sc in each of the 6 mesh rows, and 1 sc in each of the 6 base rows.
- Bottom: 2 sc in the first foundation st, sc in the next 21 sts, and 2 sc in the last st. (25 sts)
- Right side: 21 sc, worked the same way as the left side.
Sl st to the first st of Row 15. The edging has 21 + 25 + 21 = 67 sts. Fasten off and weave in the ends.
Make All Pieces
- Mustard: 3 back hexagons. Panel A has the hanger and ladder bars, Panel B has only ladder bars, and Panel C is plain.
- Mustard and cream: 3 pockets.
Here is the layout from top to bottom:
      [ ring ]
      [ hanger ]
   < Panel A + Pocket >
       ||    ||
   < Panel B + Pocket >
       ||    ||
   < Panel C + Pocket >
Joining
Ladder bars to panels
Lay the panels in a column with the RS facing up. Put Panel A at the top and Panel C at the bottom. Use the tail on each bar to whipstitch the 4 sts of the last bar row to the matching 4 sts at the end of Row 33 on the next panel down. Bar 1 joins sts 1–4, and Bar 2 joins sts 13–16.
Each bar joins stitch for stitch, so the panels stay centered and the ladder gaps stay straight.
Pockets to panels
Pin a pocket onto each panel with the WS of the pocket against the RS of the panel. Match up the bottom edges.
Sew the pockets on with mustard yarn and a tapestry needle. Whipstitch each 21-st side of the edging to rows 1–21 of the panel, so each edging st matches 1 row. Sew through the stitch one in from the edge, so the row ends stay free for the border.
Sew the 25 bottom edging sts to the 16 sts of Row 1. On 9 of the panel sts, go through 2 edging sts. On the other 7 panel sts, go through 1 edging st. That gives (9 x 2) + (7 x 1) = 25. Leave the top rim open.
Keep the sewing even and snug, but don’t pull so hard that the panel puckers.
Checkpoint: The strip should be 8 in (20.3 cm) wide at the side points. It should be 24.2 in (61.5 cm) long from the bottom of Panel C to the top of Panel A. That length is 109 rows: (3 x 33) + (2 x 5).
Border
The border uses the same gauge as the panels, 4 sc per inch. Work 1 sc in each row end.
Round 1 (mustard): Join at the top right corner of the strap. Work the top of the strap first: 3 sc in the first st, sc in the next 2 sts, and 3 sc in the last st. (8 sts) Then work down the left side:
- 14 sc along the strap
- 6 sc along the triangle
- 34 sc along Panel A: 16 on the upper slant, 2 sc in the marked Row 17 point, and 16 on the lower slant
- 5 sc along the bar
- 34 sc along Panel B
- 5 sc along the bar
- 34 sc along Panel C
The left side has 132 sts.
On the bottom of Panel C, work 2 sc in the first foundation st, 14 sc, and 2 sc in the last st. (18 sts) Work up the right side to match the left side. (132 sts) Sl st to the first sc.
The total is 8 + 132 + 18 + 132 = 290 sts. Don’t border the inner edges of the ladder gaps.
Round 2: Ch 1, rev sc in each st around. (290 sts) Sl st to join and fasten off.
Why the math works: Each slant is 16 rows tall, or 3.56 in (9.0 cm), and moves 8 sts, or 2 in (5.1 cm), to the side. That makes each slant about 4.1 in (10.4 cm) long. At 4 sc per inch, 16 sc measure 4 in (10.2 cm), so the edge lies flat. The 2-sc points and bottom corners turn the 120-degree corners of the hexagon. The 3-sc strap corners turn the 90-degree corners.
Attach the ring: Pass the strap through the wooden ring from front to back. Fold the strap down 1.5 in (3.8 cm) and whipstitch the end to the WS at the top of the triangle.
Final Blocking
- Soak the holder, then roll it in a towel to remove extra water.
- Pin it flat with the RS facing up and the panels in a straight column.
- Pin each panel to 8 in (20.3 cm) wide at the points. Check that the strip is 24.2 in (61.5 cm) long, not counting the border.
- Stuff each pocket loosely with a rolled-up towel to shape the bowl.
- Spread the honeycomb cells open evenly with your fingers.
- Let the holder dry completely before you take out the pins.
Final Quality-Control Checklist
- All 3 panels are the same size: 8 in (20.3 cm) x 7.3 in (18.5 cm).
- The side points line up along both edges.
- The ladder bars are straight and all the same length.
- Each pocket has 40 rim sts and 67 edging sts.
- Border Round 1 has 290 sts.
- The ring strap is sewn on firmly.
- All ends are woven in on the WS.
Troubleshooting
- The slants ripple: Your rows are too tall. Use a hook one size smaller, or skip 1 row end on each slant in Round 1.
- The slants cup: Your rows are too short. Work 2 sc in 1 row end near the middle of each slant.
- The pocket is too shallow: Add 1 more honeycomb growth row. The rim will then have 42 sts.
- The mesh looks uneven: Make every chain the same size, and block with the pocket stuffed.
- The strip twists: Sew the bars again stitch for stitch, and block the strip flat.
Care
Hand wash, or machine wash on a cool, gentle cycle. Take the rolls out before washing, then reshape the holder and dry it flat.
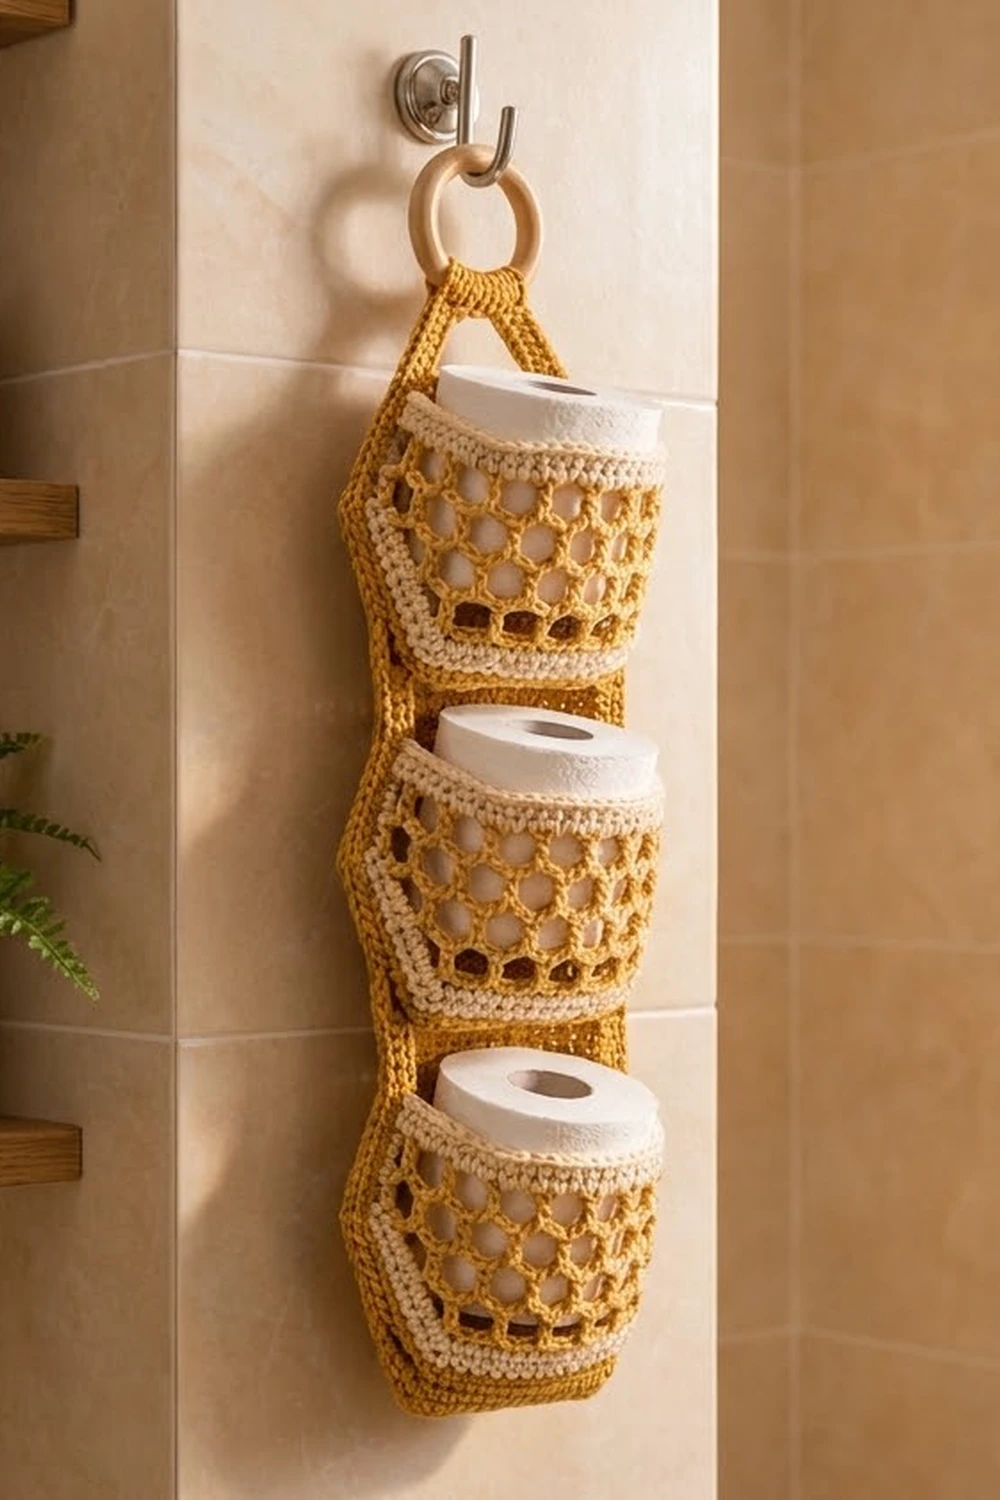
Final Notes
Every measurement in this pattern comes from the gauge. At 4 sts and 4.5 rows per inch, each panel is 8 in (20.3 cm) x 7.3 in (18.5 cm). Three panels and two bars make a strip 24.2 in (61.5 cm) long. The 21-st sides of each pocket match panel rows 1–21 one to one. The 290-st border adds 0.4 in (1.0 cm) on every side, so the finished holder is 8.8 in (22.4 cm) x 24.6 in (62.5 cm).
Happy crocheting!