

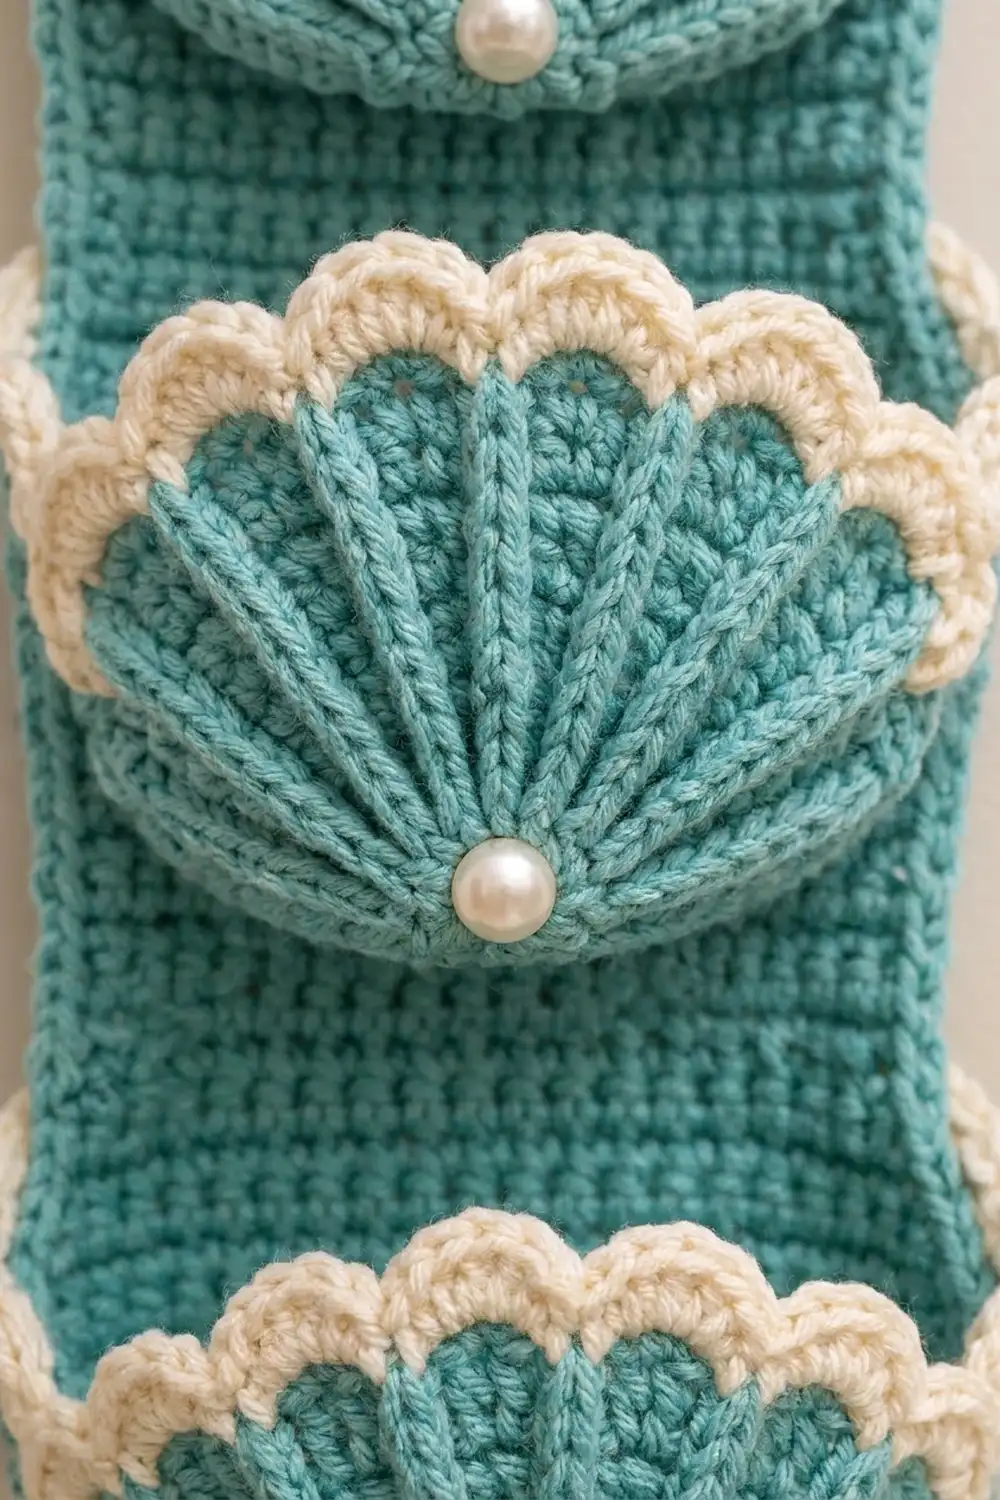
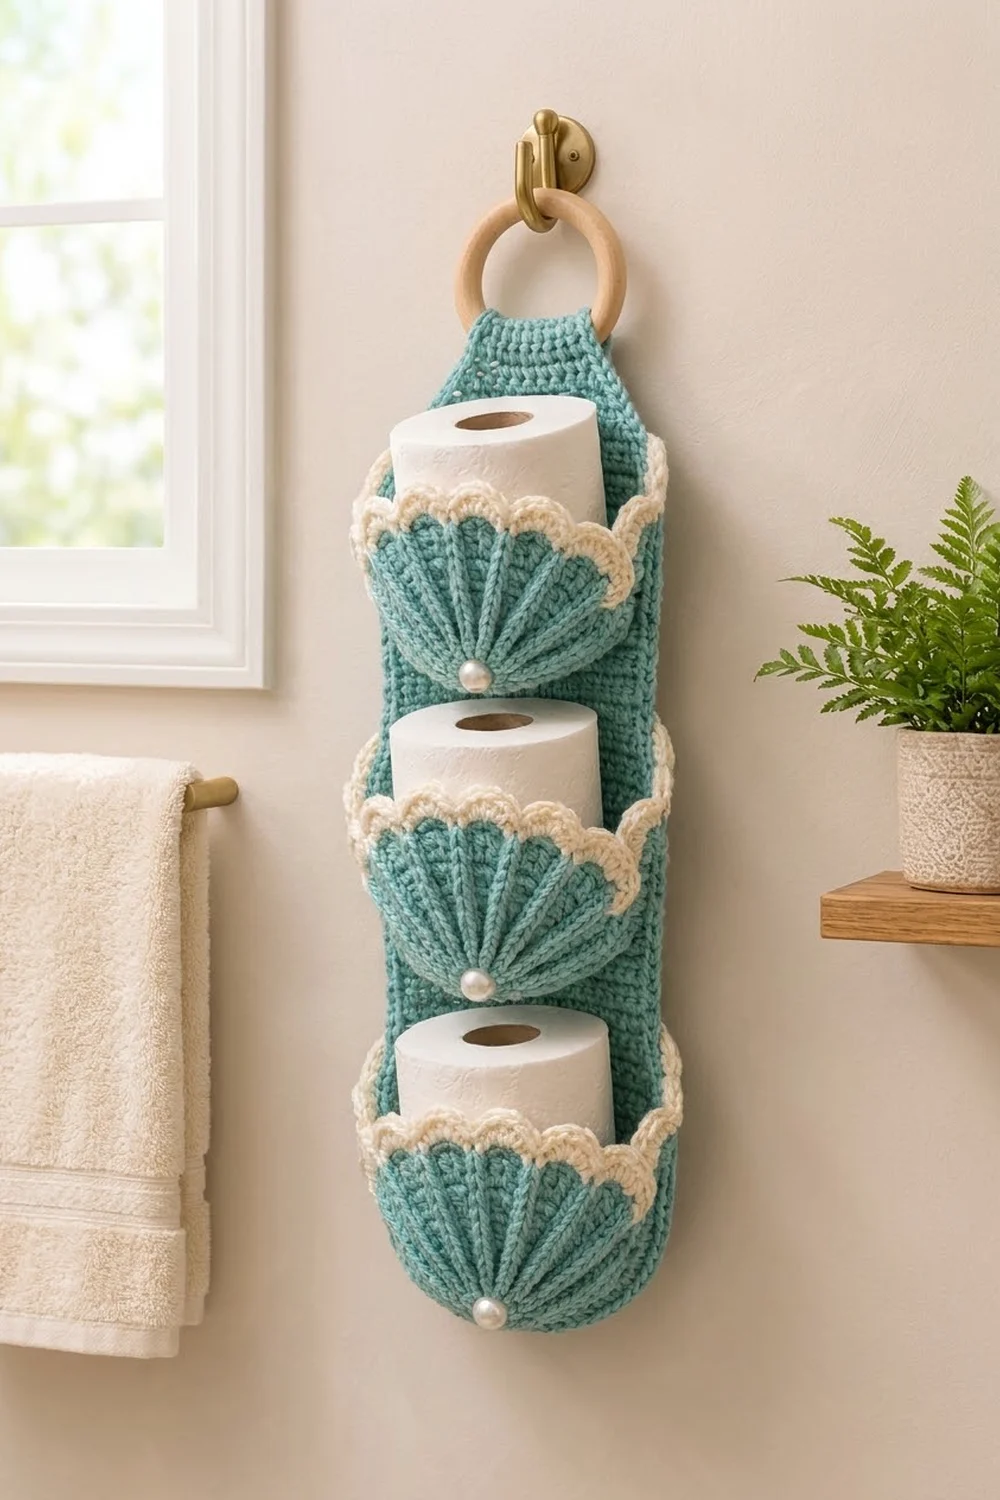
The Seaside Pearl Toilet Paper Holder is a hanging bathroom organizer with three seashell pockets, stacked one above the other. Each pocket front is a teal fan with raised ribs that all start at a small pearl at the bottom. A cream scalloped edge runs along the top of each shell.
The colors are soft teal and cream, which suits a coastal bathroom. The back panel is plain single crochet, so all the texture stays on the shells. A wooden ring at the top lets you hang the holder from a towel hook or a door hook.
This pattern uses US crochet terms. The finished holder is 7 in (17.8 cm) wide and 26.5 in (67.3 cm) long laid flat. Once the tab is folded over the ring, it hangs about 24.5 in (62.2 cm) below the ring. Each pocket holds one standard roll.
Construction overview: you make one back panel in rows. Then you make three shell fronts, worked in rows outward from a magic ring, and three gusset strips. Each gusset is sewn first to its shell and then to the panel. One round of border finishes the panel, and the tab is folded around the ring.
Finished Size and Construction
- Finished size: 7 in × 26.5 in (17.8 cm × 67.3 cm) flat; hangs about 24.5 in (62.2 cm) below the ring
- Skill level: Intermediate (post stitches, working along row ends, seaming)
- Terminology: US
- Yarn weight: Worsted (#4)
- Hook: 5.0 mm (H-8)
- Number of pieces: 7 (1 panel, 3 shell fronts, 3 gussets)
- Layout: 1 vertical column of 3 pockets, spaced 6.4 in (16.3 cm) apart, measured base to base
- Shell front size: 7 in (17.8 cm) wide × 4.25 in (10.8 cm) tall
- Gusset size: 2.5 in × 10.7 in (6.4 cm × 27.2 cm)
- Panel size before border: 6.5 in × 26 in (16.5 cm × 66.0 cm)
- Border depth: 0.25 in (0.6 cm), 1 round
Materials
Use a smooth worsted-weight yarn. Cotton or a cotton blend gives crisp ribs and keeps its shape in a damp bathroom. Acrylic also works but may make the shells softer.
- Teal (Color A): 130 g / 245 m
- Cream (Color B): 25 g / 45 m
These quantities include a margin of about 15%.
Tools and notions:
– 5.0 mm (H-8) crochet hook
– 1 wooden ring, 2.75 in (7.0 cm) across
– 3 pearl beads, 12 mm, with shanks or holes for sewing
– Tapestry needle
– Sewing needle and white thread
– 6 locking stitch markers
– Scissors, tape measure, blocking pins
Abbreviations (US Terms)
- ch – chain
- sl st – slip stitch
- sc – single crochet
- sc2tog – single crochet 2 together
- dc – double crochet
- FPdc – front post double crochet
- BPdc – back post double crochet
- FLO – front loop only
- MR – magic ring
- st(s) – stitch(es)
- RS / WS – right side / wrong side
- tch – turning chain
Special stitches:
– Rib: on RS rows, work a FPdc around the rib stitch below. On WS rows, work a BPdc around it. Either way the rib stands out on the RS.
– Scallop: 5 dc worked in the same stitch.
Gauge and Checkpoints
- Single crochet: 16 sts × 18 rows = 4 in (10.2 cm)
- Double crochet: 16 sts × 8 rows = 4 in (10.2 cm)
Make one shell front before anything else. It tests your dc gauge, your post-stitch tension and your trim all at once.
Checkpoints:
– Shell, after Row 3: the straight edge measures 3 in (7.6 cm) from end to end.
– Shell, after Row 7: the straight edge measures 7 in (17.8 cm).
– Shell, after the trim: the shell is 4.25 in (10.8 cm) tall at the center.
– Panel, after Row 3: 6.5 in (16.5 cm) wide.
– Panel, after Row 90: 20 in (50.8 cm) long.
– Panel, after Row 99: 22 in (55.9 cm) long.
– Panel, after Row 117: 26 in (66.0 cm) long.
If your pieces come out too big, go down 0.5 mm in hook size. If they come out too small, go up 0.5 mm. Post stitches often pull the fabric in. If only the shell is small, loosen the FPdc and BPdc stitches rather than changing hooks.
Back Panel
Use Color A. The ch 1 at the start of each row does not count as a stitch.
Row 1 (RS): Ch 23, sc in 2nd ch from hook and in each ch across. Turn. (22 sts)
Row 2: Ch 1, 2 sc in first st, sc in next 20 sts, 2 sc in last st. Turn. (24 sts)
Row 3: Ch 1, 2 sc in first st, sc in next 22 sts, 2 sc in last st. Turn. (26 sts)
Rows 1–3 give the panel its rounded bottom corners.
Rows 4–90: Ch 1, sc in each st across. Turn. (26 sts)
Taper
Rows 91–99: Ch 1, sc2tog, sc in each st to the last 2 sts, sc2tog. Turn.
Counts: Row 91 = 24, Row 92 = 22, Row 93 = 20, Row 94 = 18, Row 95 = 16, Row 96 = 14, Row 97 = 12, Row 98 = 10, Row 99 = 8 sts.
Tab
Rows 100–117: Ch 1, sc in each st across. Turn. (8 sts)
Fasten off. The panel is now 6.5 in × 26 in (16.5 cm × 66.0 cm).
Place markers on both side edges at Row 5, Row 34 and Row 63. These rows are 1.1 in (2.8 cm), 7.6 in (19.3 cm) and 14 in (35.6 cm) above the bottom edge. The base of each pocket will sit along the top of one of these rows.
Shell Front (make 3)
Use Color A. The ch 3 at the start of each row counts as a dc.
The shell has 5 main ribs that start in Row 1. Six more ribs start in Row 4, which gives 11 ribs at the outer edge.
Row 1 (RS): In a MR, ch 3, 6 dc. Pull the ring closed. Turn. (7 sts: 1 edge st, 5 rib sts, 1 edge st)
Row 2 (WS): Ch 3, dc in the same st. BPdc around the next dc, dc in the top of the same dc. Repeat from * 4 more times. Dc in the top of the tch. Turn. (13 sts)
Row 3 (RS): Ch 3, 2 dc in the next dc. FPdc around the next BPdc, 2 dc in the next dc. Repeat from * 4 more times. Dc in the top of the tch. Turn. (19 sts)
Row 4 (WS): Ch 3. Dc in the next dc, BPdc around the next dc, dc in the top of the same dc, BPdc around the next FPdc. Repeat from * 4 more times. Dc in the next dc, BPdc around the next dc, dc in the top of the same dc, dc in the top of the tch. Turn. (25 sts)
The 6 new BPdc in this row start the secondary ribs.
Row 5 (RS): Ch 3. Dc in the next dc, FPdc around the next BPdc. Repeat from * 11 more times. Dc in the top of the tch. Turn. (25 sts)
Check: 1 + 12 × 2 + 1 = 26 would be one too many. Work it this way instead: ch 3, then dc in the next dc, FPdc around the next BPdc 11 times, dc in the next dc, dc in the top of the tch. That is 1 + 22 + 1 + 1 = 25 sts.
Row 6 (WS): Ch 3. 2 dc in the next dc, BPdc around the next FPdc. Repeat from * 10 more times. 2 dc in the next dc, dc in the top of the tch. Turn. (37 sts: 1 + 11 × 3 + 2 + 1)
Row 7 (RS): Ch 3. Dc in the next 2 dc, FPdc around the next BPdc. Repeat from * 10 more times. Dc in the next 2 dc, dc in the top of the tch. (37 sts)
Rows 5 and 7 have no increases on purpose. Without them the shell cups forward slightly, which helps the pocket hold its roll.
Straight-edge row: Do not turn. Ch 1, then rotate the work so you can crochet along the straight edge. Work 2 sc in each of the 14 dc row ends, which is 7 row ends on each side of the ring. (28 sc) Fasten off.
The straight edge now measures 7 in (17.8 cm).
Cream Trim
Trim Row 1 (RS): With the RS facing, join Color B with a sc in the FLO of the first st of Row 7 (the tch at the right-hand corner). Sc in the FLO of each of the remaining 36 sts. (37 sc: 1 per Row 7 st + 0 added) Fasten off.
Leaving the back loops of Row 7 free gives you clean loops for seaming the gusset later.
Trim Row 2 (RS): With the RS facing, join Color B with a sc in the first sc. Skip 1 st, 5 dc in the next st, skip 1 st, sc in the next st. Repeat from * 8 more times. (9 scallops; 37 base sts used as 1 + 9 × 4) Fasten off.
The trim adds 0.75 in (1.9 cm). The shell is now 4.25 in (10.8 cm) tall.
Use white thread to sew a pearl bead over the magic ring on the RS, at the bottom point where the ribs meet.
Gusset (make 3)
Use Color A.
Row 1: Ch 11, sc in 2nd ch from hook and in each ch across. Turn. (10 sts)
Rows 2–48: Ch 1, sc in each st across. Turn. (10 sts)
Fasten off and leave a 40 in (101.6 cm) tail for sewing. The gusset measures 2.5 in × 10.7 in (6.4 cm × 27.2 cm).
On both long edges, place a marker at the end of Row 9 and at the end of Row 39. This divides each edge into three sections:
– Left leg: rows 1–9, 2 in (5.1 cm)
– Base: rows 10–39, 30 rows, 6.7 in (17.0 cm)
– Right leg: rows 40–48, 2 in (5.1 cm)
Make All Pieces
- Color A: 1 back panel, 3 shell fronts, 3 gussets
- Color B: trim on all 3 shell fronts
- Pearls: 3, one per shell
Layout, front view:
        (  wooden ring  )
           [ tab ]
         /  taper  \
   | Pocket 3 – base on Row 63 |
   | Pocket 2 – base on Row 34 |
   | Pocket 1 – base on Row 5  |
    \_____ rounded bottom _____/
Joining
Use the gusset tails and a whipstitch. Join each pocket in two steps: first sew the gusset to the shell front, then sew that unit to the panel.
Step 1 – Gusset to shell front. Match these sections, working stitch by stitch:
– Left leg (rows 1–9): sew to the back loops of the first 8 sts of Row 7. You have 9 row ends for 8 sts, so sew 2 row ends into the middle st once.
– Base (rows 10–39): sew to the 28 sc of the straight-edge row. You have 30 row ends for 28 sts, so sew 2 row ends into one st at 2 evenly spaced points.
– Right leg (rows 40–48): sew to the back loops of the last 8 sts of Row 7, using the same 9-into-8 method as the left leg.
The middle 21 sts of Row 7 are not sewn. They form the open top of the pocket, with the cream scallops above them.
Step 2 – Unit to panel. Lay the panel RS up.
– Base (rows 10–39): sew along the top of the marked panel row, across all 26 sts. You have 30 row ends for 26 sts, so sew 2 row ends into one st at 4 evenly spaced points (26 + 4 = 30).
– Legs (9 rows each): sew up the panel’s side edges, 1 gusset row to 1 panel row, through the inner half of each edge stitch. This leaves the outer edge free for the border.
Tension: pull each stitch just snug enough to close the seam. If you pull tighter, the panel puckers behind the pocket.
Checkpoint: each pocket opening should measure about 2.5 in (6.4 cm) deep at the base. A roll should drop in easily and stand upright, with about 0.5 in (1.3 cm) showing above the scallops.
Join Pocket 1 at Row 5, Pocket 2 at Row 34 and Pocket 3 at Row 63.
Border
Border gauge: 4 sc per 1 in (2.5 cm) along every edge.
The panel rows are shorter than the stitches are wide: 4.5 rows per 1 in versus 4 sts per 1 in. So along the straight row-end edges you work 8 sc for every 9 rows.
Round 1: With the RS facing, join Color A at the top right corner of the tab.
– Tab top (Row 117): 3 sc in the first st, sc in the next 6 sts, 3 sc in the last st. (12 sc)
– Left side, top to bottom:
– Tab, 18 row ends: 1 sc in each, skipping every 9th row end. (16 sc)
– Taper, 9 row ends: 1 sc in each, with 1 extra sc in every 3rd row end. (12 sc)
– Body, 90 row ends: 1 sc in each, skipping every 9th row end. (80 sc)
– Left side total: 108 sc
– Bottom (foundation chain): 1 sc in each of the 22 sts. (22 sc)
– Right side, bottom to top: body 80, taper 12, tab 16. (108 sc)
Join with a sl st to the first sc. (250 sc: 12 + 108 + 22 + 108) Fasten off.
Why the math works:
– Body: 90 rows ÷ 4.5 = 20 in, and 80 sc ÷ 4 = 20 in (50.8 cm).
– Tab: 18 rows = 4 in, and 16 sc = 4 in (10.2 cm).
– Taper: the edge is a diagonal. It drops 2 in (5.1 cm) and moves 2.25 in (5.7 cm) inward, so it is about 3 in (7.6 cm) long. That matches 12 sc.
– Bottom: the rounded corners of Rows 1–3 are already shaped, so the bottom needs no corner increases.
Width: 6.5 in + 2 × 0.25 in = 7 in (17.8 cm), the same as each shell front.
Hanging the holder: Fold the top 2 in (5.1 cm) of the tab to the back over the wooden ring. Whipstitch the tab top to the back of the panel at the start of the taper.
Final Blocking
- Mist the whole holder lightly with water until it is damp, not soaked.
- Lay it RS up on a blocking mat.
- Pin the panel to 7 in × 26.5 in (17.8 cm × 67.3 cm), keeping the bottom corners round.
- Fold a small towel to roll size and push it into each pocket so the gussets and shell curves keep their shape.
- Pin the cream scallops so each one points outward.
- Leave everything to dry completely, about 24 hours.
- Take out the towels and hang the holder.
Final Quality-Control Checklist
- [ ] Panel measures 7 in × 26.5 in (17.8 cm × 67.3 cm).
- [ ] Each shell has 11 continuous ribs and 9 cream scallops.
- [ ] Each pearl is centered and sewn firmly at the base of its shell.
- [ ] Pocket bases sit on Rows 5, 34 and 63, parallel to the bottom edge.
- [ ] No puckering behind the pockets.
- [ ] Border counts are 12 / 108 / 22 / 108, with the corners lying flat.
- [ ] Tab is sewn securely around the ring.
- [ ] All ends are woven in on the WS.
Troubleshooting
- Shell ruffles: your dc tension is loose. Go down a hook size for Rows 2–7 only.
- Shell cups too deeply: your post stitches are too tight. Pull up a slightly taller loop on each FPdc and BPdc.
- Ribs zigzag: you worked the post stitch around the wrong stitch. Every rib should go around the rib directly below it.
- Scallops fold under: you worked Trim Row 1 through both loops. Redo it in the FLO only.
- Border waves along the sides: you didn’t skip the 9th row ends. Undo the border and recount.
- Pocket sags: rolls are heavy, so tighten the gusset base seam and recheck the 30-into-26 spacing.
Care
Hand wash in cool water and lay flat to dry, reshaping the pockets while damp. Remove the wooden ring before washing, and sew the tab back on once the holder is dry.
Final Notes
The measurements build on each other:
– Gauge: 16 sc × 18 rows = 4 in (10.2 cm).
– Back panel: 6.5 in × 26 in (16.5 cm × 66.0 cm) before the border.
– Shell fronts: 7 in wide × 4.25 in tall (17.8 cm × 10.8 cm).
– Gussets: 2.5 in × 10.7 in (6.4 cm × 27.2 cm).
– Finished holder after the 0.25 in (0.6 cm) border: 7 in × 26.5 in (17.8 cm × 67.3 cm), hanging about 24.5 in (62.2 cm) below the ring.
If your first shell matches its checkpoints, the rest of the holder will fit together.
Happy crocheting!