

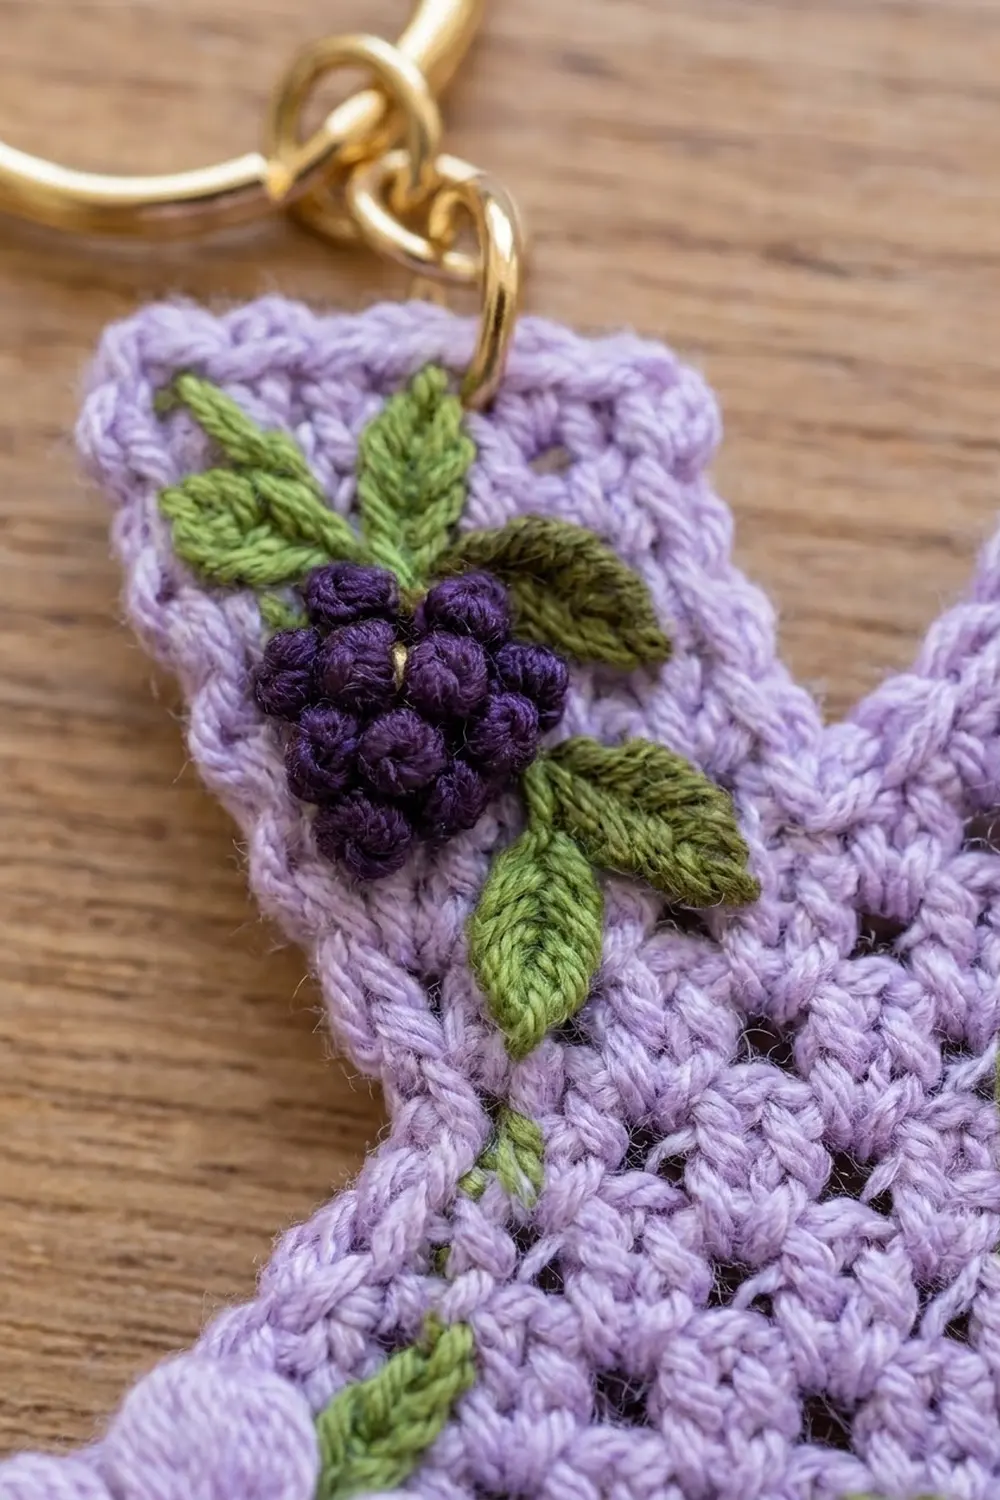
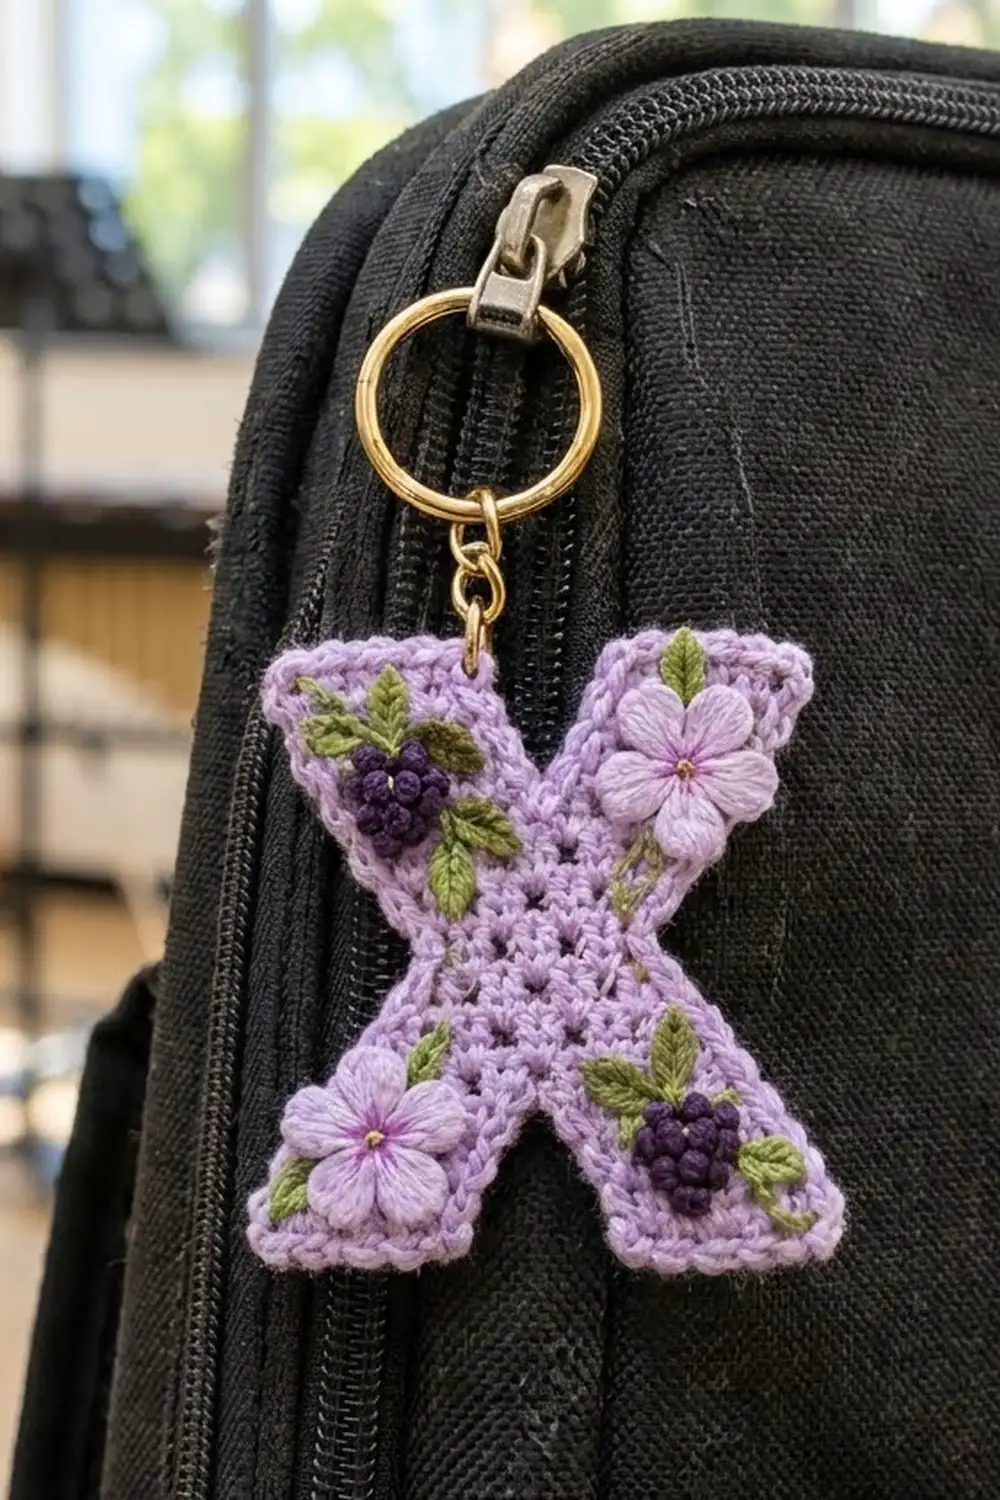
This little letter X is small enough to clip onto a bag zipper and detailed enough to look like a tiny embroidered keepsake. The body is worked in a fine lavender mesh, so the holes line up in neat columns. Two pale lilac flowers and two dark purple berry clusters sit in opposite corners, each with small green leaves.
The palette is soft and garden-like: lavender for the letter, pale lilac and magenta for the flowers, deep purple for the berries, and fresh green for the leaves. A gold split ring finishes it as a keychain.
The pattern uses US crochet terms. The finished keychain measures 2.75 in (7.0 cm) wide by 3.25 in (8.3 cm) tall, not counting the ring hardware.
The letter is one piece, worked outward from the center. You crochet a short waist strip, work two legs upward from one side, then turn the piece over and work two matching legs from the foundation chain. A two-round border smooths the stepped edges. The flowers, leaves and berries are added after blocking.
Finished Size and Construction
- Finished size: 2.75 in (7.0 cm) wide x 3.25 in (8.3 cm) tall
- Skill level: Intermediate
- Terminology: US crochet terms
- Yarn weight: Super fine (#1), size 3 mercerized cotton thread or light fingering cotton
- Hook: 2.0 mm
- Number of pieces: 1 letter body, plus 2 crocheted flowers and 10 crocheted leaves; the berries and small leaves are embroidered
- Layout: a single letter X; no joining
- Piece size before border: 2.5 in (6.4 cm) wide x 3 in (7.6 cm) tall
- Border depth: 0.125 in (0.3 cm) on every edge
Materials
Use a smooth, mercerized cotton. It shows the mesh holes clearly, holds a crisp edge, and survives life on a bag zipper. Avoid fuzzy or very stretchy fibers, because the stepped edges will lose their shape.
- Lavender (body and border): 6 g / 17 m
- Pale lilac (flowers): 2 g / 6 m
- Dark purple (berries): 2 g / 6 m
- Green (leaves): 2 g / 6 m
- Magenta (flower centers): 1 g / 3 m
These quantities include a margin for a gauge test and the tails.
Tools:
– 2.0 mm crochet hook
– Fine tapestry needle and a sharp embroidery needle
– 1 gold split ring, 1 in (2.5 cm) across
– 1 gold jump ring, 0.3 in (0.8 cm) across
– 2 pairs of flat-nose pliers
– Rustproof pins and a gridded blocking board
– Small sharp scissors
Abbreviations (US Terms)
- ch: chain
- sl st: slip stitch
- sc: single crochet
- hdc: half double crochet
- dc: double crochet
- sc2tog: single crochet 2 together
- sk: skip
- sp: space
- st(s): stitch(es)
- BLO: back loop only
- MR: magic ring
- rep: repeat
Special stitches and techniques:
- Mesh: ch 1, sk next st or ch-1 sp, hdc in next hdc. Each mesh is 2 sts wide.
- Turning chain: ch 2 counts as 1 hdc. On the next row, the last hdc of the row goes into the top of this ch-2.
- Dec-S (decrease at row start): turn without chaining. Sl st in each of the first 3 sts (hdc, ch-1 sp, hdc), then ch 2 (counts as hdc).
- Dec-E (decrease at row end): work your last hdc into the second-to-last hdc. Leave the last ch-1 sp and the edge st unworked.
- Inc-S (increase at row start): turn, ch 4, then hdc in the first hdc (the st at the base of the chain). The ch-4 counts as 1 hdc plus 1 ch-1 sp. On the next row, work into the 3rd ch of the ch-4.
- Inc-E (increase at row end): ch 1, then work an edge hdc: yo, insert your hook under the 2 lower strands at the base of the hdc you just made, yo, pull up a loop, yo, and pull through all 3 loops.
Every shift row combines one decrease and one increase. The leg keeps 7 sts but moves outward by 1 mesh, or 0.2 in (0.5 cm).
Gauge and Checkpoints
Body gauge: 10 sts = 1 in (2.5 cm) across a mesh row, and 19 rows = 3 in (7.6 cm), which is about 6.3 rows per inch.
Border gauge: 10 sc = 1 in (2.5 cm).
Instead of making a separate swatch, use the first half of the letter as your test piece:
- After Row C (the first row): the strip of 13 sts measures 1.3 in (3.3 cm) wide.
- After the first leg of Half A: each leg is 7 sts, or 0.7 in (1.8 cm) wide.
- After Half A: the piece is 10 rows, about 1.6 in (4.1 cm) tall, and 2.5 in (6.4 cm) across the leg tips.
- After Half B: 2.5 in (6.4 cm) wide x 3 in (7.6 cm) tall.
- After the border: 2.75 in (7.0 cm) x 3.25 in (8.3 cm).
If checkpoint 1 measures more than 1.3 in (3.3 cm), go down to a 1.75 mm hook. If it measures less, go up to a 2.25 mm hook. Remeasure before you start the legs. Row height matters less, because blocking can even it out by about one row.
Pattern: Letter Body
The mesh grid is 12 meshes (25 sts) wide at the tips. The waist is 6 meshes (13 sts) wide. Each leg is 3 meshes (7 sts) wide and moves outward by 1 mesh on rows H3, H6 and H9.
Center Strip
With lavender, ch 15.
Row C: Hdc in the 5th ch from the hook. The 4 skipped chs count as 1 hdc plus 1 ch-1 sp. Ch 1, sk next ch, hdc in next ch; rep from * 4 more times. (13 sts: 7 hdc and 6 ch-1 sps)*
Checkpoint 1: 1.3 in (3.3 cm) wide.
Half A
Row H1: Ch 2, turn. Work 6 meshes, putting the last hdc into the 3rd skipped ch at the start of Row C. (13 sts)
First Leg (yarn starts at the outer edge):
- H2: Ch 2, turn. Work 3 meshes; the last hdc goes into the center (4th) hdc of H1. (7 sts)
- H3 (shift): Dec-S, work 2 meshes, then Inc-E. (7 sts)
- H4: Ch 2, turn. Work 3 meshes, with the last hdc in the top of the edge st. (7 sts)
- H5: Repeat H4. (7 sts)
- H6 (shift): Inc-S, work 2 meshes, then Dec-E. (7 sts)
- H7–H8: Repeat H4 twice. (7 sts each row)
- H9 (shift): Dec-S, work 2 meshes, then Inc-E. (7 sts)
Fasten off and leave a 6 in (15.2 cm) tail.
Second Leg: Face the same side you faced while working H2 of the First Leg. Join lavender with a sl st in the center hdc of H1, the same st that holds the First Leg’s last hdc.
- H2: Ch 2 (counts as hdc). Work 3 meshes, ending in the last st of H1. (7 sts)
- H3 (shift): Inc-S, work 2 meshes, then Dec-E. (7 sts)
- H4–H5: Ch 2, turn. Work 3 meshes. (7 sts each row)
- H6 (shift): Dec-S, work 2 meshes, then Inc-E. (7 sts)
- H7–H8: Ch 2, turn. Work 3 meshes. (7 sts each row)
- H9 (shift): Inc-S, work 2 meshes, then Dec-E. (7 sts)
Fasten off.
Checkpoint 3: about 1.6 in (4.1 cm) tall and 2.5 in (6.4 cm) across the tips. Each leg should have three outward steps on its outer edge and three steps on its inner edge.
Half B
Turn the piece upside down so the foundation chain is on top. Join lavender at one corner.
Row H1: Ch 2 (counts as hdc). Ch 1, sk next free loop, hdc in next free loop; rep from * 5 more times. Place each hdc directly below a hdc of Row C so the holes line up. (13 sts)*
Work the First Leg and Second Leg exactly as in Half A, rows H2 to H9. Fasten off.
Checkpoint 4: 2.5 in (6.4 cm) x 3 in (7.6 cm), with 19 rows in total (1 center row plus 9 rows in each half).
Pattern: Appliqués
Flower (make 2)
With pale lilac, MR.
Rnd 1: Ch 1, 5 sc in the ring, sl st to the first sc. Pull the ring closed. (5 sc)
Rnd 2: In each sc around: (sl st, ch 2, 2 dc, ch 2, sl st). (5 petals)
Fasten off and leave an 8 in (20.3 cm) tail. Each flower is about 0.75 in (1.9 cm) across.
With magenta, embroider one French knot (2 wraps) in the center. Add 5 straight stitches, each 0.125 in (0.3 cm) long, radiating into the petals.
Leaf (make 10)
With green, ch 5. Sl st in the 2nd ch from the hook, sc in next ch, hdc in next ch, sc in last ch. Fasten off and leave a 6 in (15.2 cm) tail. Each leaf is about 0.4 in (1.0 cm) long.
Berry Clusters (embroidered, 2)
Each cluster is 10 French knots in dark purple, made with 3 wraps each. Arrange them in an upside-down triangle of 4, 3, 2 and 1 knots, about 0.5 in (1.3 cm) across. You will stitch them in place during finishing.
Border
Use lavender with the 2.0 mm hook. Border gauge is 10 sc = 1 in (2.5 cm).
Rnd 1: Join with a sl st at the outer corner of the upper-left tip. Work sc around the whole letter, covering each section as follows.
For each leg (4 legs):
– Tip: 3 sc in the corner st, 1 sc in each of the next 5 sts, then 3 sc in the other corner st. (11 sc)
– Outer edge: Work row-ends H8 to H2 alternating 2 sc, 1 sc, 2 sc, 1 sc, 2 sc, 1 sc, 2 sc (11 sc). Add 2 sc across each of the 3 steps (6 sc). (17 sc)
– Inner edge: Work row-ends H8 to H3 alternating 2 sc, 1 sc, 2 sc, 1 sc, 2 sc, 1 sc (9 sc). Add 2 sc across each of the 3 steps (6 sc). (15 sc)
Each V point (2): sc2tog over the two H2 row-ends that meet at the bottom of the V. (1 st)
Each waist side (2): Work row-ends H1, C and H1 as 2 sc, 1 sc, 2 sc. (5 sc)
Round total: 4 x (11 + 17 + 15) + 2 x 1 + 2 x 5 = 172 + 2 + 10 = 184 sts. Sl st to the first sc.
Rnd 2: Sl st in the BLO of each st around. (184 sl st) This makes the corded rim. Fasten off.
Why the math works: Row-ends come at about 6.3 per inch. Working 3 sc into every 2 row-ends gives about 9.5 sc per inch, which is close enough to the 10 sc per inch border gauge for the edge to lie flat. Each step is one mesh, 0.2 in (0.5 cm) wide, so it gets 2 sc to match the gauge. The 3-sc corners turn the square tips. The sc2tog at each V point keeps the inside corner from bunching. The border adds 0.125 in (0.3 cm) on every side, so 2.5 in (6.4 cm) by 3 in (7.6 cm) becomes 2.75 in (7.0 cm) by 3.25 in (8.3 cm).
Final Blocking
- Weave in all lavender tails along the row-ends, not through the mesh holes.
- Soak the letter in cool water for 10 minutes, then roll it in a towel to press out the water.
- Pin it to the gridded board at 2.75 in (7.0 cm) wide by 3.25 in (8.3 cm) tall. Put one pin at each outer tip corner and one at each waist side.
- Use the board’s grid lines to straighten the hole columns, then let the piece dry completely.
- Sew 3 leaves fanning above each berry spot, on the upper-left and lower-right legs. Sew 2 leaves under each flower spot, on the upper-right and lower-left legs.
- Sew each flower on top of its leaf bases, stitching between the petals.
- Embroider each berry cluster so that it overlaps the leaf bases.
- With green, add 4 tiny lazy-daisy leaves near the waist.
- Open the jump ring with the pliers. Slip it through the border at the upper-left outer tip corner, add the split ring, and close it firmly.
Final Quality-Control Checklist
- [ ] The letter measures 2.75 in (7.0 cm) x 3.25 in (8.3 cm).
- [ ] Every leg has 7 sts and three outward steps.
- [ ] The mesh holes line up in vertical columns through the waist.
- [ ] Border Rnd 1 has 184 sts and Rnd 2 has 184 sl sts.
- [ ] The tips are square and the V points lie flat.
- [ ] The flowers sit opposite each other, and so do the berry clusters.
- [ ] No tails show on the front, and the hardware is tightly closed.
Troubleshooting
- The legs are wider than 0.7 in (1.8 cm): check that the leg has exactly 4 hdc posts and 3 ch-1 sps.
- A leg drifts inward: you swapped the increase and decrease on a shift row. The increase always goes on the outer edge.
- The border ruffles: use 1 sc per row-end more often.
- The border cups: add an extra sc on each step.
- Inc-S looks loose: tighten the ch-4 and work firmly into the 3rd ch on the next row.
- The holes don’t line up between the halves: in Half B H1, place each hdc directly under a Row C hdc.
- The flowers curl: steam lightly and press flat before sewing them on.
Care
Hand wash in cool water and lay flat to dry. Don’t wring the keychain, and keep it away from the dryer so the metal ring can’t snag the mesh.
Final Notes
The measurement chain is short. A 13-st waist of 1.3 in (3.3 cm) leads to 7-st legs of 0.7 in (1.8 cm). Those legs step outward to a mesh body of 2.5 in (6.4 cm) by 3 in (7.6 cm). A border of 0.125 in (0.3 cm) brings the finished letter to 2.75 in (7.0 cm) by 3.25 in (8.3 cm). If your gauge matches at each checkpoint, the border count of 184 sts will fit, and the flowers and berries will fill the legs as shown.
Happy crocheting!