

This hanging holder stores three spare toilet rolls in a neat vertical stack. A long, solid back panel narrows at the top into a slim tab that wraps around a natural wooden ring. Three round, basket-style pockets sit on the front. Each one is worked in open shell lace and finished with a cream scalloped rim.
The colors are simple and warm: a rusty terracotta main color with cream trim on the pocket edges. The style is boho and a little vintage, and it suits a bathroom with plants, wood accents and linen towels.
This pattern uses US crochet terms. The finished holder is about 5.4 in (13.7 cm) wide and about 18.5 in (47.0 cm) long from the ring fold to the bottom edge. Each pocket is 4.7 in (11.9 cm) across the base and about 3.8 in (9.7 cm) tall.
Construction is straightforward:
– Crochet three pockets in the round, starting from a flat circular base.
– Make one back panel in rows.
– Add a single crochet border to the panel.
– Sew the pockets onto the panel, matching stitch to stitch.
– Fold the tab around the ring and sew it down.
Finished Size and Construction
- Finished size: 5.4 in (13.7 cm) wide x about 18.5 in (47.0 cm) long, not counting the ring
- Skill level: Easy-intermediate
- Terminology: US terms
- Yarn weight: #4 worsted, cotton or cotton blend
- Hook: 5.0 mm (H-8)
- Number of pieces: 4 (1 back panel, 3 pockets)
- Layout: 3 pockets stacked vertically on 1 panel
- Pocket size: 4.7 in (11.9 cm) base diameter x 3.8 in (9.7 cm) tall
- Panel size before border: 4.9 in (12.4 cm) wide x 20.4 in (51.8 cm) long, unfolded
- Border depth: 0.25 in (0.6 cm), 1 round of sc
Materials
Use a smooth worsted-weight cotton. Cotton holds its shape, shows the shell texture clearly, and won’t sag under the weight of the rolls. Acrylic also works, but the pockets will be softer.
- Main color (MC), terracotta/rust: 150 g, about 255 m (279 yd)
- Contrast color (CC), cream: 25 g, about 43 m (47 yd)
Both amounts include a safety margin of roughly 15-20%.
Tools:
- 5.0 mm (H-8) crochet hook
- Wooden ring, 2.75 in (7.0 cm) outer diameter
- Tapestry needle
- 6 locking stitch markers
- Scissors and measuring tape
- Pins and a blocking surface
Abbreviations (US Terms)
- ch: chain
- sl st: slip stitch
- sc: single crochet
- hdc: half double crochet
- dc: double crochet
- hdc2tog: half double crochet 2 stitches together
- BLO: back loop only
- st(s): stitch(es)
- rnd: round
- [ ]: repeat the bracketed steps as directed
Special stitch (shell): 5 dc worked into the same stitch. The 3rd dc of the shell is the “center dc.”
Gauge and Checkpoints
Gauge: 13 sts x 10 rows = 4 in (10.2 cm) in hdc rows. Sc and dc should match this width: 13 sts = 4 in (10.2 cm).
Make one pocket first. It works as both your gauge swatch and your fit test.
- After Rnd 2: base is about 2.4 in (6.1 cm) across.
- After Rnd 4: base is 4.7 in (11.9 cm) across.
- After Rnd 6: wall is about 0.6 in (1.5 cm) tall.
- After Rnd 10: pocket is about 2.9 in (7.4 cm) tall.
- After Rnd 12: pocket is about 3.8 in (9.7 cm) tall.
- Panel after Row 10: 4.9 in (12.4 cm) wide x 4 in (10.2 cm) tall.
Too big? Go down 0.5 mm in hook size. Too small? Go up 0.5 mm. To test the fit, put a roll in the finished pocket. It should slide in with gentle pressure and stay in when you tilt the pocket.
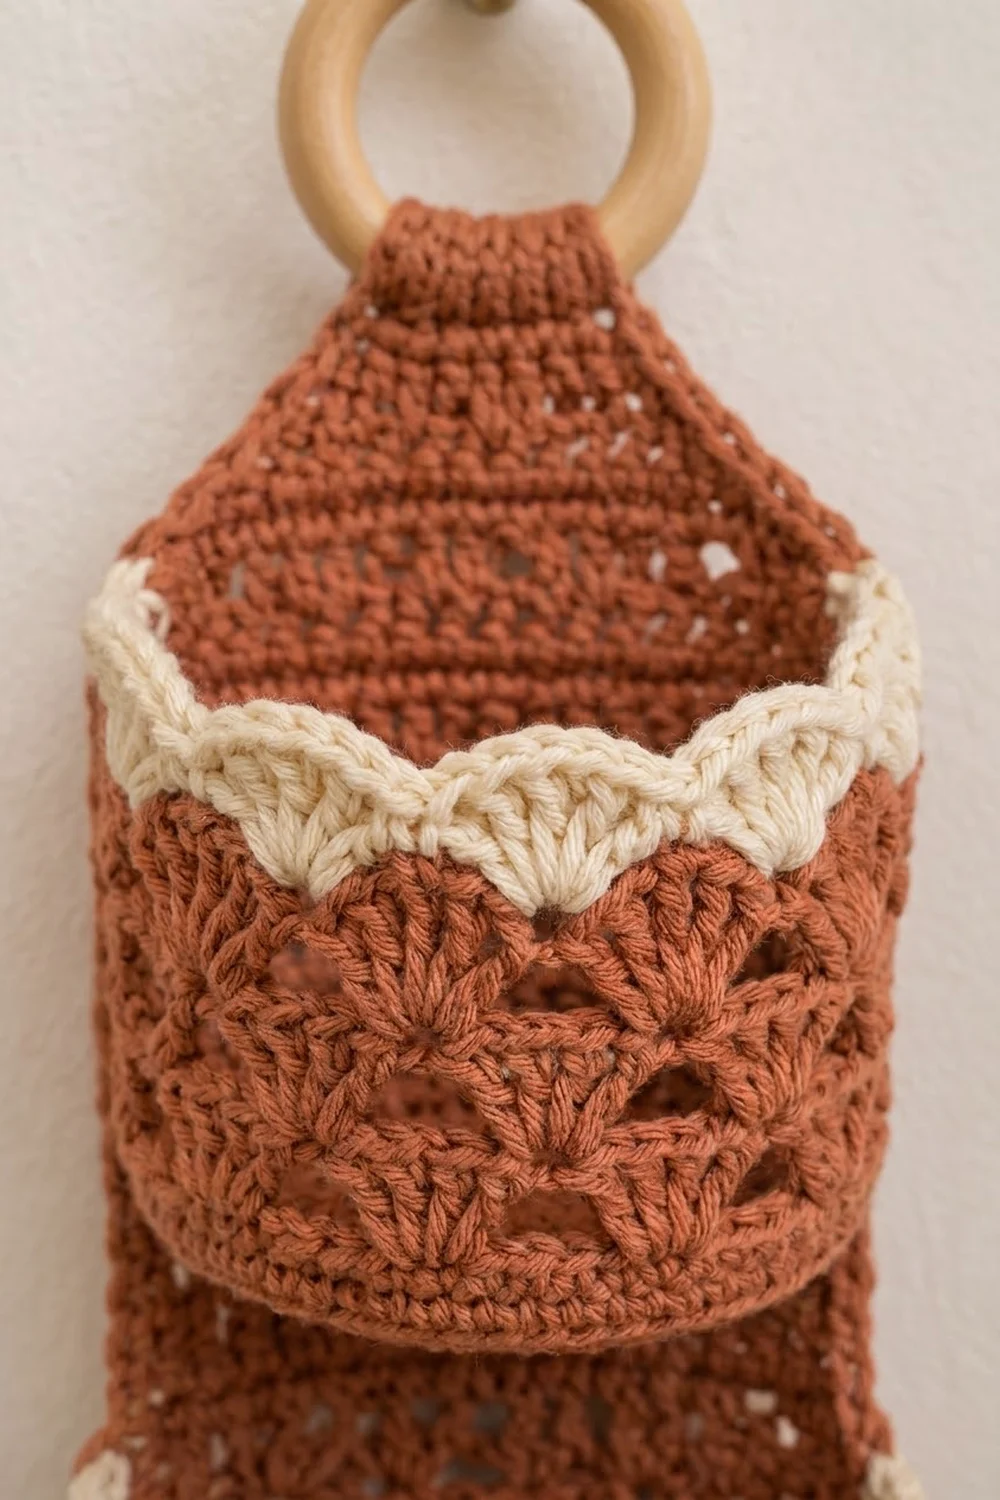
Pocket (Make 3)
Each pocket is a cylinder with a flat base. Work in joined rounds with the right side facing you. The ch-1 at the start of a round does not count as a stitch.
Base (MC)
Rnd 1: Make a magic ring, ch 3 (counts as dc), work 11 dc in the ring. Join with a sl st to the top of the ch-3. (12 dc)
Rnd 2: Ch 3 (counts as dc), dc in same st, 2 dc in each st around. Join. (24 dc)
Rnd 3: Ch 3 (counts as dc), dc in same st, dc in next st, [2 dc in next st, dc in next st] 11 times. Join. (36 dc)
Rnd 4: Ch 3 (counts as dc), dc in same st, dc in next 2 sts, [2 dc in next st, dc in next 2 sts] 11 times. Join. (48 dc)
Wall Turn (MC)
Rnd 5: Ch 1, sc in BLO of each st around. Join to first sc. (48 sc)
The unused front loops form a ridge that turns the edge of the base upward.
Rnd 6: Ch 1, sc in each st around. Join. (48 sc)
Shell Lace (MC)
Rnd 7: Ch 1, sc in first st, [skip 2 sts, shell in next st, skip 2 sts, sc in next st] 7 times, skip 2 sts, shell in next st, skip 2 sts. Join to first sc. (8 shells + 8 sc = 48 sts)
There are 8 repeats of 6 sts each, so the round uses exactly 48 sts.
Rnd 8: Sl st in next 2 dc, ch 1, sc in center dc of same shell, [shell in next sc, sc in center dc of next shell] 7 times, shell in the first sc of the previous round. Join to first sc. (8 shells + 8 sc = 48 sts)
Rnds 9-10: Repeat Rnd 8. (8 shells + 8 sc = 48 sts in each round)
The shells shift position every round, and the gaps between them form the open triangles. Fasten off MC.
Cream Rim (CC)
Rnd 11 (conversion round): Join CC in any sc of Rnd 10. Ch 1, sc in same st, then sc in each dc and each sc around. Join. (40 sc over dc + 8 sc over sc = 48 sc)
Rnd 12: Ch 1, sc in first st, [skip 2 sts, shell in next st, skip 2 sts, sc in next st] 7 times, skip 2 sts, shell in next st, skip 2 sts. Join. (8 shells + 8 sc = 48 sts)
Because you joined CC above an sc, each cream shell sits directly above a rust shell. This makes the scalloped edge. Fasten off and weave in the ends.
Back Panel (Make 1)
Work the panel in MC, in rows. The ch-1 at the start of each row does not count as a stitch.
Foundation: Ch 18.
Row 1: Hdc in 3rd ch from hook and in each ch across. Turn. (16 hdc)
Rows 2-36: Ch 1, hdc in each st across. Turn. (16 hdc)
Checkpoint: the panel is 4.9 in (12.4 cm) wide x 14.4 in (36.6 cm) tall.
Taper
Row 37: Ch 1, hdc2tog, hdc in next 12 sts, hdc2tog. Turn. (14 sts)
Row 38: Ch 1, hdc2tog, hdc in next 10 sts, hdc2tog. Turn. (12 sts)
Row 39: Ch 1, hdc2tog, hdc in next 8 sts, hdc2tog. Turn. (10 sts)
Row 40: Ch 1, hdc2tog, hdc in next 6 sts, hdc2tog. Turn. (8 sts)
Row 41: Ch 1, hdc2tog, hdc in next 4 sts, hdc2tog. Turn. (6 sts)
Hanging Tab
Rows 42-51: Ch 1, hdc in each st across. Turn. (6 hdc)
The tab is about 1.9 in (4.8 cm) wide x 4 in (10.2 cm) long. Don’t fasten off. You’ll start the border from here.
Panel checkpoint: 51 rows, 4.9 in (12.4 cm) x 20.4 in (51.8 cm).
Make All Pieces
- MC: 1 back panel and 3 pocket bodies (Rnds 1-10)
- CC: 3 pocket rims (Rnds 11-12)
Layout, front view, top to bottom:
      [ RING ]
      [ TAB  ]       Rows 42-51 (folded)
     /  TAPER \      Rows 37-41
    | open      |    Rows 34-36
    | POCKET 3  |    Rows 26-33
    | gap       |    Rows 22-25
    | POCKET 2  |    Rows 14-21
    | gap       |    Rows 10-13
    | POCKET 1  |    Rows 2-9
    | margin    |    Row 1
Joining
Work the Border section below first, then come back and sew on the pockets with MC and a tapestry needle. Cut a 24 in (61.0 cm) tail for each pocket.
How the stitches match up: Each pocket has 48 sts per round. One third of them (16 sts) lie flat against the panel, which is also 16 sts wide. Those 16 pocket sts are sewn to the 16 panel sts one to one. The other 32 sts curve forward to form the pocket.
- Flatten a pocket. Mark 16 sts in a row on Rnd 5 (the base ridge), and mark the same 16 sts on Rnd 11, directly above.
- For Pocket 1, line up the marked Rnd 5 sts with the 16 hdc of Row 2. Whipstitch each unused front loop to its matching panel st.
- Line up the marked Rnd 11 sts with Row 9 and whipstitch them the same way, 1 st to 1 st.
- Sew both vertical back edges of the pocket to the outermost hdc column of the panel, just inside the border.
- Repeat for Pocket 2 (Rnd 5 on Row 14, Rnd 11 on Row 21) and Pocket 3 (Rnd 5 on Row 26, Rnd 11 on Row 33).
The cream scallops stay free above each seam.
Tension: Pull each stitch snug but not tight. If the panel ripples, your seam is too loose. If the panel narrows to less than 4.9 in (12.4 cm) inside the border, the seam is too tight.
Size checkpoint: The panel still measures 5.4 in (13.7 cm) wide, and the back of each pocket measures 4.9 in (12.4 cm) across.
Border
Border gauge: 13 sc = 4 in (10.2 cm).
Rnd 1: With MC still on the hook after Row 51, work around the panel:
- Tab top: Ch 1, 3 sc in first st, sc in next 4 sts, 3 sc in last st. (10 sc, corners included)
- First long side: 10 sc along the tab, 8 sc along the taper, 48 sc along the body (4 sc for every 3 row ends). (66 sc)
- Bottom: Working into the foundation chain, 3 sc in first ch, sc in next 14 ch, 3 sc in last ch. (20 sc, corners included)
- Second long side: 48 sc along the body, 8 sc along the taper, 10 sc along the tab. (66 sc)
- Join to first sc. (10 + 66 + 20 + 66 = 162 sc)
Why the math works:
– Body: 36 rows measure 14.4 in (36.6 cm), and at 13 sc per 4 in that edge needs about 47 sc. Working 4 sc per 3 rows gives 48 sc, which lies flat.
– Taper: The slanted edge measures about 2.5 in (6.4 cm), which needs 8 sc.
– Tab: It’s folded and hidden at the back, so 1 sc per row end is enough.
– Corners: Each corner gets 2 extra sc, counted only once.
Fasten off. The panel now measures 5.4 in (13.7 cm) wide. Go back to the Joining section and sew on the pockets.
Attach the ring: Pass the tab through the ring from front to back. Fold the tab in half so Row 51 lies against the back of Row 42, and whipstitch it in place. The folded tab is about 2 in (5.1 cm) long.
Final Blocking
- Mist the holder with water, or soak it and press out the extra water in a towel.
- Lay the panel flat, right side up, and pin it to 5.4 in (13.7 cm) wide.
- Straighten the body edges and make the taper symmetrical.
- Put a toilet roll in each pocket so the walls dry round.
- Shape each cream scallop into an even arch with your fingers.
- Let it dry completely, for 12-24 hours.
Final Quality-Control Checklist
- Each pocket base is 4.7 in (11.9 cm) across.
- Every pocket round from Rnd 4 to Rnd 12 has 48 sts.
- Each pocket has 8 rust shells per round and 8 cream scallops.
- The panel has 16 sts in Rows 1-36 and 6 sts in Rows 41-51.
- The border has 162 sc and 4 neat corners.
- The pocket seams sit on Rows 2/9, 14/21 and 26/33.
- The tab is securely folded around the ring.
- All ends are woven in.
Troubleshooting
Base cups or ruffles: Recount your increases and check your gauge.
Shells don’t line up: Make sure each sc lands in the center (3rd) dc of the shell below.
Roll fits too tightly: Go up one hook size and make the pocket again.
Panel sides are wavy: There are too many sc in the border. Work exactly 4 sc per 3 row ends.
Pocket droops forward: Add a few more whipstitches along the vertical side seams.
Holder twists on the hook: Make sure the tab fold is centered and sewn flat.
Care
Hand wash in cool water with mild soap, then dry flat with a roll inside each pocket. Avoid the tumble dryer, which can shrink cotton.
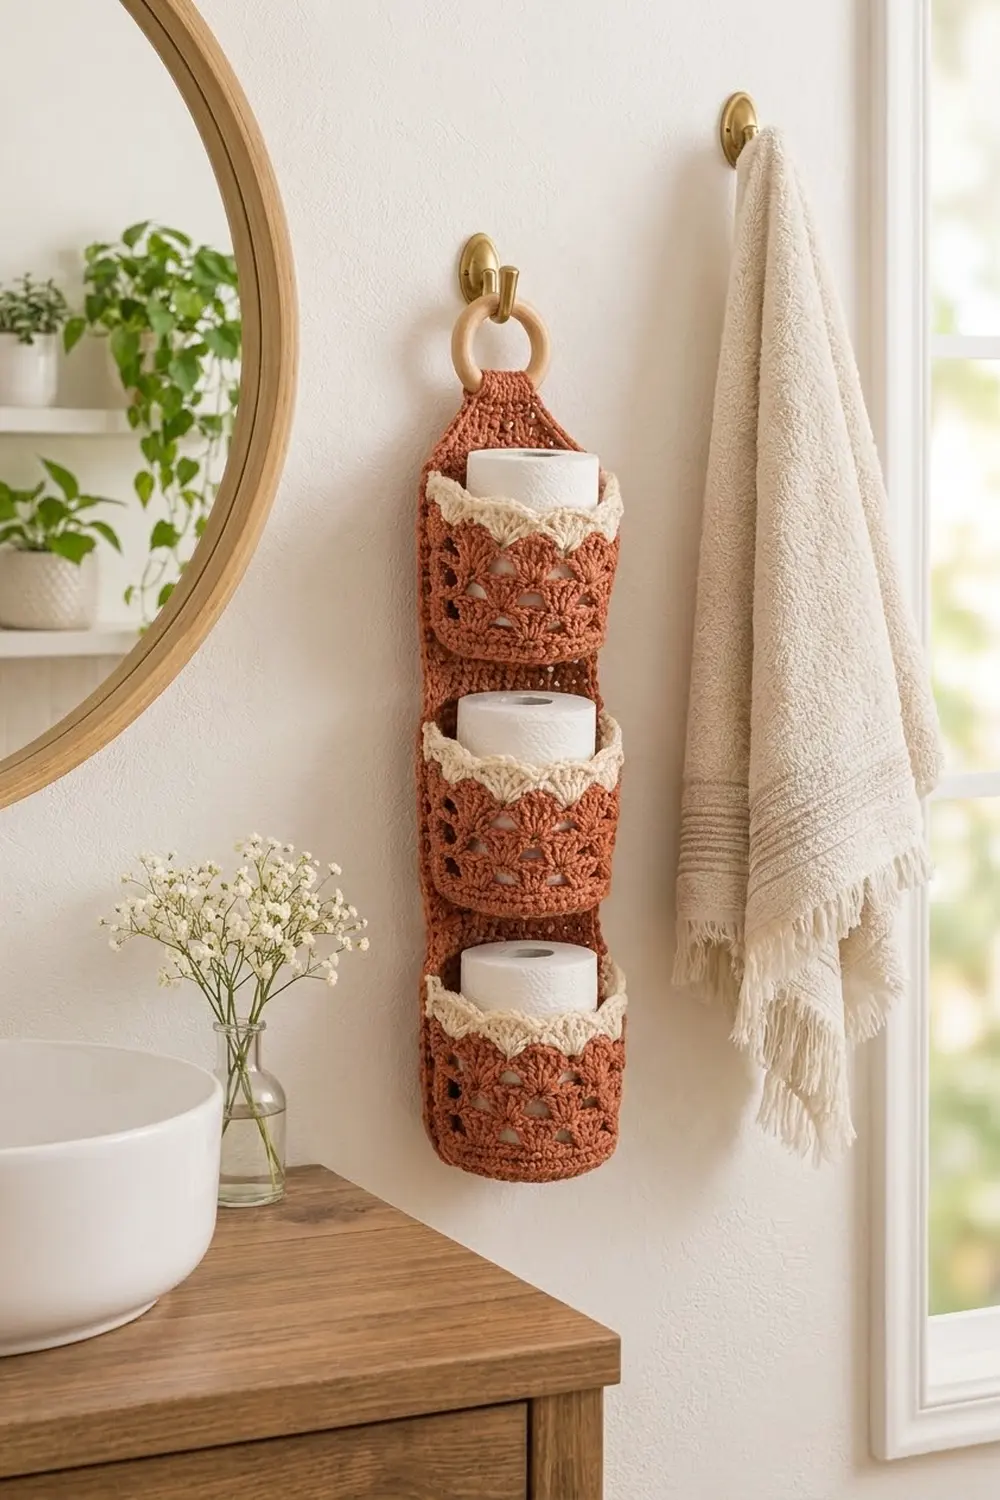
Final Notes
Here is how the measurements connect:
– At a gauge of 13 sts = 4 in, the 48-stitch base measures 4.7 in (11.9 cm) across.
– One third of that round (16 sts) lies flat at 4.9 in (12.4 cm), the same width as the 16-stitch panel.
– The 162-stitch border adds 0.25 in (0.6 cm) on each side, for a finished width of 5.4 in (13.7 cm).
Check each of these as you go, and the holder will hang straight with every roll within easy reach.
Happy crocheting!