

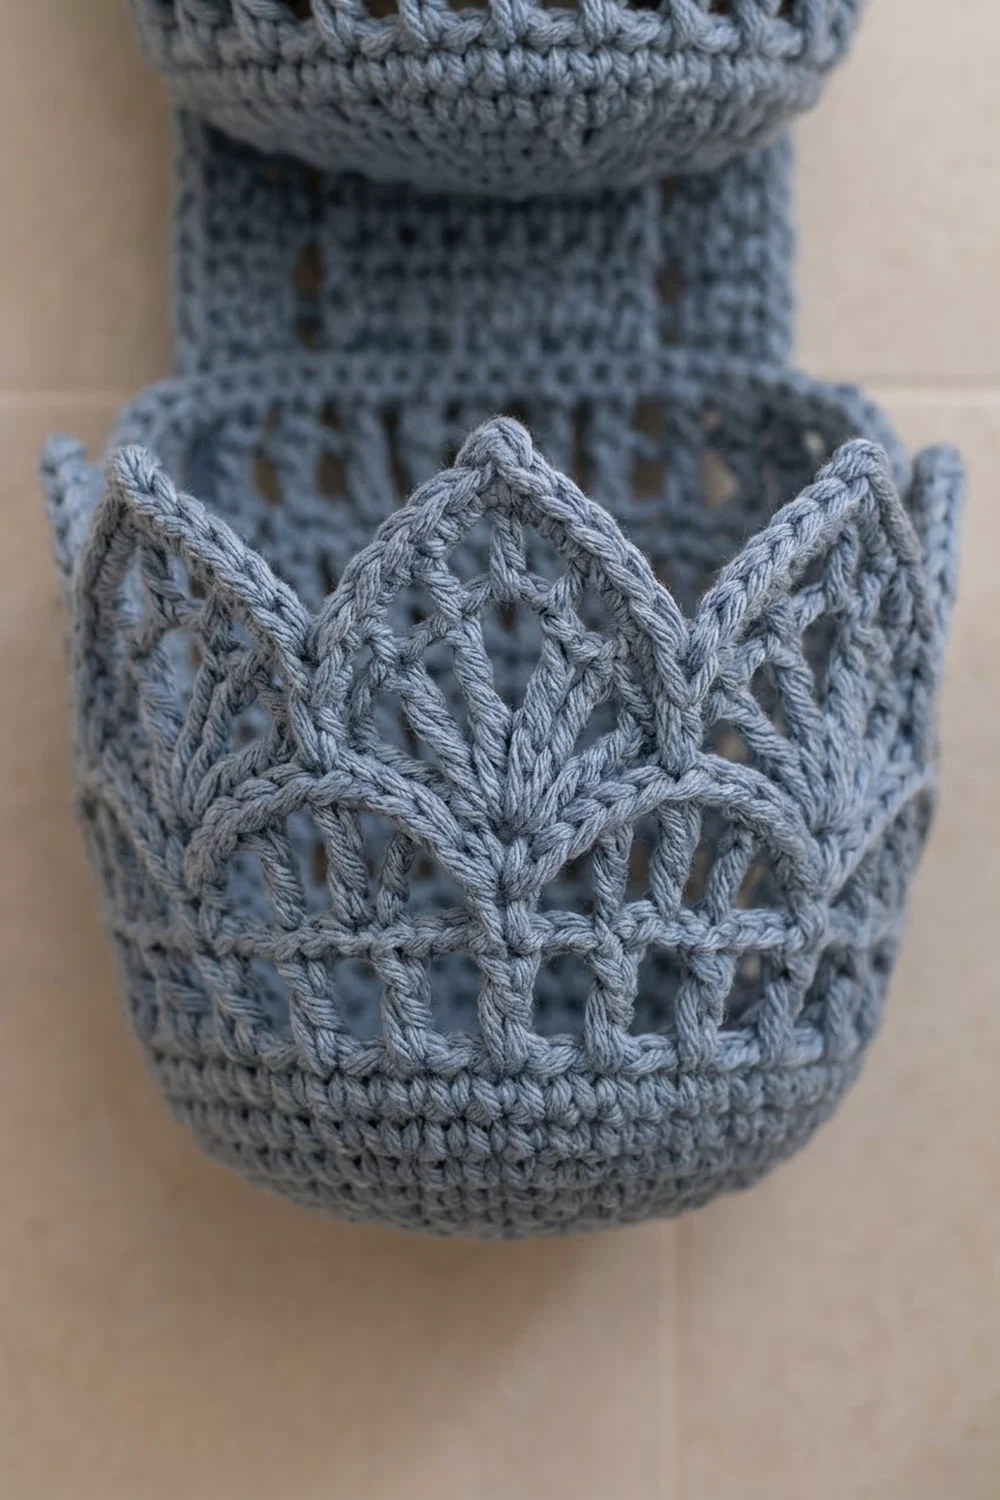
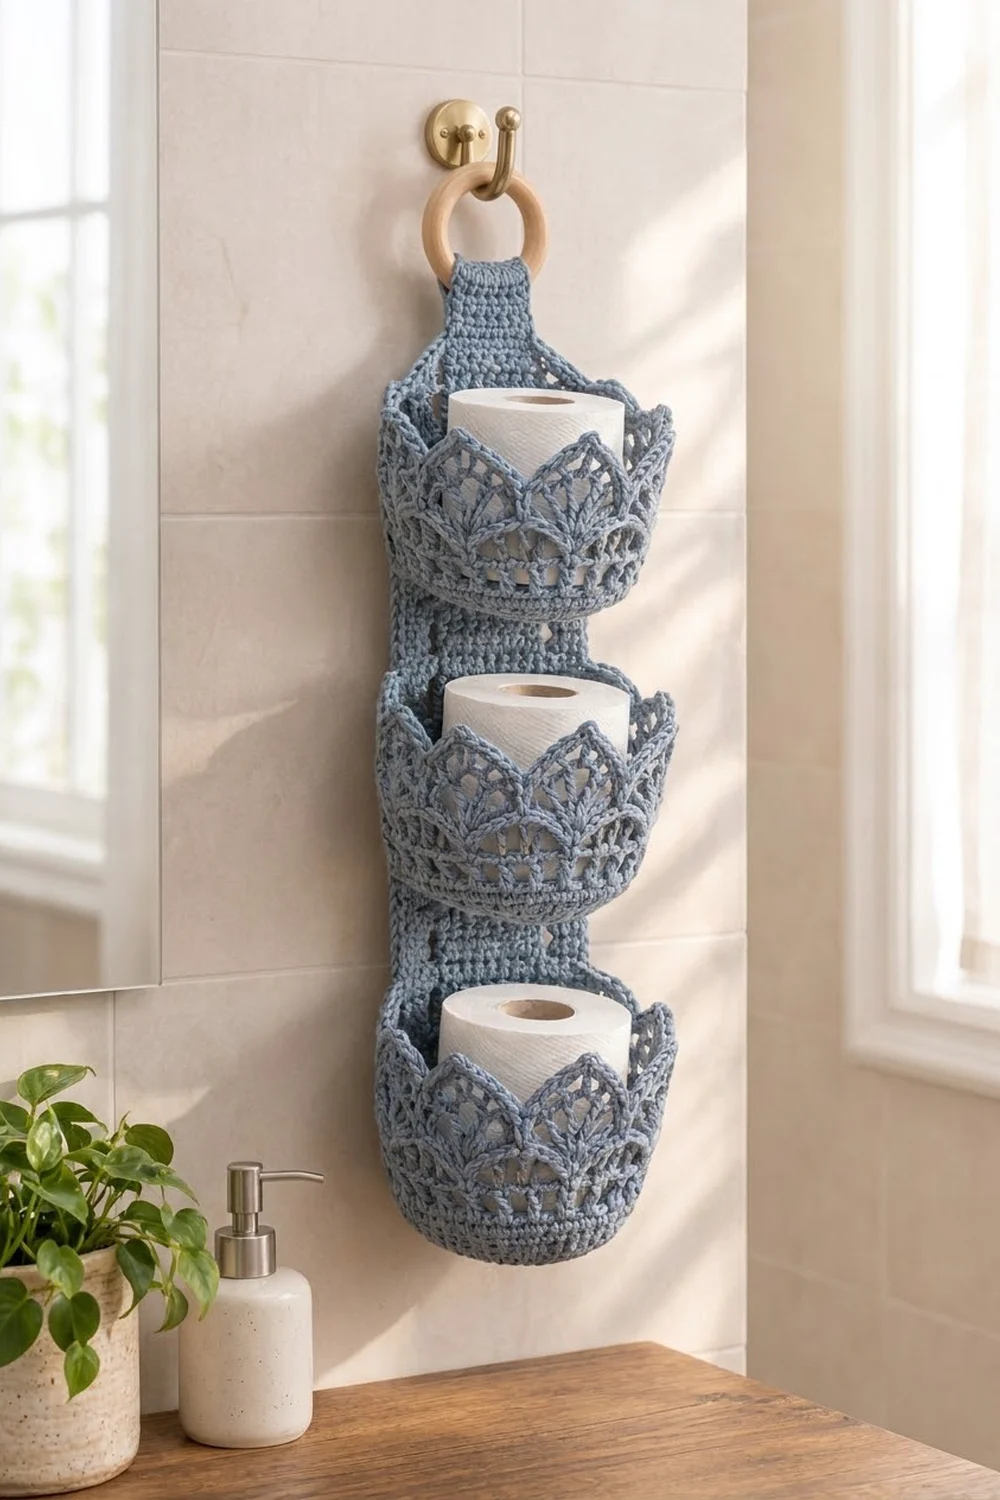
The Lotus Crown holder is a slim wall organizer for spare toilet rolls. Three round, cup-shaped baskets sit in a vertical column on a long back panel, and the whole piece hangs from a wooden ring at the top. Each basket ends in a crown of ten pointed lace petals, and the rolls peek out above them.
The sample uses one color, a soft dusty denim blue, in worsted-weight cotton. Each basket has solid single crochet at the bottom, one band of open mesh, and fan-and-lace petals with small picot tips. The look is calm and a little vintage.
This pattern uses US crochet terms. The finished holder is about 4.75 in (12.1 cm) wide at the baskets. It is about 15.5 in (39.4 cm) long from the bottom edge to the top fold of the tab, or about 18 in (45.7 cm) with the ring.
You crochet three identical baskets in joined rounds, then a back panel in rows of double crochet. The panel gets a two-round single crochet border. A tapered tab is worked off the top edge and folded around the ring. Last, you whipstitch the back of each basket to the panel.
Finished Size and Construction
- Finished size: about 4.75 in (12.1 cm) wide x 15.5 in (39.4 cm) long, plus the ring
- Skill level: Intermediate
- Terminology: US crochet terms
- Yarn weight: Worsted (#4) cotton or cotton blend
- Hook: 5.0 mm (H-8)
- Number of pieces: 4 (1 back panel and 3 baskets), plus 1 wooden ring
- Layout: 3 baskets stacked in 1 vertical column, with bases 4 in (10.2 cm) apart
- Basket size: 4.75 in (12.1 cm) across x 3.5 in (8.9 cm) tall to the petal tips
- Panel size before border: 3.5 in (8.9 cm) x 12 in (30.5 cm)
- Border depth: 2 rounds, about 0.45 in (1.1 cm)
- Panel size after border: 4.4 in (11.2 cm) x 12.9 in (32.8 cm)
Materials
Choose a smooth, firm worsted cotton or cotton blend of about 190 m per 100 g. Cotton holds the cup shape and the petal points better than acrylic, and it handles bathroom humidity well. Avoid fuzzy or splitty yarn, because the lace petals need clear stitches.
- Dusty blue: 200 g (about 380 m)
- Each basket: about 45 g (about 86 m)
- Panel, border, and tab: about 30 g (about 57 m)
These amounts include a margin. The project actually uses about 165 g (about 314 m). The extra covers differences in gauge, swatching, and sewing.
Tools:
- 5.0 mm (H-8) crochet hook
- Wooden ring, 2.75 in (7.0 cm) outer diameter
- Tapestry needle
- 4 stitch markers
- Scissors and tape measure
- Rust-proof pins and a jar or can about 4.5 in (11.4 cm) wide, for blocking
Abbreviations (US Terms)
- ch – chain
- sl st – slip stitch
- sc – single crochet
- hdc – half double crochet
- dc – double crochet
- tr – treble crochet
- sc2tog – single crochet 2 together
- BLO – back loop only
- MR – magic ring
- sp(s) – space(s)
- st(s) – stitch(es)
- inc – 2 sc in the same st
Special stitch – picot: ch 3, sl st in the 3rd ch from the hook. In this pattern a picot counts as 1 st.
Gauge and Checkpoints
Gauge: 16 sc x 18 rows = 4 in (10.2 cm). 16 dc x 8 rows = 4 in (10.2 cm).
Make one basket completely before starting anything else. It works as your gauge swatch and shows whether a roll will fit.
Checkpoints:
- Basket base after Rnd 10: 4.75 in (12.1 cm) across, lying flat.
- Basket wall after Rnd 17: about 1.8 in (4.6 cm) tall, measured from the BLO ridge.
- Finished basket: 3.5 in (8.9 cm) tall to the petal tips. A standard roll about 4.1 in (10.4 cm) wide should slide in easily.
- Panel after Row 24: 3.5 in (8.9 cm) x 12 in (30.5 cm).
- Panel after border: 4.4 in (11.2 cm) x 12.9 in (32.8 cm).
If the base is too big, use a hook half a size smaller. If it is too small or the roll won’t fit, use a hook half a size larger. If the base ruffles, recount your stitches. If it starts to cup before Rnd 11, use a larger hook for the base only.
Basket (make 3)
Work in joined rounds. Join each round with a sl st to the first st. The ch 1 at the start of a round does not count as a st. Do not turn.
Base
Rnd 1: MR, ch 1, 6 sc in ring, join. (6 sts)
Rnd 2: Ch 1, 2 sc in each st around, join. (12 sts)
Rnd 3: Ch 1, *sc in next st, inc; rep from * 5 more times, join. (18 sts)
Rnd 4: Ch 1, *sc in next 2 sts, inc; rep from * 5 more times, join. (24 sts)
Rnd 5: Ch 1, *sc in next 3 sts, inc; rep from * 5 more times, join. (30 sts)
Rnd 6: Ch 1, *sc in next 4 sts, inc; rep from * 5 more times, join. (36 sts)
Rnd 7: Ch 1, *sc in next 5 sts, inc; rep from * 5 more times, join. (42 sts)
Rnd 8: Ch 1, *sc in next 6 sts, inc; rep from * 5 more times, join. (48 sts)
Rnd 9: Ch 1, *sc in next 7 sts, inc; rep from * 5 more times, join. (54 sts)
Rnd 10: Ch 1, *sc in next 8 sts, inc; rep from * 5 more times, join. (60 sts)
Checkpoint: the base lies flat and measures 4.75 in (12.1 cm) across.
Wall
Rnd 11 (turning round): Ch 1, sc in BLO of each st around, join. (60 sts: 60 worked 1 per st + 0 added)
The unused front loops form a ridge. This ridge turns the wall upward and marks the edge of the base.
Rnds 12–15: Ch 1, sc in each st around, join. (60 sts)
Rnd 16 (mesh): Ch 4 (counts as dc + ch 1), sk next st, *dc in next st, ch 1, sk next st; rep from * around, join to 3rd ch of beg ch-4. (30 dc + 30 ch-1 sps = 60 sts)
Rnd 17: Ch 1, sc in each dc and in each ch-1 sp around, join. (60 sts: 30 sc in dc + 30 sc in sps)
Checkpoint: the wall is about 1.8 in (4.6 cm) tall.
Lotus Petals
The petals are a 6-st repeat, worked 10 times around.
Rnd 18 (fans): Ch 1, *sc in next st, sk next 2 sts, (dc, ch 1) 4 times in next st, dc in same st, sk next 2 sts; rep from * 9 more times, join to first sc. (10 fans. Each repeat = 1 sc + 5 dc + 4 ch-1 sps. 100 sts total)
Rnd 19 (lace): Ch 1, *sc in sc, ch 2, (dc in next ch-1 sp, ch 2) 4 times; rep from * 9 more times, join to first sc. (Each repeat = 1 sc + 4 dc + 5 ch-2 sps. 150 sts total)
Each repeat now has 5 ch-2 sps. Call them A to E in working order. Sp C is the center.
Rnd 20 (points): Sl st into sp A, ch 1, *2 sc in sp A, (hdc, dc) in sp B, (tr, picot, tr) in sp C, (dc, hdc) in sp D, 2 sc in sp E, sk next sc; rep from * 9 more times, working the first 2 sc of each new repeat in the next sp A, join to first sc. Fasten off and weave in ends. (10 petals. Each petal = 11 sts. 110 sts total)
Skipping the sc between repeats makes a clean V-shaped dip. The stitches get taller toward the tr and picot, which shapes each pointed tip.
Checkpoint: the basket is 4.75 in (12.1 cm) across and 3.5 in (8.9 cm) tall.
Back Panel
Foundation: Ch 16.
Row 1: Dc in 4th ch from hook (the skipped ch count as 1 dc) and in each ch across, turn. (14 dc)
Rows 2–24: Ch 3 (counts as dc), dc in each st across, working the last dc in the top of the turning ch, turn. (14 dc)
Do not fasten off. Checkpoint: 3.5 in (8.9 cm) x 12 in (30.5 cm).
Make All Pieces
All pieces are dusty blue.
- Baskets: 3 in dusty blue (about 45 g / 86 m each)
- Back panel with border and tab: 1 in dusty blue (about 30 g / 57 m)
Layout grid (front view, top to bottom):
        [ ring ]
        [ tab  ]
+---------------------+
|   Basket 1 (top)    |  base at Row 17
|   Basket 2 (middle) |  base at Row 9
|   Basket 3 (bottom) |  base at Row 1
+---------------------+
      back panel
Each basket sits 8 dc rows above the one below it. At 8 rows per 4 in (10.2 cm), the bases are 4 in (10.2 cm) apart. That leaves about 0.5 in (1.3 cm) between the top of one 3.5 in (8.9 cm) basket and the base of the next.
Joining
Finish the panel border and tab (next section) first. That way you sew the baskets onto a finished, square panel.
Method: whipstitch with a 24 in (61.0 cm) length of dusty blue and a tapestry needle.
Stitch-to-stitch logic:
- On each basket, mark 15 sts in a row along the Rnd 11 front-loop ridge. That is one quarter of the 60-st round, about 3.75 in (9.5 cm). It fits on the 4.4 in (11.2 cm) bordered panel with about 0.3 in (0.8 cm) to spare on each side.
- Center the marked section across the panel with the ridge along the right row: Row 1 for the bottom basket, Row 9 for the middle, and Row 17 for the top.
- Whipstitch the 15 ridge loops to that panel row, spacing them evenly across the panel.
- Sew straight up each side of the marked section, with 1 whipstitch per round from Rnd 11 to Rnd 17. That is 7 stitches per side.
- Whipstitch the 15 marked sc of Rnd 17 across the panel. Leave the petals free.
Tension: keep your stitches snug but not tight. The panel should stay flat. If it puckers, loosen your tension and sew again.
Size checkpoint: after joining, the holder is 4.75 in (12.1 cm) wide at the baskets and the panel is still 12.9 in (32.8 cm) long.
Border and Hanging Tab
Border gauge: 16 sc = 4 in (10.2 cm). On the sides, 2 sc per dc row gives 16 sc per 8 rows, which also equals 4 in (10.2 cm).
Rnd 1: Ch 1 and turn the panel so you can work down the long side. Work 2 sc in each row end down the side (48 sc), 3 sc in first foundation ch, sc in next 12 ch, 3 sc in last foundation ch, 2 sc in each row end up the other side (48 sc), 3 sc in the first corner st of Row 24, sc in next 12 sts, 3 sc in the last corner st, join. (132 sts)
Counts between corner groups: top 12, sides 48 each, bottom 12, plus 4 corner groups of 3 sc (12 sts). Total: 12 + 12 + 48 + 48 + 12 = 132.
Rnd 2: Ch 1, sc in each st around, working 3 sc in the center st of each corner group, join. (140 sts)
Counts between corner centers: top 14, sides 50 each, bottom 14, plus 4 corner groups of 3 sc (12 sts). Total: 14 + 14 + 50 + 50 + 12 = 140. Each edge gains exactly 2 sts, 1 from each corner, so the panel stays square.
Why the math works: 48 side sts at 16 sc per 4 in equal 12 in (30.5 cm), the same as the 24 dc rows, so the sides won’t ruffle or pull in. The 12 top sts plus the 2 corner center sts match the panel’s 14 dc. Fasten off.
Hanging Tab
Work in rows across the 14 top-edge sts of Rnd 2, between the 2 top corner centers.
Row 1: Join yarn in the first top-edge st after the corner center, ch 1, sc in same st and in next 13 sts, turn. (14 sts)
Row 2: Ch 1, sc2tog, sc in next 10 sts, sc2tog, turn. (12 sts)
Row 3: Ch 1, sc in each st across, turn. (12 sts)
Row 4: Ch 1, sc2tog, sc in next 8 sts, sc2tog, turn. (10 sts)
Row 5: Ch 1, sc in each st across, turn. (10 sts)
Row 6: Ch 1, sc2tog, sc in next 6 sts, sc2tog, turn. (8 sts)
Rows 7–18: Ch 1, sc in each st across, turn. (8 sts)
Fasten off and leave a 12 in (30.5 cm) tail. The tab is 4 in (10.2 cm) long and the strap is 2 in (5.1 cm) wide. Fold Rows 13–18 to the back through the wooden ring, then whipstitch Row 18 to the back of Row 7.
Final Blocking
- Soak the holder in cool water for 10 minutes. Press out the water in a towel without wringing.
- Wrap a 4.5 in (11.4 cm) jar or can in plastic and push it into each basket from the top.
- Shape each wall so it stands straight. Pin each of the 10 picots so the petals stand up as points.
- Lay the panel flat and pin it to 4.4 in (11.2 cm) x 12.9 in (32.8 cm), with straight sides.
- Let it dry completely, for at least 24 hours, before you remove the pins and jars.
Final Quality-Control Checklist
- Each basket has 60 sts at Rnd 10 and 10 matching petals at Rnd 20.
- Each base is 4.75 in (12.1 cm) across.
- The panel border has 140 sts: 14 on the top and bottom and 50 on each side between corner centers.
- The bases are 4 in (10.2 cm) apart and centered on the panel.
- The tab is folded evenly and holds the ring firmly.
- All ends are woven in.
Troubleshooting
Base ruffles: you have too many stitches or your tension is loose. Check each round against the stitch counts.
Walls flare outward: Rnd 11 was not worked in BLO, or your tension is loose. Work Rnd 11 again in BLO, or use a hook half a size smaller for the wall.
Petals lean or look uneven: make sure each Rnd 19 repeat has exactly 5 ch-2 sps and that the (tr, picot, tr) is in center sp C.
Panel sides wave: you worked more than 2 sc per dc row. Keep exactly 48 sc on each side in Rnd 1.
Baskets sag forward: sew a second line of whipstitches across the 15 marked sts at Rnd 14.
Care
Hand wash in cool water with mild soap. Lay flat to dry and reshape the baskets over a jar.
Final Notes
Each measurement leads to the next. A 4.75 in (12.1 cm) base gives a 60-st wall and ten 6-st petal repeats. 24 dc rows give a 12 in (30.5 cm) panel, and 2 border rounds bring it to 4.4 in (11.2 cm) x 12.9 in (32.8 cm). Spacing the baskets 8 rows apart puts their bases 4 in (10.2 cm) apart. Check each number as you go, and the holder will hang straight and hold its rolls neatly.
Happy crocheting!