

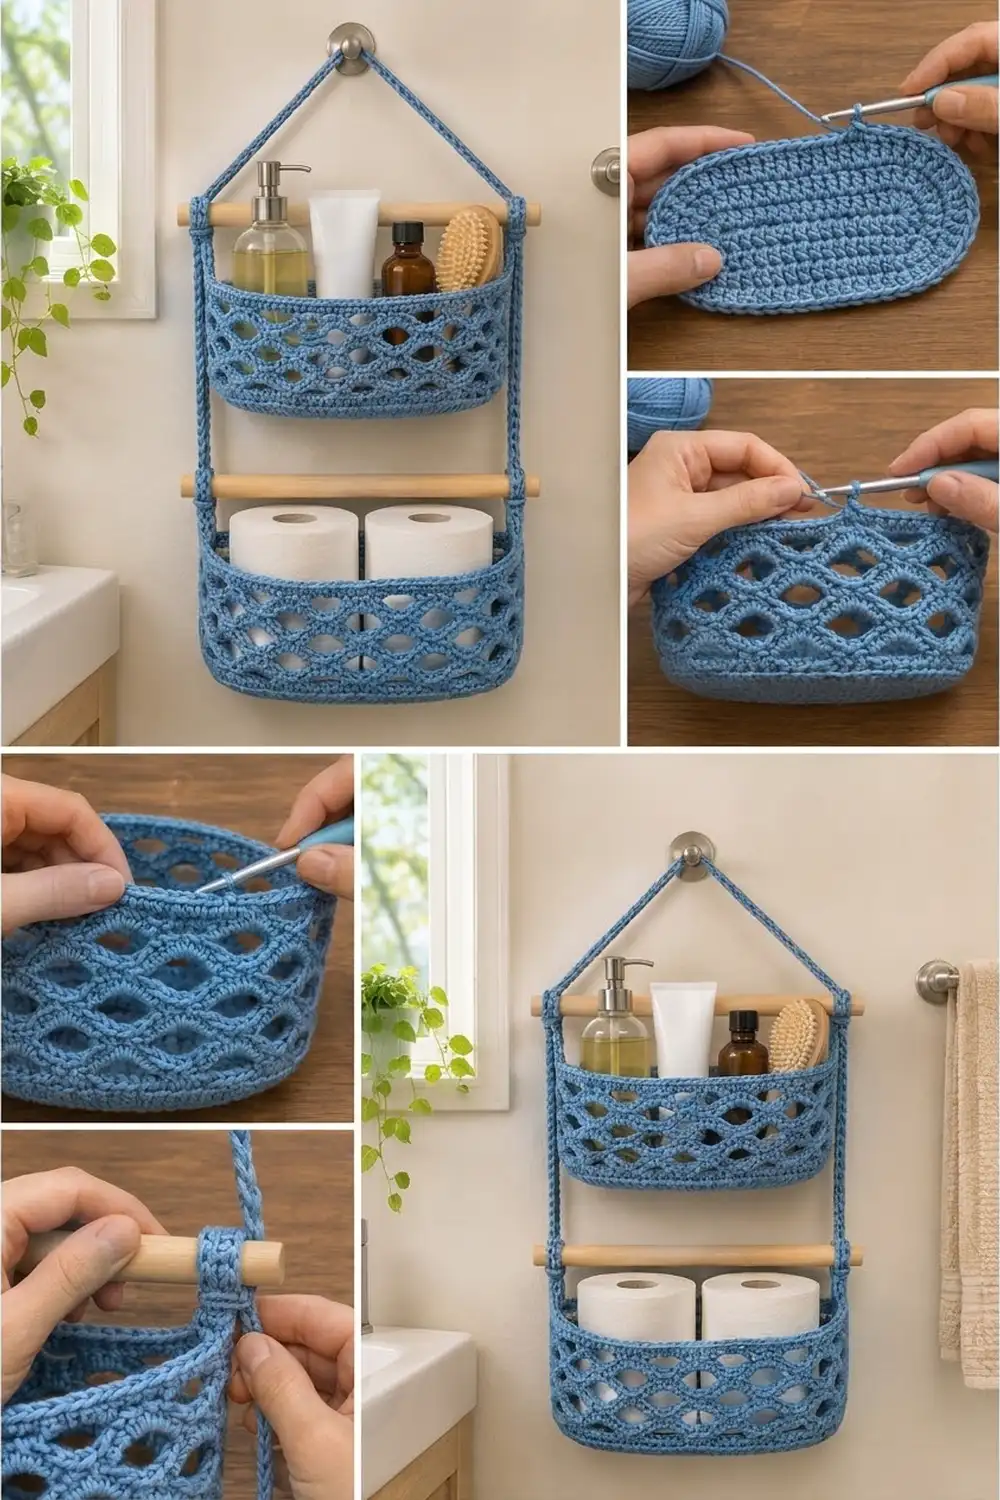
The Bluewater Lattice Organizer is a two-tier hanging storage piece for a small bathroom. It has two oval baskets with straight walls and a light, open lattice. Two slim straps carry them, and two wooden dowels keep the straps spread wide. Hang it from a hook or a door knob and fill it with soap, lotions, brushes and spare toilet paper rolls.
The whole organizer is worked in one soft cornflower blue. The texture does the decorative work. Staggered tiers of eye-shaped openings wave across each wall, and a firm single-crochet base and rim keep the baskets from sagging.
This pattern uses US crochet terms. When assembled, the organizer is about 12 in wide x 22.5 in tall (30.5 x 57.2 cm). Each basket is 10.75 in long x 4 in wide (27.3 x 10.2 cm). The upper basket is 4.5 in (11.4 cm) tall and the lower basket is 5.25 in (13.3 cm) tall.
Construction is simple. Each basket starts with an oval base worked in joined rounds. A back-loop round turns the edge, and the wall rises in a 6-stitch lattice repeat. Two flat straps are worked in rows, wrapped around the dowels and sewn to the short ends of both baskets.
Finished Size and Construction
- Finished organizer: about 12 x 22.5 in (30.5 x 57.2 cm), hanging
- Skill level: Intermediate
- Terminology: US
- Yarn weight: Worsted (#4) cotton
- Hook: 5.0 mm (H-8)
- Number of pieces: 4 crocheted pieces (2 baskets, 2 straps) plus 2 wooden dowels
- Layout: one vertical stack: peak, upper dowel, small basket, lower dowel, large basket
- Piece size: base 10.75 x 4 in (27.3 x 10.2 cm). Small basket 4.5 in (11.4 cm) tall, large basket 5.25 in (13.3 cm) tall
- Size before border (rim): small wall 3.75 in (9.5 cm), large wall 4.5 in (11.4 cm)
- Border (rim) depth: 0.75 in (1.9 cm)
Materials
Use a smooth worsted-weight cotton or cotton blend. Cotton holds its shape when the baskets are loaded, and it tolerates bathroom humidity. Avoid splitty or very soft acrylics, because the walls will slump.
- Cornflower blue: 400 g / 680 m (744 yd) total
- Small basket: about 140 g / 238 m
- Large basket: about 160 g / 272 m
- Two straps: about 45 g / 77 m
These quantities include a margin of roughly 15 percent for your gauge swatch and seaming.
Tools:
– 5.0 mm (H-8) crochet hook
– 2 wooden dowels, 0.75 in (1.9 cm) in diameter and 12 in (30.5 cm) long
– 8 locking stitch markers
– Tapestry needle
– Scissors and a measuring tape
– Pins or clips for assembly
Abbreviations (US Terms)
- ch – chain
- sc – single crochet
- hdc – half double crochet
- sl st – slip stitch
- st(s) – stitch(es)
- sk – skip
- sp – space
- BLO – back loop only
- inc – 2 sc in the same stitch
- rnd(s) – round(s)
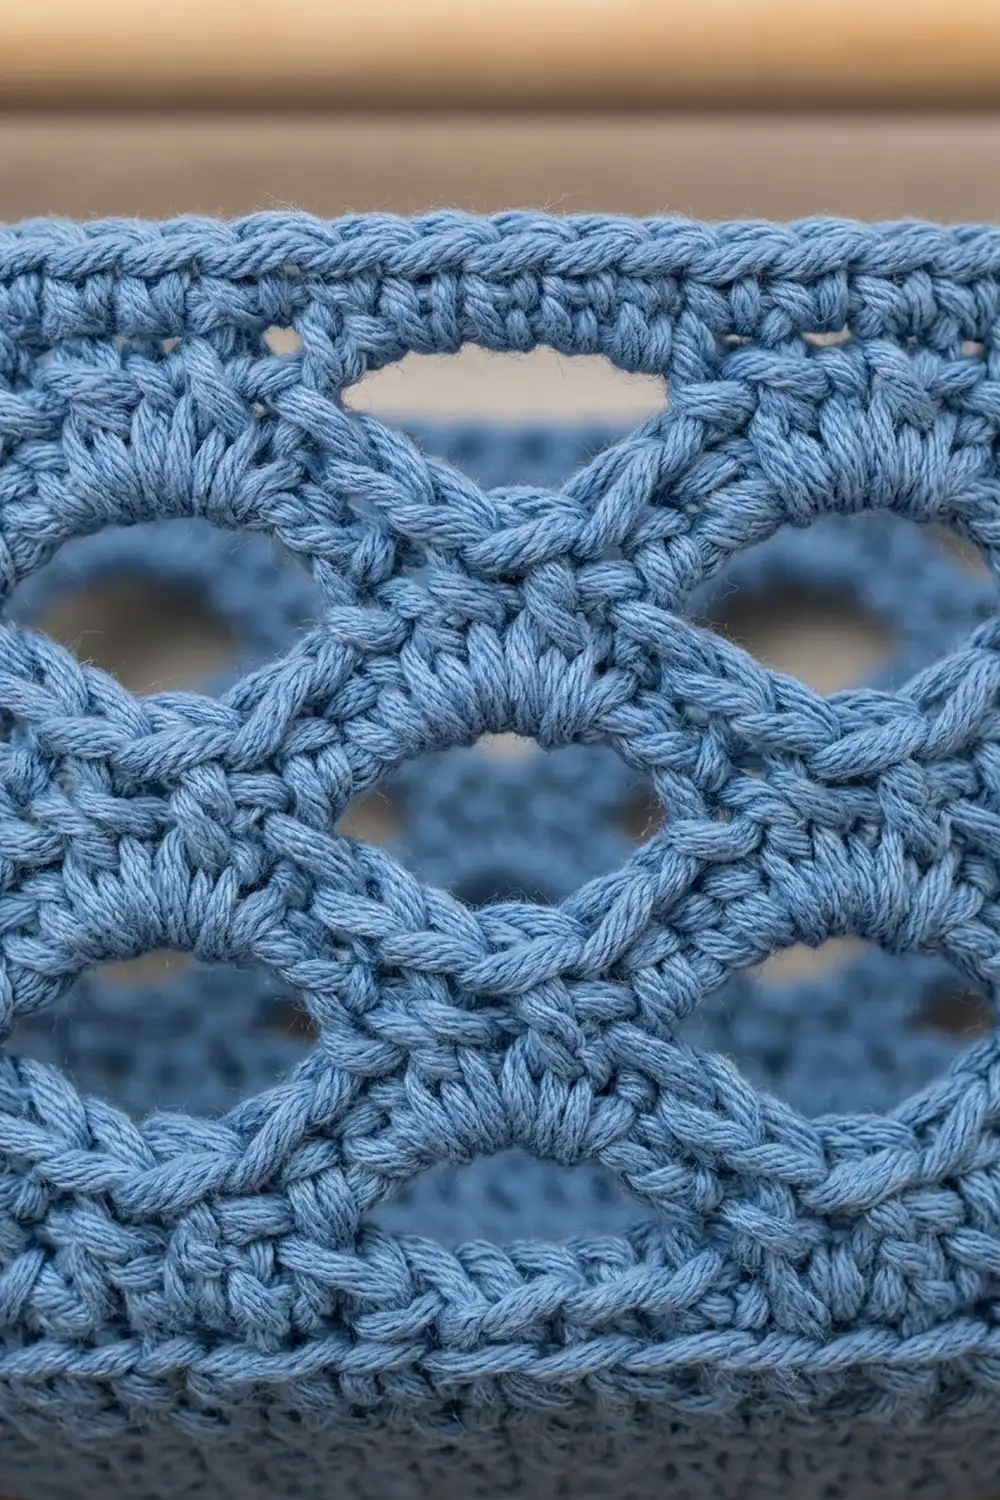
Special stitch: Lattice Tier. One tier is two rounds: an Arch Round followed by a Fan Round. In the Arch Round, a 7-chain arch spans 5 skipped stitches. The extra chains make the arch bow upward. In the Fan Round, 5 hdc worked into that arch lift it further, leaving an eye-shaped opening underneath.
Gauge and Checkpoints
Gauge: 16 sc and 18 rnds = 4 in (10.2 cm). That works out to 4 sts and 4.5 rnds per inch (2.54 cm).
One lattice tier (2 rnds) measures 0.75 in (1.9 cm) tall.
Work the small basket first and treat it as your test piece. Check it at each of these points:
- After Rnd 5: the base measures about 9 x 2.25 in (22.9 x 5.7 cm).
- After Rnd 9: the base measures 10.75 x 4 in (27.3 x 10.2 cm).
- After the first tier: the wall measures about 1.5 in (3.8 cm) above the base ridge.
- Before the rim: the small wall measures 3.75 in (9.5 cm).
Too big: go down to 4.5 mm (7). Too small: go up to 5.5 mm (I-9). Change hooks if your base is off by more than 0.25 in (0.6 cm) in either direction. Don’t add or remove stitches, because every round depends on 108 sts.
Basket Base (Make 2)
The base is identical for both baskets. Start with ch 30.
Rnd 1: Work 3 sc in the 2nd ch from the hook (end A). Sc in the next 27 ch, then work 3 sc in the last ch (end B). Rotate the piece and work along the bottom loops: sc in the next 27 ch. Join with a sl st to the first sc. (60 sts: two ends of 3 sts each, two sides of 27 sts each)
Every round now increases by 3 sts at each end. The two sides always stay at 27 sts.
Rnd 2: Ch 1. Work 2 sc in each of the next 3 sts, sc in the next 27, 2 sc in each of the next 3 sts, sc in the next 27. Join. (66 sts)
Rnds 3–9: Ch 1. Work [sc in the next (round number minus 2) sts, 2 sc in the next st] 3 times, then sc in the next 27. Repeat that sequence once more for the other end and side. Join.
- Rnd 3: [sc 1, inc] x 3 (72 sts)
- Rnd 4: [sc 2, inc] x 3 (78 sts)
- Rnd 5: [sc 3, inc] x 3 (84 sts)
- Rnd 6: [sc 4, inc] x 3 (90 sts)
- Rnd 7: [sc 5, inc] x 3 (96 sts)
- Rnd 8: [sc 6, inc] x 3 (102 sts)
- Rnd 9: [sc 7, inc] x 3 (108 sts)
After Rnd 9, the round is split into four equal sections of 27 sts: end A, side, end B, side. Place a marker in the 14th st of each end. Those are the strap centers.
Basket Wall
Rnd 10 (turning ridge): Ch 1, sc in BLO of each st around. Join. (108 sts) The unused front loops form the crisp ridge at the bottom edge.
Rnds 11–12: Ch 1, sc in each st around. Join. (108 sts)
Rnd 13 (First Arch Round): Ch 1, sc in the first st. Ch 7, sk 5 sts, sc in the next st, ch 7, sk 5 sts. Repeat from * around and join to the first sc. (18 sc and 18 ch-7 arches)
Each repeat covers 6 base sts (1 sc plus 5 skipped). That gives 18 x 6 = 108.
Rnd 14 (Fan Round): Ch 1, sc in the same sc, then 5 hdc in the next ch-7 sp. Sc in the next sc, 5 hdc in the next ch-7 sp. Repeat from * around and join. (108 sts: 18 sc + 90 hdc)
Rnd 15 (Offset Arch Round): Sl st in the next 3 sts, which brings you to the 3rd (center) hdc of the first fan. Ch 1 and sc in the same st. Ch 7, sk 5 sts, sc in the center hdc of the next fan, ch 7, sk 5 sts. Repeat from * around and join. (18 sc and 18 arches)
Each new arch is centered over a fan below, so the openings stagger like bricks.
Rnd 16: Repeat Rnd 14. (108 sts)
Small basket: Repeat Rnds 15–16 twice more, through Rnd 20. That makes 4 tiers, and the wall measures 3.75 in (9.5 cm).
Large basket: Repeat Rnds 15–16 three more times, through Rnd 22. That makes 5 tiers, and the wall measures 4.5 in (11.4 cm).
Do not fasten off. Go straight on to the rim.
Straps (Make 2)
Ch 4.
Row 1: Sc in the 2nd ch from the hook and in the next 2 ch. (3 sts)
Rows 2–130: Ch 1, turn, sc in each st. (3 sts)
Fasten off and leave a 24 in (61.0 cm) tail. The strap measures 0.75 x 29 in (1.9 x 73.7 cm).
Measured from the top end, each strap breaks down like this:
| Segment | Length |
|---|---|
| Peak overlap | 1 in (2.5 cm) |
| Diagonal leg | 8.25 in (21.0 cm) |
| Upper dowel sleeve | 2.5 in (6.4 cm) |
| Drop to small basket rim | 1 in (2.5 cm) |
| Sewn to small basket | 4.5 in (11.4 cm) |
| Drop to lower dowel | 3 in (7.6 cm) |
| Lower dowel sleeve | 2.5 in (6.4 cm) |
| Drop to large basket rim | 1 in (2.5 cm) |
| Sewn to large basket | 5.25 in (13.3 cm) |
The segments add up to exactly 29 in (73.7 cm). Mark each break with a stitch marker before assembly.
Make All Pieces
You need 400 g of cornflower blue in total:
- 1 small basket (4 tiers)
- 1 large basket (5 tiers)
- 2 straps, 130 rows each
- 2 dowels, 12 in (30.5 cm) long
         /\        <- straps overlap at peak, over hook
        /  \
   ====O====O====  <- upper dowel (strap sleeves)
       | SMALL |   <- small basket, straps on each end
       |_______|
   ====O====O====  <- lower dowel
       | LARGE |   <- large basket
       |_______|
Joining
Method: Whipstitch the straps on with the yarn tail, working through both layers.
- Peak. Overlap the top 1 in (2.5 cm) of the two straps flat, one on top of the other. Whipstitch all four edges.
- Upper sleeves. Lay the upper dowel 8.25 in (21.0 cm) below the peak on each strap. Wrap the 2.5 in (6.4 cm) sleeve segment once around the dowel. The sleeves should sit about 0.6 in (1.5 cm) in from each dowel end, so they are 10.75 in (27.3 cm) apart. Sew across the strap where the wrap meets itself.
- Small basket. Leave 1 in (2.5 cm) of strap free. Then center the strap over the marked st of each end, covering sts 13–15. Sew it from the rim down to the Rnd 10 ridge. Join one strap row to one wall round through the solid rounds, and about 3–4 strap rows per lattice tier.
- Lower sleeves. Leave a 3 in (7.6 cm) drop below the small basket. Wrap the lower dowel the same way as the upper one.
- Large basket. Leave 1 in (2.5 cm) free, then sew 5.25 in (13.3 cm) of strap down each end.
Tension: Keep your stitches snug but not puckered. The strap should lie flat against the wall without bunching.
Size checkpoint: Hang the organizer empty. It should measure about 22.5 in (57.2 cm) from the peak to the bottom of the large basket, and both dowels should hang level.
Border (Rim)
The rim keeps the 108-st count from the base, divided into four sections of 27 sts. Its gauge matches the base: 4 sts per inch (2.54 cm).
Rim Rnd 1: Ch 1, sc in each st around. Join. (108 sts: 27 on each long side, 27 on each end)
Rim Rnds 2–3: Repeat Rim Rnd 1. (108 sts: 27 per section)
Rim Rnd 4: Sl st loosely in each st around. Join and fasten off. (108 sl sts: 27 per section)
On the small basket, these are Rnds 21–24. On the large basket, they are Rnds 23–26. The rim adds 0.75 in (1.9 cm), which brings the walls to 4.5 in (11.4 cm) and 5.25 in (13.3 cm).
Why the math works: Rnd 9 ends with 27 sts in each section, and every wall round after it holds exactly 108 sts. The lattice is 18 repeats of 6, which is also 108. Because nothing is added or removed, the walls rise straight and the rim fits the base perimeter exactly. The sl st round firms up the edge without changing the width.
Final Blocking
- Weave in all ends, running them through the solid rounds.
- Spray each basket with water until it is damp but not dripping.
- Stuff each one firmly with a folded towel to square up the walls.
- Pinch the Rnd 10 ridge so it sits crisp.
- Use your fingertips to open each eye-shaped opening evenly.
- Leave the baskets to dry completely, about 24 hours.
- Assemble the organizer after blocking, so that damp yarn doesn’t stretch the straps.
Final Quality-Control Checklist
- Both bases measure 10.75 x 4 in (27.3 x 10.2 cm).
- Every wall round counted 108 sts.
- All lattice tiers stagger evenly, with 18 openings per tier.
- Each strap measures 29 in (73.7 cm).
- The sleeves are 10.75 in (27.3 cm) apart on both dowels.
- The straps are centered on the sts marked in Rnd 9.
- The organizer hangs level at 22.5 in (57.2 cm).
Troubleshooting
- Base curls up: Your tension is too tight. Go up a hook size, or relax at the end increases.
- Base ruffles: Your increases may be stacking. Recheck the bracket counts in Rnds 3–9.
- Openings look flat: The arches are too tight. Make sure you are working ch 7, not ch 5, over the 5 skipped sts.
- Count drifts in a Fan Round: You may have missed a sc on top of an arch. Count 18 sc before you join.
- Basket tilts when it hangs: One strap segment is longer than the other. Re-sew the drops to match the table.
- Walls slump under load: The yarn is too soft or the gauge is too loose. Rework with a smaller hook.
Care
Hand wash in cool water, press out the excess and dry flat over a towel-stuffed form. Remove the dowels before washing.
Final Notes
The measurement chain is short. Gauge of 4 sts per inch (2.54 cm) gives a 108-st base that measures 10.75 x 4 in (27.3 x 10.2 cm). That count holds through every wall round, every 0.75 in (1.9 cm) lattice tier and the 0.75 in (1.9 cm) rim. It gives walls of 4.5 in (11.4 cm) and 5.25 in (13.3 cm). Two 29 in (73.7 cm) straps hang the baskets at a total height of 22.5 in (57.2 cm). Check your gauge, count 108 every round, and the rest follows.
Happy crocheting!