

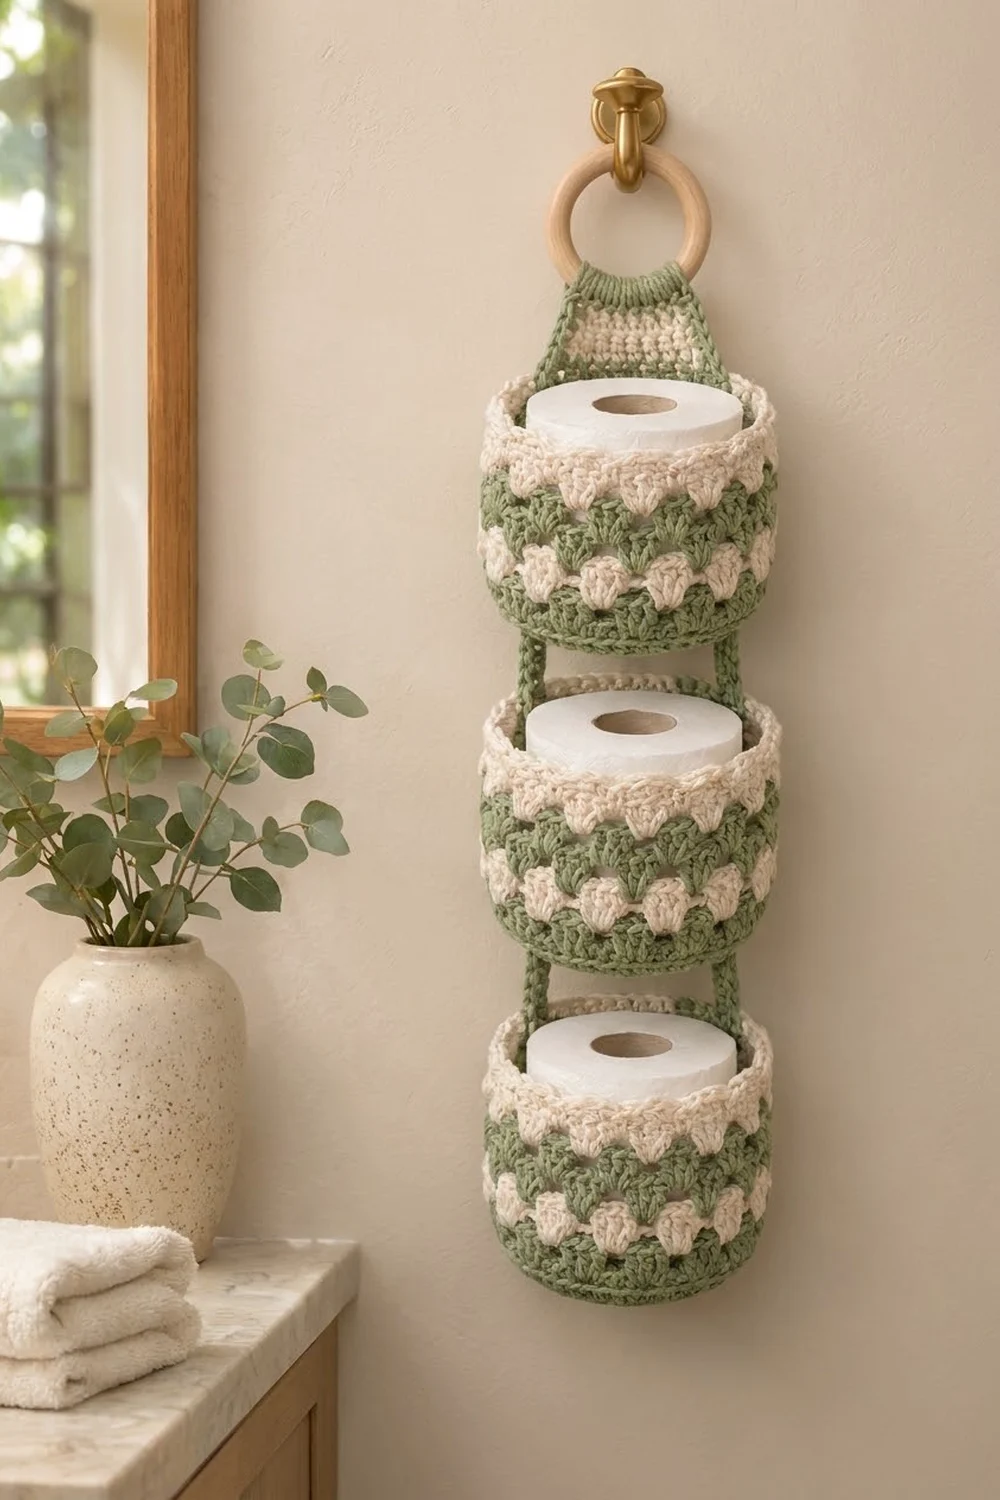
The Sage Cluster Tower is a hanging toilet paper holder with three stacked baskets. Each basket holds one standard roll, and the whole holder hangs from a wooden ring. It’s practical storage that also looks good on a bathroom wall.
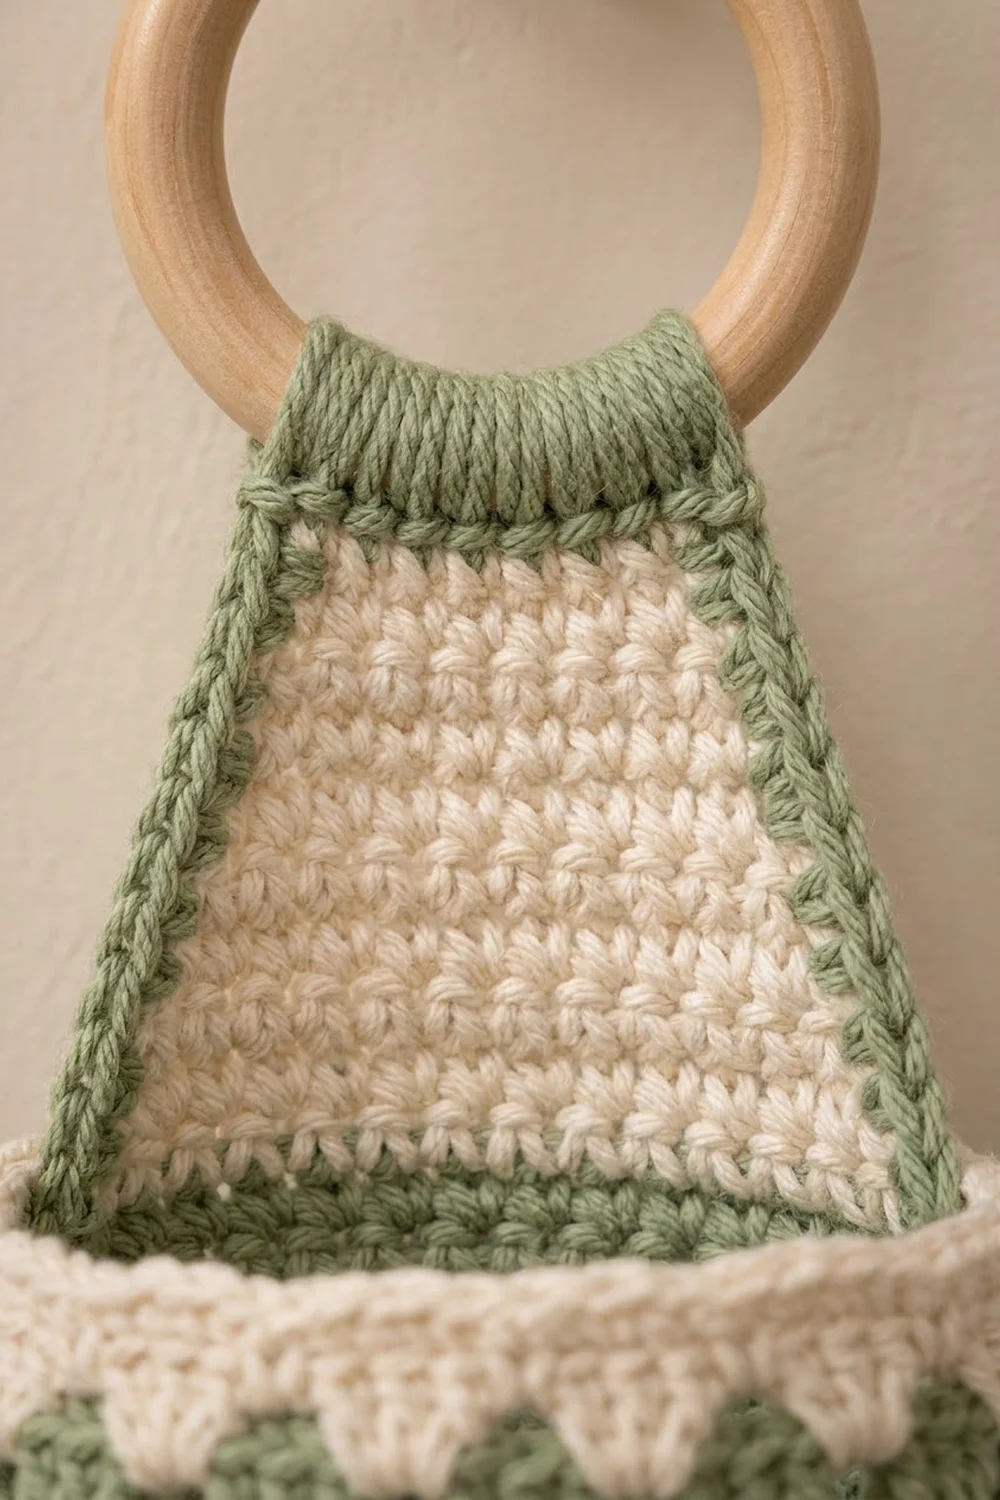
The baskets are sage green and cream. Sage fans and cream clusters alternate in staggered rounds, so the walls look like a soft checkerboard. A cream rim with a rope edge finishes each basket, and a sage-edged cream tab holds the stack to the ring.
This pattern uses US crochet terms. Each basket is 4.75 in (12.1 cm) across and 4.75 in (12.1 cm) tall. The finished holder is 21.25 in (54.0 cm) long, not counting the ring.
Here’s how it goes together. You crochet three identical baskets from the base up, four short straps and one hanging tab. Then you sew everything into a vertical stack.
Finished Size and Construction
- Finished size: 4.75 in (12.1 cm) wide x 21.25 in (54.0 cm) long, not counting the ring
- Skill level: Easy to intermediate
- Terminology: US crochet terms
- Yarn weight: Worsted weight (#4) cotton
- Hook: 5 mm (H-8)
- Number of pieces: 8 (3 baskets, 4 straps, 1 hanging tab)
- Layout: One vertical column: tab, basket, straps, basket, straps, basket
- Basket size: 4.75 in (12.1 cm) across x 4.75 in (12.1 cm) tall
- Basket height before the rim: 4 in (10.2 cm)
- Rim depth: 0.75 in (1.9 cm), 3 rounds
Materials
Use a smooth worsted-weight cotton or cotton blend. Cotton holds its shape, is easy to wash and doesn’t fuzz in a damp bathroom. Avoid very slippery yarn, because the baskets need to stand upright.
- Sage green: 120 g, about 204 m
- Cream: 75 g, about 128 m
- 5 mm (H-8) crochet hook
- One wooden ring, 3 in (7.6 cm) outside diameter
- Tapestry needle
- 6 stitch markers
- Scissors
- Measuring tape
- Rust-proof pins and a blocking mat
These amounts include about a 15% margin for gauge differences and color joins.
Abbreviations (US Terms)
- ch: chain
- sl st: slip stitch
- sc: single crochet
- sc2tog: single crochet 2 together
- dc: double crochet
- BLO: back loop only
- sp: space
- st(s): stitch(es)
- rnd: round
- rev sc: reverse single crochet (crab stitch), worked left to right
Special stitch: Cluster (3-dc cluster). Yarn over, insert the hook in the stitch and pull up a loop. Yarn over and pull through 2 loops. Repeat these steps 2 more times in the same stitch, then yarn over and pull through all 4 loops on the hook.
Beginning cluster. Ch 2. Then work a 2-dc cluster in the same stitch: do the cluster steps twice, then pull through all 3 loops.
Gauge and Checkpoints
- Single crochet: 16 sc x 16 rnds = 4 in (10.2 cm)
- Pattern rounds: 2 rnds = 1 in (2.5 cm)
- Pattern width: 5 groups (15 sts) = 3.75 in (9.5 cm)
Make one basket before you make the others. Gauge decides whether a roll fits.
Checkpoints:
– After Rnd 5: the base measures 2.4 in (6.1 cm) across.
– After Rnd 10: the base measures 4.75 in (12.1 cm) across and is 15 in (38.1 cm) around.
– After Rnd 12: the wall stands 0.5 in (1.3 cm) tall.
– After Rnd 19: the basket is 4 in (10.2 cm) tall.
– After Rnd 22: the basket is 4.75 in (12.1 cm) tall.
If your base is too big, go down to a 4.5 mm hook. If it’s too small, or a roll won’t slide in, go up to a 5.5 mm hook. Don’t add extra rounds, because the pattern needs exactly 60 stitches.
Basket (Make 3)
Base
Work the base in joined rounds with sage. Turn the work slightly at each join so the seam lines up at the back.
Rnd 1: Make a magic ring, ch 1, 6 sc in the ring, sl st to join. (6 sts)
Rnd 2: Ch 1, 2 sc in each st, join. (12 sts)
Rnd 3: Ch 1, sc 1, 2 sc in next st, repeat around, join. (18 sts)
Rnd 4: Ch 1, sc 2, 2 sc in next st, repeat around, join. (24 sts)
Rnd 5: Ch 1, sc 3, 2 sc in next st, repeat around, join. (30 sts)
Rnd 6: Ch 1, sc 4, 2 sc in next st, repeat around, join. (36 sts)
Rnd 7: Ch 1, sc 5, 2 sc in next st, repeat around, join. (42 sts)
Rnd 8: Ch 1, sc 6, 2 sc in next st, repeat around, join. (48 sts)
Rnd 9: Ch 1, sc 7, 2 sc in next st, repeat around, join. (54 sts)
Rnd 10: Ch 1, sc 8, 2 sc in next st, repeat around, join. (60 sts)
The base should lie flat and measure 4.75 in (12.1 cm) across.
Wall Turn
Rnd 11: Ch 1, sc in BLO of each st around, join. (60 sts)
This round makes the ridge you see where the base turns up into the wall.
Rnd 12: Ch 1, sc in each st around, join. (60 sts)
Cluster Pattern
Rnd 13 (sage): Ch 3 (counts as dc), 2 dc in the same st. Skip 2 sts, 3 dc in next st. Repeat 18 more times, skip the last 2 sts, and join to the top of the ch-3. Fasten off. (20 groups, 60 sts)
Rnd 14 (cream): Join cream with a sl st in the center dc of any group. Work a beginning cluster in the same st, then ch 2. Work 1 cluster in the center dc of the next group, ch 2. Repeat 18 more times and join to the top of the first cluster. Fasten off. (20 clusters + 20 ch-2 sps = 60 sts)
Rnd 15 (sage): Join sage with a sl st in any ch-2 sp. Ch 3, then 2 dc in the same sp. Work 3 dc in each remaining ch-2 sp, then join. Fasten off. (20 groups, 60 sts)
Each sage group now sits between two cream clusters, so the colors stagger.
Rnd 16 (cream): Repeat Rnd 14. (60 sts)
Rnd 17 (sage): Repeat Rnd 15. (60 sts)
Rnd 18 (cream): Repeat Rnd 14. (60 sts)
Rnd 19 (sage): Repeat Rnd 15. (60 sts)
Start each new color within a few stitches of the last join so all color changes stay at the back. Weave every end into the inside of the wall.
The basket should now be 4 in (10.2 cm) tall.
Hanging Tab (Make 1)
Body (cream):
Row 1: Ch 17, sc in the 2nd ch from the hook and in each ch across. (16 sts)
Row 2: Ch 1, turn, sc across. (16 sts)
Row 3: Ch 1, turn, sc2tog, sc 12, sc2tog. (14 sts)
Row 4: Ch 1, turn, sc across. (14 sts)
Row 5: Ch 1, turn, sc2tog, sc 10, sc2tog. (12 sts)
Row 6: Ch 1, turn, sc across. (12 sts)
Row 7: Ch 1, turn, sc2tog, sc 8, sc2tog. (10 sts)
Row 8: Ch 1, turn, sc across. (10 sts)
Row 9: Ch 1, turn, sc2tog, sc 6, sc2tog. (8 sts)
Row 10: Ch 1, turn, sc across. Switch to sage on the last yarn over. (8 sts)
The cream trapezoid is now 4 in (10.2 cm) wide at the bottom, 2 in (5.1 cm) wide at the top and 2.5 in (6.4 cm) tall.
Ring band (sage):
Rows 11–22: Ch 1, turn, sc across. (8 sts)
The band is 3 in (7.6 cm) long. Fasten off and leave a 12 in (30.5 cm) tail.
Edging (sage): Join sage at the right end of Row 10. Work these stitches in order:
- 10 sc down the side, 1 in each row end
- 3 sc in the first foundation st
- 1 sc in each of the next 14 foundation sts
- 3 sc in the last foundation st
- 10 sc up the other side
Fasten off. (40 sts: 10 + 20 + 10)
The edged tab is 4.5 in (11.4 cm) wide at the bottom.
Straps (Make 4)
With sage, ch 6.
Row 1: Sc in the 2nd ch from the hook and in each ch across. (5 sts)
Rows 2–14: Ch 1, turn, sc across. (5 sts)
Fasten off and leave a 12 in (30.5 cm) tail. Each strap is 1.25 in (3.2 cm) wide and 3.5 in (8.9 cm) long.
Make All Pieces
Basket colors: Each basket uses about 33 g of sage and 20 g of cream.
Pieces by color:
– Sage: 3 bases and walls, 4 straps, 1 tab ring band and edging
– Cream: 9 cluster rounds (3 per basket), 3 rims and the tab body
Layout (top to bottom, as seen from the front):
        [ wooden ring ]
        [ hanging tab ]
        [  BASKET 1   ]
        [ S ]     [ S ]
        [  BASKET 2   ]
        [ S ]     [ S ]
        [  BASKET 3   ]
S = strap. Each strap is 5 sts wide, and there’s an 8-st gap between the two straps in each pair.
Joining
Sew everything together after the rims are finished (see Border, below).
Marking the back: On each basket, find the color-change seam at the back. Put markers on Rnd 22 so that 9 stitches sit on each side of the seam, for 18 stitches in total. Split this span into 5 + 8 + 5 sts. The outer 5-st sections are where the straps go, and the full 18 sts are where the tab goes.
Straps to the lower basket: This step joins Basket 3 to the middle basket and the middle basket to Basket 1.
- Lay Rows 1–4 of a strap flat against the outside back of the lower basket. Line the strap’s top edge up with the rim, over one 5-st section.
- Whipstitch all the way around the overlap.
- The strap’s 5 stitches match the 5 marked rim stitches one to one.
Straps to the upper basket:
- Lay Rows 11–14 against the back wall of the upper basket. Start at the Rnd 11 ridge and go up 1 in (2.5 cm).
- Keep the strap in the same column as the strap below it.
- Whipstitch around the overlap.
Rows 5–10 stay free and make a 1.5 in (3.8 cm) gap between the baskets.
Tab: Find the two center sc of the 3-sc corner groups on the tab’s bottom edge. Counting both of those stitches, the bottom edge has 18 sts between them (1 + 1 + 14 + 1 + 1). Whipstitch those 18 sts to the 18 marked stitches on Rnd 21 of Basket 1, one to one. Then fold the ring band over the wooden ring and sew Rows 21–22 to the back of Rows 10–11.
Tension: Keep your stitches snug but not tight. A tight seam will pucker the rim.
Size check: Hang the holder up. It should measure 21.25 in (54.0 cm) from the bottom of Basket 3 to the top of the ring band.
Border
The basket rim works as the border. Work it on each basket right after Rnd 19.
Border gauge: 4 sc = 1 in (2.5 cm)
Rnd 20 (cream): Join cream in any dc. Ch 1 and work 1 sc in each dc around, then join. Rnd 19 has 20 groups x 3 dc, so this round has 60 sts.
Rnd 21: Ch 1, sc in each st, join. (60 sts)
Rnd 22: Ch 1, rev sc in each st, join. (60 sts)
Fasten off and weave in the ends.
The rim is 0.75 in (1.9 cm) deep. The basket is now 4.75 in (12.1 cm) tall.
Why the math works: The rim has 60 sts at 4 sts per inch, so it measures 15 in (38.1 cm) around. That’s the same as the base after Rnd 10, so the walls go straight up instead of flaring or pulling in.
The tab, the two strap pairs and the 18 marked rim stitches are all 4.5 in (11.4 cm) wide, so they stack in one clean line.
Final Blocking
- Put a toilet roll, or a cylinder of rolled towel 4.75 in (12.1 cm) across, inside each basket.
- Mist the baskets until they’re damp but not soaked.
- Press the BLO ridge into a sharp corner with your fingers.
- Pin the tab flat. Its bottom edge should measure 4.5 in (11.4 cm).
- Line up the straps so they hang straight and parallel.
- Let everything dry completely before you hang the holder.
Final Quality-Control Checklist
- Each basket has 60 sts in every round from Rnd 10 on.
- Each basket is 4.75 in (12.1 cm) across and 4.75 in (12.1 cm) tall.
- The cream clusters stagger evenly with the sage fans.
- All color joins are at the back.
- The four straps are each 1.25 in (3.2 cm) wide, and the gaps between baskets are 1.5 in (3.8 cm).
- The tab is centered over the straps.
- The holder hangs straight and measures 21.25 in (54.0 cm).
- All ends are woven in on the inside.
Troubleshooting
The base ruffles. Your tension is loose. Go down a hook size.
The base cups. You missed an increase. Count each round.
The walls flare. Your dc are too loose. Use a smaller hook for Rnds 13–19.
A round has 57 or 63 sts. You skipped the wrong number of stitches in Rnd 13. Rework it with exactly 20 groups.
The holder leans. The straps aren’t lined up in the same columns. Re-sew them.
The roll won’t fit. Your gauge is tight. Remake the basket with a larger hook.
Care
Hand wash in cool water and lay flat to dry, with a roll inside each basket so it keeps its shape. Don’t tumble dry.
Final Notes
Everything in this pattern follows one measurement chain:
- The base reaches 60 sts and 15 in (38.1 cm) around.
- The walls stay at 60 sts and reach 4 in (10.2 cm) tall.
- The rim adds 0.75 in (1.9 cm), so each basket is 4.75 in (12.1 cm) tall.
- 18 rim stitches, 4.5 in (11.4 cm) wide, hold the straps and the tab.
- Three baskets, two 1.5 in (3.8 cm) gaps and a 4 in (10.2 cm) tab add up to 21.25 in (54.0 cm).
Check each measurement as you go and the holder will hang straight.
Happy crocheting!