

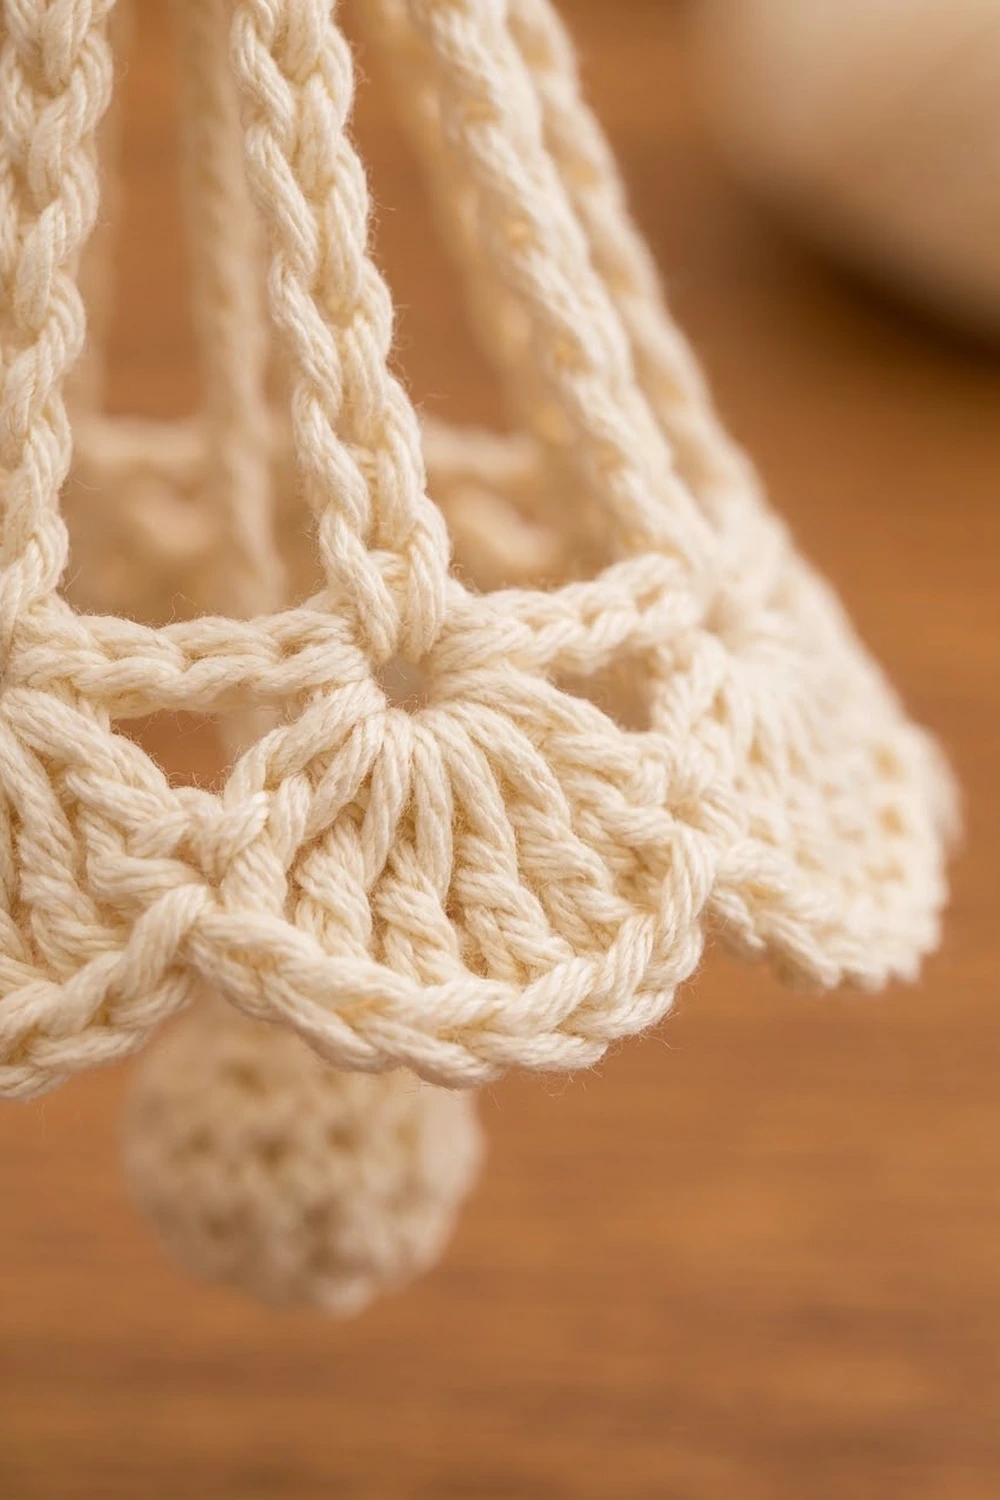
The Lacy Lantern Bell is a small, airy Christmas ornament. It has a textured shell dome, a row of open corded columns, and a flared scalloped hem that holds its shape on the tree. A tiny ball clapper hangs just below the rim, so the ornament reads as a bell from across the room.
It is worked in one cream cotton thread, so it suits vintage, farmhouse, and Scandinavian trees. When it is starched, the bell keeps its shape and catches tree lights through the open windows.
This pattern uses US crochet terms. The finished bell is about 3 in (7.6 cm) tall and 3 in (7.6 cm) across the hem. With the clapper it is about 3.75 in (9.5 cm) tall, not counting the hanging loop.
The bell is worked top-down in one piece. You start with the dome in rounds, then add 12 slip-stitch cords for the lattice. Next you rejoin the thread at the cord tips and work the fan hem. Last, you add the clapper and the loop.
Finished Size and Construction
- Finished size: 3 in (7.6 cm) tall × 3 in (7.6 cm) across the hem
- Height with clapper: 3.75 in (9.5 cm)
- Skill level: Intermediate
- Terminology: US crochet terms
- Yarn weight: Fingering weight (Super Fine / 1) mercerized cotton, or size 3 crochet thread
- Hook: 2.5 mm
- Number of pieces: 1 bell, with a clapper and a loop attached
- Layout: Single 3D ornament, worked in the round from the top down
- Size before border (after the lattice and Round 9): 2.25 in (5.7 cm) tall, opening 2.3 in (5.8 cm) across
- Border (hem) depth: 0.75 in (1.9 cm)
Materials
Yarn: Choose a smooth, mercerized cotton. It shows stitch definition clearly and takes starch well. Avoid fuzzy or acrylic yarns, because the dome and hem will not hold a crisp shape.
- Cream: 10 g / about 34 m (based on a cotton of about 170 m per 50 g)
These quantities include a safety margin. One bell uses about 7 g.
Tools:
– 2.5 mm crochet hook
– Tapestry needle
– Scissors
– 1 stitch marker
– A pinch of fiberfill for the clapper
– Fabric stiffener or heavy spray starch
– A blocking form, such as a 2.5 in (6.4 cm) plastic ornament, small cup, or egg-shaped form
– Rust-proof pins
Abbreviations (US Terms)
- ch – chain
- sl st – slip stitch
- sc – single crochet
- hdc – half double crochet
- dc – double crochet
- sc2tog – single crochet 2 together
- BLO – back loop only
- MR – magic ring
- st(s) – stitch(es)
- sp – space
Special stitch: slip-stitch cord. Chain the stated number. Starting in the 2nd chain from the hook, sl st into the back bump of each chain back to the start. This gives a firm, doubled cord with a braided look, and it is used for the lattice columns and the hanging loop. The last chain you made (the one you skipped) stays free at the tip of the cord.
Gauge and Checkpoints
Gauge is not critical for an ornament, but it decides whether the bell keeps its shape. Make one test bell before starting a batch.
- Base gauge: Rounds 1–3 of the dome lie flat and measure 1.5 in (3.8 cm) across. One dc round is about 0.22 in (0.6 cm) tall.
- Checkpoint A (after Round 3): flat circle, 1.5 in (3.8 cm) across.
- Checkpoint B (after Round 7): the dome is cupped, about 1.5 in (3.8 cm) wide and 1.1 in (2.8 cm) tall.
- Checkpoint C (after the cords): each cord hangs about 1.2 in (3.0 cm) long.
- Checkpoint D (after Round 9): 2.25 in (5.7 cm) tall, opening about 2.3 in (5.8 cm) across.
- Checkpoint E (finished): 3 in (7.6 cm) tall and 3 in (7.6 cm) across the hem.
If the bell is too big: go down to a 2.25 mm hook, or tighten your chains. If it is too small or stiff: go up to a 2.75 mm hook. If only the cords are off, add or remove 1 chain per cord. Do not change the stitch counts.
Dome
Work in joined rounds. Do not turn. The beginning ch-3 counts as a dc, and the beginning ch-1 does not count as a stitch.
Round 1: MR, ch 3, 11 dc in ring, then sl st to the top of ch-3 to join. Pull the ring closed. (12 dc)
Round 2: Ch 3, dc in the same st, 2 dc in each st around, then join. (24 dc)
Round 3: Ch 3, 2 dc in the next st, dc in the next st, 2 dc in the next st; repeat from * 10 more times, then join. (36 dc)*
Checkpoint A: the circle lies flat and measures 1.5 in (3.8 cm).
Round 4 (shells): Ch 1, sc in the same st, skip 2 sts, 5 dc in the next st, skip 2 sts, sc in the next st; repeat from * 4 more times, skip 2, 5 dc in the next st, skip 2, then sl st to the first sc. (6 shells + 6 sc = 36 sts)*
No stitches are added, so the dome starts to curve down.
Round 5 (offset shells): Sl st in the next 3 dc, which brings you to the center dc of the shell. Ch 1, sc in the same st, 5 dc in the next sc, sc in the center dc of the next shell; repeat from * 4 more times, 5 dc in the last sc, then join to the first sc. (36 sts)*
The new shells sit between the old ones, which gives the star-like cluster texture on the dome.
Round 6: Ch 1, sc in each st around, then join. (36 sc)
Round 7: Ch 1, sc in BLO of each st around, then join. (36 sc)
Rounds 6–7 form the double-line band. The front loops left over from Round 6 make the lower ridge line.
Checkpoint B: dome is 1.5 in (3.8 cm) wide and 1.1 in (2.8 cm) tall.
Lattice Cords
Round 8 (cords): Do not fasten off.
Ch 14, then make a slip-stitch cord back up those chains (13 sl sts). Sl st into the same Round 7 st where the cord started. Sl st in each of the next 3 sts. Repeat from * to * 11 more times. (12 cords, 1 every 3 sts)
Cords start on Round 7 sts 1, 4, 7, and so on up to 34. After the 12th cord, the 3 slip stitches bring you back to st 1.
Fasten off and weave in the end.
Checkpoint C: each cord hangs 1.2 in (3.0 cm).
Round 9 (hem ring): Hold the bell upside down. Join the thread with a sc into the free tip chain of any cord. Ch 5, sc into the tip chain of the next cord; repeat from * 10 more times, ch 5, then sl st to the first sc. (12 sc + 12 ch-5 sps = 72 sts)*
Check that no cord is twisted. The cords should lean outward evenly, like the ribs of a lampshade.
Checkpoint D: 2.25 in (5.7 cm) tall, opening 2.3 in (5.8 cm) across.
Border: Two-Tier Fan Hem
Border gauge: Round 10 should measure about 7.2 in (18.3 cm) around, which is 10 sc per 1 in (2.5 cm). Each cord section is one repeat. There are no corners on a bell, so each “side” in this border is one cord section, and there are exactly 12 of them.
Round 10 (conversion round): Ch 1, sc in each sc and 5 sc in each ch-5 sp, then join. (12 worked 1-per-sc + 60 worked into chain spaces = 72 sc; 6 sc per cord section)
Round 11 (fans): Ch 1, sc in the first sc (it sits directly above a cord). Skip 2 sc, 7 dc in the next sc, skip 2 sc, sc in the next sc; repeat from * 10 more times, skip 2, 7 dc in the next sc, skip 2, then join to the first sc. (12 fans of 7 dc + 12 sc = 96 sts; 8 sts per section)*
Each fan sits in the center of a window between two cords.
Round 12 (scalloped rim): Ch 1, sc in the first sc. Over the next fan work: dc in the next dc, dc in the next dc, 2 dc in the next dc, 3 dc in the center dc, 2 dc in the next dc, dc in the next dc, dc in the next dc. Then sc in the next sc. Repeat from * to * around, ending with a sl st to the first sc instead of the last sc. (96 worked 1-per-st + 48 extra = 144 sts; 11 dc + 1 sc = 12 sts per section)
Fasten off and weave in the end.
Why the math works: 12 cords × 6 sc = 72 sts. A 6-stitch fan repeat fits 72 exactly 12 times, so every fan lines up with a window and every sc lines up with a cord. Round 12 adds 4 sts per fan (12 × 4 = 48), which flares the hem without making it ruffle.
Checkpoint E: 3 in (7.6 cm) tall, hem 3 in (7.6 cm) across when shaped.
Clapper and Hanging Loop
Clapper: Leave a 12 in (30.5 cm) starting tail.
– Round 1: MR, 6 sc. (6)
– Round 2: 2 sc in each st. (12)
– Round 3: Sc in each st. (12)
– Round 4: Sc2tog 6 times. (6)
Stuff the ball lightly, then close the hole and fasten off. The ball is about 0.5 in (1.3 cm) across.
With the starting tail, ch 32 (about 3.25 in / 8.3 cm). Thread the chain up through the center of Round 1 from the inside of the bell. Adjust it so the top of the ball hangs 0.25 in (0.6 cm) below the hem, then tie the chain off securely on top of the bell.
Loop: Ch 31, then make a slip-stitch cord along it (30 sl sts). Fold the cord in half and sew both ends to the top center of the dome, covering the clapper knot. The loop stands 1.5 in (3.8 cm) high.
Final Blocking
- Wet the bell in a stiffener solution, or saturate it with spray starch.
- Press out the extra liquid in a towel. Do not wring it.
- Slide the bell over the blocking form so the dome sits snugly on top.
- Pull each cord straight and even, keeping 12 equal windows.
- Pin the 12 rim scallops evenly so the hem flares to 3 in (7.6 cm) across.
- Shape the dome shells with your fingertips so they look rounded.
- Let it dry completely, usually 12–24 hours.
- Remove the form and let the clapper fall into place.
Final Quality-Control Checklist
- Dome is round and even, with 6 shells per round showing.
- The band shows two clean lines.
- There are 12 cords, all the same length and untwisted.
- Windows are open from the band to the hem, with no crossbars.
- There are 12 fans, each centered in a window.
- Rim scallops have 11 dc each.
- The clapper hangs centered, just below the hem.
- The loop is centered and secure.
- All ends are woven in and trimmed.
Troubleshooting
- Dome is flat, not cupped: you added stitches in Rounds 4–7. Recount to 36 sts.
- Dome is ruffled: your Round 3 gauge is too loose. Use a smaller hook.
- Cords are uneven: count 14 chains for every cord, and keep the slip stitches loose.
- Hem ruffles: your Round 12 tension is loose, or you added extra dc. Check for 144 sts.
- Fans don’t line up with the windows: Round 11 must start in the sc above a cord.
- Clapper hangs off-center: thread the chain exactly through the center of the magic ring.
- Bell collapses: use more stiffener, or let it dry longer on the form.
Care
Dust the bell gently or spot-clean it with cool water. Re-starch and reshape it on the form if it softens in storage.

Final Notes
The measurements build up in a set order:
– The dome top lies flat at 1.5 in (3.8 cm) and cups to 1.1 in (2.8 cm) tall.
– The cords add 1.2 in (3.0 cm).
– The hem ring brings the bell to 2.25 in (5.7 cm) tall.
– The two-tier hem adds 0.75 in (1.9 cm), for a finished bell 3 in (7.6 cm) tall and 3 in (7.6 cm) wide.
Check each stage before moving on and the bell will come out right.
Happy crocheting!