

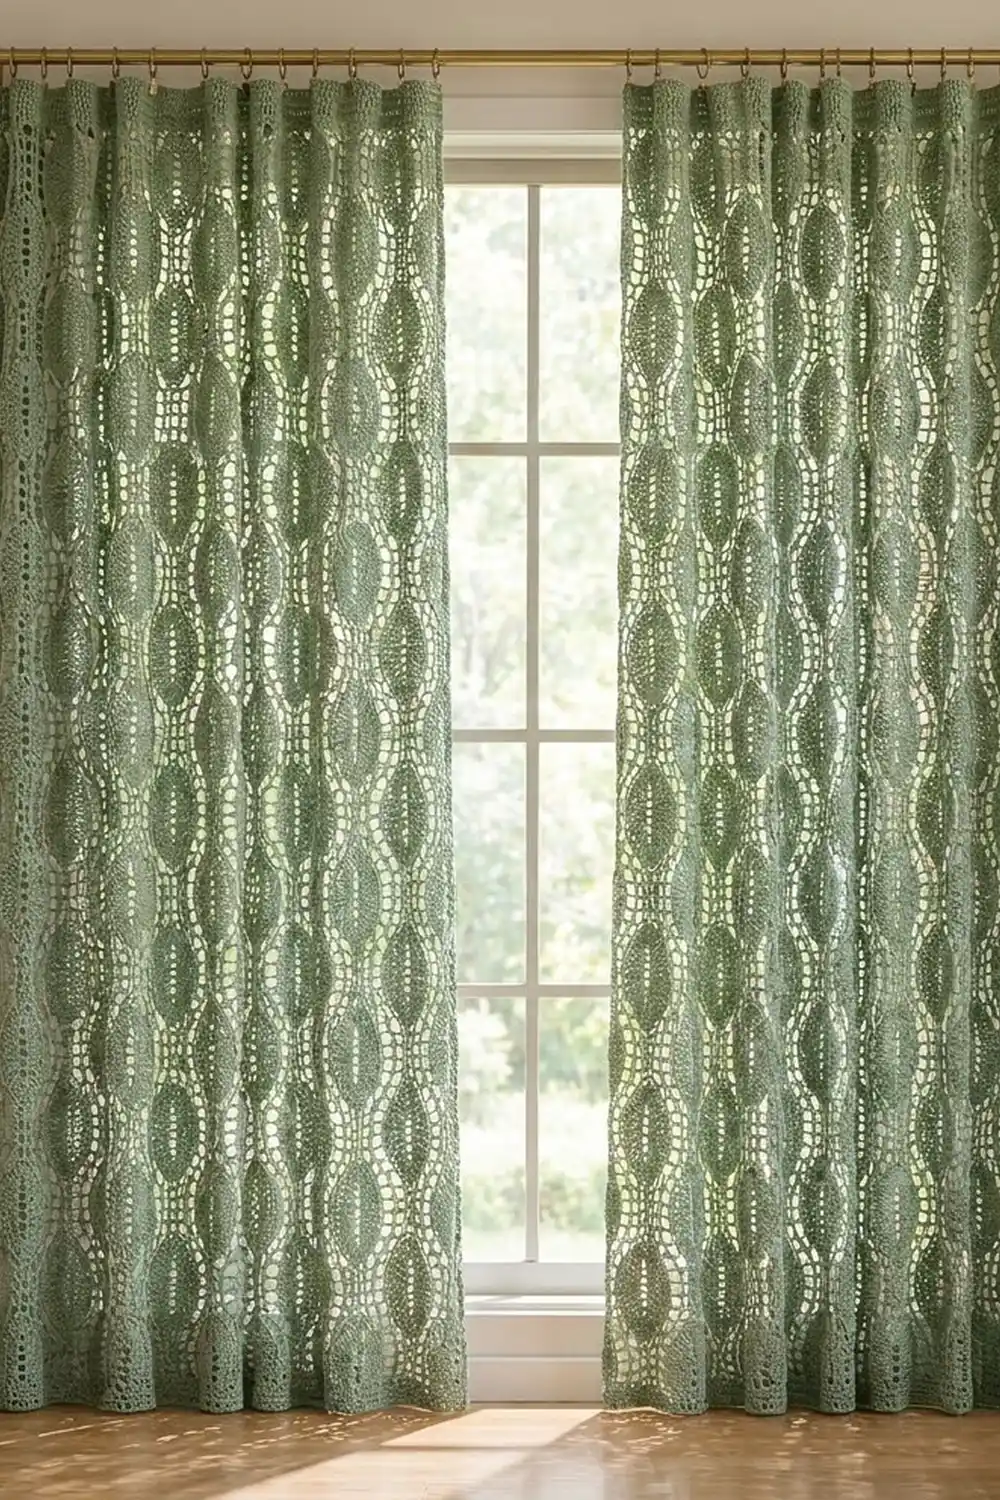
The Sage Leaf Lattice Curtain Panel is a tall, airy lace curtain made from columns of solid almond-shaped motifs set into an open ladder mesh. Each almond has a line of small eyelets down its center, so with light coming through the window it looks like a row of stylized leaves.
The panel is worked in one soft sage green. The almonds are dense and textured, and the mesh around them is light and open. The finished panel hangs straight from clip rings, so you don’t need a rod pocket or tabs.
This pattern uses US crochet terms. One finished panel measures 37 in wide x 86 in long (94.0 x 218.4 cm), including the border. Make two panels for a window pair.
For construction, each block starts as a short eyelet strip. You work rounds around that strip to make the almond, then add two mesh rounds that square it into a 7 x 12 in (17.8 x 30.5 cm) rectangle. You join 35 blocks in a 5 x 7 grid, then finish with a 1 in (2.5 cm) solid border.
Finished Size and Construction
- Finished panel size: 37 x 86 in (94.0 x 218.4 cm)
- Skill level: Intermediate
- Terminology: US crochet terms
- Yarn weight: Worsted (#4)
- Hook: 5.0 mm (H-8)
- Number of pieces: 35 blocks per panel (70 for a pair)
- Layout: 5 blocks wide x 7 blocks tall
- Block size: 7 x 12 in (17.8 x 30.5 cm)
- Size before border: 35 x 84 in (88.9 x 213.4 cm)
- Border depth: 1 in (2.5 cm) on all four sides
Materials
Choose a smooth worsted-weight cotton or cotton blend of about 180 m per 100 g. Cotton gives crisp stitch definition, blocks flat, and won’t stretch much on the rod. Avoid fuzzy yarns, because they soften the eyelets and blur the mesh.
- Sage green: 1,000 g (about 1,800 m) per panel; 2,000 g (about 3,600 m) for a pair
Each block uses about 22 g. The joining for one panel takes about 30 g and the border about 110 g. The quantities above include a margin of roughly 10% for swatching and dye-lot safety, so buy all your yarn from one dye lot.
Tools:
- 5.0 mm (H-8) crochet hook
- Tapestry needle
- Stitch markers (at least 4)
- Measuring tape
- Blocking mats and rust-proof pins
- Spray bottle
- 8–10 curtain clip rings per panel for hanging
Abbreviations (US Terms)
- ch – chain
- sl st – slip stitch
- sc – single crochet
- hdc – half double crochet
- dc – double crochet
- tr – treble crochet (yarn over twice)
- dtr – double treble crochet (yarn over 3 times, then work off loops in pairs 4 times)
- sp(s) – space(s)
- st(s) – stitch(es)
- beg – beginning
- rep – repeat
- RS / WS – right side / wrong side
Mesh counting rule: In Rounds 5 and 6 of the block, and when you join the blocks, every chain counts as one stitch, the same as every post. Corner ch-2 spaces are not counted.
Gauge and Checkpoints
Make one full block and block it before you start the rest. Every later number depends on this block.
- After the strip: about 5 x 0.5 in (12.7 x 1.3 cm)
- After Round 3: the almond measures 4.5 x 9.5 in (11.4 x 24.1 cm), tip to tip
- After Round 6: the block measures 7 x 12 in (17.8 x 30.5 cm)
- Mesh gauge: 49 sts along a long side = 12 in (30.5 cm); 29 sts along a short side = 7 in (17.8 cm), which works out to about 4 sts per inch
If your block is too big, change to a 4.5 mm hook. If it is too small, change to a 5.5 mm hook. Keep the stitch counts exactly as written and change only the hook. If the almond ruffles but the overall size is right, tighten your tension on Round 3.
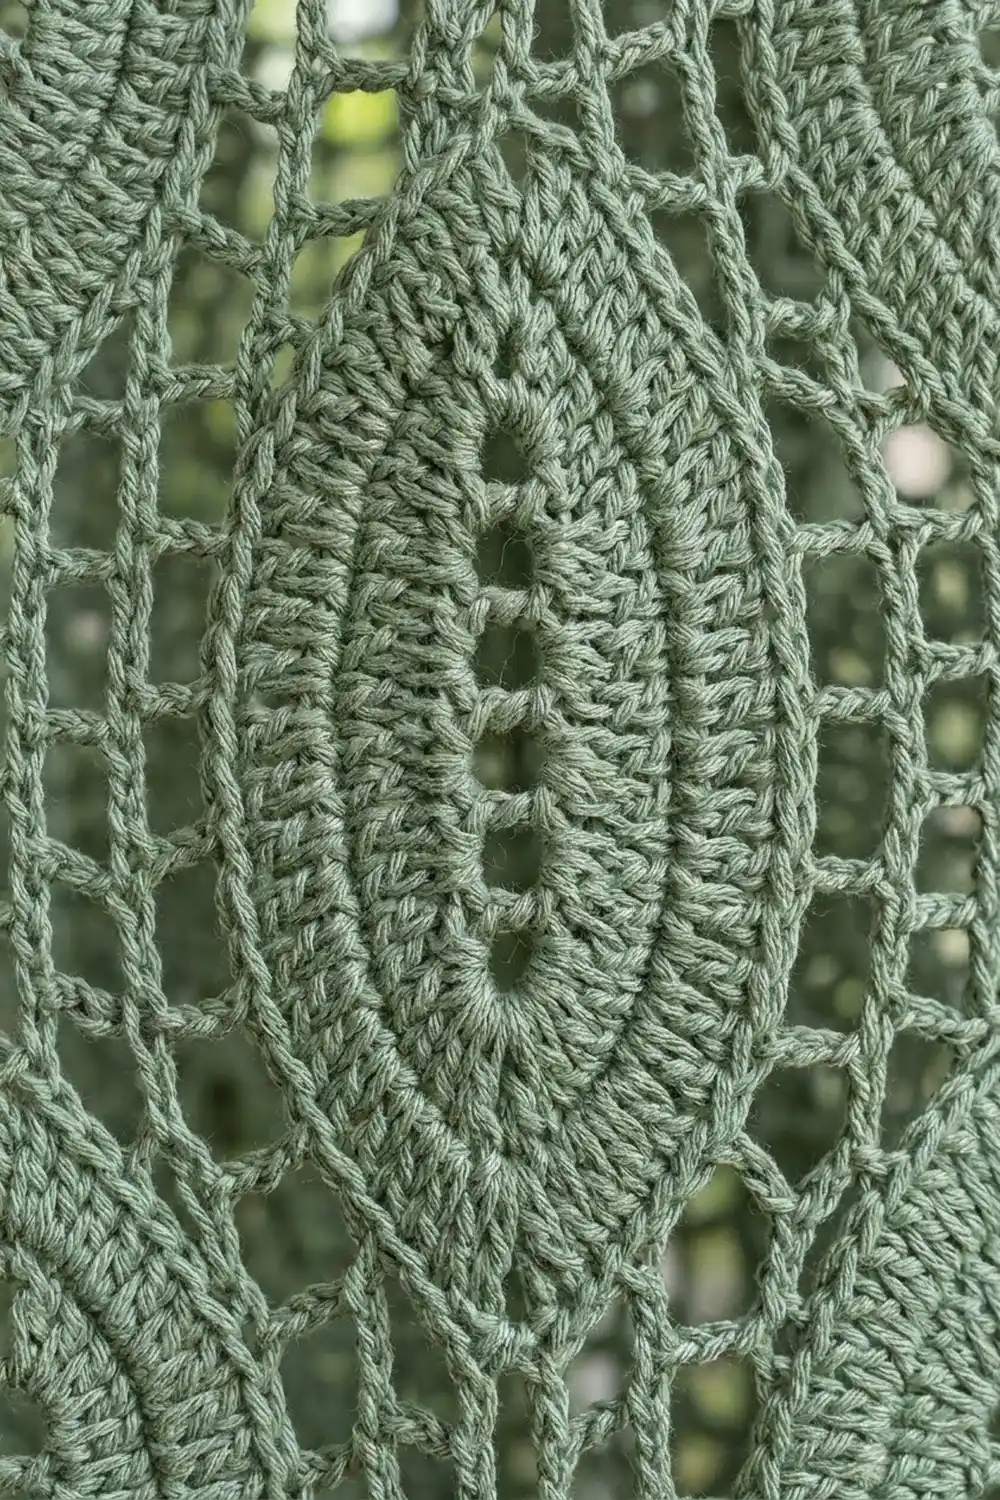
Block (Make 35 per Panel)
Center Eyelet Strip
Ch 24.
Row 1: Dc in 6th ch from hook. The 5 skipped ch count as the first dc, a ch-1 sp, and a skipped base ch. Ch 1, skip next ch, dc in next ch; rep from * 8 more times. Do not turn. (11 dc, 10 ch-1 sps; 21 sts along the top edge)*
This row makes the column of 10 eyelets that runs down the center of the almond.
Almond Rounds
Round 1: Ch 3 (counts as dc). Work 6 dc around the post of the last dc to make the end fan (7 dc). Rotate the strip and work 21 dc along the foundation chain, one into the base of each dc and one into each skipped ch. Insert your hook into the chain loops, not into the eyelet holes. Work 7 dc around the post of the beg turning ch for the second end fan. Rotate again and dc in each dc and each ch along the top edge (21 dc). Join with a sl st to the top of beg ch-3. (56 dc: 21 per side + 7 per end)
Round 2 (growth round): Ch 3 (counts as dc), dc in same st, 2 dc in each of next 2 sts, (dc, ch 2, dc) in next st for the tip, 2 dc in each of next 3 sts, dc in each of next 21 sts, 2 dc in each of next 3 sts, (dc, ch 2, dc) in next st, 2 dc in each of next 3 sts, dc in each of last 21 sts. Join. (70 dc: 21 per side + 14 per end, plus 2 tip ch-2 sps)
Round 3 (growth round): Ch 4 (counts as tr), tr in next 2 sts, 2 tr in next st, tr in next 3 sts, (2 tr, ch 2, 2 tr) in tip ch-2 sp, tr in next 3 sts, 2 tr in next st, tr in next 3 sts, tr in next 21 sts. Work the second end the same way: tr in next 3 sts, 2 tr in next st, tr in next 3 sts, (2 tr, ch 2, 2 tr) in tip sp, tr in next 3 sts, 2 tr in next st, tr in next 3 sts, tr in last 21 sts. Join. (82 tr: 21 per side + 20 per end, plus 2 tip ch-2 sps)
The (2 tr, ch 2, 2 tr) groups make the pointed almond tips. From tip to tip along each side there are now 41 tr. Checkpoint: 4.5 x 9.5 in (11.4 x 24.1 cm).
Mesh Frame
Round 4: Sl st in next 7 sts and into the tip ch-2 sp. Ch 1, sc in same sp. [Ch 4, skip 2 sts, sc in next st] 13 times, ch 4, skip 2 sts, sc in next tip ch-2 sp. Rep the bracketed sequence along the second side, ending with ch 4, skip 2 sts, join to first sc. (28 ch-4 loops, 14 per side)
The loops are numbered 1–14 on each side, starting from the tip where the round began. The first side’s loops are L1–L14 and the second side’s loops are M1–M14.
Round 5 (squaring round): Ch 2 (counts as hdc), ch 3, dc in L1, ch 3, tr in L2, ch 5, (dtr, ch 2, dtr) in L3 for the corner, ch 5, dtr in L4, ch 5, tr in L5, ch 5, dc in L6, [ch 3, dc in next loop] 3 times (L7–L9), ch 5, tr in L10, ch 5, dtr in L11, ch 5, (dtr, ch 2, dtr) in L12, ch 5, tr in L13, ch 3, dc in L14, ch 3, hdc in tip sc. Repeat the same sequence on the M loops, starting with ch 3, dc in M1, and ending with ch 3, dc in M14, ch 3. Join to top of beg ch-2.
The graded post heights fill the deeper gaps at the corners, so the outer edge comes out straight. Count per side: short sides 29 sts (7 posts + 22 ch); long sides 49 sts (10 posts + 39 ch). (156 sts + 4 corner ch-2 sps) Every post lands on an odd-numbered stitch of its side, which sets up Round 6.
Round 6 (mesh round): Ch 3 (counts as dc). [Ch 1, skip next st, dc in next st] 7 times, ending in a corner dtr. Ch 2, dc in next dtr, [ch 1, skip next st, dc in next st] 24 times. Ch 2, dc in next dtr, [ch 1, skip next st, dc in next st] 14 times. Rep from * to * once more, but on the last short side work the bracketed repeat 6 times instead of 14. Ch 1, skip next st, join to top of beg ch-3. Fasten off and weave in ends.
Count per side: short sides 29 sts (15 dc + 14 ch-1); long sides 49 sts (25 dc + 24 ch-1). Each side count includes its own two corner dc. (156 sts + 4 corner ch-2 sps) Checkpoint: 7 x 12 in (17.8 x 30.5 cm).
Make All Pieces
Make 35 blocks for one panel, or 70 for a pair, all in sage green (about 22 g each). Block them in batches so they all match in size before you join them.
Layout per panel (B = block, almond points run vertically):
B B B B B   row 1 (top)
B B B B B   row 2
B B B B B   row 3
B B B B B   row 4
B B B B B   row 5
B B B B B   row 6
B B B B B   row 7 (bottom)
Joining
Method: Slip-stitch join with the blocks held WS together, working through both loops of both layers. This gives a flat seam that looks almost the same from both sides, which matters on a curtain.
Step 1, horizontal strips: Join 5 blocks side by side along their long (12 in) edges. Match stitch to stitch: 49 sl sts per seam, one through each pair of matching dc or ch. Make 7 strips. Each strip measures 35 x 12 in (88.9 x 30.5 cm).
Step 2, stacking strips: Join the strips along their 5-block edges. Each strip edge has 5 x 29 = 145 sts. Work 145 sl sts, matching stitch to stitch. Where four corners meet, sl st once through the stacked corner ch-2 sps. This holds the junction but adds nothing to any edge count.
Tension: Make each sl st the same height as one mesh stitch, about 1/4 in (0.6 cm). If the seams pucker, go up a hook size for joining only.
Checkpoint: the joined panel measures 35 x 84 in (88.9 x 213.4 cm).
Border
Border gauge: 4 sc = about 1 in (2.5 cm). This matches the mesh, so working one stitch into each edge stitch keeps the edges flat.
Starting counts: the top and bottom edges are 5 blocks x 29 = 145 sts. The side edges are 7 blocks x 49 = 343 sts. Don’t work into the joined corner ch-2 sps at seam junctions on the outer edge. Only the four outer panel corners are worked.
With RS facing, join yarn in a corner ch-2 sp.
Round 1: Ch 1, (sc, ch 2, sc) in corner sp, sc in each st along the edge; rep from * around. Join. (Top/bottom: 145 + 2 = 147 sc; sides: 343 + 2 = 345 sc; 984 sc total)*
Round 2: Ch 2 (does not count), hdc in each st to corner, (hdc, ch 2, hdc) in corner sp; rep from * around. Join. (Top/bottom 149; sides 347; 992 total)*
Round 3: Rep Round 2. (Top/bottom 151; sides 349; 1,000 total)
Round 4: Ch 1, sc in each st to corner, (sc, ch 2, sc) in corner sp; rep from * around. Join, fasten off. (Top/bottom 153; sides 351; 1,008 total)*
Why the math works: Each round adds exactly 1 stitch per corner to each side, so 2 per side and 8 per round. The edge stitches stay 1-to-1 with the mesh at the same gauge, so the border neither ruffles nor pulls in. Four rounds add 1 in (2.5 cm) on every side: 35 + 2 = 37 in (94.0 cm) wide and 84 + 2 = 86 in (218.4 cm) long.
Final Blocking
- Weave in all ends along the posts so they don’t show in the mesh.
- Lay the panel flat on mats. Pin the outer corners first to 37 x 86 in (94.0 x 218.4 cm).
- Pin along each edge every 3 in (7.6 cm), keeping the border straight.
- Check that each block’s grid lines run straight, and pin the seam lines if needed.
- Mist the panel evenly until it is damp, but not dripping.
- Smooth each almond flat with your palm and open the eyelets with a fingertip.
- Let it dry completely, at least 24 hours, before unpinning.
Final Quality-Control Checklist
- [ ] Every block has 49 sts on each long side and 29 on each short side
- [ ] All almond points run vertically and the eyelets are open
- [ ] Seams are flat, with 49 or 145 sl sts each
- [ ] Border Round 4 counts are 153 on top/bottom and 351 on the sides
- [ ] Panel measures 37 x 86 in (94.0 x 218.4 cm)
- [ ] Both panels in a pair match within 1/2 in (1.3 cm)
Troubleshooting
Almond cups: Round 3 is too tight. Loosen your tension or use a larger hook for Rounds 1–3.
Almond ruffles: Your trebles are too loose. Check the 2-tr increases and use a smaller hook for Round 3.
Eyelets are closed: In Round 1 you worked into the holes. Work into the chain loops instead.
Block isn’t rectangular: Recheck the Round 5 chain lengths (5 near corners, 3 elsewhere) and the post heights.
Panel edges wave: You worked into seam junctions on the border. Skip them so the counts stay exact.
Panel is too short: Wet block a little firmer lengthwise. The cotton will also relax on the rod over time.
Care
Hand wash cool or machine wash on a gentle cycle in a mesh bag, then lay flat to dry and reshape. Don’t hang the panel while it’s wet, because the weight will stretch it.
Final Notes
The measurement chain is simple. The almond measures 4.5 x 9.5 in (11.4 x 24.1 cm), and the block measures 7 x 12 in (17.8 x 30.5 cm). Five by seven blocks make 35 x 84 in (88.9 x 213.4 cm), and the border brings the panel to 37 x 86 in (94.0 x 218.4 cm). Once your first block is right, the rest of the panel follows.
Happy crocheting!