

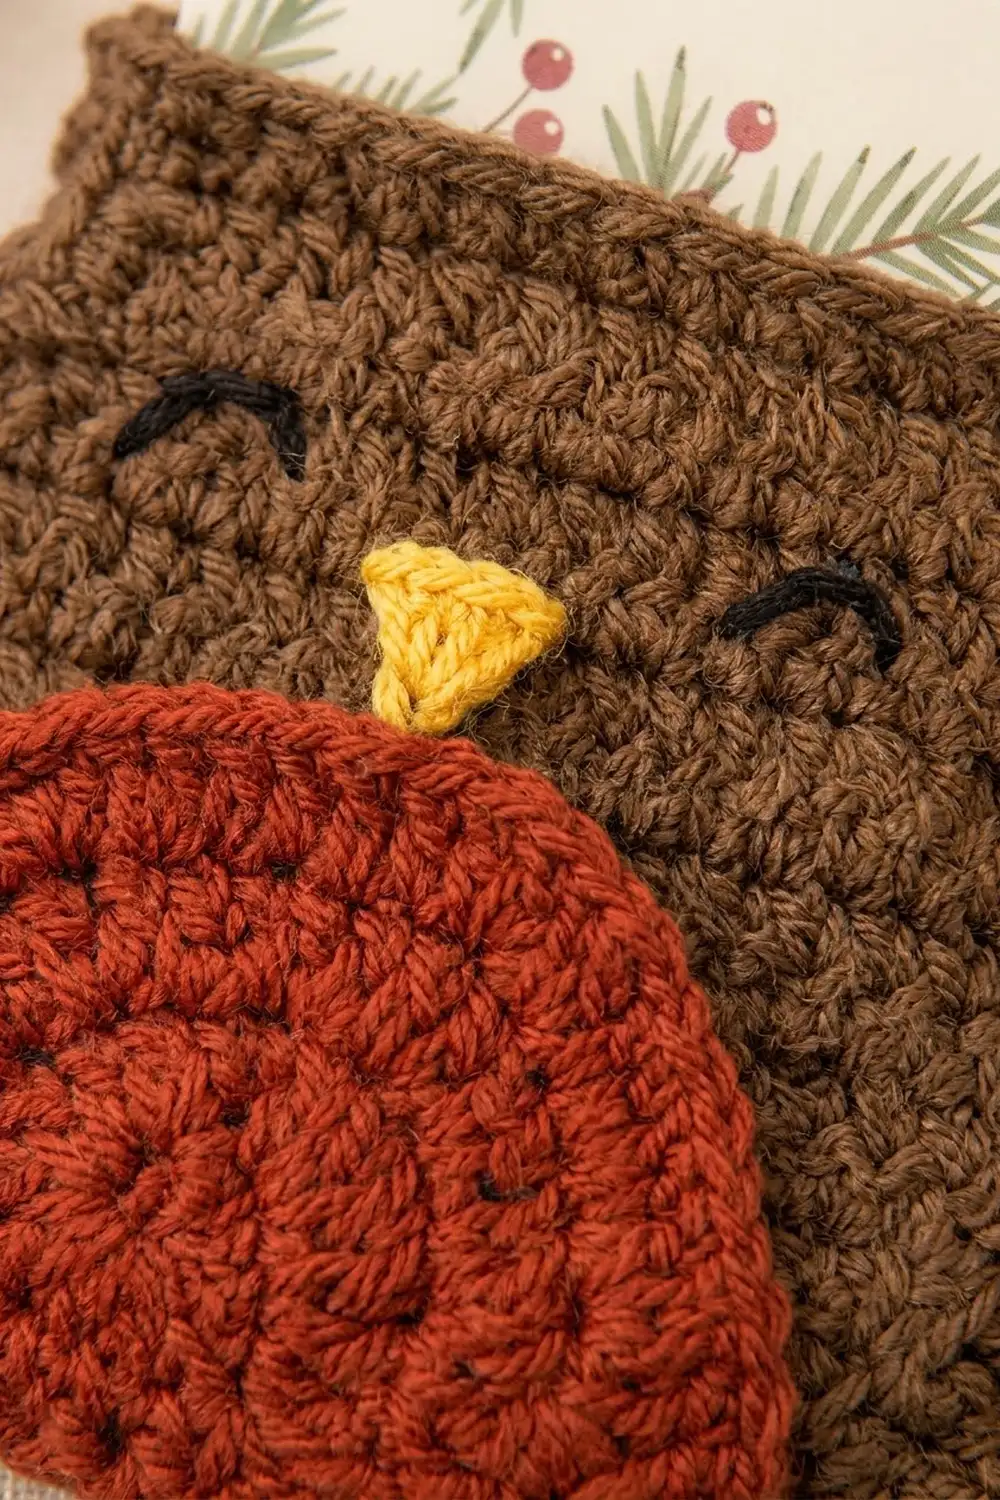
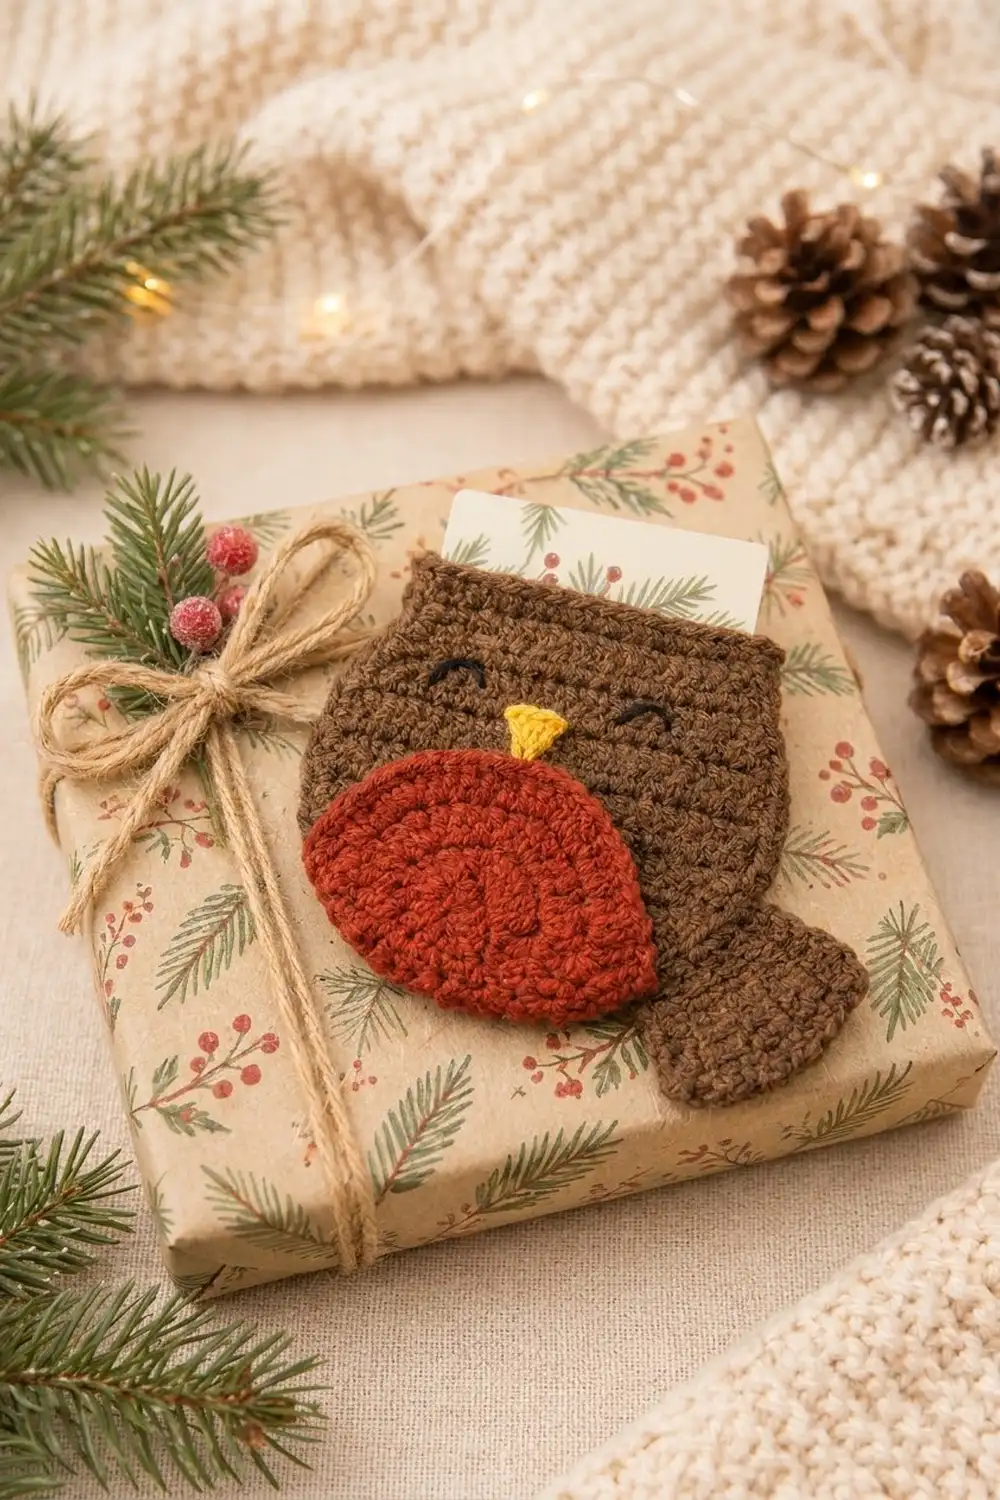
This little robin is a flat, pocket-style gift card holder. A gift card slides into the open top and stays put, with just the top edge peeking out. The brown body has a rust-red breast, a tiny mustard-yellow beak, and two sleepy embroidered eyes. A short tail flares out at the lower right.
The style is cozy and rustic, and it looks great tucked under the twine on a wrapped gift or hung on a tree. Once the card is spent, the robin can stay on as an ornament.
The pattern uses US crochet terms. The finished body measures 4.8 in (12.2 cm) wide by 4.2 in (10.7 cm) tall. With the tail, the holder is about 6.0 in (15.2 cm) wide.
Here is how it’s built. You make two identical body panels in single crochet rows, starting at the bottom. You add the eyes, beak, and breast to the front panel, then join the two panels with one round of single crochet that also trims the top. A short stitched “card shelf” holds the card at the right height. Last, you sew the tail onto the back.
Finished Size and Construction
- Finished size: body 4.8 in × 4.2 in (12.2 cm × 10.7 cm); about 6.0 in (15.2 cm) wide with the tail
- Skill level: Easy
- Terminology: US
- Yarn weight: worsted (#4)
- Hook: 4.0 mm (G-6)
- Number of pieces: one finished holder made of 5 components (front panel, back panel, breast, beak, tail)
- Layout: single item, front and back panels stacked, with appliqués on the front
- Panel size (before border): 4.4 in × 3.8 in (11.2 cm × 9.7 cm)
- Border depth: 0.2 in (0.5 cm), one round of sc
- Card pocket depth: 1.2 in (3.0 cm) from the top edge down to the card shelf
Materials
A smooth worsted cotton or cotton blend gives the clearest stitch texture, and it holds the flat shape well. Acrylic works too, but it may need firmer blocking. The amounts below assume about 100 m per 50 g.
- Brown (body and tail): 18 g, about 36 m
- Rust red (breast): 6 g, about 12 m
- Mustard yellow (beak): 1 g, about 2 m
- Black (eyes): 1 g, about 1 m
All amounts include a small safety margin.
Tools:
– 4.0 mm (G-6) crochet hook
– Tapestry needle
– Stitch markers (2)
– Scissors
– Pins for placement and blocking
– A standard gift card, 3.4 in × 2.1 in (8.6 cm × 5.3 cm), for test fitting
Abbreviations (US Terms)
- ch – chain
- sl st – slip stitch
- sc – single crochet
- hdc – half double crochet
- dc – double crochet
- tr – treble crochet
- sc2tog – single crochet 2 together
- sc3tog – single crochet 3 together
- st(s) – stitch(es)
- inc – 2 sc in the same stitch
- magic ring – adjustable ring
Special stitch – sc3tog: (insert hook in next st, yarn over, pull up a loop) 3 times, yarn over, and draw through all 4 loops on the hook.
Gauge and Checkpoints
Gauge: 18 sc and 20 rows = 4 in (10.2 cm), which is 4.5 sts and 5 rows per inch.
Make one body panel first and check it before you start the second. Measure your panel at these points:
- After Row 1: 10 sts should measure 2.2 in (5.6 cm) across.
- After Row 6: 20 sts should measure 4.4 in (11.2 cm) across.
- After Row 19: the panel should be 3.8 in (9.7 cm) tall and 4.0 in (10.2 cm) across the top.
- Card test: lay the gift card on the panel. You want about 0.6 in (1.5 cm) of ease side to side across the top.
Panel too big? Go down one hook size, to 3.5 mm. Too small, or the card won’t fit? Go up to 4.5 mm. Change only one thing at a time, and remeasure after Row 6.
Body Panels (make 2)
Use brown. Turn at the end of every row. The ch 1 at the start of a row does not count as a stitch.
Row 1: Ch 11. Sc in the 2nd ch from the hook and in each ch across. (10 sts)
Row 2: Ch 1, inc in the first st, sc in the next 8 sts, inc in the last st. (12 sts)
Row 3: Ch 1, inc, sc 10, inc. (14 sts)
Row 4: Ch 1, inc, sc 12, inc. (16 sts)
Row 5: Ch 1, inc, sc 14, inc. (18 sts)
Row 6: Ch 1, inc, sc 16, inc. (20 sts)
These first six rows make the rounded lower corners. The flat bottom is the 10-stitch foundation.
Rows 7–17: Ch 1, sc in each st across. (20 sts each, 11 rows)
Row 18: Ch 1, sc2tog, sc 16, sc2tog. (18 sts)
Row 19: Ch 1, sc in each st across. (18 sts)
Fasten off and weave in the ends. The panel should measure 4.4 in × 3.8 in (11.2 cm × 9.7 cm), with the top 4.0 in (10.2 cm) across. Row 18 narrows the top slightly, which gives the body its plump, rounded shape.
Pick the neater side of one panel to be the front. Leave the other panel plain. It is the back.
Face and Appliqués
Eyes
Use black yarn and a tapestry needle on the front panel. On Row 17, mark the 5th st and the 16th st. These are the eye centers, about 2.0 in (5.1 cm) apart.
Over each marker, backstitch an arch 3 sts wide, about 0.5 in (1.3 cm). It should rise half a row in the middle. Work 3 backstitches for a smooth curve. Secure the ends on the wrong side.
Beak (make 1)
Use mustard yellow.
Row 1: Ch 4. Sc in the 2nd ch from the hook and in the next 2 ch. (3 sts)
Row 2: Ch 1, turn, sc3tog. (1 st)
Fasten off, leaving a 6 in (15.2 cm) tail. The beak is a small triangle, 0.7 in (1.8 cm) wide and 0.4 in (1.0 cm) tall. Sew it with the point down, centered between the eyes, so the wide edge sits on Row 16.
Breast (make 1)
Use rust red. This piece is a half circle worked in turned rows. The ch 3 counts as a dc.
Row 1: Make a magic ring. Ch 3, then 5 dc in the ring. Pull the ring closed. (6 sts)
Row 2: Ch 3, turn, dc in the first st, then 2 dc in each remaining st. (12 sts)
Row 3: Ch 3, turn, dc in the first st, dc in the next st, then (2 dc in the next st, dc in the next st) 5 times. (18 sts)
Row 4 (trim): Ch 1, turn. Sc in the first 16 sts, hdc in the next st, then (dc, tr) in the last st. That’s 18 sts worked one per existing stitch plus 1 extra, for 19 sts. The dc and tr make the pointed tip.
Straight edge: Don’t turn. Rotate to work along the flat edge. Work 2 sc in each of the 3 row ends, 1 sc into the center of the ring, then 2 sc in each of the next 3 row ends. (13 sc)
Sl st to the first sc of Row 4. That’s 32 sts around. Fasten off, leaving a 12 in (30.5 cm) tail.
The breast measures about 3.3 in (8.4 cm) along the straight edge and 1.7 in (4.3 cm) deep.
Placement: Lay the breast on the lower left of the front panel with its straight edge tilted upward to the right. The left end of the straight edge sits at the panel’s left edge on Row 9. The pointed tip sits just under the beak, around Row 14. The curved edge faces down toward the bottom of the panel.
Pin it in place, then whipstitch through the back loops of the Row 4 and straight-edge sc. Sew through the front panel only.
Joining Round (Border)
Border gauge
On the side edges, work 1 sc per row end on the straight rows, and 2 sc on alternating row ends where the edge curves. Work 1 sc per stitch along the foundation and along the top.
Joining
Hold the panels with wrong sides together and the front panel facing you. Line up the stitches, and use brown.
Round 1: Join the yarn through both layers at the top left corner (the end of Row 19).
- Left side, through both layers: ch 1. Work 1 sc in each row end from Row 19 down to Row 7, for 13 sc. Then work the Row 6 to Row 2 ends as follows: 1 sc, 2 sc, 1 sc, 2 sc, 1 sc, for 7 sc. Work 1 sc in the Row 1 end. (21 sc)
- Bottom, through both layers: working into the opposite side of the foundation chain, 2 sc in the first ch, sc in the next 8 ch, 2 sc in the last ch. (12 sc)
- Right side, through both layers: mirror the left side. Work 1 sc in the Row 1 end, then 1, 2, 1, 2, 1 sc over the Row 2 to Row 6 ends, then 1 sc in each row end from Row 7 to Row 19. (21 sc)
- Front top only: sc in each of the 18 sts of Row 19 on the front panel. (18 sc)
Sl st to the first sc. That’s 72 sts in total: 21 + 12 + 21 + 18. Fasten off.
Back top: Join brown at the top right corner of the back panel. Ch 1, then sc in each of the 18 sts of Row 19. (18 sc) Fasten off.
The top is now open between the two 18-stitch edges. That opening is the card slot.
Why the math works
The panel is 20 sts wide, and the border adds one sc on each side, which is about 0.2 in (0.5 cm) per side. That brings the width to 4.4 + 0.4 = 4.8 in (12.2 cm). The bottom and top each gain one sc row of 0.2 in (0.5 cm), so the height becomes 3.8 + 0.4 = 4.2 in (10.7 cm).
On the 13 straight rows, 1 sc per row end matches the 5 rows-per-inch row gauge, so the sides lie flat. The diagonal corner edge (Rows 2–6) is longer than the row height alone. The 2 extra sc there let the curve open smoothly instead of cupping. The bottom gets 10 sc for the 10 foundation chains plus 2 extra at the turns, so it stays flat.
Card shelf
Use brown and a tapestry needle. Backstitch through both layers along the line between Rows 14 and 15, from side to side. Where the line meets the tip of the breast, pass behind the tip.
This shelf stops the card 1.2 in (3.0 cm) below the top edge. About 0.9 in (2.3 cm) of the 2.1 in (5.3 cm) card stays visible, so it is easy to pull out. Skip the shelf if you’d rather have the card hidden inside.
Tail (make 1)
Use brown, and turn at the end of each row.
Row 1: Ch 5. Sc in the 2nd ch from the hook and in each ch across. (4 sts)
Row 2: Ch 1, sc in each st across. (4 sts)
Row 3: Ch 1, inc, sc 2, inc. (6 sts)
Row 4: Ch 1, sc in each st across. (6 sts)
Row 5: Ch 1, inc, sc 4, inc. (8 sts)
Row 6: Ch 1, sc in each st across. (8 sts)
The tail now measures 1.8 in × 1.2 in (4.6 cm × 3.0 cm).
Edging: Ch 1, but don’t turn. Work 3 sc in the first st, sc 6, then 3 sc in the last st, for 12 sc along the wide end. Work 6 sc down the side, 4 sc across the foundation, and 6 sc up the other side. Sl st to the first sc. (28 sts) Fasten off, leaving a 10 in (25.4 cm) tail.
The finished tail measures 2.2 in × 1.6 in (5.6 cm × 4.1 cm).
Attach: Pin the narrow end to the back of the body at the lower right, angled down and outward. Let 0.4 in (1.0 cm) overlap the body so the wide end extends about 1.2 in (3.0 cm) past the right edge. Whipstitch it to the back layer only, so the stitches don’t show from the front.
Final Blocking
- Weave in all remaining ends between the layers, keeping them away from the card slot.
- Lightly mist the holder with water, or steam it from 1 in (2.5 cm) above. With acrylic, don’t let the iron touch the yarn.
- Pin it flat to 4.8 in × 4.2 in (12.2 cm × 10.7 cm) on a blocking board.
- Pat the breast and tail flat, and ease the breast tip into a crisp point.
- Slip the gift card into the slot while the piece is damp, so the pocket dries to fit.
- Let it dry completely before you unpin.
Final Quality-Control Checklist
- The body measures 4.8 in × 4.2 in (12.2 cm × 10.7 cm).
- The joining round has 72 sts, and the back top edge has 18 sts.
- The sides lie flat with no ruffling or cupping at the lower corners.
- The eyes are level on Row 17 and 2.0 in (5.1 cm) apart.
- The beak is centered and points down.
- The breast is sewn to the front only, with its tip under the beak.
- The card slides in easily and rests on the shelf with about 0.9 in (2.3 cm) showing.
- The tail is secure and angled outward.
Troubleshooting
- Lower corners ripple: Replace one of the 2-sc row ends on Rows 2–6 with 1 sc.
- Lower corners pull in: Add 1 sc at the Row 4 end on each side.
- Card is too tight: Remake the panels with a 4.5 mm hook, or add a row of 20 sts before Row 18.
- Breast curls: Your dc tension is tighter than your sc tension. Go up one hook size for the breast only.
- Beak looks lumpy: Pull the sc3tog firmly, and sew the beak down along all three edges.
- Card sinks too low: Move the shelf one row higher.
Care
Hand wash in cool water with a mild soap, press out the water in a towel, and dry flat. Take out the gift card before washing.
Final Notes
The measurement chain keeps this robin true to size. Gauge is 4.5 sts and 5 rows per inch. Row 6 should reach 20 sts at 4.4 in (11.2 cm), and Row 19 brings the panel to 3.8 in (9.7 cm) tall. The 72-stitch joining round finishes the body at 4.8 in × 4.2 in (12.2 cm × 10.7 cm), and the tail takes it to about 6.0 in (15.2 cm) wide. Check each stage as you go, and the card will slip in perfectly every time.
Happy crocheting!