

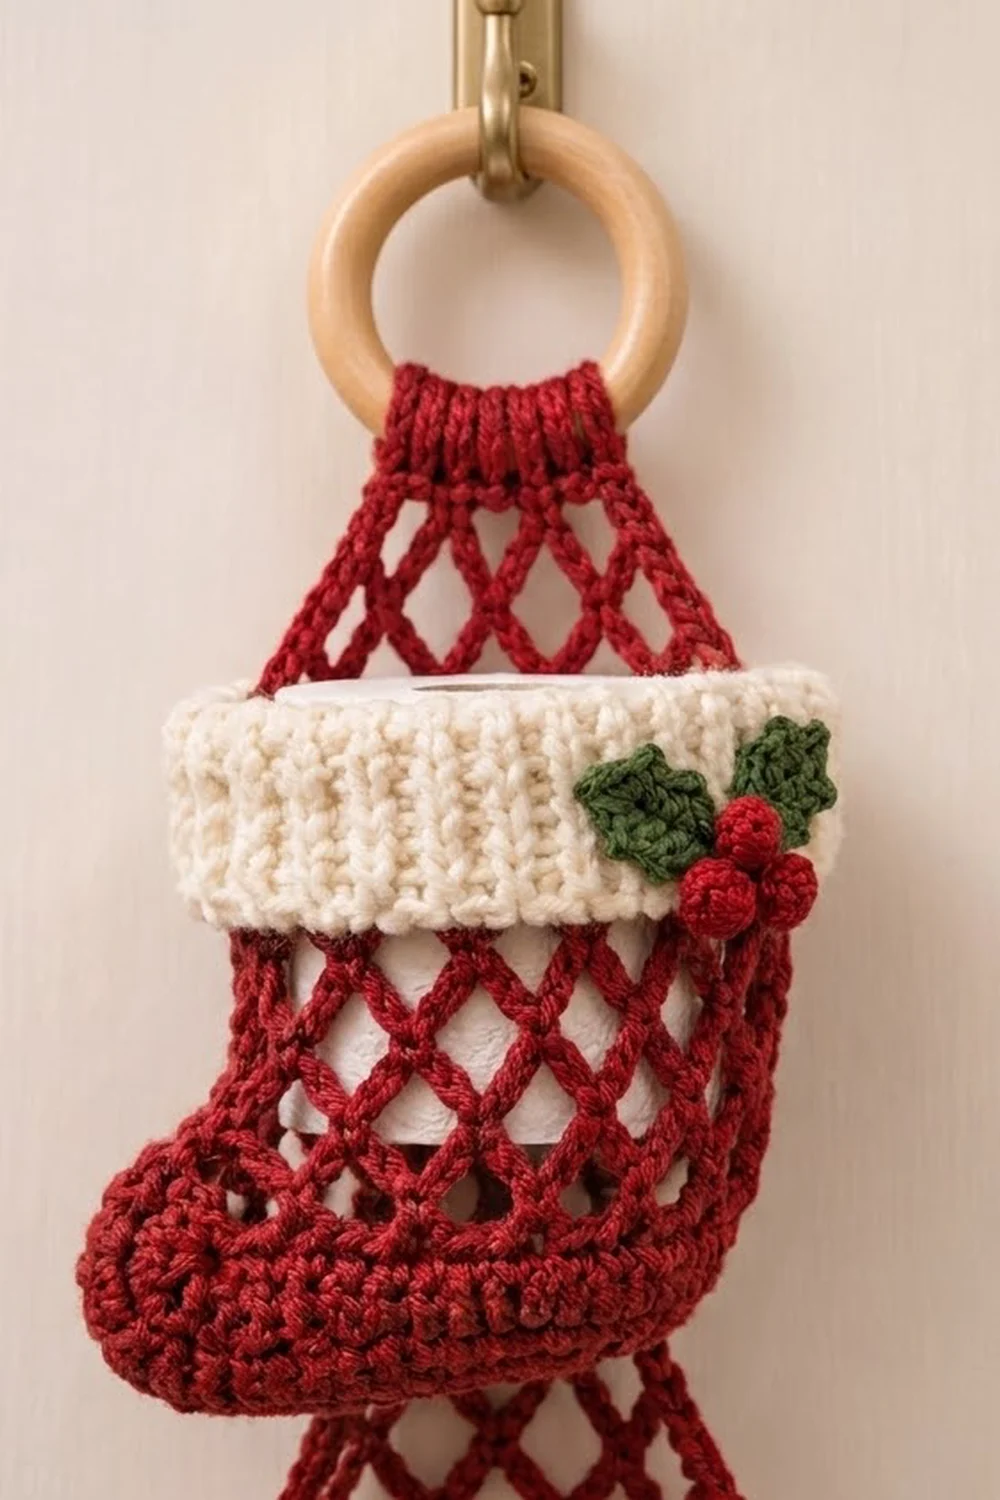
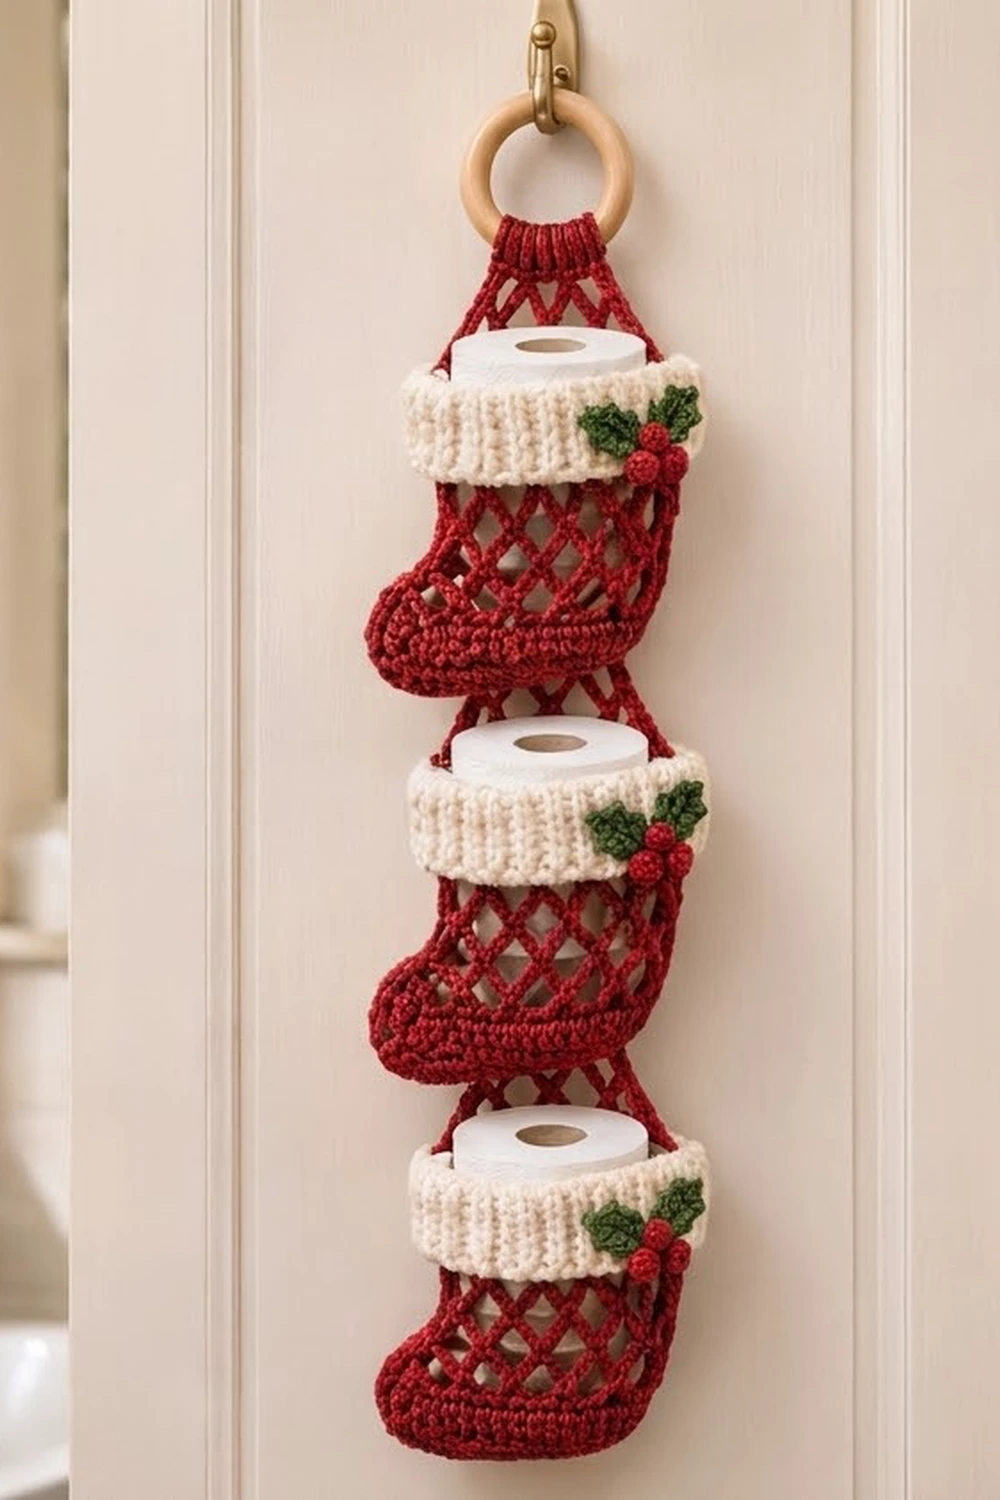
This hanging holder stores three spare rolls of toilet paper in three cherry-red mesh stockings, each topped with a cream ribbed cuff and a small holly sprig. A tapered mesh hanger loops over a wooden ring, so the whole column hangs from a hook, towel bar, or the back of a door.
The colors are deep red, cream, and holly green, with tiny red bobble berries. The open diamond mesh shows the white roll inside. A solid band across the bottom of each foot and the chunky ribbed cuff give the stockings their shape.
The pattern uses US crochet terms. Each stocking measures about 8.5 in (21.6 cm) wide at the foot and 8.75 in (22.2 cm) tall. The finished holder is about 33.25 in (84.5 cm) long including the ring.
Each stocking is made from two flat panels worked bottom-up and seamed with single crochet. You then add a ribbed cuff in rounds, stack the stockings with a small overlap, and sew a tapered hanger to the top stocking.
Finished Size and Construction
- Finished size: 8.5 in (21.6 cm) wide × 33.25 in (84.5 cm) long, ring included
- Skill level: Intermediate
- Terminology: US
- Yarn weight: Worsted (#4)
- Hook: 5.0 mm (H-8)
- Number of pieces: 6 stocking panels, 1 hanger, 6 leaves, 9 berries
- Layout: 3 stockings in a single vertical column (1 across × 3 down)
- Single stocking: 8.5 in (21.6 cm) wide at the foot, 7.5 in (19.1 cm) wide at the leg, 8.75 in (22.2 cm) tall
- Panel height before the cuff: about 7 in (17.8 cm)
- Cuff (border) depth: 1.75 in (4.4 cm)
Materials
Use a smooth worsted acrylic or cotton blend. Fuzzy yarn hides the mesh, so choose yarn with clear stitch definition.
- Red (main color): 100 g, about 200 m
- Cream (cuffs): 50 g, about 100 m
- Green (leaves): 20 g, about 40 m
- Tools:
- 5.0 mm (H-8) hook
- Wooden ring, 3 in (7.6 cm) outer diameter
- Tapestry needle
- Stitch markers
- Scissors
- Pins and a tape measure
All quantities include a margin of about 25% for gauge swatches and differences in tension.
Abbreviations (US Terms)
- ch – chain
- sl st – slip stitch
- sc – single crochet
- hdc – half double crochet
- dc – double crochet
- sk – skip
- sp – space
- st(s) – stitch(es)
- rep – repeat
- RS – right side
- FPdc – front post double crochet
- BPdc – back post double crochet
Special stitches:
- Picot: Ch 3, sl st in 3rd ch from hook.
- Berry bobble: Make 4 dc in the same place, stopping each one with 2 loops left on the hook. Yarn over and pull through all 5 loops.
- Mesh loop: One ch-5 loop that is anchored with sc at both ends. Each loop is 1 in (2.5 cm) wide.
Gauge and Checkpoints
- Single crochet: 16 sc and 18 rows = 4 in (10.2 cm)
- Mesh: 1 mesh loop = 1 in (2.5 cm) wide, and 3 mesh rows = 2 in (5.1 cm)
Make one full panel before you make any more. It is your real gauge test.
- After Row 6: 8.25 in (21.0 cm) wide and about 1.3 in (3.3 cm) tall
- After Row 14: the mesh adds about 5.3 in (13.5 cm)
- After Row 15: the panel is about 7 in (17.8 cm) tall, and the leg is 7.25 in (18.4 cm) wide
If the panel is more than 0.25 in (0.6 cm) too big, go down half a hook size. If it is too small, go up half a size. Mesh that is too short usually means the chain loops are tight, so chain more loosely rather than changing the hook.
Stocking Panel (Make 6: 2 per stocking)
Use red. Odd-numbered rows end at the toe edge, and even-numbered rows begin there. The toe points left when the RS faces you.
Foundation: Ch 30.
Row 1 (RS): Sc in the 2nd ch from the hook and in each ch across. Turn. (29 sc)
Row 2: Ch 1, 2 sc in the first st, sc in the next 27 sts, 2 sc in the last st. Turn. (31 sc)
Row 3: Ch 1, 2 sc in the first st, sc in the next 29 sts, 2 sc in the last st. Turn. (33 sc)
Rows 4–6: Ch 1, sc in each st across. Turn. (33 sc)
This finishes the solid sole band, which rounds slightly at the heel and toe.
Row 7 (mesh A): Ch 1, sc in the first st, ch 5, sk 3 sts, sc in the next st; rep from * across. Turn. (8 loops)* This uses 1 + (8 × 4) = 33 sts.
Row 8 (mesh B): Ch 5 (counts as dc + ch 2), sc in the first ch-5 sp, ch 5, sc in the next ch-5 sp; rep from * across. Finish with ch 2, dc in the last sc. Turn. (7 full loops + 2 half loops)*
Row 9: Ch 1, sc in the dc, ch 5, sc in the next ch-5 sp; rep from * 6 more times. Finish with ch 5, sc in the 3rd ch of the turning ch. Turn. (8 loops)*
Row 10: Rep Row 8.
Row 11 (toe step): Ch 1, sc in the dc, ch 5, sc in the next ch-5 sp; rep from * 6 more times. Do not work the last loop. Turn. (7 loops)*
The unworked edge creates the toe, which sticks out 1 in (2.5 cm).
Row 12: Ch 5 (counts as dc + ch 2), sc in the first ch-5 sp, ch 5, sc in the next ch-5 sp; rep from * 5 more times. Finish with ch 2, dc in the last sc. Turn. (6 full loops + 2 half loops)*
Row 13: Ch 1, sc in the dc, ch 5, sc in the next ch-5 sp; rep from * 5 more times. Finish with ch 5, sc in the 3rd ch of the turning ch. Turn. (7 loops)*
Row 14: Rep Row 12.
Row 15 (trim row): This row converts the mesh to solid stitches. Ch 1 and work:
- 1 sc in the dc
- 1 sc in the ch-2 sp
- 1 sc in the next sc
- *3 sc in the next ch-5 sp, sc in the next sc; rep from * 5 more times
- 1 sc in the last ch-2 sp
- 1 sc in the 3rd ch of the turning ch
Count: 7 sc worked into the existing sc + 22 sc worked into spaces and chains (18 in loops + 2 in half loops + 2 in the dc and turning ch) = 29 sc. Fasten off.
Make All Pieces
- Red: 6 panels, 1 hanger, 9 berries
- Cream: 3 cuffs, worked directly onto the stockings
- Green: 6 leaves
Layout (front view):
        [ wooden ring ]
        [   hanger    ]
        [ Stocking 1  ]
        [ Stocking 2  ]
        [ Stocking 3  ]
Hanger (Make 1, red)
Foundation: Ch 30.
Row 1: Sc in the 2nd ch from the hook and in each ch across. Turn. (29 sc)
Row 2: Ch 1, sc in the first st, ch 5, sk 3, sc in the next st; rep from * across. Turn. (7 loops)*
Rows 3–8: Ch 1, sc in the first ch-5 sp, *ch 5, sc in the next ch-5 sp; rep from * across. Turn. Each row has one loop fewer than the row before:
- Row 3: 6 loops
- Row 4: 5 loops
- Row 5: 4 loops
- Row 6: 3 loops
- Row 7: 2 loops
- Row 8: 1 loop
Row 9: Ch 1, 5 sc in the ch-5 sp. Turn. (5 sc)
Rows 10–14: Ch 1, sc in each st across. Turn. (5 sc)
The strap is 1.25 in (3.2 cm) wide. Fasten off, leaving a 12 in (30.5 cm) tail.
Holly Leaf (Make 6, green)
Ch 7.
First side: Sl st in the 2nd ch from the hook, sc in the next ch, hdc in the next ch, picot, dc in the next ch, hdc in the next ch, picot, sc in the last ch.
Tip: Ch 3, sl st in the 2nd ch from the hook, ch 1.
Second side: Work along the other side of the foundation ch: sc, picot, hdc, dc, picot, hdc, sc, sl st in the first ch.
Each leaf has 5 points and is about 1.5 in (3.8 cm) long. Fasten off, leaving a tail.
Berry (Make 9, red)
Ch 2 into a magic ring, then work a berry bobble into the ring. Ch 1 to close the bobble and pull the ring tight. Fasten off, leaving a tail. Each berry is about 0.5 in (1.3 cm) across.
Seaming Each Stocking
Stack two panels with the RS facing up on both, so both toes point left. Join red at the top heel corner.
Working through both layers, sc evenly around the sides and bottom:
- Heel side: 23 sc (1 in each sc row end and 2 in each mesh row end)
- Bottom corner: 2 sc
- Bottom edge: 29 sc along the underside of the foundation chain
- Toe corner: 2 sc
- Toe side: 26 sc (6 along the sole, 8 along the foot mesh, 3 across the toe step, 8 along the leg mesh, 1 at Row 15)
Seam total: 82 sc. Leave the top open and fasten off.
The seamed stocking is 8.5 in (21.6 cm) wide at the foot and 7.5 in (19.1 cm) wide at the leg.
Border: Ribbed Cuff (Make 3, cream)
The cuff is this item’s border. Work it in rounds around each stocking’s opening before you join the stockings. Use the same 5.0 mm hook.
Border gauge: 1 sc round + 3 rib rounds = 1.75 in (4.4 cm).
Rnd 1: Join cream at the top of the heel seam. Sc in each of the 29 Row 15 sts on the front panel, then in each of the 29 on the back panel. Join with a sl st. (58 sc: 29 front + 29 back)
Rnd 2: Ch 2 (does not count as a st), FPdc around the next st, BPdc around the next st; rep from * around. Join. (58 sts: 29 FPdc + 29 BPdc)*
Rnds 3–4: Ch 2, FPdc around each FPdc and BPdc around each BPdc. Join. (58 sts)
Fasten off.
Why the math works: Rnd 1 places exactly 1 sc on each of the 29 sts per panel. The cuff’s flat width therefore matches the 7.25 in (18.4 cm) leg, so it doesn’t ruffle or pull in. The 58 sts make an even number, so the 1×1 rib fits with no half-repeat at the join. The post stitches give the cuff extra thickness and grip, which holds a 4.5 in (11.4 cm) roll steady. The roll measures about 14 in (35.6 cm) around, and the opening is 14.5 in (36.8 cm) around.
Holly: On the cuff front near the heel side, sew two leaves in a V with their bases touching. Sew three berries in a tight cluster over the point where the leaves meet. Repeat on each cuff.
Joining
Finish all three cuffs before you start this step. Use red yarn and whipstitch on the back (wall side) only.
Stockings: Place Stocking 2 below Stocking 1. Slide the bottom edge of Stocking 1’s back panel behind Stocking 2’s cuff until it lines up with the top of Rnd 3 of the cuff, which is 0.5 in (1.3 cm) below the top edge.
Whipstitch stitch-to-stitch: the 29 foundation sts of the upper back panel go to the 29 back-half sts of Rnd 3 on the lower cuff. Because both edges have 29 sts, they match exactly, with nothing to ease or skip. Join Stocking 3 to Stocking 2 the same way.
Hanger: Align hanger Row 1 behind Stocking 1’s cuff along Rnd 3 in the same way, again matching 29 sts to 29, and whipstitch. Fold the strap over the ring so about 1 in (2.5 cm) wraps around it, then sew the end down firmly across all 5 sts.
Tension: Stitch snugly but don’t pull. Puckering here makes the stockings tilt.
Size checkpoint:
- Stocking column: 3 × 8.75 in − 2 × 0.5 in = 25.25 in (64.1 cm)
- Visible hanger: about 5 in (12.7 cm)
- Ring: 3 in (7.6 cm)
- Total: 33.25 in (84.5 cm)
Final Blocking
- Weave in all ends along the solid stitches, not through the mesh.
- Lay the holder flat on a blocking mat.
- Pin each stocking to 8.5 in (21.6 cm) at the foot and 7.5 in (19.1 cm) at the leg.
- Pin out the corners of each mesh diamond so they open evenly.
- Mist cotton with water. For acrylic, hold a steam iron above the work without touching it.
- Don’t pin or stretch the cuffs. Just pat them into shape.
- Let everything dry completely, then insert the rolls.
Final Quality-Control Checklist
- Each panel has 29 sc in Row 15.
- Each cuff has 58 sts in every round.
- All toes point left.
- The stockings overlap by exactly 0.5 in (1.3 cm).
- The holly sits on the heel side of every cuff.
- The column hangs straight from the ring.
- The total length is about 33.25 in (84.5 cm).
Troubleshooting
- The mesh leans to one side: You missed a half loop at the edge of a B row. Check that every B row ends with ch 2, dc.
- The cuff ruffles: Rnd 1 has too many sts. Rework it with exactly 29 sc per panel.
- The roll won’t fit: The chain loops are too tight. Chain more loosely or go up a hook size.
- The holder tilts: The joining stitches are uneven. Re-sew them, matching st to st.
- The toe step is lumpy: Make sure you put exactly 3 sc across it during seaming.
Care
Hand wash in cool water and lay flat to dry. Reshape the mesh while it’s damp.
Final Notes
The measurement chain builds from the gauge up:
- A loop 1 in (2.5 cm) wide gives an 8.25 in (21.0 cm) foot and a 7.25 in (18.4 cm) leg.
- Seaming brings these to 8.5 in (21.6 cm) and 7.5 in (19.1 cm).
- A 7 in (17.8 cm) panel plus the 1.75 in (4.4 cm) cuff makes an 8.75 in (22.2 cm) stocking.
- Three stockings with two 0.5 in (1.3 cm) overlaps make a 25.25 in (64.1 cm) column, which finishes at 33.25 in (84.5 cm) with the hanger and ring.
If your gauge is right at the start, every later measurement will come out right too.
Happy crocheting!