

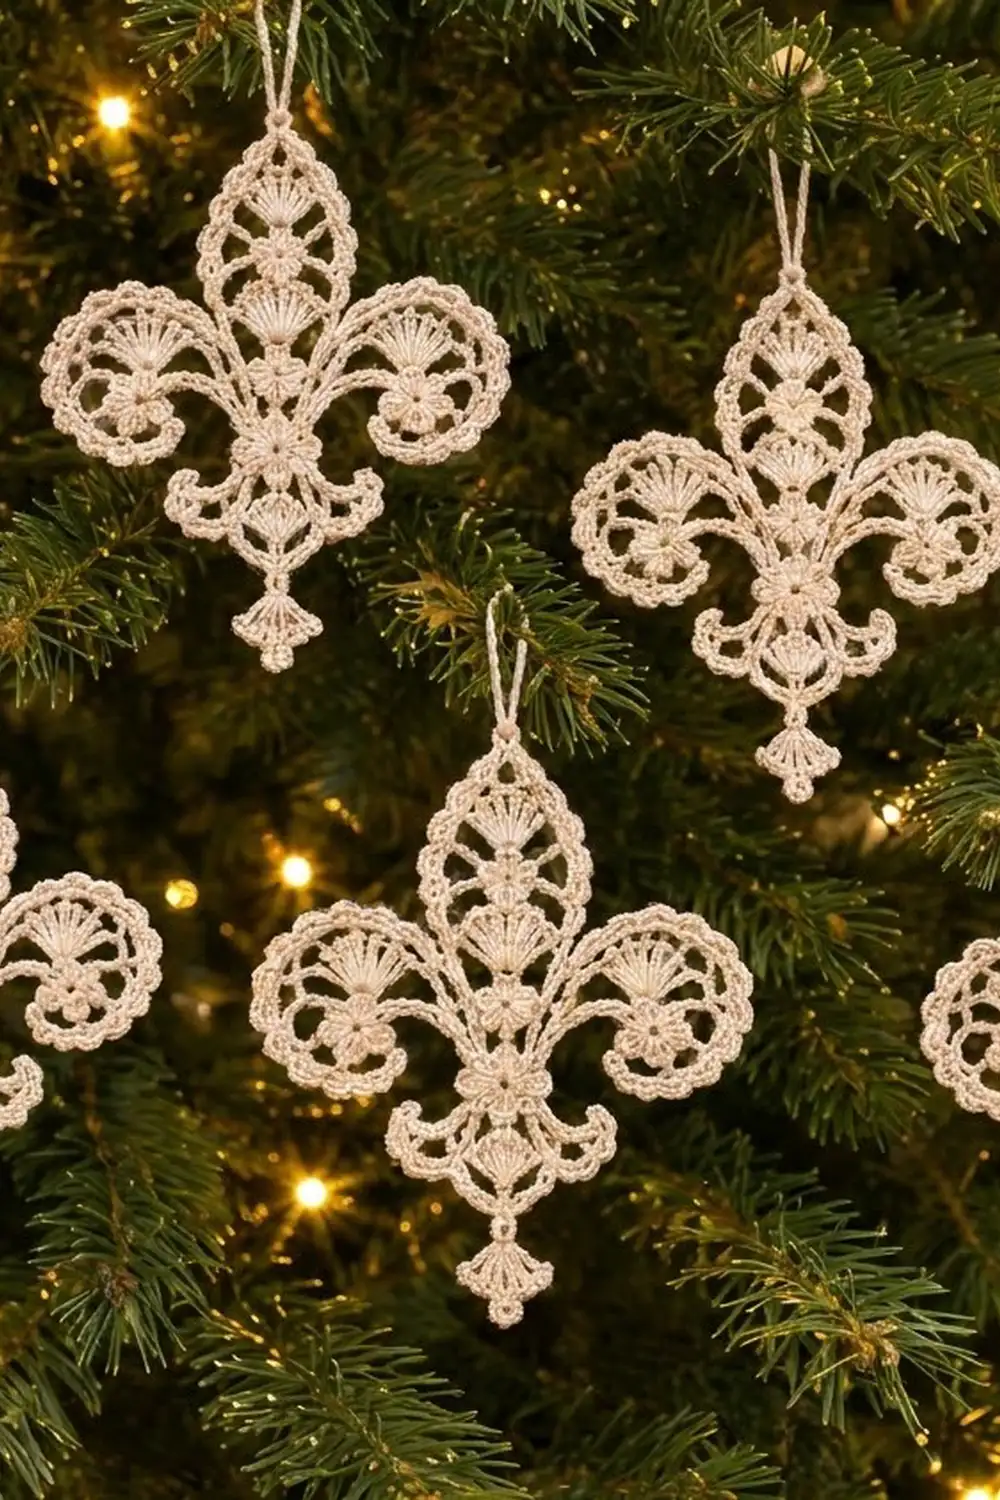
This fleur-de-lis ornament is a small piece of heirloom-style lace. Fine ivory cotton thread forms a tall teardrop petal and two curling side scrolls. Each lobe holds a radiating fan and a tiny five-petal flower, and a fan-shaped drop hangs from the bottom.
The style is classic Irish crochet: you work separate motifs first, then sew them into one flat ornament. The single ivory color looks like vintage lace against a green tree, but white, gold or soft silver thread work just as well.
The pattern uses US crochet terms. The finished ornament measures 4 in (10.2 cm) tall and 3.5 in (8.9 cm) wide without the hanging loop. With the loop, it is 5.25 in (13.3 cm) tall.
You will make 13 small parts: 4 flowers, 3 fans, 1 petal frame, 2 scrolls, 2 tendrils and 1 drop. Each one takes only minutes. After blocking, you tack them together with a needle and thread. A crocheted hanging loop finishes the piece.
Finished Size and Construction
- Finished size: 4 in (10.2 cm) tall x 3.5 in (8.9 cm) wide; 5.25 in (13.3 cm) tall with the loop
- Skill level: Intermediate (fine thread, small pieces, sewn assembly)
- Terminology: US crochet terms
- Yarn weight: Size 10 crochet cotton (Lace / 0)
- Hook: 1.5 mm steel hook
- Number of pieces: 13 parts, joined into 1 ornament
- Layout: petal on top, center flower in the middle, one scroll on each side, tendrils and drop below
- Piece sizes: flower 0.75 in (1.9 cm) across; fan 1 in (2.5 cm) wide; petal frame 2.25 in (5.7 cm) tall after blocking
- Size before edging: each scroll’s base strip is 3.75 in (9.5 cm) long
- Edging depth: the picot loop edge adds about 0.15 in (0.4 cm) to each frame and scroll
Materials
Thread: Use mercerized size 10 cotton crochet thread. It keeps crisp stitch definition and blocks very well. Avoid soft, fuzzy cotton because it blurs the fan spokes.
- Ivory / cream: 10 g, about 50 m, per ornament
These amounts include extra thread for sewing tails and a gauge test. For a set of 8 ornaments, one 50 g ball is enough with thread to spare.
Tools:
– 1.5 mm steel crochet hook
– Fine tapestry needle, or a sharp sewing needle with an eye big enough for size 10 thread
– Small sharp scissors
– Rustproof pins and a foam blocking board
– Spray bottle with water
– Fabric stiffener or a starch solution (optional, recommended)
Abbreviations (US Terms)
- ch – chain
- sl st – slip stitch
- sc – single crochet
- hdc – half double crochet
- dc – double crochet
- sk – skip
- sp – space
- st(s) – stitch(es)
- rep – repeat
Special stitch – picot: Ch 3, sl st into the 3rd ch from hook.
Gauge and Checkpoints
Gauge: 11 sc = 1 in (2.5 cm); 12 ch = 1 in (2.5 cm).
Make one flower before anything else; this is your gauge test. After a light press, it should measure 0.75 in (1.9 cm) across from petal tip to petal tip.
Checkpoints:
– Flower: 0.75 in (1.9 cm) across
– Fan: 1 in (2.5 cm) wide and 0.6 in (1.5 cm) tall
– Scroll, Row 1: 3.75 in (9.5 cm) long, unstretched
– Petal frame, Round 1: about 5.5 in (14.0 cm) around
– Joined ornament: 4 in (10.2 cm) x 3.5 in (8.9 cm)
If your flower is too big, go down to a 1.25 mm hook. If it is too small, go up to a 1.75 mm hook. Do not change the stitch counts. The scrolls and frame are sized to fit snugly around the fans and flowers, so every piece needs the same gauge.
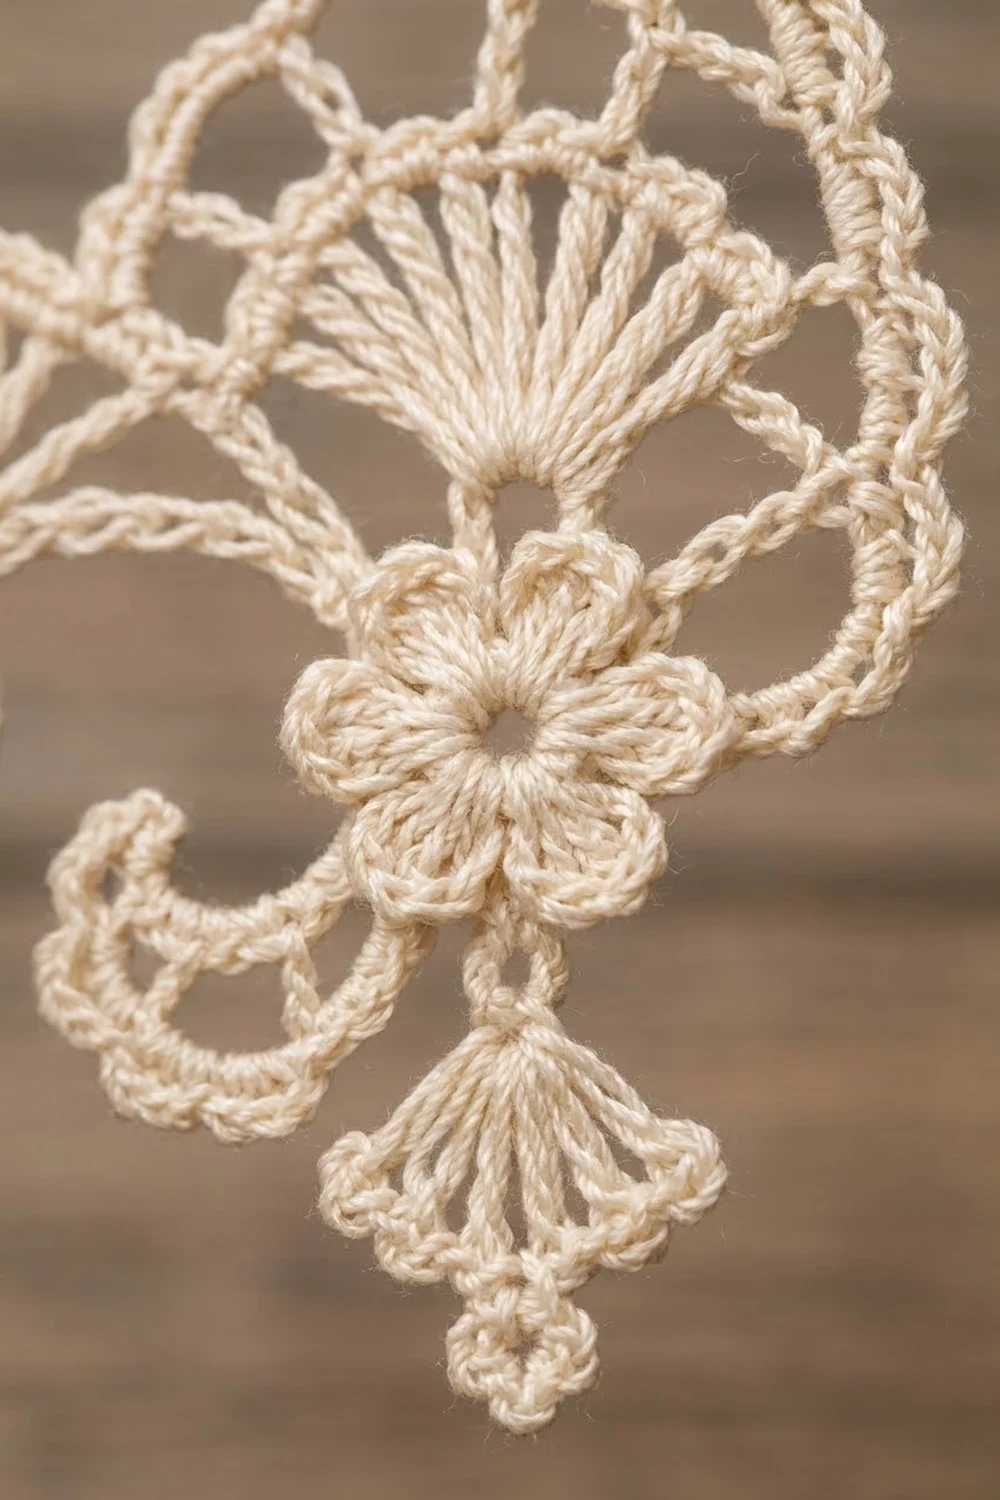
Flower (Make 4)
Ch 4, sl st in first ch to form a ring.
Round 1: Ch 1, 10 sc in ring, sl st in first sc. (10 sc)
Round 2: Ch 1, sc in next sc, (hdc, 2 dc, hdc) in next sc; rep from * 4 more times, sl st in first sc. (25 sts: 5 sc + 20 petal sts; 5 petals)*
Fasten off and leave a 6 in (15.2 cm) tail for sewing. The ch-4 ring makes the small open center you see in each flower.
Fan (Make 3)
Make an adjustable ring.
Row 1: Ch 3 (counts as dc), 8 dc in ring. Pull the ring tight but do not join, so the dc form a half circle. (9 dc)
Row 2: Ch 4 (counts as dc + ch 1), turn, dc in next dc, ch 1; rep from * 6 more times, dc in top of turning ch. (9 dc, 8 ch-1 sps)*
Row 3: Ch 1, turn, sc in first dc, (sc, picot, sc) in next ch-1 sp, sc in next dc; rep from * 7 more times. (25 sc, 8 picots)*
Check: 1 + (8 x 3) = 25 sc. Fasten off with a 6 in (15.2 cm) tail. The dc posts become the radiating spokes, and the picots form the scalloped top edge.
Petal Frame (Make 1)
Ch 60 and sl st in first ch to form a ring. Make sure the chain is not twisted.
Round 1: Ch 1, sc in each ch around, sl st in first sc. (60 sc)
Round 2: Ch 1, sc in next sc, ch 5, sk 3 sc; rep from * 14 more times, sl st in first sc. (15 sc, 15 ch-5 loops)*
Check: 15 repeats x 4 sts = 60 sts.
Round 3: Sl st into first ch-5 loop, ch 1, (3 sc, picot, 3 sc) in ch-5 loop; rep from * in each loop around, sl st in first sc. (90 sc, 15 picots)*
Fasten off with a 12 in (30.5 cm) tail. The frame is still a circle at this stage; blocking turns it into a teardrop. Mark the Round 1 join with a scrap of thread, because that point becomes the bottom of the teardrop.
Scroll (Make 2)
Ch 42.
Row 1: Sc in 2nd ch from hook and in each ch across. (41 sc)
Row 2: Ch 1, turn, sc in first sc, ch 5, sk 3 sc, sc in next sc; rep from * 9 more times. (11 sc, 10 ch-5 loops)*
Check: 1 + (10 x 4) = 41 sts.
Row 3: Ch 1, turn, (3 sc, picot, 3 sc) in next ch-5 loop; rep from * 9 more times. (60 sc, 10 picots)*
Fasten off with a 12 in (30.5 cm) tail. The outer edge is longer than the inner edge, so the strip bends into a curve on its own. Both scrolls are worked the same way. To get the mirror image, block the second scroll curling the other way.
Tendril (Make 2)
Ch 21.
Row 1: Sc in 2nd ch from hook and in next 9 ch, hdc in each of last 10 ch. (20 sts: 10 sc + 10 hdc)
Fasten off with a 6 in (15.2 cm) tail. The tendril is about 1.75 in (4.4 cm) long. The shorter sc end curls more tightly, which forms the small hooked curl.
Drop (Make 1)
Make an adjustable ring.
Row 1: Ch 3 (counts as dc), 6 dc in ring. Pull tight; do not join. (7 dc)
Row 2: Ch 1, turn, sc in first dc, ch 3, sc in next dc; rep from * 5 more times. (7 sc, 6 ch-3 loops)*
Fasten off. Rejoin the thread at the base of the ring. Bottom ring: Ch 5, sl st in first of these ch. Fasten off.
The drop measures 0.6 in (1.5 cm) wide and 0.75 in (1.9 cm) tall, including the ring.
Make All Pieces
All pieces are ivory. Make:
- Flowers: 4 (A in the petal, B and C in the scrolls, D at the center)
- Fans: 3 (A in the petal, B and C in the scrolls)
- Petal frame: 1
- Scrolls: 2
- Tendrils: 2
- Drop: 1
Block every piece flat before joining (see Final Blocking, steps 1-3). Flat pieces are much easier to sew.
Layout grid:
                  [Hanging loop]
                 [Petal frame]
                 [ Fan A     ]
                 [ Flower A  ]
[Scroll L        ]  [Flower D]  [        Scroll R]
[ Fan B, Flower B]              [Fan C, Flower C ]
       [Tendril L]   [Drop]   [Tendril R]
Joining
Tack all joins with the sewing tails and a needle, working on the wrong side. Take small stitches through the back loops or the sc posts only, so the joins stay hidden in the lace.
1. Fill the petal frame. Pin the frame into a teardrop with the Round 1 join at the bottom point. Place Fan A in the top of the teardrop with the scallops facing up, and tack 3 of the fan’s picots to 3 sc of Round 1 at the frame tip. Place Flower A below the fan. Tack the fan’s ring point to the flower’s top petal, then tack the flower’s two side petals to the inner sc edge of the frame.
2. Fill the scrolls. Pin each scroll into a C-curl with the inner sc edge facing in. Tack the scalloped edge of Fan B to sc 15-23 of Row 1, so the fan sits inside the curl. Tack Flower B in the center of the curl, touching the fan’s ring point. Repeat with Fan C and Flower C on the other scroll, curled in the opposite direction.
3. Center flower. Place Flower D below the point of the petal frame and tack its top petal to the frame’s bottom point. Tack sc 1 of each scroll’s Row 1 to the left and right petals of Flower D.
4. Tendrils and drop. Tack the hdc end of each tendril to one of the two lower petals of Flower D, so it curls outward and then back in. Tack the center sc of the drop’s Row 2 to the bottom of Flower D, between its two lower petals, with the ring hanging down.
Tension advice: Tack each contact point with 2-3 snug stitches, but never pull hard. Tight joins pucker the lace and keep it from lying flat.
Size checkpoint: The joined ornament should measure 4 in (10.2 cm) tall from the frame tip to the bottom ring, and 3.5 in (8.9 cm) wide across both scrolls. If the width is off, adjust the scroll curl first.
Border: Picot Edge and Hanging Loop
The outer border is already built into the frame (Rounds 2-3) and the scrolls (Rows 2-3). You do not work a separate round around the whole ornament. Check these counts before you join.
Border gauge: Each ch-5 loop with (3 sc, picot, 3 sc) covers 4 base sts and is about 0.55 in (1.4 cm) long.
Petal frame edge: 15 loops on 60 base sts, for a total of 90 sc and 15 picots. When the teardrop is pinned, that is 7 loops up each side plus 1 loop at the tip.
Each scroll edge: 10 loops on 41 base sts, for 60 sc and 10 picots along the outer curve. The inner edge stays at 41 sc.
Why the math works: Each loop puts 6 sc onto 4 base sts, so the outer edge is 1.5 times as long as the base. On the closed frame, the extra length ruffles slightly and then relaxes into a flat, rounded edge when blocked. On the open scroll strip, the outer edge has 60 sc and the inside has 41 sc. That is about 5.5 in (14.0 cm) outside against 3.75 in (9.5 cm) inside, and the difference pulls the strip into the C-curl.
Hanging loop: Join the thread with a sl st to the picot at the frame tip. Ch 30, then sl st in the same picot. Ch 1, work 40 sc over the chain loop and sl st to join. Fasten off and weave in. Covering the 30 ch with 40 sc makes the loop firmer without making it longer. The loop is 1.25 in (3.2 cm) tall when hanging.
Final Blocking
- Mix the fabric stiffener or starch as directed on the label. Dip the joined ornament and squeeze out the excess.
- Lay it right side up on the blocking board. Pin the frame tip first, then the bottom ring, 4 in (10.2 cm) apart.
- Pin the outer point of each scroll so the ornament is 3.5 in (8.9 cm) wide.
- Pin out every picot on the frame and scrolls. Start with one picot on each side and work outward, so the curve stays even.
- Open each fan so the spokes spread evenly. Pin the center of each flower so the open ring stays round.
- Shape the tendril curls with a pin inside each curl.
- Let it dry completely, about 12 hours. Remove the pins and lightly steam the loop if needed.
Final Quality-Control Checklist
- Flowers are 0.75 in (1.9 cm) across, each with 5 petals.
- Fans are 1 in (2.5 cm) wide, each with 9 spokes and 8 picots.
- The frame has 15 picots and each scroll has 10.
- The two scrolls curl in mirror image.
- The ornament is 4 in (10.2 cm) x 3.5 in (8.9 cm) and lies flat.
- No tacking stitches show from the front.
- The hanging loop is centered on the frame tip.
- All ends are woven in and trimmed close.
Troubleshooting
The scroll will not curl. Row 1 is probably too loose. Re-pin it with a tighter curve while it is wet, or remake Row 1 with a smaller hook.
The frame cups instead of lying flat. Round 1 is too tight. Remake it with looser sc, or block it wetter and stretch it gently.
The fan spokes lean to one side. Pull the adjustable ring tighter and pin each spoke straight while blocking.
The flower petals look uneven. Check that each petal is (hdc, 2 dc, hdc) worked into one sc, with 1 sc between petals.
The ornament looks crowded. Your parts are bigger than gauge. Remake the flowers and fans with a smaller hook so they fit inside the frames.
The ornament sags on the tree. Use a firmer stiffener or add a second coat.
Care
Hand wash gently in cool water with mild soap, then block and stiffen again. Store flat between sheets of tissue paper.
Final Notes
Every size in this pattern follows from one measurement. A 0.75 in (1.9 cm) flower confirms your gauge. At that gauge, the fans come out 1 in (2.5 cm) wide and the scroll base 3.75 in (9.5 cm) long. The picot edge curls the scrolls and rounds the frame. Joining and blocking set the ornament at 4 in (10.2 cm) x 3.5 in (8.9 cm), plus a 1.25 in (3.2 cm) loop. Check each stage and the finished ornament will match.
Happy crocheting!