

This little stocking is drawn in yarn rather than filled in. A solid cuff sits at the top, five rope-like cords form an open leg, and two round motifs make the heel and toe. The result is a light, graphic ornament that shows up clearly against a busy tree.
The sample is worked in a single deep cranberry red with a soft sheen. Using one color keeps the outline crisp and lets the texture do the work. You get smooth single crochet on the cuff, raised cords on the leg, and spoked double crochet centers on the circles.
The pattern uses US crochet terms. The finished ornament measures about 5.6 in (14.2 cm) tall without the loop and about 3.5 in (8.9 cm) wide across the foot. The hanging loop adds about 1.25 in (3.2 cm).
The construction is simple. You make the heel circle and the toe circle first, then the cuff with an edging round. With the circles pinned in place below the cuff, you work the leg cords and foot connectors straight into both, so there is no sewing. A small reinforced loop finishes the top.
Finished Size and Construction
- Finished size: 5.6 in (14.2 cm) tall x 3.5 in (8.9 cm) wide, plus a 1.25 in (3.2 cm) loop
- Skill level: Easy / advanced beginner
- Terminology: US crochet terms
- Yarn weight: DK (weight 3), cotton or cotton blend
- Hook: 3.5 mm (E/4)
- Number of pieces: 1 finished ornament, made from 3 components joined as you go
- Layout: cuff at the top, heel circle lower left, toe circle higher right, joined by 7 chain cords
- Component sizes: cuff 3.0 x 1.6 in (7.6 x 4.1 cm) with edging; heel 2.0 in (5.1 cm) across; toe 1.4 in (3.6 cm) across
- Cuff size before edging: 2.6 x 1.2 in (6.6 x 3.0 cm)
- Edging depth: 1 round of sc, about 0.2 in (0.5 cm)
Materials
Choose a smooth, firmly twisted DK cotton or mercerized cotton blend. Cotton holds a flat shape well and shows the cords clearly. Fuzzy or brushed yarns will blur the openwork outline.
- Cranberry red: 8 g, about 18 m
Tools:
- 3.5 mm (E/4) crochet hook
- Tapestry needle
- 2 locking stitch markers
- Rustproof pins and a foam blocking mat
- Spray bottle with clean water
- Optional: fabric stiffener for a firmer ornament
- Scissors and a ruler
The yarn amount includes about 25% extra for gauge swatching and weaving in ends. One 50 g ball makes about six ornaments.
Abbreviations (US Terms)
- ch: chain
- sl st: slip stitch
- sc: single crochet
- hdc: half double crochet
- dc: double crochet
- st(s): stitch(es)
- MR: magic ring
- RS: right side
Special technique (Cord): Ch the number given, then sl st into the named stitch of the circle. Turn and sl st into the back bump of each chain back to the cuff, ending with a sl st into the same cuff stitch you started from. Each cord is a chain backed by slip stitches, which gives the thick, rope-like look in the photo.
Gauge and Checkpoints
Gauge: 5 sc and 5 rows = 1 in (2.5 cm). Chains: 6 ch = 1 in (2.5 cm), worked at a relaxed tension.
Make the heel circle first and treat it as your swatch. It tells you everything you need to know before you start the cuff.
Checkpoints:
- Heel after Round 1: 0.8 in (2.0 cm) across
- Heel after Round 2: 1.6 in (4.1 cm) across
- Heel after Round 3: 2.0 in (5.1 cm) across
- Toe after Round 2: 1.4 in (3.6 cm) across
- Cuff after Row 6: 2.6 x 1.2 in (6.6 x 3.0 cm)
- Cuff after edging: 3.0 x 1.6 in (7.6 x 4.1 cm)
If your heel is larger than 2.0 in (5.1 cm), go down to a 3.25 mm hook. If it is smaller than about 1.9 in (4.8 cm), go up to a 3.75 mm hook. Small differences matter here, because the cord lengths are set to fit these exact circle sizes.
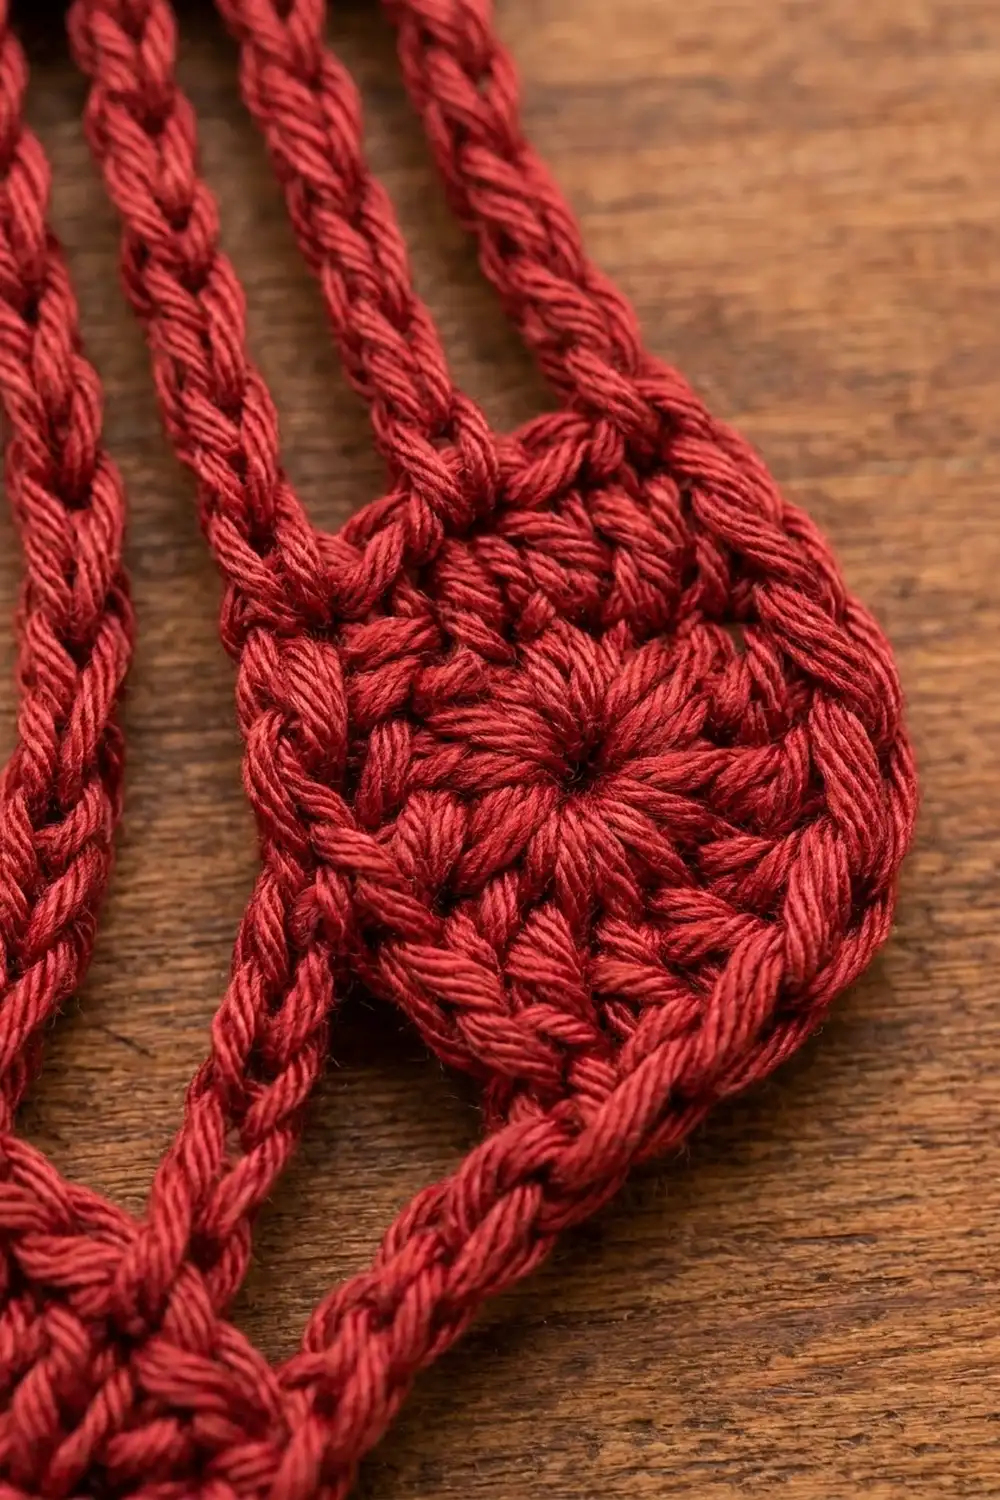
Heel Circle
Work in joined rounds with the RS facing. The beginning ch does not count as a stitch.
Round 1: MR, ch 2, 12 dc in ring, pull ring closed, sl st to first dc. (12 dc)
Round 2 (growth): Ch 2, 2 dc in each st around, sl st to first dc. (24 dc)
Round 3 (trim): Ch 1, sc in next st, 2 sc in next st; repeat from * around, sl st to first sc. (24 sc worked 1 per stitch + 12 extra sc = 36 sc)
Place a marker in the first sc of Round 3. This is stitch 1. Fasten off and weave in the tail.
Stitch positions: With the RS facing and stitch 1 at the top (12 o’clock), count clockwise. Each stitch covers 10 degrees, so each “hour” is 3 stitches.
- 12 o’clock = st 1
- 1 o’clock = st 4
- 2 o’clock = st 7
- 4 o’clock = st 13
- 11 o’clock = st 34
Toe Circle
Round 1: MR, ch 2, 12 dc in ring, pull ring closed, sl st to first dc. (12 dc)
Round 2 (growth): Ch 2, 2 hdc in each st around, sl st to first hdc. (24 hdc)
Place a marker in the first hdc of Round 2. This is stitch 1. Fasten off and weave in the tail.
Stitch positions: With the RS facing and stitch 1 at 12 o’clock, count clockwise. Each stitch covers 15 degrees, so each “hour” is 2 stitches.
- 12 o’clock = st 1
- 7 o’clock = st 15
- 8 o’clock = st 17
- 10 o’clock = st 21
The toe has no sc trim round. Its hdc edge is slightly softer, which lets it sit neatly beside the larger heel.
Cuff
Foundation: Ch 14.
Row 1: Sc in 2nd ch from hook and in each ch across, turn. (13 sc)
Rows 2–6: Ch 1, sc in each st across, turn. (13 sc)
Checkpoint: the cuff should measure 2.6 x 1.2 in (6.6 x 3.0 cm). Do not fasten off.
Cuff Edging (Border)
The edging uses the same gauge as the cuff: 5 sc = 1 in (2.5 cm). The corners are ch-1 spaces, and they are not included in the per-side counts below.
Edging Round: Ch 1 (first corner), do not turn. Working along the row ends, work 6 sc down the side, 1 sc in each row end. Ch 1 (corner). Working in the free loops of the foundation chain, sc in each of the 13 chains. Ch 1 (corner). Work 6 sc up the second side, 1 sc in each row end. Ch 1 (corner). Sc in each of the 13 sts across the top of Row 6. Sl st to the first ch-1 corner. Fasten off.
Counts per side:
- Side 1: 6 sc
- Bottom: 13 sc
- Side 2: 6 sc
- Top: 13 sc
- Total: 38 sc + 4 ch-1 corners
Why the math works: The cuff is 13 stitches across and 6 rows tall. One sc per stitch on the top and bottom gives 13 on each long side, and one sc per row end gives 6 on each short side. Nothing is added or skipped, so the cuff stays flat. The edging adds about 0.2 in (0.5 cm) on every side, taking the cuff from 2.6 x 1.2 in (6.6 x 3.0 cm) to 3.0 x 1.6 in (7.6 x 4.1 cm).
Lay the cuff RS up with the foundation edge at the bottom. Number the 13 bottom sc from left to right as B1 to B13. Number the 13 top sc from left to right as T1 to T13.
Positioning the Circles
Lay the cuff on a flat surface. Place each circle with its marked stitch 1 at the top:
- Heel: center 3.0 in (7.6 cm) below the cuff’s bottom edge, directly under B4. Its top sits 2.0 in (5.1 cm) below the cuff.
- Toe: center 2.0 in (5.1 cm) below the cuff’s bottom edge, directly under B13. Its top sits 1.3 in (3.3 cm) below the cuff.
The circles should almost touch, with about 0.3 in (0.8 cm) between them. Pin them to the surface or to a piece of cardboard so they stay put while you work.
Leg Cords
Work all five cords with one continuous strand, at the relaxed chain gauge of 6 ch = 1 in (2.5 cm).
Join yarn with a sl st in B1.
Cord 1 (back of leg): Ch 13, sl st in heel st 34 (11 o’clock), sl st back along the chain, sl st in B1. Length about 2.2 in (5.6 cm).
Sl st in B2, B3 and B4.
Cord 2: Ch 12, sl st in heel st 1 (12 o’clock), sl st back along the chain, sl st in B4. Length about 2.0 in (5.1 cm).
Sl st in B5, B6 and B7.
Cord 3: Ch 13, sl st in heel st 4 (1 o’clock), sl st back along the chain, sl st in B7. Length about 2.2 in (5.6 cm).
Sl st in B8, B9 and B10.
Cord 4: Ch 10, sl st in toe st 21 (10 o’clock), sl st back along the chain, sl st in B10. Length about 1.7 in (4.3 cm).
Sl st in B11, B12 and B13.
Cord 5 (front of leg): Ch 8, sl st in toe st 1 (12 o’clock), sl st back along the chain, sl st in B13. Length about 1.3 in (3.3 cm).
Fasten off. Count check: you should have 5 cords and 56 chains in total (13 + 12 + 13 + 10 + 8). The cords start 3 stitches apart, at B1, B4, B7, B10 and B13.
Foot Connectors
Instep: Join yarn with a sl st in heel st 7 (2 o’clock). Ch 2, sl st in toe st 17 (8 o’clock), sl st back along the 2 chains, sl st in heel st 7. Fasten off. Length about 0.3 in (0.8 cm).
Sole: Join yarn with a sl st in heel st 13 (4 o’clock). Ch 6, sl st in toe st 15 (7 o’clock), sl st back along the 6 chains, sl st in heel st 13. Fasten off. Length about 1.0 in (2.5 cm).
The sole cord curves gently upward from the heel to the toe and closes the bottom of the foot outline.
Hanging Loop
Join yarn with a sl st in T7, the center stitch of the top edge. Ch 16, then sl st in T7 to form the loop. Work 20 sc over the loop chain, then sl st in T7. Fasten off and weave in the end.
Covering the chain with sc makes the loop firm and matches the cords. The finished loop stands about 1.25 in (3.2 cm) above the cuff.
Final Blocking
- Weave in all ends along the back of the cords or into the circles. Never carry them across the open spaces.
- Lay the ornament RS up on the blocking mat.
- Check the layout against the positions above: heel top 2.0 in (5.1 cm) below the cuff, toe top 1.3 in (3.3 cm) below.
- Pin each cord straight, with one pin at each end.
- Pin each circle round, using 4 pins around its edge.
- Mist with water until damp, not soaked.
- For a stiffer ornament, brush on a thin coat of fabric stiffener instead of water.
- Let it dry completely before you unpin it, usually 4 to 6 hours.
Final Quality-Control Checklist
- The heel measures 2.0 in (5.1 cm) across and has 36 sc in its last round.
- The toe measures 1.4 in (3.6 cm) across and has 24 hdc.
- The cuff measures 3.0 x 1.6 in (7.6 x 4.1 cm), with 13/6/13/6 sc per side.
- Five leg cords start at B1, B4, B7, B10 and B13.
- The instep and sole connectors are both in place.
- The overall size is about 5.6 x 3.5 in (14.2 x 8.9 cm).
- The ornament lies flat with no cupping or rippling.
- The loop is centered over T7 and fully covered in sc.
- No tails show from the front.
Troubleshooting
Heel cups into a bowl: Round 3 is too tight. Rework it with a looser hand, or with a 3.75 mm hook for that round only.
Heel ruffles: The dc rounds are too loose. Go down a hook size for Rounds 1 and 2.
Cords sag or bow: Your chains are looser than 6 per inch. Remove 1 chain from each cord, or tighten your slip stitches on the way back.
Cords pull the circles out of place: Your chains are too tight. Add 1 chain to each cord, or work the chains with a larger hook.
Cuff edge flares: You may have worked more than 1 sc per row end. Recount: there should be 6 per short side.
Cords look thin: Make sure the return slip stitches go into the back bumps, not the top loops.
Ornament twists when hanging: Check that the loop is on T7, then block again.
Care
Hand wash in cool water, press the water out in a towel, and dry flat. If you used fabric stiffener, spot clean only and store the ornament flat between sheets of tissue paper.
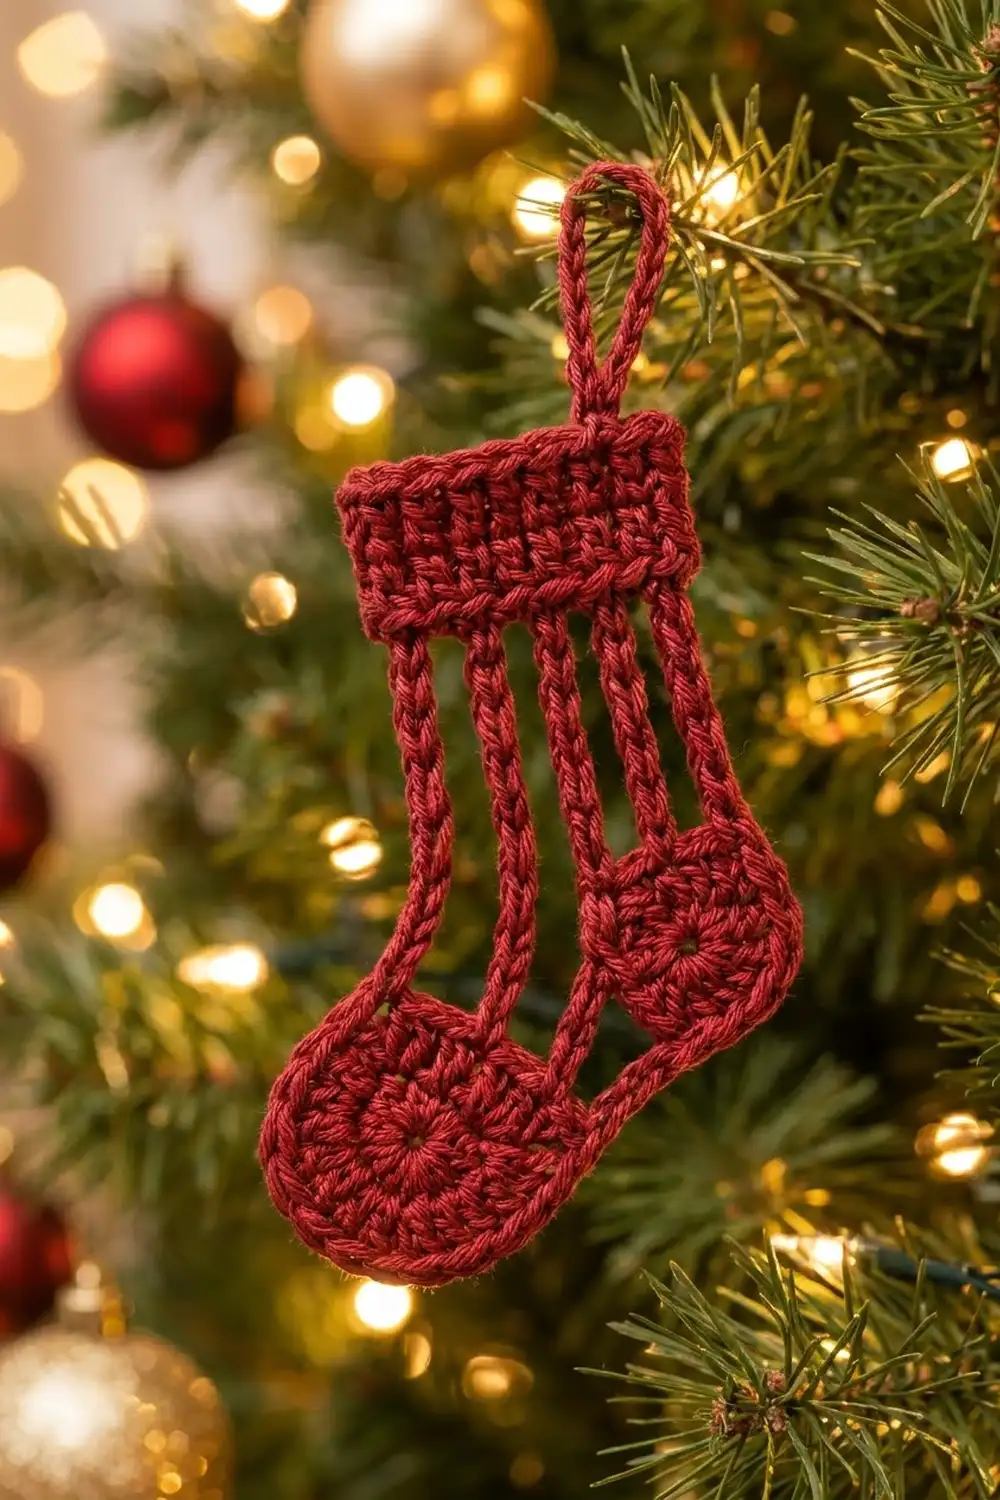
Final Notes
Each measurement in this pattern sets up the next one. The heel is the anchor: 36 sc and 2.0 in (5.1 cm) across. The toe follows at 24 hdc and 1.4 in (3.6 cm). The cuff is 13 sc by 6 rows, or 2.6 x 1.2 in (6.6 x 3.0 cm), and the edging brings it to 3.0 x 1.6 in (7.6 x 4.1 cm). The cords are sized to fit those pieces, from 1.3 in (3.3 cm) up to 2.2 in (5.6 cm). Together they make an ornament about 5.6 in (14.2 cm) tall and 3.5 in (8.9 cm) wide.
If your heel matches gauge, everything else falls into place. Make one, check it against the checklist, then make a whole set for the tree.
Happy crocheting!