

These curtain panels are made from square motifs. Each one has a raised rose in the center, set inside an open chain-loop mesh, so light comes through the gaps while the roses stand out from the surface. Hung at a window, the roses form neat vertical columns down each panel.
The whole pair is worked in one dusty rose-pink DK cotton. The single color keeps the look soft and vintage, and the texture of the layered petals does the decorating. The pattern uses US crochet terms throughout.
Each blocked panel measures 29.5 in x 86.25 in (74.9 cm x 219.1 cm). A pair covers a standard window with some gathering. If you need a different size, add or remove motif rows or columns.
Each motif is worked in the round: first the coiled center and three layers of petals, then three mesh rounds that turn the circle into a square. The motifs are joined as you go on their last round, 4 across and 12 down. A single-crochet border goes around each panel, and a solid header band is added across the top for clip rings.
Finished Size and Construction
- Finished panel size: 29.5 in x 86.25 in (74.9 cm x 219.1 cm)
- Skill level: Intermediate
- Terminology: US crochet terms
- Yarn weight: DK / light worsted (#3), cotton
- Hook: 4.0 mm (US G-6)
- Number of pieces: 2 panels, each made of 48 motifs (96 motifs total)
- Layout: 4 motifs wide x 12 motifs long per panel
- Motif size: 7 in (17.8 cm) square, blocked
- Panel size before border: 28 in x 84 in (71.1 cm x 213.4 cm)
- Border depth: 0.75 in (1.9 cm) on the sides and bottom; 1.5 in (3.8 cm) at the top, including the header
Materials
Yarn: Choose a smooth, mercerized or combed DK cotton of about 115 m per 50 g. Cotton holds the petals’ shape, hangs straight, and blocks crisply. Avoid fuzzy blends, because they hide the stitch definition of the rose.
- Dusty Rose: 1,300 g (about 2,990 m), which is 26 balls of 50 g
The quantity includes a margin of about 10% for swatching, joins, and weaving in ends. Buy all of it from the same dye lot.
Tools:
– 4.0 mm (US G-6) crochet hook
– Tapestry needle
– Stitch markers
– Rust-proof pins and blocking mats
– Spray bottle
– Measuring tape
– 20 curtain clip rings (10 per panel)
Abbreviations (US Terms)
- ch – chain
- sl st – slip stitch
- sc – single crochet
- hdc – half double crochet
- dc – double crochet
- tr – treble crochet
- sp – space
- st(s) – stitch(es)
- MR – magic ring
- RS – right side
Special stitch:
– bpsc (back post single crochet): Working from the back of the work, insert the hook from back to front to back around the post of the stitch indicated, yarn over, pull up a loop, then yarn over and pull through both loops. This places each new loop ring behind the petals just made.
Gauge and Checkpoints
Make one complete motif and block it before starting any panel. All later measurements depend on it.
- After Rnd 7 (outer petals): the rose measures 4 in (10.2 cm) across.
- After Rnd 9: the mesh circle measures about 5 in (12.7 cm) across.
- After Rnd 10: the motif is a 6 in (15.2 cm) square.
- After Rnd 11, blocked: the motif is a 7 in (17.8 cm) square.
- Weight: one motif weighs about 11 g.
Border gauge: about 19½ sc = 4 in (10.2 cm), or 34 sc along one 7 in (17.8 cm) motif side.
If your motif is more than ¼ in (0.6 cm) too big, go down half a hook size. If it is more than ¼ in (0.6 cm) too small, go up half a size. A difference of ¼ in per motif becomes 3 in (7.6 cm) over the 12 motifs of the panel length, so the check is worth doing.
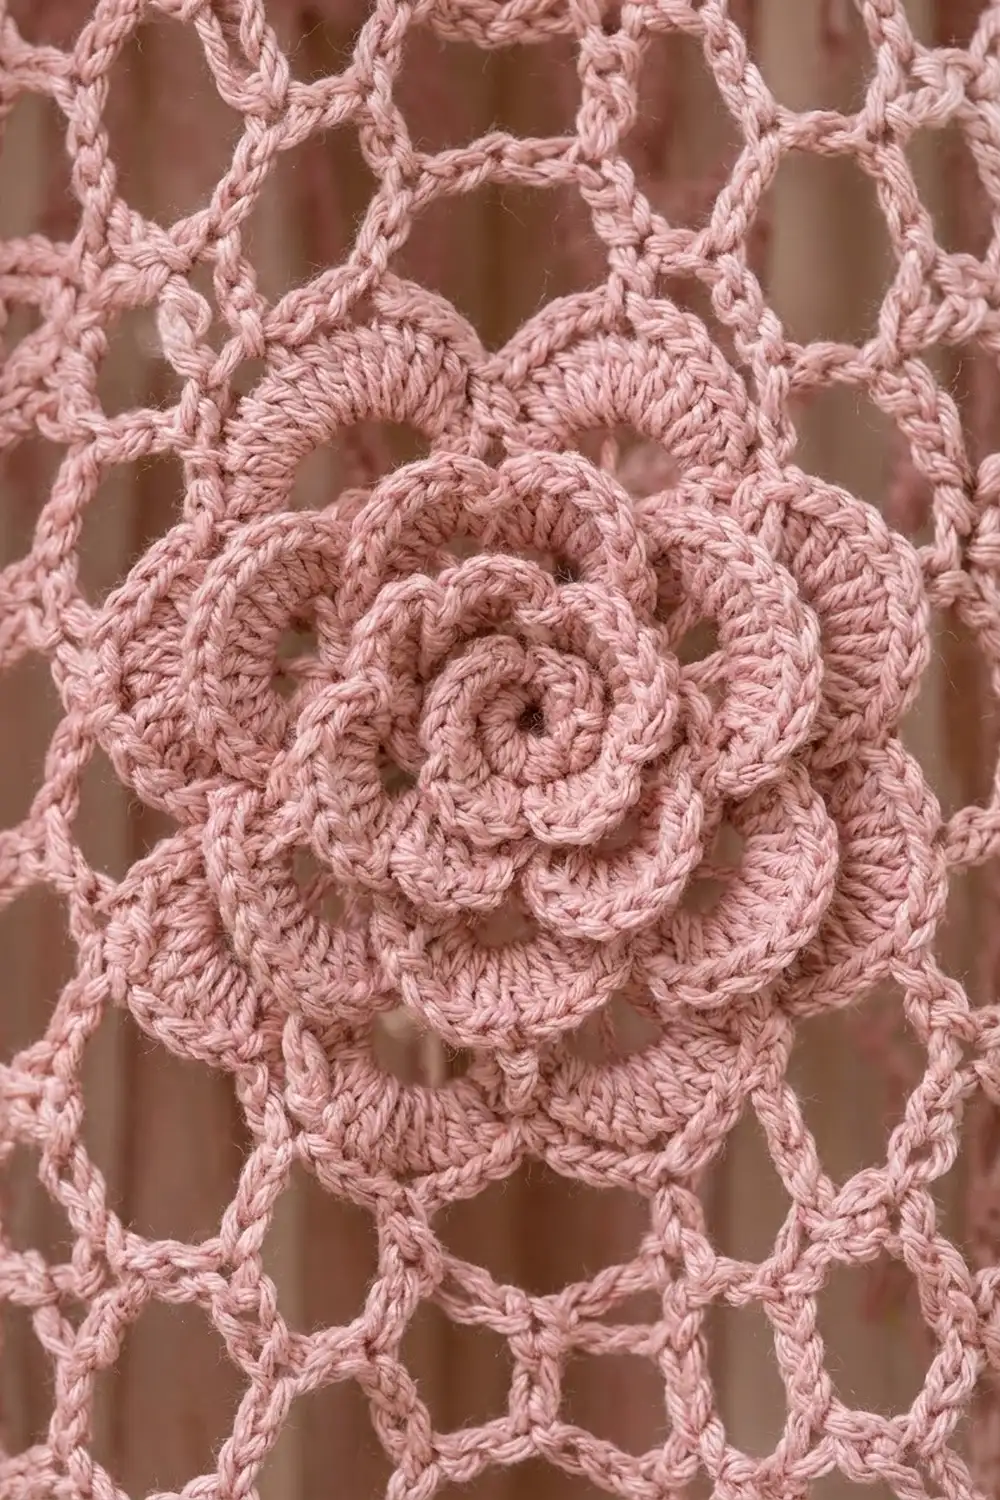
Rose Motif
The Rose
Rnd 1: MR, ch 1, 8 sc in ring, sl st to first sc. (8 sc)
Rnd 2: Ch 1, sc in next sc, ch 3; rep from * 8 times total, sl st to first sc. (8 sc, 8 ch-3 sps)
Rnd 3 (inner petals): In each ch-3 sp work (sc, hdc, 2 dc, hdc, sc). Sl st to first sc. (8 petals, 6 sts each = 48 sts)
Rnd 4: Fold the petals forward. Bpsc around next Rnd 2 sc, ch 4; rep from * 8 times total, sl st to first bpsc. (8 ch-4 sps)
Rnd 5 (middle petals): In each ch-4 sp work (sc, hdc, 3 dc, hdc, sc). Sl st to first sc. (8 petals, 7 sts each = 56 sts)
Rnd 6: Bpsc around next Rnd 4 bpsc, ch 5; rep from * 8 times total, sl st to first bpsc. (8 ch-5 sps)
Rnd 7 (outer petals): In each ch-5 sp work (sc, hdc, 2 dc, tr, 2 dc, hdc, sc). Sl st to first sc. (8 petals, 9 sts each = 72 sts)
Checkpoint: the rose should be 4 in (10.2 cm) across.
Rnd 8: Bpsc around next Rnd 6 bpsc, ch 6; rep from * 8 times total, sl st to first bpsc. (8 ch-6 sps)
Spiral center coil: With a separate length of yarn, ch 16. Work 3 hdc in 2nd ch from hook and in each ch across. (45 hdc) The strip twists into a corkscrew on its own. Coil it tightly into a spiral about 1 in (2.5 cm) across and sew it into the center of Rnd 1, using the tail to tack each turn in place.
The Mesh Frame
Rnd 9 (conversion round): Sl st into first ch-6 sp, ch 1. (Sc, ch 5, sc) in ch-6 sp, ch 5; rep from * 8 times total, sl st to first sc.
Count: (8 loops worked inside the existing ch-6 sps) + (8 extra loops bridging between them) = 16 ch-5 loops.
Rnd 10 (squaring round): Sl st to center of first loop, ch 1. (Sc, ch 7, sc) in this loop for the corner, ch 5, [sc in next loop, ch 5] 3 times; rep from * 4 times total, sl st to first sc.
Count: (16 ch-5 loops, one following each existing loop) + (4 extra ch-7 corner loops) = 20 loops. That is 4 ch-5 loops per side plus 4 corners.
Checkpoint: the square measures 6 in (15.2 cm).
Rnd 11 (final round / joining round): Sl st to center of first ch-7 corner sp, ch 1. (Sc, ch 7, sc) in corner sp, [ch 5, sc in next ch-5 loop] 4 times, ch 5; rep from * 4 times total, sl st to first sc. Fasten off.
Count: (20 loops worked one per existing loop: 16 ch-5 + 4 ch-7) + (4 extra ch-5 loops, one per side) = 24 loops. That is 5 ch-5 loops per side plus 4 ch-7 corners.
Each side of the motif is now: half of a corner loop, 5 ch-5 loops, half of a corner loop. Block the test motif to 7 in (17.8 cm).
Make All Pieces
Make the first motif complete through Rnd 11. Every later motif is worked through Rnd 10 and then joined on Rnd 11.
- Per panel: 48 motifs (about 528 g)
- Pair total: 96 motifs, all in Dusty Rose
Panel layout, 4 columns x 12 rows (row 1 at the top):
Row 1:   [R][R][R][R]
Row 2:   [R][R][R][R]
Row 3:   [R][R][R][R]
 ...      (repeat)
Row 12:  [R][R][R][R]
Each R is one rose motif. Work across Row 1 from right to left, then join each row of four to the row above.
Joining (Join-As-You-Go)
Work Rnd 11 of the new motif as written until you reach a side that sits next to a finished motif. Then swap in the joins below.
- Corner join: In place of ch 7, work ch 3, sl st into the neighbor’s ch-7 corner sp, ch 3.
- Side loop join: In place of each ch 5, work ch 2, sl st into the neighbor’s matching ch-5 loop, ch 2.
Each side has exactly 5 ch-5 loops, so the loops match one to one: loop 1 to loop 1, through to loop 5. No loop is skipped or doubled.
Four-way corners: Where four motifs meet, sl st into the sl st of the earlier diagonal join, not into the corner space. This keeps all four corners on one point.
Tension: Keep the joining chains as loose as your normal chains. If they are tight, the seams pucker and the mesh looks uneven. Leave the work flat on a table while you join so you don’t twist it.
Size checkpoint: After Row 2, the joined strip should measure 28 in x 14 in (71.1 cm x 35.6 cm) when lightly stretched. The completed motif grid should measure 28 in x 84 in (71.1 cm x 213.4 cm).
Border
The border uses the gauge of 34 sc per 7 in (17.8 cm) motif side.
How one motif side is counted: 2 sc in the corner half-loop at the start, 6 sc in each of the 5 ch-5 loops (30 sc), and 2 sc in the corner half-loop at the end, for 34 sc. Those 34 sc already include the corner stitches at both ends.
Where two motifs meet along the edge, their corner loops are joined in the middle. Each motif’s half-loop gets its own 2 sc, so the seam gets 4 sc in total, and those are already included in each motif’s 34. Nothing extra is added at a seam.
Rnd 1: With RS facing, join yarn in the top-right corner ch-7 sp. Ch 1. Work 2 sc in the corner sp, then sc along each side as described above. At each of the 4 panel corners, work (2 sc, ch 2, 2 sc) in the unjoined ch-7 sp. The 2 sc on either side of the ch-2 belong to the motif sides next to them. Sl st to first sc.
- Top and bottom: 4 motifs x 34 = 136 sc each
- Left and right sides: 12 motifs x 34 = 408 sc each
- Total: 1,088 sc plus 4 ch-2 corner sps
Rnd 2: Ch 1, sc in each sc, and (sc, ch 2, sc) in each corner ch-2 sp. Sl st to first sc.
- Top and bottom: 138 sc each; sides: 410 sc each. (1,096 sc)
Rnd 3: Repeat Rnd 2.
- Top and bottom: 140 sc each; sides: 412 sc each. (1,104 sc) Fasten off.
The panel now measures 29.5 in x 85.5 in (74.9 cm x 217.2 cm).
Why the math works: 136 sc across 28 in (71.1 cm) is the same as 34 sc per 7 in (17.8 cm), which matches the border gauge. The edge therefore lies flat without ruffling or pulling in. The 2 sc added per corner on each round let the border turn the corner smoothly.
Header Band
Work into the 140 sc along the top edge only. Skip the corner sps.
Row 1 (RS): Join yarn in the first sc after the top-right corner sp. Ch 3 (counts as dc), dc in each sc across. (140 dc) Turn.
Row 2: Ch 1, sc in each st across. (140 sc) Fasten off.
The header adds 0.75 in (1.9 cm). The total top band is 1.5 in (3.8 cm), and the finished panel is 29.5 in x 86.25 in (74.9 cm x 219.1 cm).
Make the second panel the same way.
Final Blocking
- Weave in all ends along the mesh chains, splitting the plies so the ends stay hidden.
- Soak each panel in lukewarm water for 15 minutes, then press the water out gently. Do not wring.
- Roll the panel in towels to remove excess moisture.
- Lay it flat on mats and pin it to 29.5 in x 86.25 in (74.9 cm x 219.1 cm).
- Pin the mesh in straight lines, with every corner join on a square grid.
- Puff each rose up with your fingertips so the petal layers stand apart.
- Leave it to dry completely, which takes 24–48 hours.
Final Quality-Control Checklist
- Each panel has 48 motifs, arranged 4 x 12.
- Every motif side has 5 joined loops, with none missed.
- All four-way corners share a single join point.
- Every spiral coil is sewn down securely.
- Border Rnd 3 counts are 140 / 412 / 140 / 412.
- The header has 140 sc.
- Both panels match in size within ½ in (1.3 cm).
Troubleshooting
- Petals lie flat and the layers merge: Make sure each bpsc goes around the correct post, behind the petals. Working into the front pushes the layers together.
- Motif cups: Your chain loops are too short. Chain more loosely, or go up half a hook size.
- Motif ruffles: Your chains are too loose. Tighten them or go down half a size.
- Border waves: You have worked too many sc into some loops. Recount to 34 per motif side.
- Border pulls in: You have too few sc, usually missing the 2 sc in a seam half-loop.
- Panel leans after hanging: Re-block it, and pin the vertical columns straight.
- Coil unwinds: Tack every turn of the spiral, not just its outer edge.
Care
Hand wash cool or machine wash on a gentle cycle in a mesh bag. Reshape while damp and dry flat; never tumble dry, because the weight of wet cotton stretches the mesh.

Final Notes
Everything depends on the measurement chain. The rose is 4 in (10.2 cm), the blocked motif is 7 in (17.8 cm), and the motif grid is 28 in x 84 in (71.1 cm x 213.4 cm). Each motif side takes 34 border sc. The border brings the panel to 29.5 in x 85.5 in (74.9 cm x 217.2 cm), and the header finishes it at 29.5 in x 86.25 in (74.9 cm x 219.1 cm). If your first motif is correct, the whole pair will come out correct.
Clip 10 rings to each header, spaced about 3¼ in (8.3 cm) apart.
Happy crocheting!