

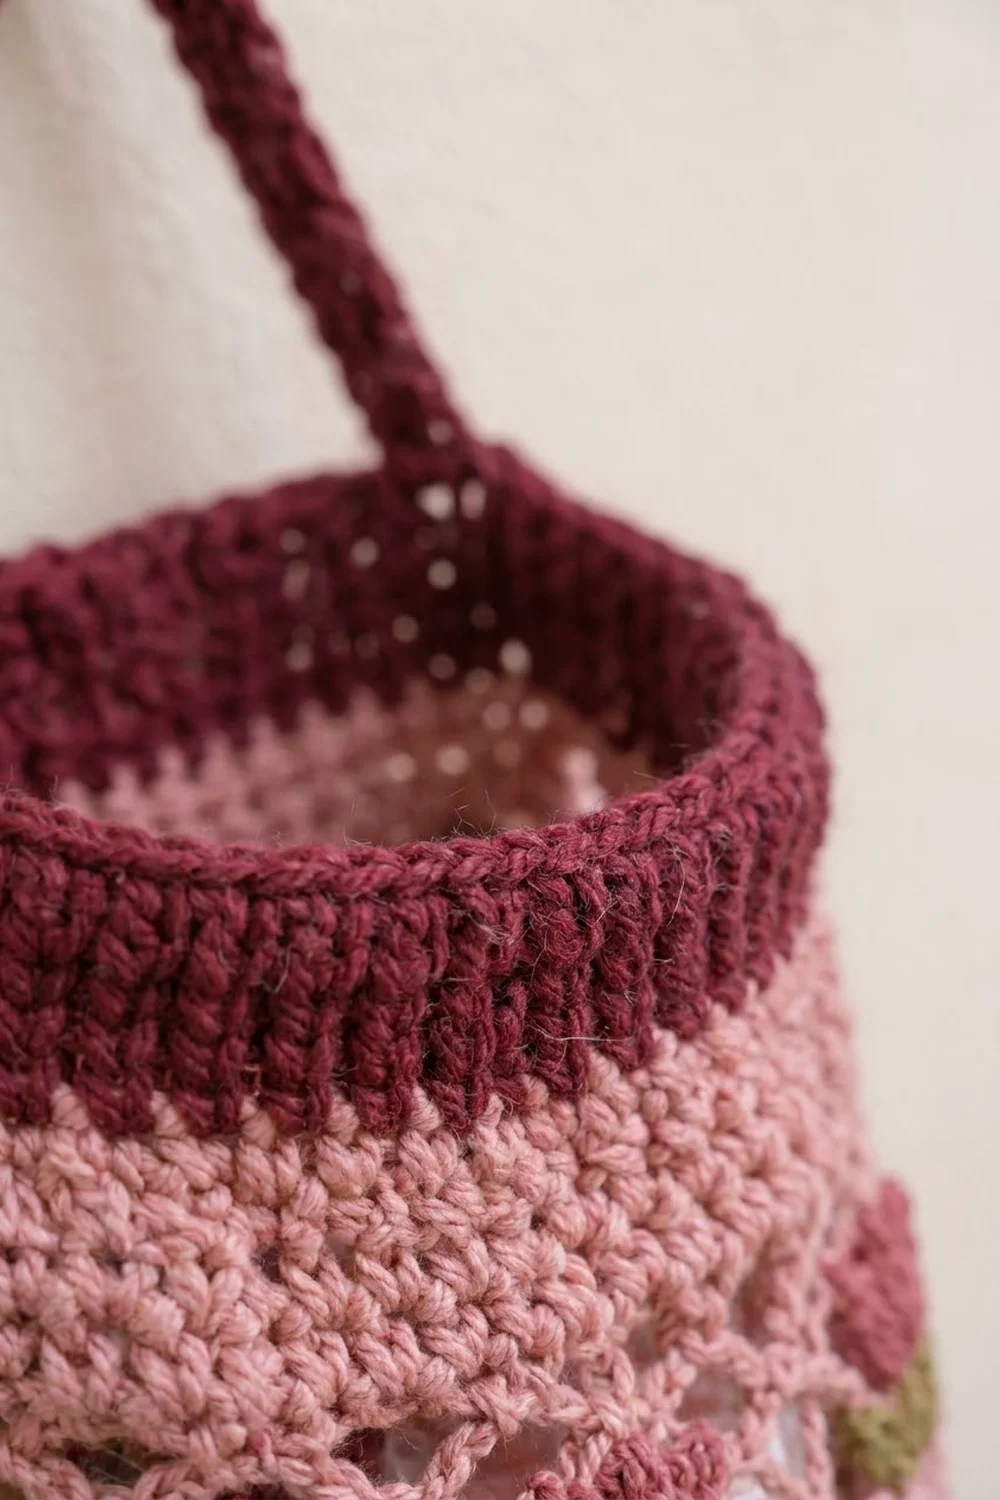
This tulip bag holder is a long, egg-shaped tube in dusty pink cotton. It has three bands of open diamond mesh, and each band carries a row of raised rose tulips with small green leaves. Deep burgundy rims finish the wide top opening and the narrow bottom opening, and a burgundy strap hangs it from a hook.
You stuff plastic bags in through the top and pull them out one at a time through the bottom. The mesh bands let the bags show through softly, so the holder looks light and lacy even when it’s full. It suits a cottage kitchen and is a quick, satisfying make.
The pattern uses US crochet terms. The finished body is 8 in (20.3 cm) wide when laid flat at its widest point and 18.6 in (47.2 cm) long. The strap adds an 8 in (20.3 cm) loop, so the total hanging length is 26.6 in (67.6 cm).
The holder is one single piece worked from the bottom up in joined rounds. You start with the burgundy bottom rim, increase out to full width in pink, and then work three tulip lattice bands separated by solid single crochet bands. After decreasing toward the top, you add the burgundy top rim, the strap and a slip-stitch edging. Last, you embroider the green leaves.
Finished Size and Construction
- Finished size: 8 in (20.3 cm) wide flat × 18.6 in (47.2 cm) long, plus an 8 in (20.3 cm) strap
- Skill level: Easy-intermediate
- Terminology: US
- Yarn weight: Worsted (#4) cotton
- Hook: 4.5 mm (US 7)
- Number of pieces: 1
- Layout: One seamless tube, open at both ends
- Piece size: 64 sts around at the widest point = 16 in (40.6 cm) circumference
- Size before border: 8 in × 17.0 in (20.3 × 43.2 cm) after Rnd 61
- Border depth: 1.6 in (4.1 cm) top rim, plus a slip-stitch edging
Materials
Pick a smooth worsted-weight cotton or cotton blend. Cotton holds its shape on a hook and doesn’t stretch out under the weight of the bags. Acrylic will also work, but the mesh will sag a little more.
- Pink (main color): 100 g, about 160 m
- Burgundy (rims and strap): 30 g, about 48 m
- Rose (tulip blooms): 10 g, about 16 m
- Green (leaves): 10 g, about 16 m
Tools:
- 4.5 mm (US 7) crochet hook
- Tapestry needle
- 4 stitch markers
- Measuring tape
- Scissors
- A rolled towel or a 2 L soda bottle for blocking
These amounts include a margin of about 25 percent for swatching and tails.
Abbreviations (US Terms)
- ch – chain
- sc – single crochet
- dc – double crochet
- sl st – slip stitch
- st(s) – stitch(es)
- sk – skip
- sc2tog – single crochet 2 together
- inc – 2 sc in the same stitch
- rnd(s) – round(s)
- RS / WS – right side / wrong side
Tulip Popcorn (TP): With rose, work 4 dc in the indicated st. Remove the hook from the loop, insert the hook from front to back through the top of the first dc, catch the dropped loop and pull it through. Ch 1 with pink to close. The closing ch does not count as a stitch, and the popcorn counts as 1 st. Worked with the RS facing, the popcorn pushes forward and makes a rounded bloom.
Round notes: Every rnd is joined with a sl st to the first st. Beginning ch 1 does not count as a st. Keep the RS facing out the whole time. To change color, work the joining sl st of the old rnd with the new color.
Gauge and Checkpoints
Gauge: 16 sc and 18 rnds = 4 in (10.2 cm) in sc worked in the round.
The pattern only has one piece, so the bottom of that piece is your test. Work Rnds 1–13, then check before going further. Mesh rounds are measured as a unit: one 8-rnd tulip band is about 2.9 in (7.4 cm) tall.
Checkpoints (length from the bottom edge, laid flat):
- After Rnd 4: 0.9 in (2.3 cm); flat width 4 in (10.2 cm)
- After Rnd 13: 2.9 in (7.4 cm); flat width 8 in (20.3 cm)
- After Rnd 21: 5.8 in (14.7 cm)
- After Rnd 29: 7.6 in (19.3 cm)
- After Rnd 37: 10.5 in (26.7 cm)
- After Rnd 45: 12.3 in (31.2 cm)
- After Rnd 53: 15.2 in (38.6 cm)
- After Rnd 61: 17.0 in (43.2 cm); flat width 6 in (15.2 cm)
- After Rnd 68: 18.6 in (47.2 cm)
If your work is too big (Rnd 13 is wider than 8 in / 20.3 cm), go down to a 4 mm hook. If it is too small, go up to a 5 mm hook. Width matters more than length. If only your round height is off, you can add or remove a round in a solid sc band.
Bottom Rim and Lower Taper
With burgundy, ch 32. Join with a sl st to the first ch to form a ring, taking care not to twist the chain.
Rnd 1: Ch 1, sc in each ch around, join. (32 sts)
Rnds 2–4: Ch 1, sc in each st around, join. (32 sts each)
The opening now measures 8 in (20.3 cm) around, or 4 in (10.2 cm) flat. Change to pink on the final join.
Rnd 5: Ch 1, sc in next 3 sts, inc in next st 8 times, join. (40 sts)
Rnd 6: Ch 1, sc in each st around, join. (40 sts)
Rnd 7: Ch 1, sc in next 4 sts, inc in next st 8 times, join. (48 sts)
Rnd 8: Ch 1, sc in each st around, join. (48 sts)
Rnd 9: Ch 1, sc in next 5 sts, inc in next st 8 times, join. (56 sts)
Rnd 10: Ch 1, sc in each st around, join. (56 sts)
Rnd 11: Ch 1, sc in next 6 sts, inc in next st 8 times, join. (64 sts)
Rnds 12–13: Ch 1, sc in each st around, join. (64 sts each)
Spacing the increases every other round makes the soft, rounded egg shape at the bottom.
Tulip Lattice Band
You’ll work this 8-round band three times. It starts and ends with 64 sts. The rounds below are numbered B1–B8.
B1 (mesh): Ch 1, sc in first st, ch 5, sk 3 sts, sc in next st 15 times, ch 2, sk 3 sts, dc in first sc. (16 loops; the ch 2 + dc makes the last loop and leaves your hook at its center)
B2 (mesh): Ch 1, sc around the post of the dc just made, ch 5, sc in next ch-5 loop 15 times, ch 5, join to first sc. (16 sc, 16 ch-5 loops)
The loops of B2 sit offset from those of B1, which makes the diamond lattice.
B3 (conversion): Ch 1, sc in same st as join, 3 sc in next ch-5 loop, sc in next sc, 3 sc in next ch-5 loop 15 times, join. (16 sc worked 1-per-existing-sc + 48 sc worked into loops = 64 sts)
B4 (tulip round): Ch 1, with pink sc in next 2 sts, TP in next st, with pink sc in next 5 sts 8 times, join. (64 sts: 56 sc + 8 popcorns)
Carry the unused color loosely along the inside of the tube and catch it under a stitch every 3 or 4 sts. Each popcorn sits right above the center of a B2 loop, with 2 in (5.1 cm) between blooms. Fasten off rose at the end of the round.
B5: Ch 1, sc in each st around (work into the top of each popcorn, not the closing ch), join. (64 sts)
B6 (mesh): Work as B1. (16 loops)
B7 (mesh): Work as B2. (16 sc, 16 ch-5 loops)
B8 (conversion): Work as B3. (16 + 48 = 64 sts)
Body Assembly Order
Rnds 14–21: Work the Tulip Lattice Band (B1–B8). (64 sts)
Rnds 22–29: Ch 1, sc in each st around, join. (64 sts each)
Rnds 30–37: Work the Tulip Lattice Band. (64 sts)
Rnds 38–45: Ch 1, sc in each st around, join. (64 sts each)
Rnds 46–53: Work the Tulip Lattice Band. (64 sts)
Upper Taper
Rnd 54: Ch 1, sc in each st around, join. (64 sts)
Rnd 55: Ch 1, sc in next 6 sts, sc2tog 8 times, join. (56 sts)
Rnds 56–57: Ch 1, sc in each st around, join. (56 sts each)
Rnd 58: Ch 1, sc in next 5 sts, sc2tog 8 times, join. (48 sts)
Rnds 59–61: Ch 1, sc in each st around, join. (48 sts each)
The top opening now measures 12 in (30.5 cm) around, or 6 in (15.2 cm) flat. That’s narrower than the middle, which lets the top cuff gather in slightly as it does in the finished piece.
Leaf Embroidery
With green and a tapestry needle, work on the B3 round right below each popcorn. Make one straight stitch from the base of the bloom down through B3 for the stem. Then work one lazy-daisy stitch angled out to the left and one angled out to the right for the two leaves, each about 0.5 in (1.3 cm) long. Weave the tails in on the inside. You will have 24 tulips in total.
Border: Top Rim, Strap and Edging
Border gauge: The rim stays at the body gauge of 16 sc = 4 in (10.2 cm). The edging uses 1 sl st per stitch or per row end, so it adds no extra width.
Top rim: Change to burgundy on the Rnd 61 join.
Rnds 62–68: Ch 1, sc in each st around, join. (48 sts each: 24 per side when flat)
Seven rounds give a 1.6 in (4.1 cm) rim. Fasten off.
Strap: Flatten the holder so that the round join sits on one side fold. St 1 of Rnd 68 is at that fold, and st 25 is at the opposite fold.
Row 1: Join burgundy in st 47. Ch 1, sc in sts 47, 48, 1, 2 and 3, turn. (5 sts, centered on st 1)
Rows 2–36: Ch 1, sc in each st across, turn. (5 sts each)
The strap is 1.25 in (3.2 cm) wide and 8 in (20.3 cm) long. Check that it isn’t twisted, then hold the last row against the inside of the rim at sts 23–27, which are centered on st 25. Sl st through both layers 5 times. Fasten off.
Strap edging: Join burgundy at any row end. Sl st in each row end along one long side (36 sl sts). Fasten off, then repeat on the other side (36 sl sts).
Top edging: Sl st in each st of Rnd 68 that the strap doesn’t cover: sts 4–22 on one side (19 sl sts) and sts 28–46 on the other (19 sl sts). That’s 38 in total. Fasten off.
Bottom edging: Join burgundy to the free loops of the starting chain. Sl st in each loop around (32 sl sts, 16 per side flat), then join.
Why the math works: The rim is 48 sts, the same as Rnd 61, so it doesn’t flare or pull in. The two strap bases use 5 + 5 = 10 sts, and 38 + 10 = 48, so every rim stitch is either part of the strap or gets edged once. The bottom edging matches the 32-ch foundation exactly.
Final Blocking
- Weave in all remaining ends on the inside, following the stitch direction.
- Soak the holder in cool water for 10 minutes, then gently press out the water. Don’t wring it.
- Roll it in a towel to take out more moisture.
- Slide a rolled towel or a 2 L bottle inside so the body fills out to 8 in (20.3 cm) flat at the widest point.
- Gently open each mesh band so the diamonds look even, and push each tulip forward.
- Pin the strap flat at 8 in (20.3 cm) long.
- Let it dry completely before hanging.
Final Quality-Control Checklist
- The body is 8 in (20.3 cm) wide flat and 18.6 in (47.2 cm) long.
- The bottom opening is 4 in (10.2 cm) flat, and the top opening is 6 in (15.2 cm) flat.
- Each band has 8 tulips spaced evenly, for 24 in total.
- Every tulip sits above a mesh loop center and has a stem and two leaves.
- The diamonds are even all the way around.
- The strap isn’t twisted and its ends sit on opposite folds.
- No color floats show from the outside.
- All ends are secured.
Troubleshooting
Mesh bands flare out: Your ch-5 loops are too loose. Try ch 4 instead, or chain more tightly.
Mesh bands pull in: Use ch 6, or loosen your chains.
Popcorns pop toward the inside: You may have the WS facing. Turn the tube so the RS faces out, and insert the hook from front to back when closing the popcorn.
Wrong stitch count after B3: Check that you worked exactly 3 sc in every loop and 1 sc in every sc.
Tulips drift sideways from band to band: The joins may be wandering. Mark st 1 of each round.
Strap stretches: Work it with a 4 mm hook and tighter tension.
Care
Hand wash in cool water and lay flat to dry, reshaping over a rolled towel. Don’t tumble dry, because the strap and mesh can stretch.

Final Notes
The whole holder follows one measurement chain. With 16 sc to 4 in (10.2 cm), 32 sts make the 4 in (10.2 cm) bottom opening, 64 sts make the 8 in (20.3 cm) body and 48 sts make the 6 in (15.2 cm) top. Three 2.9 in (7.4 cm) tulip bands and the solid bands between them bring the body to 18.6 in (47.2 cm), and the 8 in (20.3 cm) strap finishes it. If you match your gauge at Rnd 13, every later count will fall into place.
Happy crocheting!