

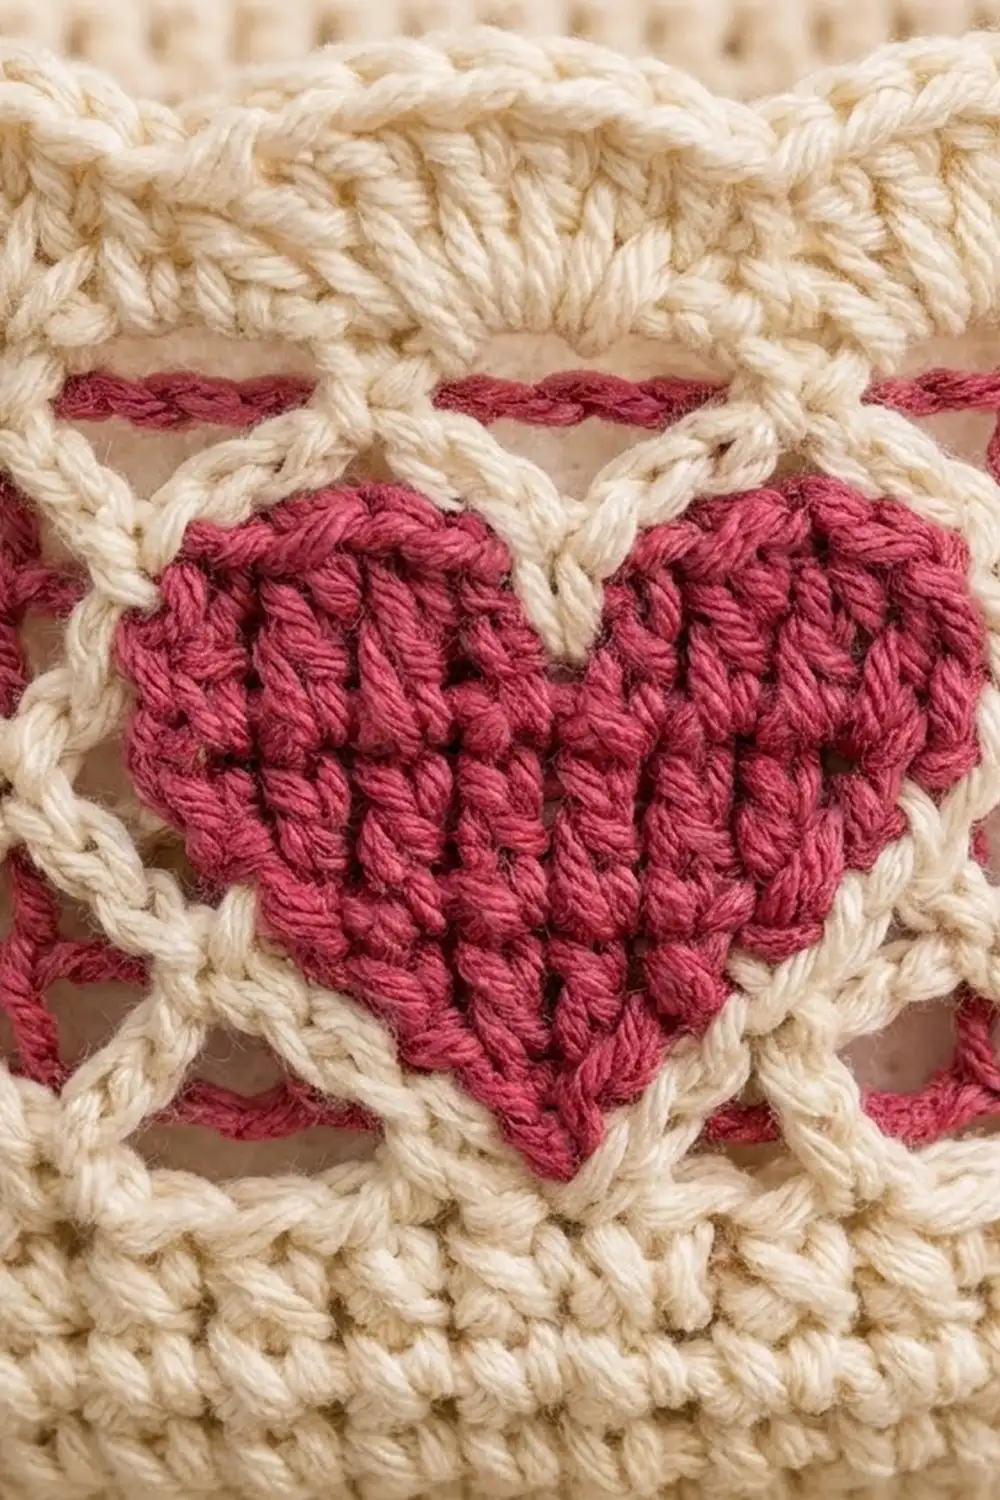
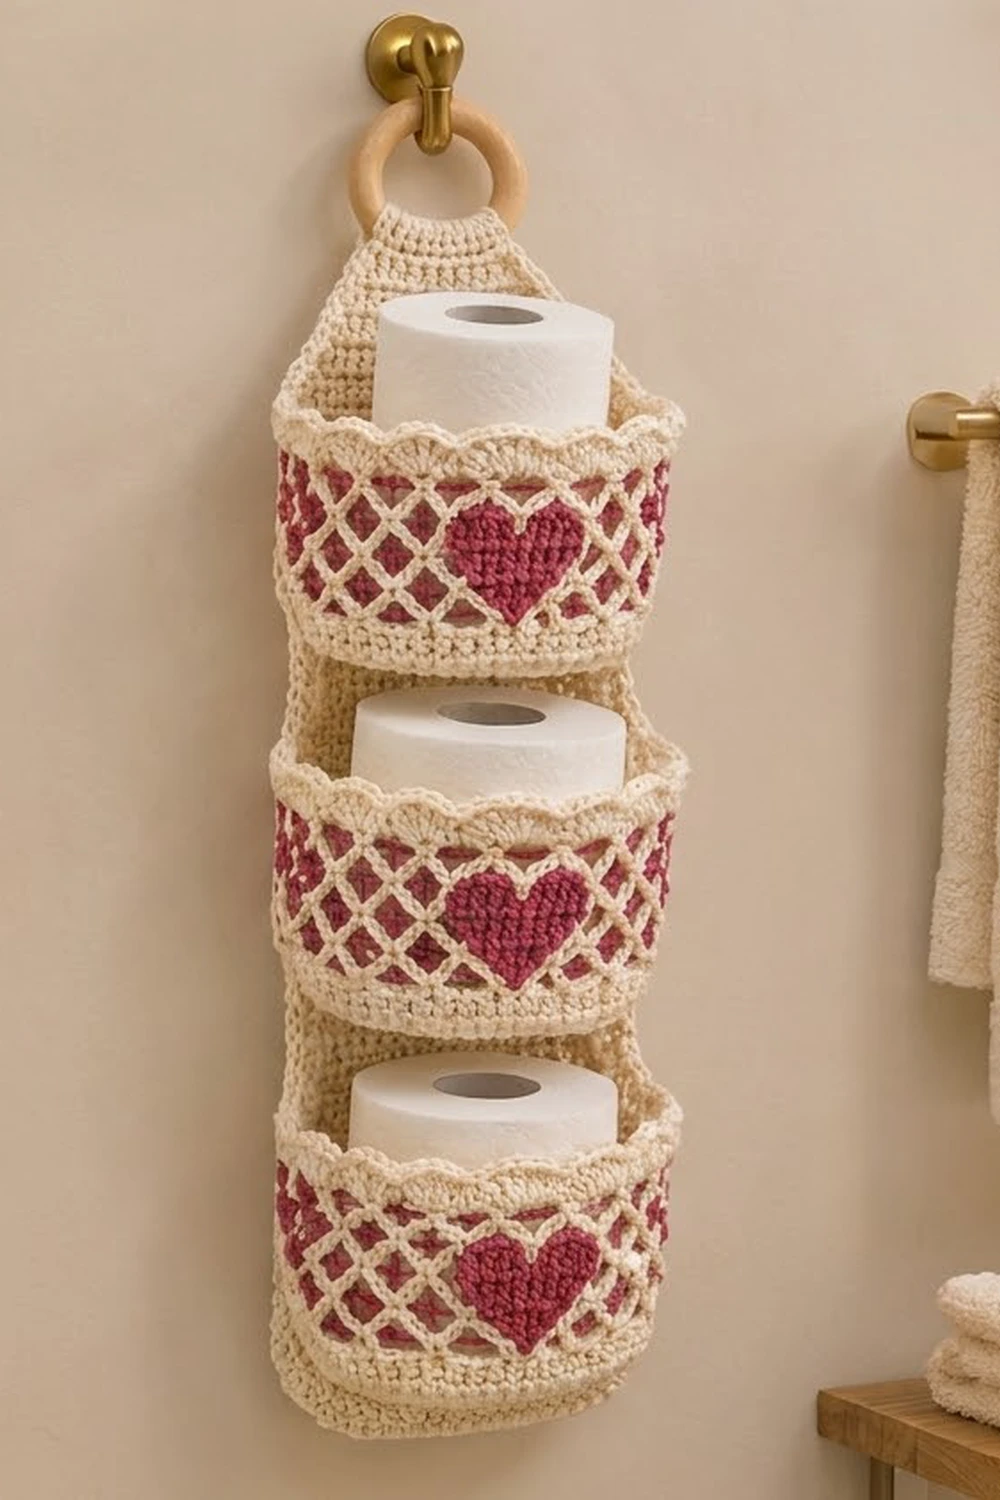
This hanging toilet paper holder has a cream backing panel and three stacked pockets. Each pocket has a raspberry band with a cream diamond lattice and one solid raspberry heart on the front. A small cream scalloped edge finishes the top of each pocket. At the top, the panel narrows into a strap that wraps around a wooden ring.
The style is cottage-romantic and still practical. Each pocket holds one standard roll upright, with the top of the roll showing above the scallops.
This pattern uses US terms. The finished holder is 8.5 in (21.6 cm) wide and about 24.25 in (61.6 cm) tall from the bottom edge to the strap fold, not counting the ring. Each pocket sticks out about 4.5 in (11.4 cm) from the panel.
You make four pieces. The panel is worked flat in single crochet rows and gets a border. The three pockets are worked in the round from an oval base, using tapestry single crochet for the lattice and heart. Then you sew the pockets to the panel stitch by stitch.
Finished Size and Construction
- Finished size: 8.5 in (21.6 cm) x 24.25 in (61.6 cm), plus ring
- Skill level: Intermediate
- Terminology: US
- Yarn weight: Worsted (#4) cotton
- Hook: 4.5 mm (US 7)
- Number of pieces: 4 (1 panel, 3 pockets) plus 1 wooden ring
- Layout: 3 pockets stacked in one vertical column
- Pocket size: base 7 x 4.5 in (17.8 x 11.4 cm); 3.75 in (9.5 cm) tall including scallops
- Panel size before border: 8 in (20.3 cm) x 26 in (66.0 cm), with the strap unfolded
- Border depth: 0.25 in (0.6 cm) on each edge
Materials
Use a smooth worsted-weight cotton or cotton blend. Cotton holds its shape and won’t stretch under the weight of the rolls. The amounts below assume about 170 m per 100 g.
- Cream (main color): 300 g, about 510 m
- Raspberry (contrast): 80 g, about 136 m
These quantities include a margin of about 15% for swatching and differences in tension.
Tools:
– 4.5 mm (US 7) hook
– Wooden ring, 3 in (7.6 cm) outer diameter
– Tapestry needle
– 4 locking stitch markers
– Tape measure, scissors, pins
Abbreviations (US Terms)
- ch – chain
- sc – single crochet
- dc – double crochet
- sl st – slip stitch
- st(s) – stitch(es)
- inc – 2 sc in the same st
- sc2tog – single crochet 2 together
- blo – back loop only
- sk – skip
- C / R – cream / raspberry
- Shell – 5 dc in the same st
Tapestry sc: Work each sc with the active color while laying the inactive color across the tops of the stitches below, so each sc encloses it. To change color, work the last sc before the change until 2 loops are left on the hook. Then yarn over with the new color and pull it through both loops.
Gauge and Checkpoints
Gauge: 16 sc and 18 rows = 4 in (10.2 cm). Tapestry sc in the round should match within one stitch.
Make one pocket first. It uses every technique in the pattern, so it makes the best gauge test.
Checkpoints:
– Base after Rnd 10: 7 x 4.5 in (17.8 x 11.4 cm)
– Rim circumference after Rnd 24: 20 in (50.8 cm)
– Pocket height to the top of Rnd 24: 3.25 in (8.3 cm)
– Panel width at Row 10: 8 in (20.3 cm)
If your pieces come out too big, go down 0.5 mm in hook size. If they come out too small, go up 0.5 mm. Tapestry rounds often come out tight. If only the band measures small, go up 0.5 mm for the band rounds only.
Pocket (make 3)
Start with cream. Join every round with a sl st to the first sc and ch 1. The ch 1 does not count as a stitch.
Oval Base
Ch 13.
Rnd 1: 3 sc in the 2nd ch from the hook (End A). Sc in the next 10 ch. Work 3 sc in the last ch (End B). Then, working along the other side of the chain, sc in the next 10 ch. (26 sts)
Every base round has four sections in this order: End A, 10 straight sts, End B, 10 straight sts.
Rnd 2: [Inc 3 times], sc 10, [inc 3 times], sc 10. (32 sts)
Rnd 3: [(sc 1, inc) 3 times], sc 10, [(sc 1, inc) 3 times], sc 10. (38 sts)
Rnd 4: [(sc 2, inc) 3 times], sc 10, [(sc 2, inc) 3 times], sc 10. (44 sts)
Rnds 5–10: Repeat the same pattern, working 1 more sc before each inc in every round. In Rnd 10, each end group is (sc 8, inc) 3 times.
Stitch counts: Rnd 5 = 50, Rnd 6 = 56, Rnd 7 = 62, Rnd 8 = 68, Rnd 9 = 74, Rnd 10 = 80.
The finished base measures 7 x 4.5 in (17.8 x 11.4 cm). In Rnd 10:
– sts 1–30 are End A
– sts 31–40 are the back straight edge
– sts 41–70 are End B
– sts 71–80 are the front straight edge
Sides
Rnd 11: Sc blo in each st around. (80 sts) This round turns the wall upward. Place markers in st 22 and st 49. The 28 sts from 22 to 49 are the back sts that will be sewn to the panel.
Rnds 12–14: Sc in each st around. (80 sts)
Fasten off cream. Place a marker in st 68. The heart window is sts 68–80 plus sts 1–3, which makes 16 sts centered on the front.
Lattice and Heart Band
Join cream with a standing sc in st 68 and begin carrying raspberry. From here on, every round starts at st 68. Each round is the 16-st heart window followed by 8 lattice repeats of 8 sts (64 sts), for 80 sts in total.
Heart window (16 sts):
– Rnd 15: 7 C, 2 R, 7 C
– Rnd 16: 6 C, 4 R, 6 C
– Rnd 17: 5 C, 6 R, 5 C
– Rnd 18: 4 C, 8 R, 4 C
– Rnd 19: 3 C, 10 R, 3 C
– Rnds 20–21: 2 C, 12 R, 2 C
– Rnd 22: 2 C, 5 R, 2 C, 5 R, 2 C
– Rnd 23: 3 C, 3 R, 4 C, 3 R, 3 C
Lattice repeat (8 sts, work 8 times):
– Rnd 15: 1 C, 7 R
– Rnd 16: 1 R, 1 C, 5 R, 1 C
– Rnd 17: 2 R, 1 C, 3 R, 1 C, 1 R
– Rnd 18: 3 R, 1 C, 1 R, 1 C, 2 R
– Rnd 19: 4 R, 1 C, 3 R
– Rnd 20: as Rnd 18
– Rnd 21: as Rnd 17
– Rnd 22: as Rnd 16
– Rnd 23: as Rnd 15
Every band round has 80 sts (16 + 64). The cream lines move one stitch per round, out to the middle of the repeat and back again. Where neighboring repeats meet, the lines close into diamonds.
The heart is 12 sts (3 in / 7.6 cm) wide and 9 rounds (2 in / 5.1 cm) tall. It sits on a cream background, so it stands out clearly from the lattice.
Fasten off raspberry at the end of Rnd 23.
Top Edge
Rnd 24 (C): Sc in each st around. (80 sts) The pocket now measures 3.25 in (8.3 cm) tall from the base fold.
Rnd 25: Sc in the first st. Sk 1, shell in the next st, sk 1, sc in the next st. Repeat from * around. End with sk 1, shell, sk 1, and join to the first sc. You will have 20 shells and 20 sc: each repeat uses 4 sts, and 80 ÷ 4 = 20.
Fasten off and weave in the ends.
Panel (make 1)
Work in cream, in rows. The ch 1 at the start of each row does not count as a stitch.
Ch 33.
Row 1: Sc in the 2nd ch from the hook and in each ch across. (32 sts)
Rows 2–81: Ch 1, turn, sc in each st across. (32 sts) The panel body now measures 8 x 18 in (20.3 x 45.7 cm).
Taper
Row 82: Ch 1, turn, sc2tog, sc across to the last 2 sts, sc2tog. (30 sts)
Row 83: Ch 1, turn, sc in each st across. (30 sts)
Rows 84–99: Repeat Rows 82–83 eight more times. After Row 99 you have 14 sts. The taper is 4 in (10.2 cm) tall.
Strap
Rows 100–117: Ch 1, turn, sc in each st across. (14 sts) The strap measures 3.5 in (8.9 cm) wide and 4 in (10.2 cm) long.
Do not fasten off. Go straight on to the border.
Make All Pieces
- Panel: 1, cream only
- Pockets: 3, cream with a raspberry band
Layout, from top to bottom:
      [ RING ]
     [ STRAP  ]
    [  TAPER   ]
  [ POCKET 3 Rows 57-70 ]
  [ POCKET 2 Rows 30-43 ]
  [ POCKET 1 Rows  3-16 ]
Joining
Finish the panel border (next section) first. Then sew the pockets on with cream yarn, using whipstitch.
Placement: Each pocket covers 14 panel rows and panel sts 3–30. That is 28 sts, or 7 in (17.8 cm), which leaves 0.5 in (1.3 cm) of panel showing on each side. Sew Pocket 1 on Rows 3–16, Pocket 2 on Rows 30–43, and Pocket 3 on Rows 57–70. The pockets are spaced 27 rows, or 6 in (15.2 cm), apart. That leaves about 2 in (5.1 cm) of space above each roll.
Stitch to stitch:
1. Base: Sew the 28 marked back sts of Rnd 11 to panel sts 3–30, on the lowest row of that pocket’s placement. Match 1 pocket st to 1 panel st.
2. Sides: Sew from Rnd 11 up to Rnd 24 along panel st 3, then along panel st 30. Match 1 pocket round to 1 panel row, for 14 to 14 on each side.
3. Rim: Sew the 28 back sts of Rnd 24 across the top row of the placement. Leave the scallops free.
Tension: Pull each stitch snug but not tight, so the panel lies flat behind the pocket. The 52 front sts of each pocket stay free and curve outward.
Checkpoint: After joining, the panel should still measure 8.5 in (21.6 cm) wide. Each pocket should open 4.5 in (11.4 cm) deep with a roll inside.
Border
Only the panel gets a border.
Border gauge: Along the long edges, work 8 sc for every 9 row ends. This matches the 16-st to 18-row gauge.
Rnd 1:
– Top: Continuing from the strap, work 3 sc in the first st of Row 117, sc in the next 12 sts, and 3 sc in the last st. That gives 12 sc between the corners.
– First long side: Working down across 117 row ends, sc in the next 8 row ends, sk 1 row end. Repeat 13 times, for 104 sc.
– Bottom: Work 3 sc in the first foundation ch, sc in the next 30 ch, and 3 sc in the last ch. That gives 30 sc between the corners.
– Second long side: Work up the side the same way, for 104 sc. Join.
Total: 12 + 104 + 30 + 104 = 250 sts, plus 4 corners x 3 sc = 12, for 262 sts.
Rnd 2: Sl st in each st around. (262 sts) Fasten off.
Why the math works: The 117 rows divide into 13 groups of 9 rows, and each group gets 8 sc. That puts 104 sc along 26 in (66.0 cm), which is exactly 4 sc per inch, the same as the gauge. The top and bottom edges get 1 sc per st. Extra stitches go only at the corners, and each 3-sc corner is counted once. The border adds 0.25 in (0.6 cm) on each side, so the panel goes from 8 in to 8.5 in (21.6 cm).
Ring: Pass the strap through the ring from front to back. Fold about 2 in (5.1 cm) of the strap behind the panel and whipstitch its edge across the back of the taper.
Final Blocking
- Spray the whole piece until it is evenly damp.
- Pin the panel flat at 8.5 in (21.6 cm) wide, keeping the side edges straight.
- Fill each pocket with a roll, or with a towel rolled to 4.5 in (11.4 cm) across.
- Pin each scallop point out evenly.
- Use your fingers to even out the heart lobes.
- Let it dry completely, then remove the pins.
Final Quality-Control Checklist
- Each pocket base has 80 sts and measures 7 x 4.5 in (17.8 x 11.4 cm)
- Every band round has 80 sts (16 + 64)
- The diamonds close cleanly
- Each heart is centered on the front of its pocket
- Each pocket has 20 shells
- The border has 262 sts and the edges lie flat
- The pockets sit on sts 3–30, 6 in (15.2 cm) apart
- The strap is sewn securely around the ring
Troubleshooting
- Raspberry shows through cream stitches: Keep the carried strand at the back of the stitch, and tug it gently every few stitches.
- The band pulls in: You are carrying the yarn too tightly. Spread your stitches out on the hook, or go up 0.5 mm.
- The base cups upward: Your tension is tight. Go up 0.5 mm for the base.
- The base ruffles: Go down 0.5 mm.
- The lattice shifts: Count each repeat to 8. One missed stitch moves every diamond after it.
- A pocket sags: Re-sew the back rim more firmly, making sure all 28 sts are attached.
- The panel edge is wavy: Rework the border with 8 sc per 9 rows.
Care
Hand wash in cool water with mild soap and lay flat to dry. Don’t tumble dry, because heat can shrink the cotton and distort the pockets.
Final Notes
Here is the measurement chain, step by step:
– Gauge: 16 sc x 18 rows = 4 in (10.2 cm).
– Pocket base: 80 sts, measuring 7 x 4.5 in (17.8 x 11.4 cm), with a 20 in (50.8 cm) rim.
– Pocket height: 3.75 in (9.5 cm), with 28 back sts sewn to 28 panel sts.
– Panel: 8 in (20.3 cm) wide, or 8.5 in (21.6 cm) with the 262-st border.
– Finished height: 24.25 in (61.6 cm) from the bottom edge to the strap fold.
If each stage matches its number, the holder will hang straight and hold three rolls neatly.
Happy crocheting!