

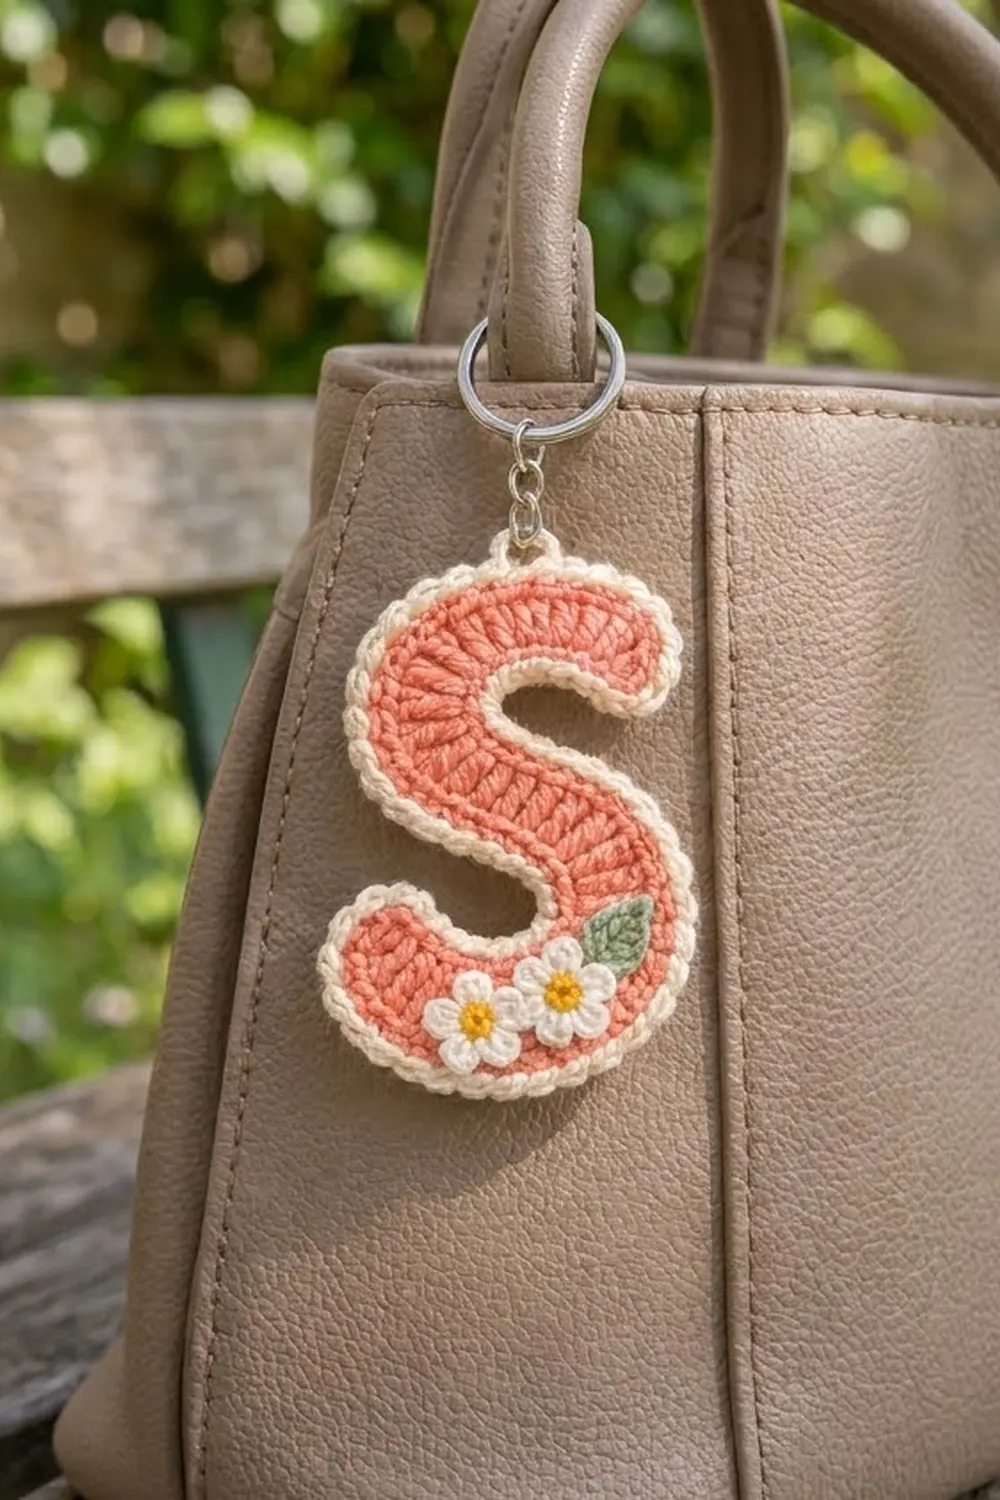
This letter S is a quick, personal keychain: a chunky coral initial with a creamy beaded edge and a little posy of daisies on its lower curve. It hangs from a silver split ring and looks as sweet on a tote handle as it does on a set of keys.
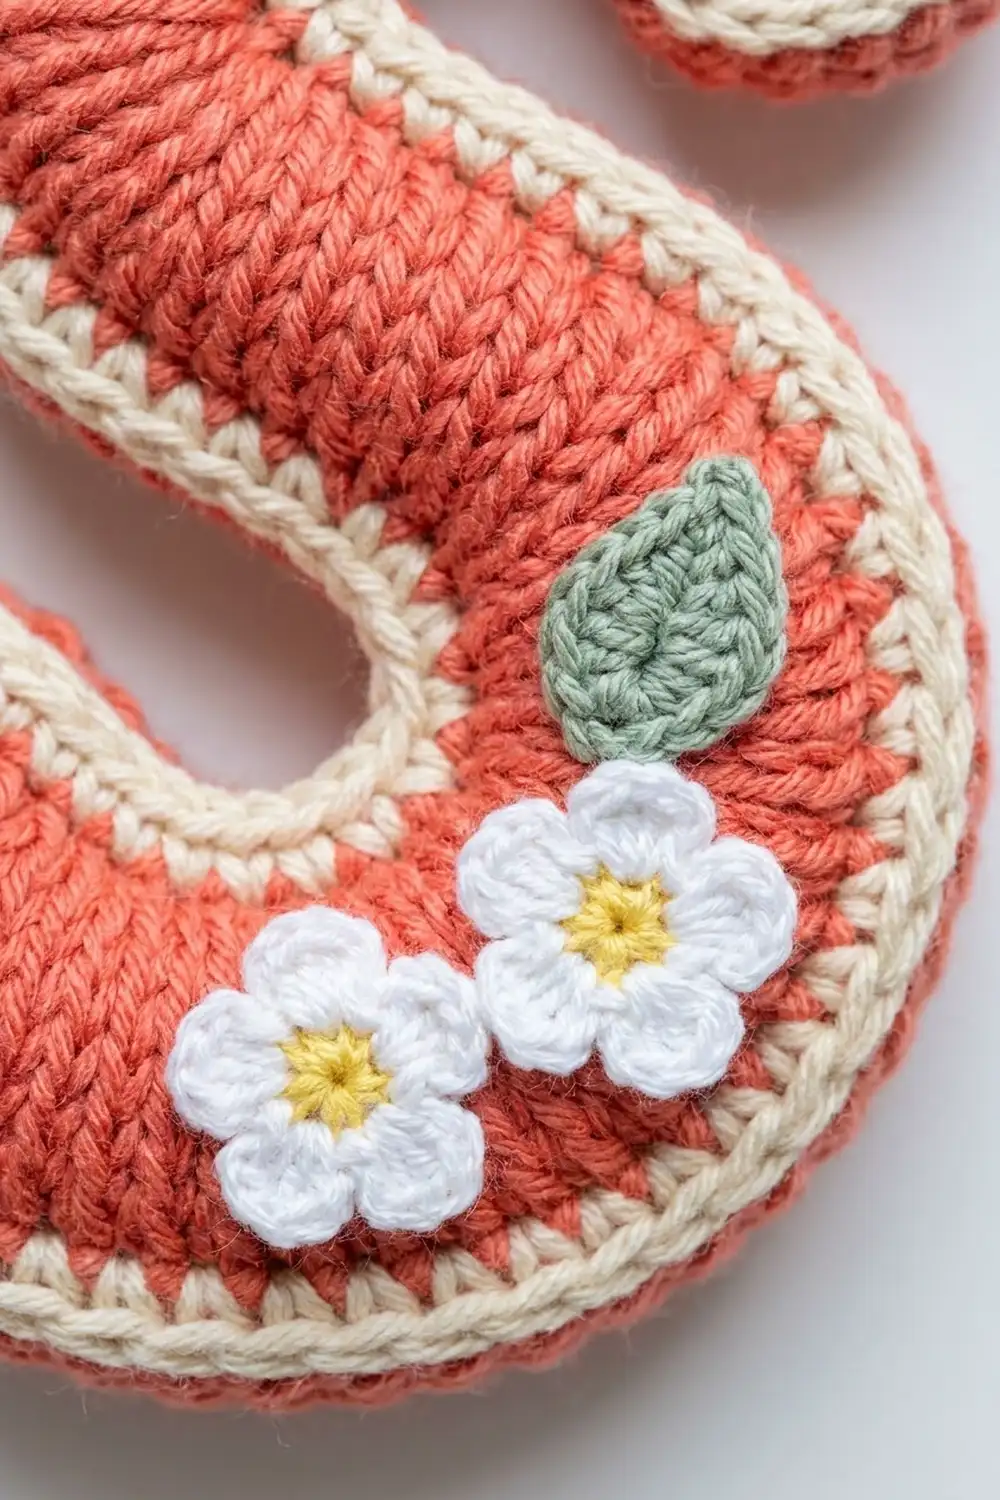
The letter is coral with a soft cream outline. It is finished with two white five-petal flowers with yellow centers and one sage-green leaf. Tall stitches fan out from a center spine across the width of each stroke, which gives the letter a rich, ribbed texture.
The pattern uses US crochet terms. The finished keychain measures about 2.5 in (6.4 cm) wide and 3.75 in (9.5 cm) tall, not counting the ring and chain.
The construction is simple. You make one foundation chain that follows the center line of the S. Then you work one round of double crochet around both sides of it, adding stitches on the outer curves and decreasing on the inner curves so the strip bends into an S. Two cream rounds form the border and the hanging loop. You make the flowers and leaf separately and sew them on.
Finished Size and Construction
- Finished size: 2.5 in (6.4 cm) x 3.75 in (9.5 cm), not including hardware
- Skill level: Easy-intermediate
- Terminology: US crochet terms
- Yarn weight: Sport weight (#2) cotton
- Hook: 2.5 mm (US B/1 or C/2)
- Number of pieces: 1 letter, plus 2 flower appliqués and 1 leaf appliqué sewn on
- Layout: Single letter, with the flowers and leaf on the lower-left curve
- Stroke width after Rnd 1: about 0.75 in (1.9 cm)
- Size before border: about 2.1 in (5.3 cm) x 3.35 in (8.5 cm)
- Border depth: about 0.2 in (0.5 cm) on every edge
- Final stroke width: about 1.15 in (2.9 cm)
Materials
Use a smooth mercerized cotton or cotton blend in sport weight. Cotton holds the curves crisply, resists pilling on a busy keyring and shows the stitch texture clearly. Avoid fuzzy or stretchy yarns.
- Coral (main color): 7 g / 20 m
- Cream (border and loop): 6 g / 18 m
- White (petals): 2 g / 6 m
- Yellow (flower centers): 1 g / 3 m
- Sage green (leaf): 1 g / 3 m
All quantities include a margin for tails, sewing and one restart.
Tools:
- 2.5 mm crochet hook
- Tapestry needle
- 1 in (2.5 cm) split key ring with a short chain and jump ring
- Flat-nose pliers
- 2 stitch markers
- Blocking mat, rustproof pins and a spray bottle
- Scissors
Abbreviations (US Terms)
- ch: chain
- sl st: slip stitch
- sc: single crochet
- hdc: half double crochet
- dc: double crochet
- dc2tog: double crochet 2 together. (Yarn over, insert hook in next ch, pull up a loop, yarn over, pull through 2 loops) twice, then yarn over and pull through all 3 loops.
- sc2tog: single crochet 2 together
- st(s): stitch(es)
- rev sc: reverse single crochet (crab stitch)
Special stitch, reverse single crochet (rev sc): Work from left to right (if you crochet right-handed). Insert the hook into the next stitch to the right, pull up a loop, yarn over and pull through both loops. Keep your tension relaxed; this makes the rounded, beaded edge.
Standing sc: With a slip knot on the hook, insert the hook into the stitch and complete a sc as usual.
Gauge and Checkpoints
Gauge: 24 dc and 12 dc rows = 4 in (10.2 cm). That means 6 dc or 6 sc measure 1 in (2.5 cm), and one dc row is about 0.33 in (0.8 cm) tall.
The keychain is small, so the letter itself is your test piece. Work the foundation chain and Rnd 1, then measure before you add the border.
Checkpoint 1, foundation: The 38 working chains should measure about 6.25 in (15.9 cm) unstretched.
Checkpoint 2, after Rnd 1: Each stroke should be about 0.75 in (1.9 cm) wide. Nudge the strip into an S. It should measure about 2.1 in (5.3 cm) x 3.35 in (8.5 cm).
Checkpoint 3, after the border: About 2.5 in (6.4 cm) x 3.75 in (9.5 cm).
If the letter is too big (more than 1/8 in (0.3 cm) over at Checkpoint 2), go down 0.25 mm in hook size and restart. If it is too small, go up 0.25 mm. Tight gauge makes the inner curves pucker. Loose gauge makes the letter floppy.
Letter S
Each working chain of the foundation has a label from F1 to F38. F1 is the 3rd chain from the hook, at the top end of the S. F38 is the first chain you made, next to the slip knot, at the bottom end.
The spine is divided into sections:
- F1: top end fan
- F2–F4: top terminal (3 ch)
- F5–F18: top arc (14 ch)
- F19–F21: middle diagonal (3 ch)
- F22–F35: bottom arc (14 ch)
- F36–F37: bottom terminal (2 ch)
- F38: bottom end fan
On the first side, the top arc is the outer edge and the bottom arc is the inner edge. On the second side, this reverses. That swap is what bends the strip into an S.
Foundation
With coral, ch 40.
Round 1 (coral)
- Work 4 dc in the 3rd ch from the hook (F1). The 2 skipped chains do not count as a stitch. (4 sts)
- Dc in next 3 ch (F2–F4). (3 sts)
- (2 dc in next ch, dc in next ch) 7 times (F5–F18). (21 sts, top outer curve)
- Dc in next 3 ch (F19–F21). (3 sts)
- Dc2tog over next 2 ch, 7 times (F22–F35). (7 sts, bottom inner curve)
- Dc in next 2 ch (F36–F37). (2 sts)
- 7 dc in last ch (F38). (7 sts, bottom end fan)
Rotate the piece and work into the free loops on the other side of the foundation chain.
- Dc in next 2 ch (F37–F36). (2 sts)
- (2 dc in next ch, dc in next ch) 7 times (F35–F22). (21 sts, bottom outer curve)
- Dc in next 3 ch (F21–F19). (3 sts)
- Dc2tog over next 2 ch, 7 times (F18–F5). (7 sts, top inner curve)
- Dc in next 3 ch (F4–F2). (3 sts)
- 3 dc in F1, the same ch as the first 4 dc. (3 sts)
- Join with a sl st to the first dc.
Total: 86 dc.
– First side: 3 + 21 + 3 + 7 + 2 = 36
– Second side: 2 + 21 + 3 + 7 + 3 = 36
– End fans: 7 + 7 = 14 (the F1 fan is the first 4 dc plus the last 3 dc)
– 36 + 36 + 14 = 86
Fasten off and weave in the tails along the foundation chain. The chain stays visible as a slim ridge down the center of each stroke, with the dc posts fanning out on both sides.
Lay the strip flat and coax it into an S. The sides with increases bulge outward and the dc2tog sides draw in. Take Checkpoint 2 now.
Round 2 (cream)
Start at the first dc of the top terminal. This is the 5th stitch of Rnd 1, worked into F2.
- Standing sc in that st, then sc in the next 2 sts. (3 sc, top terminal)
- (Sc in next 6 sts, 2 sc in next st) 3 times. (24 sc, top outer curve)
- Sc in next 3 sts. (3 sc, diagonal)
- (Sc in next st, sc2tog) twice, sc in next st. (5 sc, bottom inner curve)
- Sc in next 2 sts. (2 sc, bottom terminal)
- (Sc in next st, 2 sc in next st) 3 times, sc in next st. (10 sc, bottom end fan)
- Sc in next 2 sts. (2 sc)
- (Sc in next 6 sts, 2 sc in next st) 3 times. (24 sc, bottom outer curve)
- Sc in next 3 sts. (3 sc)
- (Sc in next st, sc2tog) twice, sc in next st. (5 sc, top inner curve)
- Sc in next 3 sts. (3 sc)
- (Sc in next st, 2 sc in next st) 3 times, sc in next st. (10 sc, top end fan)
- Join with a sl st to the first sc.
Total: 94 sc (37 + 10 + 37 + 10).
Mark the 11th sc of the round, which is the 8th sc of the top outer curve. Once the letter is shaped, this stitch sits at the highest point of the S. If it lands a stitch off on your piece, move the marker one stitch.
Round 3 (cream, edging and loop)
- Ch 1. Working from left to right, rev sc in each sc around.
- In the marked st, work (rev sc, ch 5, rev sc) to make the hanging loop.
- Join with a sl st to the first rev sc. Fasten off and weave in the tail.
Total: 95 rev sc plus one ch-5 loop. That is 93 sts with 1 rev sc each, plus 2 rev sc in the marked st.
Flowers (make 2)
Center: With yellow, make a magic ring. Ch 1, work 5 sc in the ring, pull it closed and join with a sl st to the first sc. Fasten off. (5 sc)
Petals: Join white in any sc. (Ch 2, 2 dc, ch 2, sl st) in the same st, sl st in the next st. Repeat from * to * 4 more times, working the last sl st into the joining st. (5 petals) Fasten off, leaving a 6 in (15.2 cm) tail.
Each flower is about 5/8 in (1.6 cm) across.
Leaf (make 1)
With sage green, ch 7.
Starting in the 2nd ch from the hook: sl st, sc, hdc, dc, hdc, then 3 sc in the last ch. Along the other side of the chain: hdc, dc, hdc, sc, then sl st in the last ch. Join to the first sl st. (13 sts) Fasten off, leaving a 6 in (15.2 cm) tail.
The leaf is about 0.75 in (1.9 cm) long.
Border
The cream border is Rounds 2 and 3 above. Here is why the counts work.
Border gauge: 6 sc = 1 in (2.5 cm). Rnd 2 sits about 0.1 in (0.3 cm) outside Rnd 1, and the rev sc adds about another 0.1 in (0.3 cm). Together they make a 0.2 in (0.5 cm) border.
| Section | Rnd 1 sts | Rnd 2 sc | Rnd 3 rev sc |
|---|---|---|---|
| First side | 36 | 37 | 38 (includes loop st) |
| Bottom end fan | 7 | 10 | 10 |
| Second side | 36 | 37 | 37 |
| Top end fan | 7 | 10 | 10 |
| Total | 86 | 94 | 95 |
- Straight sections: 1 sc in each st, so the count doesn’t change.
- Outer curves: 21 sts worked 1 per stitch + 3 extra = 24. The curve’s radius grows from about 1 in to 1.1 in (2.5 cm to 2.8 cm), so the edge needs about 10 to 15 percent more stitches.
- Inner curves: 7 sts minus 2 decreases = 5. The inner radius shrinks from about 0.33 in to 0.23 in (0.8 cm to 0.6 cm), about 30 percent shorter, so 5 sc lie flat where 7 would ruffle.
- End fans: 7 sts + 3 extra = 10. Each rounded end is about 1.5 in (3.8 cm) around at Rnd 2, which is 9 to 10 sc at this gauge.
Rnd 3 is a trim round: 94 sts worked 1 per stitch + 1 extra rev sc at the loop = 95.
Final Blocking
- Weave in all tails except the sewing tails on the flowers and leaf.
- Mist the letter until it is damp, not soaked.
- Shape the S on the blocking mat, opening the two curved inner spaces evenly.
- Pin the two ends, the outer point of each curve and the middle diagonal. Put the pins through the cream border.
- Check the size: 2.5 in (6.4 cm) x 3.75 in (9.5 cm).
- Let it dry completely.
- Unpin. Set the two flowers side by side on the bottom outer curve near the lower-left end. Place the leaf just above and to the right of them.
- Sew the flowers through their centers and petal tips, and sew the leaf along its center and tip. Hide your stitches on the back.
- Open the jump ring, slip it through the ch-5 loop, attach the key ring chain and close the jump ring fully.
Final Quality-Control Checklist
- Rnd 1 has 86 dc, Rnd 2 has 94 sc, and Rnd 3 has 95 rev sc plus the loop.
- The S lies flat with no cupping or ruffling.
- Each stroke is about 1.15 in (2.9 cm) wide, including the border.
- The loop is at the top and the S hangs upright.
- The appliqués are secure, with no stitches showing on the front.
- The jump ring has no gap.
- All ends are woven in at least 1 in (2.5 cm).
Troubleshooting
The letter looks like a C, not an S. Check that you swapped the increases and decreases between the two sides. Outer curves get the (2 dc, dc) repeat and inner curves get dc2tog.
The outer curves cup. Your increases are too tight. Go up a hook size.
The inner curves pucker. Work the dc2tog stitches more loosely and block firmly.
The border ruffles. Remove one increase from each outer curve on Rnd 2.
The crab stitch looks tight. Pull up a taller loop before you finish each rev sc.
The keychain hangs crooked. Move the loop one stitch toward the heavier side.
Care
Hand wash in cool water with mild soap, roll the keychain in a towel to remove water, and dry it flat, reshaping the S. Remove the metal ring before washing.
Final Notes
The measurement chain is short. A 38-chain spine of about 6.25 in (15.9 cm) becomes a coral S of about 2.1 in (5.3 cm) x 3.35 in (8.5 cm) after Round 1, with strokes about 0.75 in (1.9 cm) wide. The two cream rounds add 0.2 in (0.5 cm) all around, for a finished letter of 2.5 in (6.4 cm) x 3.75 in (9.5 cm). Check your size at the first two checkpoints and count your stitches, and the curves will fall into place.
Happy crocheting!