

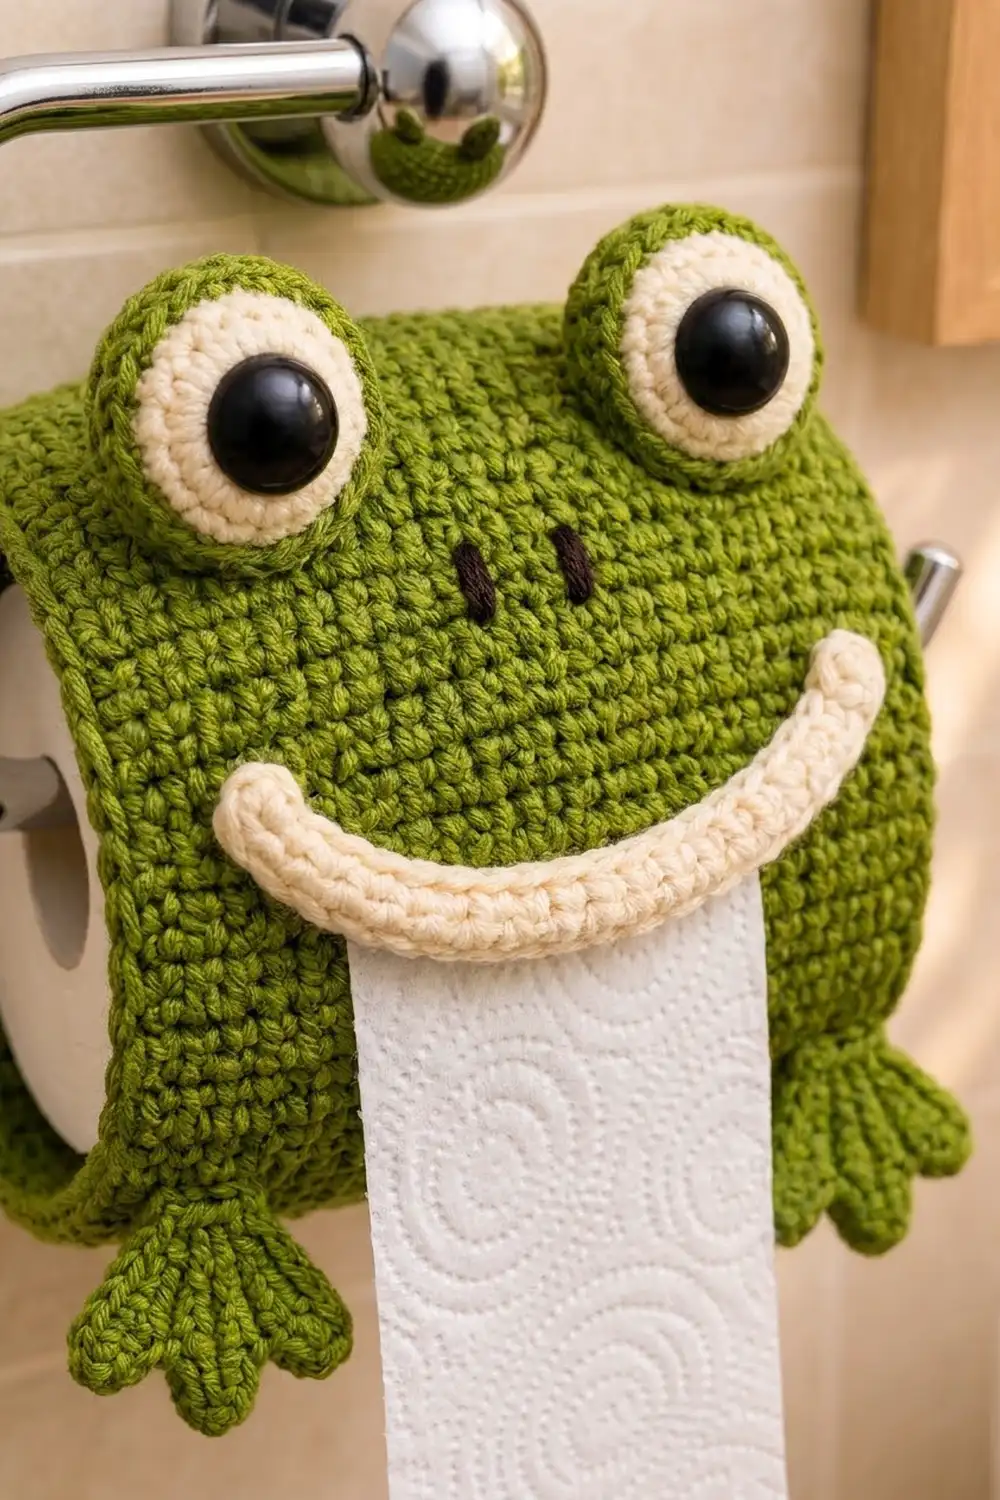
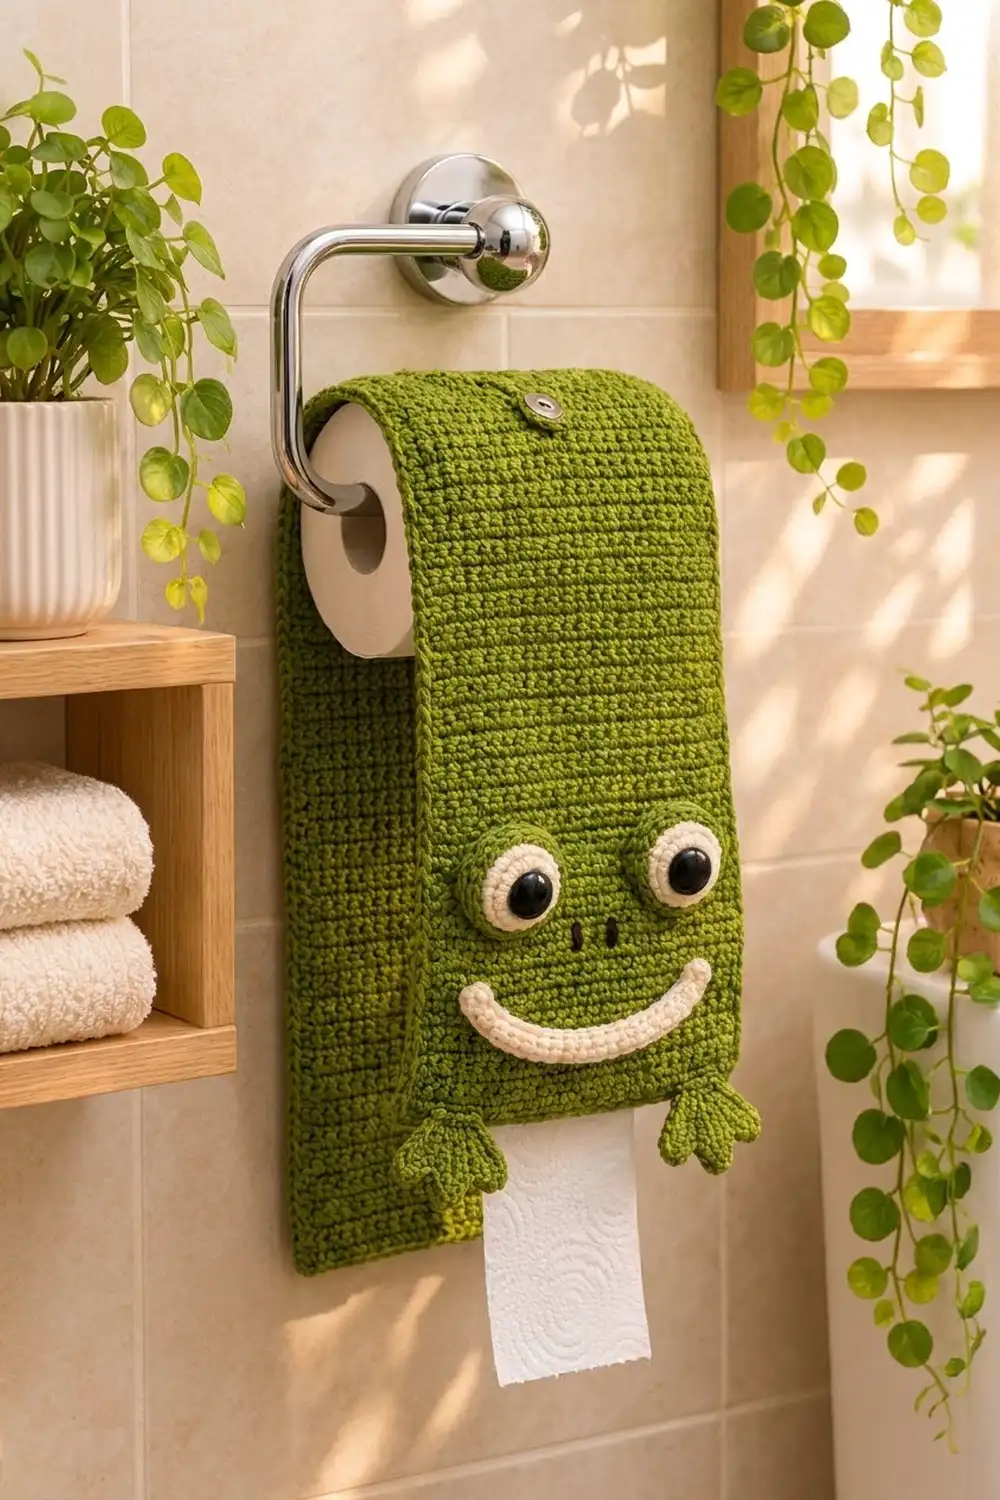
This frog sits on your toilet paper roll and grins at whoever walks into the bathroom. He has big domed eyes, a wide cream smile and two stubby feet hanging over the front of the roll. The paper comes out right under his mouth.
The palette is simple: olive green for the body, eyes and feet, cream for the smile and eye rings, and a scrap of dark brown for the nostrils. The body is a firm single crochet fabric that holds its shape on a holder. The appliqués give it a cute, three-dimensional look.
This pattern uses US crochet terms. Laid flat, the finished cover measures 5.5 in x 16.5 in (14.0 cm x 41.9 cm).
You crochet the body as one long rectangle in rows and add one round of edging. Then you make two eyes, a smile and two feet and sew them onto the front end. A sew-on snap closes the back flap into a loop that hooks over the holder arm.
Finished Size and Construction
- Finished size: 5.5 in x 16.5 in (14.0 cm x 41.9 cm), flat
- Skill level: Easy
- Terminology: US crochet terms
- Yarn weight: Worsted (#4)
- Hook: 4.0 mm (US G-6)
- Number of pieces: 1 body panel plus 5 appliqués (2 eyes, 1 smile, 2 feet)
- Layout: One panel. The face is at the Row 1 end and the snap flap is at the Row 72 end.
- Panel size before border: 5 in x 16 in (12.7 cm x 40.6 cm)
- Border depth: 0.25 in (0.6 cm) per side
- Fits: A standard roll about 4.5 in (11.4 cm) wide and 4.5 in (11.4 cm) across
Materials
Use a smooth worsted yarn. Acrylic or a cotton-acrylic blend works best because it holds its shape and copes with a humid bathroom. Avoid fuzzy or splitty yarn, because it hides the stitch texture and makes the embroidery messy.
- Olive green: 120 g / 240 m (body, border, eyes, feet)
- Cream: 15 g / 30 m (eye rings, smile)
- Dark brown: 2 g / 4 m (nostrils)
These amounts include a margin of roughly 10–15%.
Tools:
- 4.0 mm (US G-6) crochet hook
- Two 15 mm black safety eyes
- One sew-on metal snap, 0.5 in (1.3 cm)
- A small amount of polyester fiberfill
- Tapestry needle, plus a sewing needle with green thread
- Stitch markers
- Scissors and a measuring tape
- Pins and a blocking mat
Abbreviations (US Terms)
- ch – chain
- sl st – slip stitch
- sc – single crochet
- hdc – half double crochet
- sc2tog – single crochet 2 together
- MR – magic ring
- BLO – back loop only
- st(s) – stitch(es)
- RS / WS – right side / wrong side
Special stitch – corner group: Work 3 sc into the same stitch. The middle sc is the corner point.
Gauge and Checkpoints
Gauge: 16 sc and 18 rows = 4 in (10.2 cm) in sc rows, after a light steam.
Make the body panel first and measure it as you go, before you start any appliqués. Stitch counts set the appliqué sizes, but the panel decides whether the cover fits the roll.
- After Row 1: 5 in (12.7 cm) wide
- After Row 18: 4 in (10.2 cm) long
- After Row 36: 8 in (20.3 cm) long
- After Row 54: 12 in (30.5 cm) long
- After Row 72: 16 in (40.6 cm) long
If your panel is too big, use a 3.75 mm hook. If it is too small, use a 4.5 mm hook. If only the length is off, change the number of rows instead. Each row is about 0.22 in (0.6 cm). Write down any rows you add or remove so you can recount the long-side border.
Body Panel
Work in olive green.
Row 1 (RS): Ch 21. Sc in the 2nd ch from the hook and in each ch across. (20 sc)
Rows 2–72: Ch 1, turn. Sc in each st across. (20 sc)
Don’t fasten off. Go straight on to the border.
The panel should measure 5 in x 16 in (12.7 cm x 40.6 cm). Put a marker on Row 1; that end is the face.
Eyes (Make 2)
Each eye is one piece worked in continuous rounds. It starts with a cream center and changes to green for the outer ring and the dome. Move a marker up each round.
Rnd 1 (cream): 6 sc in MR. (6 sc)
Rnd 2 (cream): 2 sc in each st around. (12 sc) Change to green in the last st.
Rnd 3 (green): (Sc in next st, 2 sc in next st) 6 times. (18 sc)
Rnd 4 (green): (Sc in next 2 sts, 2 sc in next st) 6 times. (24 sc)
Rnd 5 (green): Sc in BLO of each st around. (24 sc) This round turns the edge back so the eye becomes a shallow cup.
Push a 15 mm safety eye through the center of the MR, between Rnds 1 and 2, and lock the washer on the inside.
Rnd 6 (green): (Sc in next 2 sts, sc2tog) 6 times. (18 sc)
Fasten off and leave a 12 in (30.5 cm) tail. Stuff the eye lightly so it’s domed but not hard. It measures about 1.75 in (4.4 cm) across.
Smile
Work in cream.
Row 1: Ch 26. Sc in the 2nd ch from the hook and in each ch across. (25 sc) The strip is about 6.25 in (15.9 cm) long.
Row 2: Ch 1, turn. Sc in next 4 sts, (2 sc in next st, sc in next st) 8 times, sc in last 5 sts. (33 sc)
That makes 4 + 24 + 5 = 33 stitches, worked into 4 + 16 + 5 = 25 stitches of Row 1. The 8 extra stitches make the outer edge longer, so the strip curves into a crescent.
Row 3: Ch 1, turn. Sl st in each st across. (33 sl st) This firms up the outer edge and rounds the profile.
Fasten off and leave a 14 in (35.6 cm) tail. The smile is about 0.5 in (1.3 cm) wide. As you sew it on, roll the inner edge slightly toward the WS so it looks like a padded tube.
Feet (Make 2)
Work in olive green.
Rnd 1: 6 sc in MR. (6 sc)
Rnd 2: 2 sc in each st around. (12 sc)
Toes: Sl st in next st. Ch 4, 2 sc in the 2nd ch from the hook (rounded toe tip), sc in next ch, hdc in next ch, sl st in next 2 sts of Rnd 2. Repeat from * to * 2 more times.
This gives 3 toes across 7 stitches of Rnd 2: the first sl st plus 2 stitches per toe. The other 5 stitches form the heel.
Fasten off and leave a 10 in (25.4 cm) tail. Each foot is about 1.75 in (4.4 cm) long from heel to toe tip.
Border
Border gauge: On the short ends, the border sc match the panel gauge of 4 sts per inch. On the long sides, you work 1 sc into each row end. A sc worked sideways into a row end covers exactly one row’s height, so 1 sc per row lies flat.
Rnd 1: At the end of Row 72, ch 1 and turn the panel so you can work down a long side.
- Long side 1: Sc in the row end of each of Rows 71 down to 2. (70 sc)
- Corner: Work a corner group in the corner st of Row 1.
- Short side (Row 1 edge): Sc in each of the next 18 sts.
- Corner: Work a corner group in the other corner st of Row 1.
- Long side 2: Sc in the row end of each of Rows 2 up to 71. (70 sc)
- Corner: Work a corner group in the corner st of Row 72.
- Short side (Row 72 edge): Sc in each of the next 18 sts.
- Corner: Work a corner group in the last corner st of Row 72.
Join with a sl st to the first sc. (188 sc)
Counts per side, including the corner groups:
- Short sides: 3 + 18 + 3 = 24 sc
- Long sides: 3 + 70 + 3 = 76 sc
Two sides share each corner group, so the total counts each group only once: 70 + 70 + 18 + 18 + (4 × 3) = 188.
Why the math works:
- Short sides: Each short side has 20 original stitches. The 2 end stitches become corner groups, and each of the 18 stitches between them gets 1 sc. That adds 2 extra sc per corner and no other increases.
- Long sides: Each long side covers Rows 2–71, which is 70 row ends, with 1 sc each. The corner groups cover Rows 1 and 72.
- Result: The border adds 0.25 in (0.6 cm) on every side. The width becomes 5.5 in (14.0 cm) and the length becomes 16.5 in (41.9 cm).
The corner groups lie softly rounded instead of pointed. Blocking shapes them into the rounded corners in the photo.
Fasten off and weave in the ends.
Snap and Assembly
Snap:
- Sew the ball half of the snap to the WS, centered across the width, 0.75 in (1.9 cm) from the Row 72 edge.
- Sew the socket half to the RS, centered, 4 in (10.2 cm) from the Row 72 edge.
When you fold the flap over the holder arm and snap it shut, it forms a loop of about 3.25 in (8.3 cm).
Face: Measure all placements from the Row 1 edge, border included, with the RS facing you.
- Eyes: Place each eye’s center 5 in (12.7 cm) from the front edge and 1.5 in (3.8 cm) in from its long edge. The centers end up 2.5 in (6.4 cm) apart. Pin the eyes, then whipstitch around Rnd 6 through both layers. They sit right where the panel bends over the roll, so they stand up above it.
- Nostrils: With dark brown, embroider two vertical straight stitches, each 0.25 in (0.6 cm) long. Center them 3.75 in (9.5 cm) from the front edge, 0.5 in (1.3 cm) apart.
- Smile: Center the smile with the curve pointing down. The lowest point sits 1.5 in (3.8 cm) from the front edge. The tips sit 3 in (7.6 cm) from the front edge, each about 1 in (2.5 cm) in from the side. Sew along both long edges.
- Feet: Sew each heel to the WS at a front corner, so the toes stick out 0.75 in (1.9 cm) below the edge and angle slightly outward.
Final Blocking
- Lay the cover flat on a blocking mat, RS up.
- Pin it to 5.5 in x 16.5 in (14.0 cm x 41.9 cm), shaping the border corners into gentle curves.
- Hold a steam iron 1 in (2.5 cm) above the fabric and steam. Never press acrylic directly.
- Pat the smile and feet flat with your fingers. Keep the steam away from the eyes so the domes don’t flatten.
- Let it dry completely, for at least 1 hour, before you unpin it.
- While it’s still slightly warm, drape the cover over a roll to train the curve over the top.
Final Quality-Control Checklist
- [ ] After blocking, the panel measures 5.5 in x 16.5 in (14.0 cm x 41.9 cm).
- [ ] The border has 188 sc: 24 on each short side and 76 on each long side, including corner groups.
- [ ] Both eyes are the same size, about 1.75 in (4.4 cm), and the safety eyes are locked tight.
- [ ] The smile is centered, curves evenly and isn’t twisted.
- [ ] The nostrils are level and evenly spaced.
- [ ] The feet match, with 3 toes each.
- [ ] The snap closes easily and the flap loop fits over the holder arm.
- [ ] All ends are woven in on the WS.
Troubleshooting
- Panel gets narrower or wider: You’re skipping or adding stitches at the row ends. Count to 20 sc every few rows, and put a marker in the last stitch of each row.
- Border ruffles on the long sides: Your border is looser than the body. Redo it with firmer tension, or use a hook 0.25 mm smaller for the border only.
- Border pulls in on the long sides: You missed some row ends. Each long side needs 70 sc between the corner groups.
- Smile stays straight: Row 2 is missing its increases. It needs 33 stitches.
- Smile curls too much: Block it flat and stitch both edges down firmly.
- Eyes look flat: Add a little more fiberfill, and check that Rnd 5 was worked in the BLO.
- Cover slides off the roll: Move the snap socket 0.5 in (1.3 cm) closer to the flap end to make the loop tighter.
- Paper won’t feed: Let the face hang lower in front, so the paper comes out under the smile instead of rubbing against it.
Care
Hand wash in cool water with mild soap, gently squeeze out the water and dry flat. Don’t tumble dry, because heat can damage the safety eyes and flatten the domes.
Final Notes
The whole frog follows one short measurement chain:
- Gauge: 16 sc and 18 rows = 4 in (10.2 cm).
- Panel: 20 stitches make a 5 in (12.7 cm) width, and 72 rows make a 16 in (40.6 cm) length.
- Border: One round of 188 sc adds 0.25 in (0.6 cm) per side. The finished cover is 5.5 in x 16.5 in (14.0 cm x 41.9 cm). That wraps a standard 4.5 in (11.4 cm) roll and leaves enough for the snap flap.
Stitch counts set the size of the eyes, smile and feet, so if your panel matches gauge, the face will look right.
Happy crocheting!