

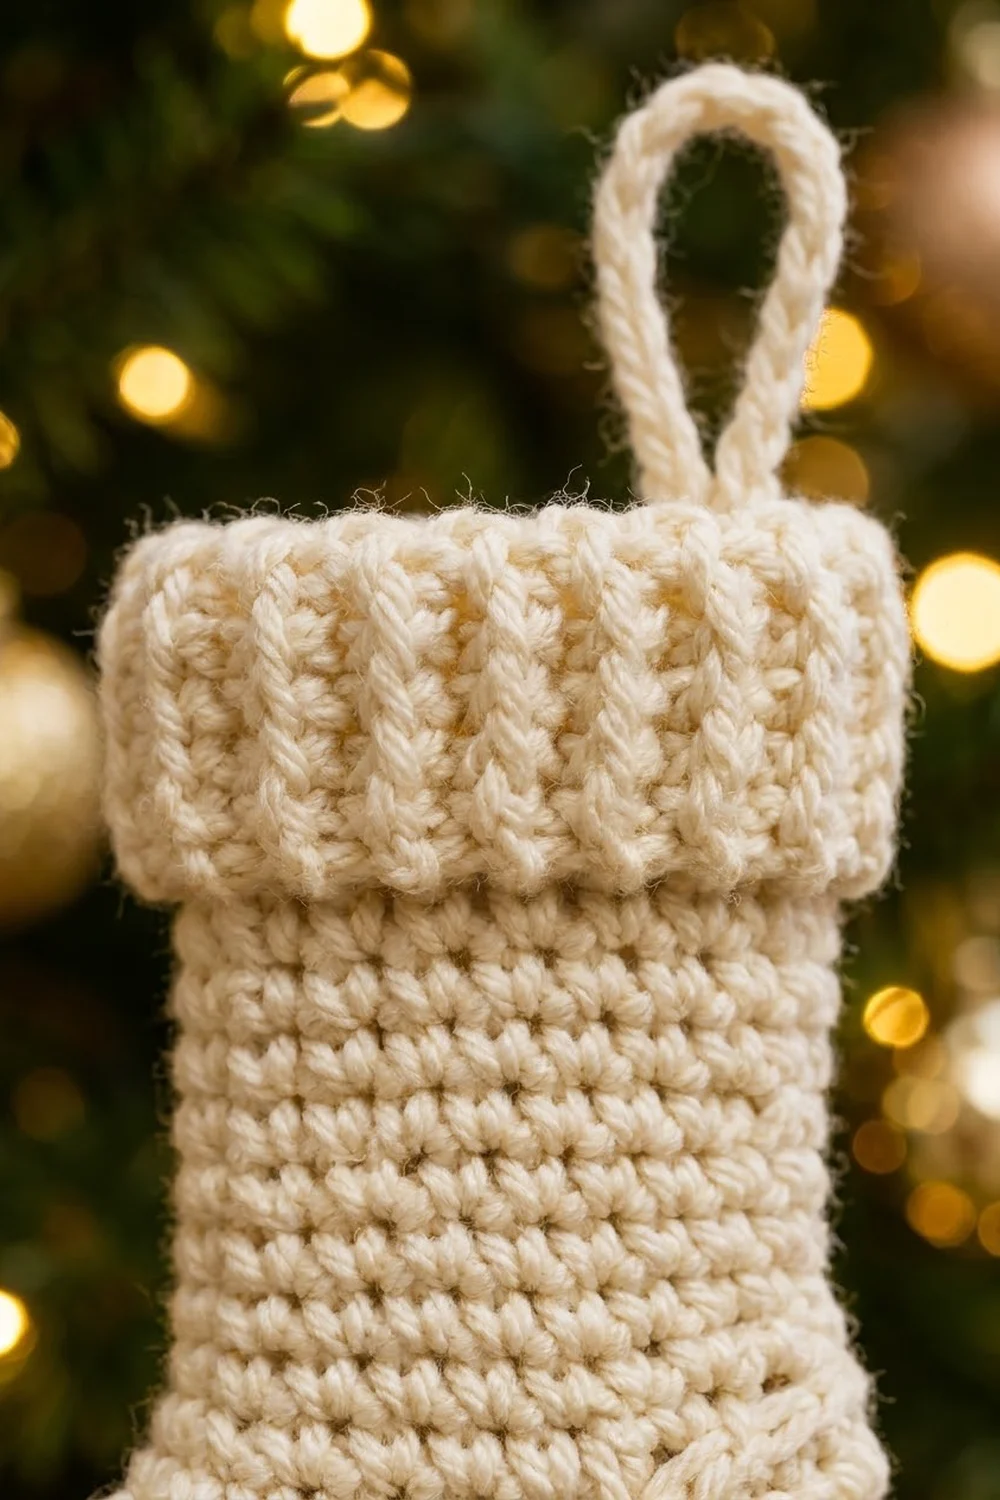
This little stocking is a small, cozy ornament in one soft cream color. It has a rounded toe, a neat cupped heel, a smooth single crochet body, and a thick folded ribbed cuff with a chain hanging loop at the top. It looks like a tiny hand-knit sock but is fully crocheted.
The style is simple and Scandinavian-inspired: one neutral shade and plain texture, no added decoration. It sits nicely on a tree with gold and white ornaments, and it works as a gift tag or a little advent pocket too.
The pattern uses US crochet terms. The finished ornament measures about 4 in (10.2 cm) tall from sole to cuff fold, not counting the loop. The leg is 2 in (5.1 cm) wide when flat, and the foot is about 3 in (7.6 cm) long from heel to toe.
Construction is toe-up and worked in the round. You start the toe with a magic ring, work the foot in a spiral, leave a chain gap for an afterthought heel, and work the leg straight up. Then you work the ribbed cuff onto the top of the leg and fold it down, close the heel opening with decrease rounds, and add the hanging loop.
Finished Size and Construction
- Finished size: about 4 in (10.2 cm) tall x 2 in (5.1 cm) wide at the leg, plus a 1.5 in (3.8 cm) loop
- Foot length: about 3 in (7.6 cm), heel to toe
- Skill level: Easy / advanced beginner
- Terminology: US crochet terms
- Yarn weight: DK (light worsted, #3)
- Hook: 3.5 mm (E-4)
- Number of pieces: 1 (the heel, cuff, and loop are all worked onto the same piece)
- Layout: single 3D ornament, worked in the round, lightly stuffed
- Piece size before cuff: about 3.1 in (7.9 cm) tall x 2 in (5.1 cm) wide
- Cuff (border) depth: about 1.75 in (4.4 cm) unfolded, about 0.9 in (2.3 cm) once folded
Materials
Yarn: Choose a smooth DK yarn in cotton, cotton blend, or soft acrylic. A smooth yarn shows the single crochet texture and the vertical ribs clearly. Avoid fluffy or very splitty yarns, because the post stitches in the cuff need clear stitch definition.
- Cream (main color): 12 g, about 28 m (31 yd)
That quantity includes a margin of roughly 30% for your gauge check, the hanging loop, and weaving in ends. One ornament uses about 8 to 9 g.
Tools:
- 3.5 mm (E-4) crochet hook
- 1 locking stitch marker
- Tapestry needle
- Scissors
- A small pinch of polyester fiberfill (optional)
- Pins and a spray bottle for blocking
Abbreviations (US Terms)
- ch – chain
- sl st – slip stitch
- sc – single crochet
- inc – 2 sc in the same stitch
- dec – sc2tog (single crochet 2 together)
- sk – skip
- st(s) – stitch(es)
- rnd(s) – round(s)
- FPdc – front post double crochet
- BPdc – back post double crochet
- MR – magic ring
Special stitches:
- FPdc: Yarn over, insert the hook from front to back to front around the post of the stitch, pull up a loop, then (yarn over, pull through 2 loops) twice. It sits on the front of the fabric.
- BPdc: Yarn over, insert the hook from back to front to back around the post of the stitch, pull up a loop, then (yarn over, pull through 2 loops) twice. It sits on the back of the fabric.
Alternating FPdc and BPdc stacked over each other creates the raised vertical ribs on the cuff.
Gauge and Checkpoints
Gauge: 20 sc and 24 rnds = 4 in (10.2 cm) in the round, which is 5 sc and 6 rnds per 1 in (2.5 cm). Cuff rib: 4 rib rnds = 1.5 in (3.8 cm) tall.
The toe is your gauge test. Work Rnds 1–4, flatten the tube, and measure across.
Checkpoints:
- After Toe Rnd 4 (20 sts): flattened width 2 in (5.1 cm).
- After Rnd 12: foot measures 2 in (5.1 cm) from the toe tip.
- After Rnd 26: leg measures about 2.33 in (5.9 cm) above the heel chain gap.
- After heel: heel cup sticks out about 0.8 in (2.0 cm), and the whole body is about 3.1 in (7.9 cm) tall.
- After cuff, unfolded: about 1.75 in (4.4 cm) tall. Folded: about 0.9 in (2.3 cm).
If your toe is too big (more than 2.1 in or 5.3 cm across), go down to a 3.25 mm or 3 mm hook. If it’s too small (less than 1.9 in or 4.8 cm), go up to a 3.75 mm or 4 mm hook. Don’t change the stitch counts. The heel and cuff math depends on 20 stitches around.
Work tightly enough that the stuffing does not show through. Single crochet in the round should feel firm and slightly stiff.
Toe
Work in a continuous spiral. Do not join rounds. Place the marker in the first stitch of each round and move it up as you go.
Rnd 1: MR, 6 sc in ring. Pull the ring closed. (6 sts)
Rnd 2: Inc in each st around. (12 sts)
Rnd 3: (Sc in next st, inc) 6 times. (18 sts)
Rnd 4: (Sc in next 8 sts, inc) 2 times. (20 sts)
Using only two increases in Rnd 4 keeps the toe nicely rounded instead of flat and pointy. Check your gauge now: 2 in (5.1 cm) across when flattened.
Foot
Rnds 5–12: Sc in each st around. (20 sts per rnd)
The foot should now be 2 in (5.1 cm) long from the tip of the toe. Weave in the magic ring tail on the inside now, while the toe is still easy to reach.
Heel Opening
This round leaves a gap of chains that will later become the heel. The 10 sc are the top of the foot (instep), and the 10 skipped stitches are where the heel cup goes.
Rnd 13: Sc in next 10 sts, ch 10, sk next 10 sts. (10 sc + 10 ch = 20 sts)
Rnd 14: Sc in each of the next 10 sc, then sc in each of the 10 ch. (20 sts)
Work into the back bump or the top loop of each chain, but stay consistent. The gap should lie flat, not puckered. If it pulls, your chains are too tight. Redo Rnd 13 with looser chains.
Leg
Rnds 15–26: Sc in each st around. (20 sts per rnd)
At the end of Rnd 26, sl st into the next st to smooth out the spiral jog. Don’t fasten off. The cuff starts directly from here.
Checkpoint: The leg measures about 2.33 in (5.9 cm) above the heel gap (Rnds 13–26 = 14 rnds at 6 rnds per inch). Flattened width is still 2 in (5.1 cm).
Ribbed Cuff (Border)
The cuff is the edging for this design. It’s worked upward from the top of the leg, then folded down over the outside, so the ribs show on the front.
Border gauge: 24 sts around = about 4.5 in (11.4 cm) circumference, so the flattened cuff measures about 2.25 in (5.7 cm) wide. Each rib round is about 0.375 in (1.0 cm) tall.
Work the cuff in joined rounds, not a spiral, so the ribs stack straight. The ch 2 at the start of each rib round does not count as a stitch.
Cuff Rnd 1 (conversion round): Ch 1, (sc in next 4 sts, inc) 4 times, sl st to first sc to join. (20 sts worked 1-per-stitch + 4 extra = 24 sts)
Cuff Rnd 2: Ch 2, (FPdc around next st, BPdc around next st) 12 times, sl st to first FPdc to join. (24 sts: 12 FPdc + 12 BPdc)
Cuff Rnds 3–5: Ch 2, (FPdc around the next FPdc, BPdc around the next BPdc) 12 times, sl st to first FPdc to join. (24 sts per rnd)
Cuff Rnd 6: Sl st loosely in each st around, sl st to first sl st. (24 sts) Fasten off with an 8 in (20.3 cm) tail.
Count per side: When you flatten the stocking, each side of the cuff shows 12 sts, which is 6 FPdc ribs on the front and 6 on the back. A round has no corners, so the side folds don’t add stitches. 12 + 12 = 24.
Why the math works: The leg has 20 sts. Going up to 24 makes the cuff 20% wider than the leg, which gives it room to fold down over the leg without pulling tight. It also makes 24 an even number, which you need for an FPdc/BPdc pair repeat. Four rib rounds at about 0.375 in (1.0 cm) each, plus the sc and sl st rounds, add up to about 1.75 in (4.4 cm). Folded in half, that’s the 0.9 in (2.3 cm) band you see.
Fold: Turn the cuff down over the outside of the leg so the slip stitch edge sits about 0.9 in (2.3 cm) below the fold. The fold is now the top edge of the ornament. Use the tail to tack the slip stitch edge to the leg at both side folds with 2 small stitches. Then bury the tail.
Heel
Turn the stocking so the sole faces you and the heel gap is on top. The gap has 10 skipped sts on one edge and the 10 undersides of the chains on the other.
Join yarn at one corner of the gap.
Heel Rnd 1: Ch 1, sc in each of the 10 skipped sts, then sc in the underside of each of the 10 ch. Do not join. Place the marker. (20 sts)
Heel Rnd 2: (Sc in next 3 sts, dec) 4 times. (16 sts)
Heel Rnd 3: (Sc in next 2 sts, dec) 4 times. (12 sts)
Heel Rnd 4: (Sc in next st, dec) 4 times. (8 sts)
If you want a softer, fuller ornament, push a small pinch of fiberfill into the toe and foot now through the heel hole. Keep it light. The stocking should stay flat enough to hang flush against a branch.
Heel Rnd 5: Dec 4 times. (4 sts)
Fasten off and leave a 6 in (15.2 cm) tail. Thread it through the front loops of the last 4 sts, pull tight, and weave it in on the inside.
The four decrease lines spiral in to a single point, which gives the heel its gathered, radiating look. If there are small holes at the two corners of the heel gap, close them from the inside with the yarn tail.
Checkpoint: The heel cup sticks out about 0.8 in (2.0 cm) (5 rnds). The stocking stands about 3.1 in (7.9 cm) from the sole to the top of the leg and about 4 in (10.2 cm) to the cuff fold.
Hanging Loop
Flatten the stocking with the toe pointing to one side. Join yarn with a sl st inside the cuff on the top edge of the leg, at the side fold above the heel.
Ch 15, which should measure about 3 in (7.6 cm). Sl st into the same st where you joined, so the chain forms a loop about 1.5 in (3.8 cm) tall. Fasten off and weave both tails into the leg, under the cuff, where they won’t show.
To make the loop sturdier, sl st back along the chain before you fasten off.
Final Blocking
- Weave in all remaining tails inside the stocking.
- Lay the stocking flat on a blocking mat or folded towel. Put the toe to one side and the heel on the opposite side.
- Lightly mist it with water until it’s damp but not soaked.
- Shape the toe into a smooth round curve and push the heel into a neat cup.
- Pin the leg to 2 in (5.1 cm) wide and the full height to 4 in (10.2 cm) from sole to cuff fold.
- Roll the cuff fold so it sits straight and level, with the ribs running vertically. Don’t pin into the ribs. Just pat them into line.
- Straighten the hanging loop so it stands upright.
- Let it dry completely, about 6–12 hours, before unpinning.
If you use acrylic, a quick pass of steam from above (without touching the iron to the yarn) works better than water. Don’t over-steam the cuff, because the ribs will flatten.
Final Quality-Control Checklist
- Toe is round and smooth, with the magic ring fully closed
- Foot and leg each hold 20 sts, with no extra or lost stitches
- Heel gap closed without holes at the corners
- Heel decrease lines meet at one neat point
- Cuff has 24 sts and 12 clear vertical ribs all the way around
- Cuff folds evenly to about 0.9 in (2.3 cm)
- Finished height about 4 in (10.2 cm), leg width 2 in (5.1 cm)
- Loop sits at the top back edge, is firmly anchored, and is about 1.5 in (3.8 cm) tall
- No ends visible on the outside
Troubleshooting
The toe is pointy, not round. Make sure Rnd 4 has only 2 increases, spaced 8 sts apart. If you stacked increases in Rnd 3, offset them.
The stocking spirals or twists. This is normal for sc in a continuous spiral. Block it straight. You can also do the leg in joined rounds (ch 1, sl st to join) to reduce the twist.
There are holes at the heel corners. Pick up 1 extra st at each corner in Heel Rnd 1, then dec it away in the same round. Or sew the holes closed with the tail.
The cuff ribs lean. Make sure each FPdc goes around an FPdc and each BPdc around a BPdc. Check that your join lands on the first FPdc every round.
The cuff flares or ruffles. Your post stitches are too loose. Drop to a 3.25 mm hook just for the cuff.
The cuff won’t fold neatly. Fold it again and tack it at the sides, then block it with the fold steamed in place.
The ornament is too big. Go down a hook size and keep every count the same.
Care
Hand wash in cool water with mild soap, press out the water in a towel, and dry flat. Store it flat or hang it, away from direct sunlight, so the cream color stays fresh.

Final Notes
The measurement chain is short and easy to check. The toe should be 2 in (5.1 cm) wide at 20 sts. The foot should be 2 in (5.1 cm) long after Rnd 12. The leg should be about 2.33 in (5.9 cm) above the heel gap. The heel adds 0.8 in (2.0 cm) for a 3.1 in (7.9 cm) body. The 24-st cuff adds 0.9 in (2.3 cm) folded, for a finished height of about 4 in (10.2 cm). If the toe checkpoint is right, everything after it will land in place.
Happy crocheting!