

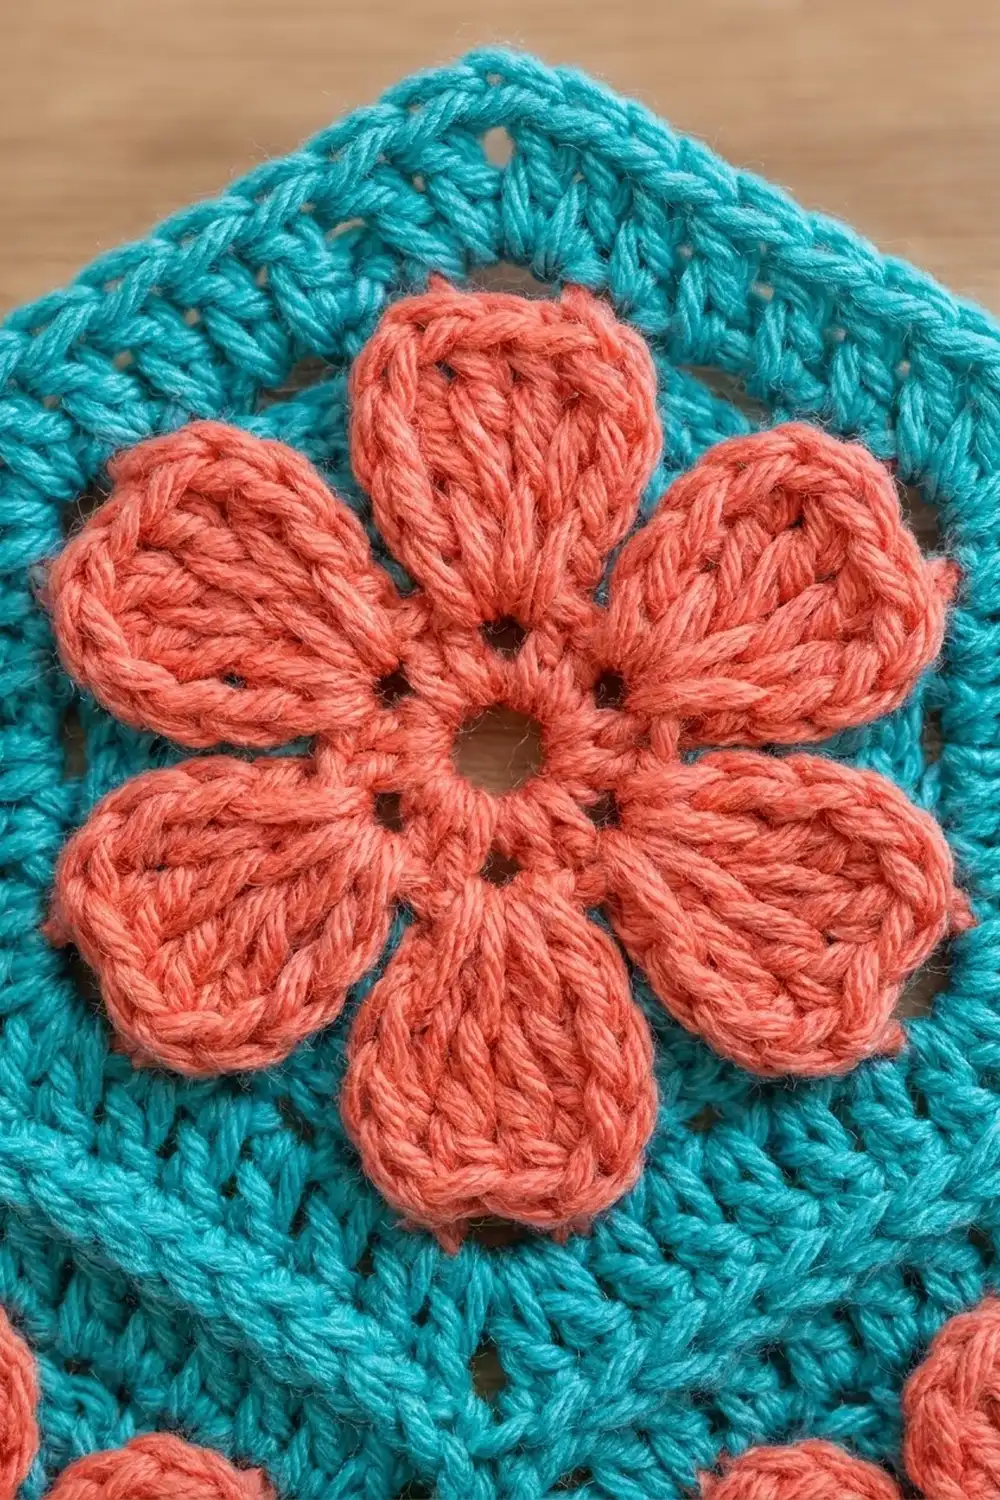
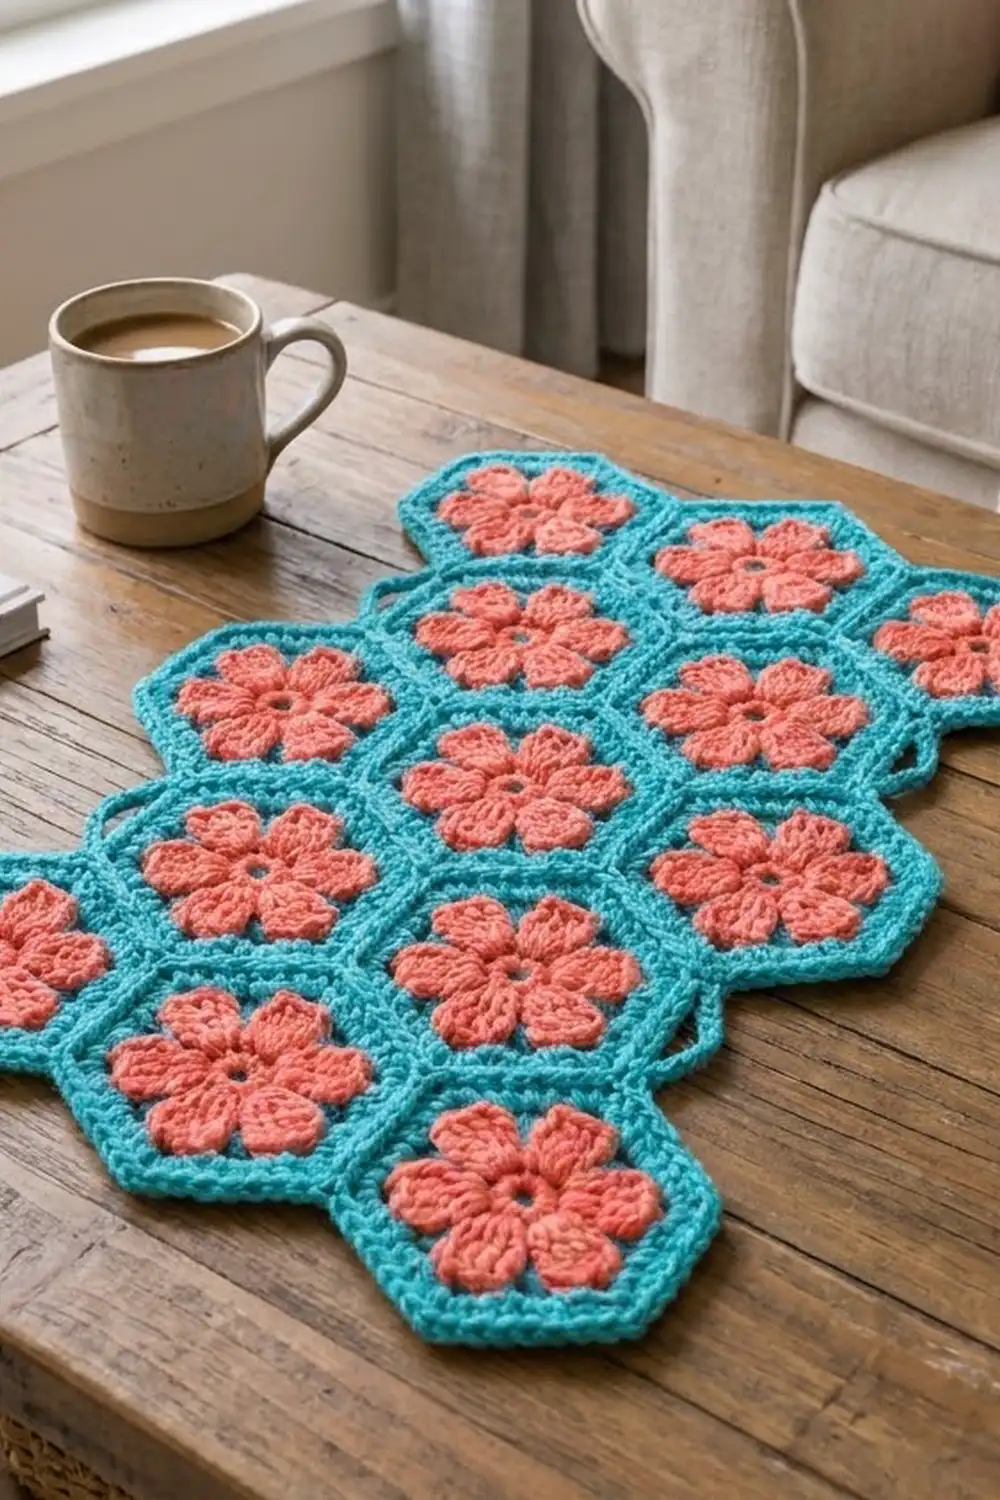
The Coral Bloom Hexagon Panel is a bright, cheerful piece built from thirteen hexagon motifs. Each hexagon has a raised six-petal coral flower set against a solid turquoise background. A crisp teal border follows the zigzag outline.
The colors are warm coral and clear turquoise, a summery mix that looks good on a table, a dresser or the back of a chair. The petals are worked so they stand in front of the hexagon, which gives each flower soft depth and texture.
This pattern uses US crochet terms. The finished panel measures about 17.8 x 27 in (45.2 x 68.6 cm) including the border.
Construction is simple. You make 13 identical motifs, join them in five offset rows (3-2-3-2-3) with a single crochet seam, then work a two-round border around the whole outline.
Finished Size and Construction
- Finished size: 17.8 x 27 in (45.2 x 68.6 cm)
- Skill level: Easy-intermediate
- Terminology: US crochet terms
- Yarn weight: Worsted (#4)
- Hook: 5.0 mm (H-8)
- Number of pieces: 13 hexagon motifs
- Layout: 5 offset rows of 3-2-3-2-3, pointy-top hexagons
- Motif size: 5.6 in (14.2 cm) flat side to flat side; 6.5 in (16.5 cm) point to point; side length 3.25 in (8.3 cm)
- Size before border: 16.8 x 26 in (42.7 x 66.0 cm)
- Border depth: 0.5 in (1.3 cm), 2 rounds
Materials
Choose a smooth worsted-weight cotton, cotton blend or soft acrylic. A smooth yarn keeps the petal texture clear and the seams tidy. Avoid fuzzy or very splitty yarns.
- Coral (flowers): 65 g / about 130 m
- Turquoise (background, joining, border): 175 g / about 350 m
These quantities include a margin of about 15–20% for gauge differences and a test motif.
Tools:
– 5.0 mm (H-8) crochet hook
– Tapestry needle
– Scissors
– Stitch markers
– Measuring tape
– Blocking mats and rust-proof pins
– Spray bottle
Abbreviations (US Terms)
- ch – chain
- sl st – slip stitch
- sc – single crochet
- hdc – half double crochet
- dc – double crochet
- sp – space
- st(s) – stitch(es)
- sk – skip
- sc2tog – single crochet 2 together
- sc3tog – single crochet 3 together
- RS / WS – right side / wrong side
Special stitch – BPsc (back post single crochet): Working from the back, insert the hook from back to front to back around the post of the stitch. Yarn over and pull up a loop, then yarn over and pull through both loops. This places the stitch behind the work so the petals stay in front.
Standing sc: Start with a slip knot on the hook, then work a sc as normal.
Gauge and Checkpoints
Gauge: 16 sc = 4 in (10.2 cm) in turquoise.
Make one complete motif first and measure it before you start the rest. Check it at each stage:
- After Rnd 1: 1.5 in (3.8 cm) across
- After Rnd 3: 3.25 in (8.3 cm) from petal tip to opposite petal tip
- After Rnd 5: 4.2 in (10.7 cm) flat to flat
- After Rnd 6: 5.1 in (13.0 cm) flat to flat
- After Rnd 7: 5.6 in (14.2 cm) flat to flat, with each side 3.25 in (8.3 cm)
If your motif is too big: go down to a 4.5 mm hook. If it’s too small: go up to a 5.5 mm hook. A difference of 0.25 in (0.6 cm) per motif adds up to about 0.75 in (1.9 cm) across the panel’s width, so it’s worth fixing now.
Hexagon Motif (make 13)
Flower (Coral)
Rnd 1: Make a magic ring. Ch 3 (counts as dc), work 11 dc into the ring, then sl st to the top of the beg ch-3. Pull the ring snug but leave a small open center. (12 dc)
Rnd 2: Ch 1, sc in the same st, ch 3, sk next dc. Sc in next dc, ch 3, sk next dc; repeat from * 4 more times. Sl st to first sc. (6 sc, 6 ch-3 sps)
Rnd 3 (petals): Sl st into the first ch-3 sp. Work (sc, hdc, 3 dc, hdc, sc) in each ch-3 sp around. Sl st to first sc. (6 petals of 7 sts each = 42 sts)
Fasten off coral and weave in the ends. The petals should cup slightly. That’s normal, and blocking relaxes them.
Hexagon (Turquoise)
Rnd 4: Fold the petals toward you. Join turquoise with a standing BPsc around the post of any Rnd 2 sc (these sc sit between petals). Ch 5 behind the next petal. BPsc around the next Rnd 2 sc, ch 5; repeat from * 4 more times. Sl st to first BPsc. (6 sc, 6 ch-5 sps)
Each ch-5 sp sits directly behind one petal. This is what sends each petal toward a corner.
Rnd 5: Sl st into the first ch-5 sp. Ch 3 (counts as dc), then work (2 dc, ch 2, 3 dc) in the same sp. (3 dc, ch 2, 3 dc) in next ch-5 sp; repeat from * 4 more times. Sl st to top of beg ch-3. (36 dc, 6 ch-2 corners; 6 dc per side between corners)
Rnd 6: Sl st in the next 2 dc and into the ch-2 sp. Ch 3 (counts as dc), then work (dc, ch 2, 2 dc) in the same sp. Dc in each of the next 6 dc. (2 dc, ch 2, 2 dc) in next ch-2 sp, dc in each of next 6 dc; repeat from * 4 more times. Sl st to top of beg ch-3. (60 dc, 6 ch-2 corners; 10 dc per side between corners)
Rnd 7: Ch 1. Sc in the same st as the join and in the next dc. (Sc, ch 2, sc) in the ch-2 sp. Sc in each of next 10 dc, (sc, ch 2, sc) in next ch-2 sp; repeat from * 4 more times. Sc in each of the last 8 dc, then sl st to first sc. (72 sc, 6 ch-2 corners)
Side count: each side now has 12 sc between corner ch-2 sps. That’s 1 corner sc + 10 + 1 corner sc. In this pattern the ch-2 corner sp is counted separately and is not part of the 12.
Fasten off, leaving a 6 in (15.2 cm) tail, and weave in the ends.
Make All Pieces
- Motifs: 13 total
- Coral per motif: about 4 g (Rnds 1–3)
- Turquoise per motif: about 9 g (Rnds 4–7)
Layout (pointy-top hexagons, each row offset by half a motif):
Row 1:  H   H   H
Row 2:    H   H
Row 3:  H   H   H
Row 4:    H   H
Row 5:  H   H   H
The 2-motif rows sit in the dips between the motifs above and below them. This leaves a notch at each side of Rows 2 and 4.
Joining
Method: sc seam with the WS together, so a slightly raised teal ridge forms on the RS.
Stitch-to-stitch logic: every motif side has 12 sc plus a ch-2 corner sp at each end. When two sides are held together, the stitches match one to one. Work through both layers:
- 1 sc in the stacked corner sps
- 1 sc in each of the 12 matching sc pairs
- 1 sc in the next stacked corner sps
That’s 14 sc per single seam.
Step 1 – Join motifs within each row. In Rows 1, 3 and 5, join motif 1 to motif 2 along their vertical sides, then motif 2 to motif 3. In Rows 2 and 4, join the two motifs. That makes 8 seams in total.
Step 2 – Join the rows. Lay Row 2 below Row 1. The top two sides of each Row 2 motif meet the bottom sides of the Row 1 motifs, which forms a zigzag of 4 sides. Work it as one continuous seam: 12 sc along each side, plus 1 sc in the stacked corner sps at each of the 5 points of the zigzag. That’s 53 sc per row-to-row seam. Where three corner sps meet, work through as many layers as you comfortably can. Repeat for Rows 2–3, 3–4 and 4–5, which gives 16 sides in total.
That’s 24 shared sides altogether: 8 + 16.
Tension: keep the seam sc the same size as your motif sc. If the seam is tight, the panel puckers. If it’s loose, the ridge gets floppy. Lay the panel flat after each row join.
Checkpoint: the joined panel should measure 16.8 in (42.7 cm) wide and 26 in (66.0 cm) tall.
The width is 3 motifs x 5.6 in. The height is 6.5 in for the first motif, plus 4 row steps of 4.875 in each. A row step is 1.5 x the side length.
Border (Turquoise)
Border gauge: same as the motifs, 16 sc = 4 in (10.2 cm). Each round adds about 0.25 in (0.6 cm).
The panel’s outline has 30 exposed motif sides, each with 12 sc. You’ll meet two kinds of corner as you work around:
- 18 outer points, where only one motif touches the edge
- 12 valleys, where two motifs meet at the edge
Rnd 1: Join with a standing sc in any sc right after an outer point.
- Each exposed side: sc in each of the 12 sc.
- Each outer point: (sc, ch 2, sc) in the ch-2 corner sp.
- Each valley: sc2tog, pulling up the first loop in the corner sp of one motif and the second loop in the corner sp of the next motif. Skip the seam stitch between them.
Sl st to first sc.
Count: 30 sides x 12 sc = 360 sc, plus 18 points x 2 sc = 36 sc, plus 12 sc2tog = 12. Total 408 sts and 18 ch-2 sps.
For example, a side running from one outer point to the next has 14 sts between its ch-2 sps: 1 + 12 + 1.
Rnd 2: Ch 1.
- Each st along the edge: sc in it.
- Each outer point: (sc, ch 2, sc) in the ch-2 sp.
- Each valley: sc3tog over the sc before the sc2tog, the sc2tog itself, and the sc after it.
Sl st to first sc and fasten off.
Count: 408 sts, minus 2 per valley (12 x 2 = 24), plus 2 per outer point (18 x 2 = 36). Total 420 sts and 18 ch-2 sps. A side running from one outer point to the next now has 16 sts between its ch-2 sps: 1 + 14 + 1.
Why the math works: an outer edge is longer than the edge inside it, so each outer point gains 2 sts per round to stay flat. A valley’s edge is shorter than the edge inside it, so each valley loses 2 sts per round to stop ruffling. There are 6 more outer points than valleys (18 − 12), which matches the six 60° turns of any closed hexagon outline. The border therefore lies flat all the way around.
Final size: 16.8 + 1 = 17.8 in (45.2 cm) wide, and 26 + 1 = 27 in (68.6 cm) tall.
Final Blocking
- Weave in all remaining ends along seams or behind the petals.
- Lay the panel RS up on blocking mats.
- Pin the three top points of Row 1 in a straight line, 16.8 in (42.7 cm) apart edge to edge, measured inside the border.
- Pin the bottom points of Row 5 so the total height is 27 in (68.6 cm).
- Pin each outer point and push each valley gently inward, keeping every motif side straight.
- Mist evenly until damp, not soaked. For acrylic, use light steam held above the fabric instead, and don’t press.
- Shape the petals with your fingertips so they curve forward and stand evenly.
- Leave to dry completely before unpinning, usually 12–24 hours.
Final Quality-Control Checklist
- 13 motifs, each 5.6 in (14.2 cm) flat to flat
- Every motif has 72 sc in Rnd 7 (12 per side) and 6 corner sps
- All six petals point toward corners and sit in front of the turquoise
- Flower centers are small and even, with no loose rings
- Rows run 3-2-3-2-3, with the offset rows centered in the dips
- Seam ridges are even, with no gaps at three-way junctions
- Border Rnd 2 has 420 sts and 18 ch-2 points
- Panel lies flat at 17.8 x 27 in (45.2 x 68.6 cm)
Troubleshooting
- Petals flop backward: you worked Rnd 4 as front post. Redo it with BPsc so the chains sit behind the petals.
- Motif cups: Rnd 5 chains may be too short for your tension. Try ch 6 in Rnd 4, or loosen up on the dc rounds.
- Motif ruffles: your dc tension is loose. Go down a hook size for Rnds 5–6 only.
- Sides don’t match when joining: recount Rnd 7. Each side must have exactly 12 sc.
- Holes at three-way junctions: work the junction sc through all three corner sps, or tighten with the tail on the WS.
- Border ripples at points: check that each outer point has the (sc, ch 2, sc). Border puckers in valleys: check that you worked the sc2tog or sc3tog.
- Panel is skewed: re-block, pinning the row lines straight first.
Care
Hand wash in cool water with a mild detergent, gently squeeze out the water, and dry flat, reshaping the points while damp. Cotton versions can go in a mesh bag on a gentle cycle, but always dry flat.
Final Notes
Everything in this panel follows one measurement chain:
- 16 sc = 4 in gives a motif side of 12 sc, about 3.25 in (8.3 cm).
- That side makes a motif 5.6 in (14.2 cm) wide.
- Thirteen motifs in a 3-2-3-2-3 layout make a panel of 16.8 x 26 in (42.7 x 66.0 cm).
- The 0.5 in (1.3 cm) border brings it to 17.8 x 27 in (45.2 x 68.6 cm).
If your first motif hits its checkpoints, the rest of the panel will fall into place.
Happy crocheting!