

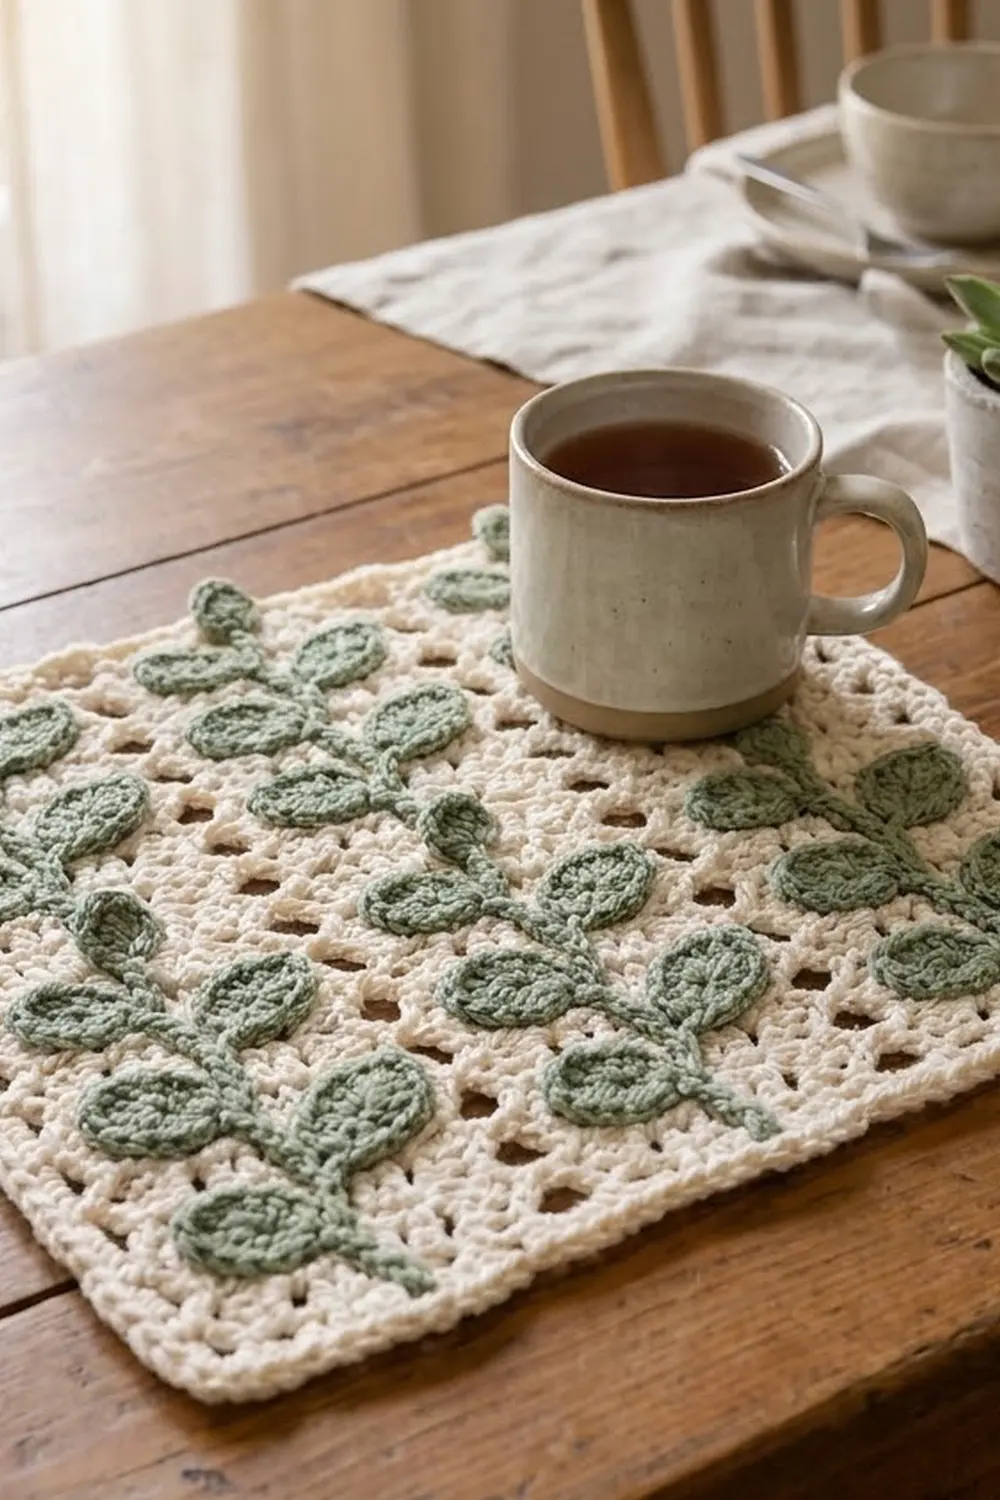
The Sage Trellis Vine Lace Panel is a single rectangle of airy cream fishnet mesh with three sage-green vines climbing straight up it. Each vine has a solid green stem, a small round bud at the top and twelve plump oval leaves that alternate from side to side. A firm corded border frames the lace and keeps the edges straight.
The palette uses just two colors: warm cream for the mesh and border, and soft sage green for the stems, leaves and buds. The look is quiet and botanical. You can use the panel as a placemat, a doily or a framed wall piece.
This pattern uses US crochet terms throughout. After blocking, the panel measures 9 in x 11.5 in (22.9 cm x 29.2 cm).
You work the mesh flat in rows and finish it with a two-round border. Then you make three stems, 36 leaves and 3 buds separately and sew them onto the mesh. Each measurement in this pattern builds on the one before it, so if every checkpoint matches, the finished size will match too.
Finished Size and Construction
- Finished size: 9 in x 11.5 in (22.9 cm x 29.2 cm)
- Skill level: Intermediate (the stitches are easy, but the vines need careful placement)
- Terminology: US crochet terms
- Yarn weight: DK (light worsted, #3) cotton
- Hook: 4.0 mm (US G-6)
- Number of pieces: 1 mesh panel plus 3 vine appliqués (3 stems, 36 leaves and 3 buds), sewn into one finished panel
- Layout: 3 vertical vines, evenly spaced, each with 12 alternating leaves and 1 bud at the top
- Piece size: 9 in x 11.5 in (22.9 cm x 29.2 cm)
- Size before border: 8 in x 10.5 in (20.3 cm x 26.7 cm)
- Border depth: 0.5 in (1.3 cm) on every side
Materials
Choose a smooth mercerized or combed cotton in DK weight. Cotton keeps the open mesh crisp and blocks flat. Avoid fuzzy or splitty yarns, because the fishnet loops need clear definition.
- Color A, Cream: 50 g, about 110 m
- Color B, Sage Green: 35 g, about 75 m
These quantities include a margin of about 20%. That leaves enough for a test leaf, a gauge swatch and sewing tails.
Tools:
- 4.0 mm (US G-6) crochet hook
- Blunt tapestry needle
- 6–8 locking stitch markers
- Rust-proof pins
- Ruler or tape measure
- Blocking mat or folded towel
- Spray bottle
- Scissors
Abbreviations (US Terms)
- ch – chain
- sl st – slip stitch
- sc – single crochet
- hdc – half double crochet
- dc – double crochet
- sk – skip
- sp – space
- st(s) – stitch(es)
- RS – right side
- rev sc – reverse single crochet
Special stitch – Reverse single crochet (rev sc, also called crab stitch): Work from left to right (if you crochet right-handed). Insert the hook into the next stitch to the right, yarn over and pull up a loop. Yarn over again and pull through both loops. This makes a twisted, rope-like edge.
Gauge and Checkpoints
Before you start the full piece, make one test leaf and work the first few rows of the panel.
- Sc gauge: 41 sc = 8 in (20.3 cm), about 5 sc per inch
- Mesh gauge: 4 mesh rows = 2 in (5.1 cm), so each mesh row is 0.5 in (1.3 cm) tall
- Sc rows: each sc row is 0.25 in (0.6 cm) tall
- Stem gauge: 11 ch = 2 in (5.1 cm) after you slip-stitch back along the chain
- Leaf: 1 in (2.5 cm) long x 0.6 in (1.5 cm) wide
Checkpoints:
- After Row 1, the strip measures 8 in (20.3 cm) wide.
- After Row 11, the panel measures 5.25 in (13.3 cm) tall.
- After Row 22, the panel measures 8 in x 10.5 in (20.3 cm x 26.7 cm).
- After the border, the panel measures 9 in x 11.5 in (22.9 cm x 29.2 cm).
- Each stem measures 10 in (25.4 cm).
If your piece is too big, go down to a 3.75 mm hook. If it is too small, go up to a 4.5 mm hook. Change the hook, not the stitch counts, because the border and the vine placement depend on these exact numbers. You can also adjust the mesh height by up to 0.25 in (0.6 cm) when blocking.

Mesh Panel
With Color A, ch 42.
Row 1: Sc in 2nd ch from hook and in each ch across, turn. (41 sc)
Row 2 (mesh row A): Ch 1, sc in first sc, *ch 5, sk 3 sc, sc in next sc; repeat from * 9 more times, turn. (11 sc, 10 ch-5 loops)
Row 3 (mesh row B): Ch 5 (counts as dc + ch 2), sc in first ch-5 loop, *ch 5, sc in next ch-5 loop; repeat from * 8 more times, ch 2, dc in last sc, turn. (10 sc, 9 ch-5 loops, 2 ch-2 half loops and 2 dc counting the turning ch)
Row 4 (mesh row A): Ch 1, sc in first dc, sk ch-2 sp, *ch 5, sc in next ch-5 loop; repeat from * 8 more times, ch 5, sc in 3rd ch of turning ch, turn. (11 sc, 10 ch-5 loops)
Each sc in an A row sits directly above the sc in the A row below it. That stacking makes the diamond trellis and gives you straight columns for placing the vines.
Rows 5–21: Repeat Rows 3 and 4 eight more times, then work Row 3 once more. Row 21 is a B row. You now have 20 mesh rows: 10 A rows and 10 B rows.
Row 22 (top edge): Ch 1, sc in first dc, sc in ch-2 sp, sc in next sc, *3 sc in next ch-5 loop, sc in next sc; repeat from * 8 more times, sc in ch-2 sp, sc in 3rd ch of turning ch. Fasten off. (41 sc: 1 + 1 + 1 + 36 + 1 + 1)
Row 22 has the same count as Row 1, so the top and bottom edges are the same width. The panel should now measure 8 in x 10.5 in (20.3 cm x 26.7 cm). The height is 0.25 in + 10 in + 0.25 in (0.6 cm + 25.4 cm + 0.6 cm).
Border
Border gauge: about 5 sc per inch on every side. The top and bottom have 41 sts over 8 in (20.3 cm). The sides have 50 sts over the 10 in (25.4 cm) of mesh rows.
Round 1 (sc): With the RS facing you, join Color A in the first sc of Row 22. Ch 1, then work:
- Top: 3 sc in first st (corner), sc in each of next 39 sts, 3 sc in last st (corner).
- Side 1: Work down the row ends of Rows 21 to 2. Work 3 sc around each B-row end (the dc or turning ch) and 2 sc in each A-row end (the sc). That gives 10 x 3 + 10 x 2 = 50 sc.
- Bottom: Work into the opposite loops of the foundation ch: 3 sc in first ch (corner), sc in each of next 39 ch, 3 sc in last ch (corner).
- Side 2: Work up the row ends of Rows 2 to 21 the same way as Side 1. (50 sc)
Sl st to the first sc. Count: 39 + 39 + 50 + 50 between the corners, plus 4 corners x 3 sc = 190 sc.
The 3-sc corner groups cover the row ends of Rows 1 and 22, so don’t add stitches there. Each corner stitch is counted once, inside its 3-sc group.
Round 2 (rev sc): Ch 1, rev sc in each sc around, sl st to the first rev sc. Fasten off. Count: 190 worked 1 per existing stitch + 0 added = 190 rev sc.
Why the math works: Each side gets about 5 sc per inch, which matches the sc gauge of the fabric, so the edge won’t ruffle or pull in. The 3-sc corners in Round 1 turn each corner cleanly, so Round 2 needs no increases. Two rounds at 0.25 in (0.6 cm) each add 0.5 in (1.3 cm) per side. The width becomes 8 in + 1 in = 9 in (22.9 cm), and the height becomes 10.5 in + 1 in = 11.5 in (29.2 cm).
Vine Stems (Make 3)
With Color B, ch 56.
Row 1: Sl st in the back bump of the 2nd ch from hook and of each ch across. Fasten off, leaving a 20 in (50.8 cm) tail for sewing. (55 sl sts)
Each stem measures 10 in (25.4 cm). It is a firm, slightly raised cord that shows as one solid green line on the mesh.
Leaves (Make 36)
With Color B, ch 7. The leaf is worked in one round along both sides of the chain.
Round 1: Sc in 2nd ch from hook, hdc in next ch, dc in next 2 ch, hdc in next ch, 3 sc in last ch. Turn the work to the other side of the chain and work into the opposite loops: hdc in next ch, dc in next 2 ch, hdc in next ch, sc in next ch (the same ch as the first sc). Sl st to the first sc. Fasten off, leaving a 10 in (25.4 cm) tail. (13 sts: 5 + 3 + 5)
The skipped chain gives the leaf a soft rounded tip. The end with the 3 sc is the base, which goes against the stem. Each leaf is a plump oval, 1 in (2.5 cm) long and 0.6 in (1.5 cm) wide.
Buds (Make 3)
With Color B, make a magic ring.
Round 1: Ch 1, 6 sc in ring, sl st to the first sc. Pull the ring tight. Fasten off, leaving a 10 in (25.4 cm) tail. (6 sc)
Each bud is a small solid circle about 0.4 in (1.0 cm) across.
Attaching the Vines
Block the bordered panel before you sew (see Final Blocking). It is much easier to place the vines on flat, square lace.
1. Mark the stem columns. Each A row has 11 sc. In Row 2 and in Row 20, count from the right edge and mark the 3rd, 6th and 9th sc. These are stitches 9, 21 and 33 of the 41-st rows. The vines are 12 sts apart, about 2.3 in (5.8 cm). Each outer vine sits 8 sts, about 1.6 in (4.1 cm), in from the edge of the body, so the layout is centered.
2. Sew the stems. Lay one stem along a marked column, with the bottom end on Row 2 and the top end on Row 21. Using the tail, whipstitch the stem to every A-row sc in that column. Also catch each B-row ch-5 loop where it crosses the column. Keep your stitches small and the tension light so the mesh doesn’t pucker. Repeat for all three stems.
3. Mark the leaf positions. On each stem, counting from the top, place markers at sl sts 5, 9, 13, 17, 21, 25, 29, 33, 37, 41, 45 and 49. That gives 12 positions about 0.75 in (1.9 cm) apart. The bottom 6 sts, about 1.1 in (2.8 cm), stay bare.
4. Sew the leaves. Alternate sides: left at sl st 5, right at sl st 9, and so on, ending on the right at sl st 49. That puts 6 leaves on each side. Set each leaf base against the stem and angle the leaf upward at about 45 degrees. Sew the base firmly to the stem. Then tack the tip and both edges to the mesh with 3–4 small stitches.
5. Sew the buds. Center one bud at the top end of each stem so it slightly overlaps Rows 21 and 22. Whipstitch around its edge.
Weave in all ends on the wrong side, behind the green appliqués, where they won’t show.
Final Blocking
- Wet the panel in cool water. Press out the extra water in a towel, without wringing.
- Lay it RS up on a blocking mat.
- Pin the four corners to a 9 in x 11.5 in (22.9 cm x 29.2 cm) rectangle.
- Pin along each side every 1.5 in (3.8 cm), keeping the edges straight.
- Use your fingertips to open the mesh diamonds evenly.
- Smooth each leaf flat and set it at a clean 45-degree angle.
- Let the panel dry completely, then unpin it and trim the ends.
Final Quality-Control Checklist
- Rows 1 and 22 each have 41 sc.
- There are 20 mesh rows, alternating A and B, and each A row has 10 ch-5 loops.
- Border Round 1 has 190 sc, with 3 sc in each corner.
- Border Round 2 has 190 rev sc.
- The body measured 8 in x 10.5 in (20.3 cm x 26.7 cm) before the border.
- The finished panel measures 9 in x 11.5 in (22.9 cm x 29.2 cm).
- Each stem has 55 sl sts and measures 10 in (25.4 cm).
- There are 36 leaves of 13 sts each, 12 per vine, alternating sides.
- There are 3 buds, one at the top of each stem.
- The stems are straight and parallel, on sts 9, 21 and 33.
Troubleshooting
Mesh is narrower than 8 in (20.3 cm): Your ch-5 loops are too tight. Go up a hook size or loosen your chains.
Panel is taller than 10.5 in (26.7 cm): Your loops are loose and drooping. Go down a hook size, or pin more firmly across the width when blocking.
Edge ripples: There are too many border stitches. Recount each side to 50 sc, with 2 sc in A-row ends and 3 sc in B-row ends.
Corners curl: Check that each corner has 3 sc, and loosen your rev sc tension.
Leaves look flat or pointed: Make sure the 2 dc go into separate chains on each side and the 3 sc go into the last ch.
Mesh puckers under a stem: Unpick that section and resew it with looser whipstitches.
Vines drift diagonally: Mark sts 9, 21 and 33 in several A rows, and pin each stem in place before you sew.
Care
Hand wash in cool water with mild soap, reshape and dry flat. Don’t tumble dry, because heat can distort the lace and the leaves.
Final Notes
Each measurement builds on the one before it. 41 sc make 8 in (20.3 cm) of width. 20 mesh rows plus 2 sc rows make 10.5 in (26.7 cm) of height. The 190-stitch, two-round border adds 0.5 in (1.3 cm) on each side, for a finished panel of 9 in x 11.5 in (22.9 cm x 29.2 cm). Three 10 in (25.4 cm) stems sit 12 sts apart, and 36 leaves and 3 buds complete the vines. Check each number as you go, and the panel will come out flat, square and true to size.
Happy crocheting!