

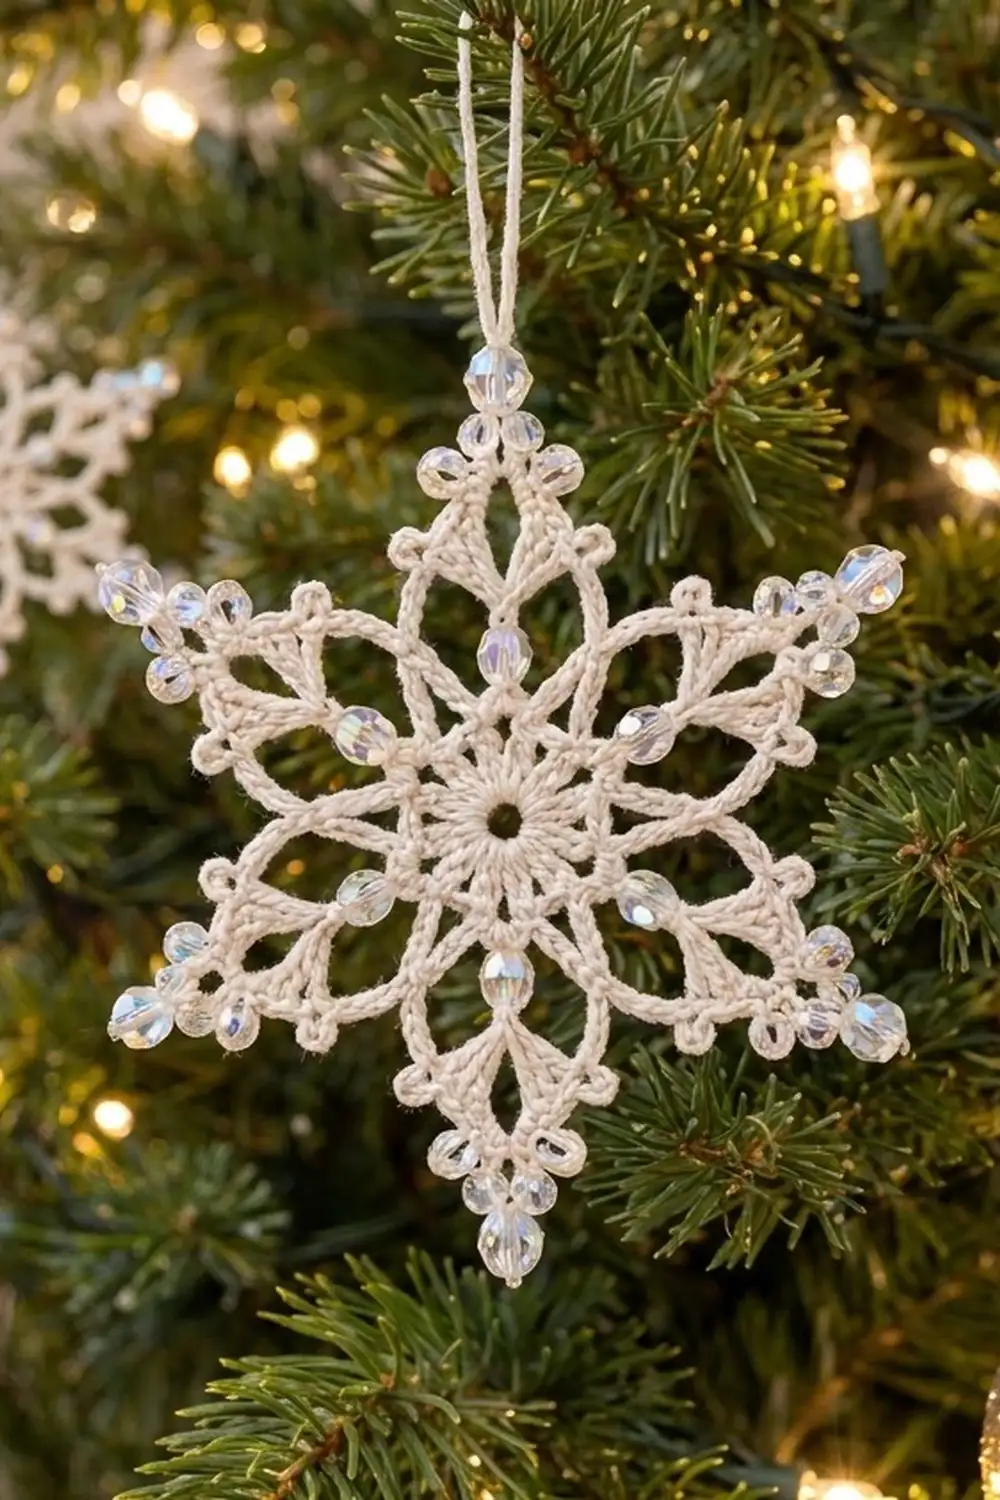
The Frostlight Snowflake is a six-pointed lace ornament with sparkle built right in. Every arm ends in a cluster of three crystal beads. Each side lobe holds one bead, and one more bead sits in each valley between the arms, so the snowflake catches light from every angle.
It uses one color of soft cream cotton thread with clear AB (aurora borealis) beads. The look is classic, calm and wintry. It works on a tree, in a window, as a gift tag or tied onto a wrapped package.
This pattern uses US crochet terms. After blocking, the snowflake measures 5 in (12.7 cm) from tip to opposite tip.
The construction is simple. First you string all the beads onto the thread. Then you work six rounds outward from a chain ring:
– Rounds 1 to 3 build the solid center and the inner star.
– Rounds 4 and 5 build the lace frame and the arms.
– Round 6 is the beaded edging that finishes every arm.
A light starch blocking sets the points.
Finished Size and Construction
- Finished size: 5 in (12.7 cm) tip to opposite tip
- Skill level: Easy-intermediate (thread and beads, but only basic stitches)
- Terminology: US crochet terms
- Yarn weight: Size 3 cotton crochet thread (Lace / 0 weight)
- Hook: 2.25 mm (US B-1)
- Number of pieces: 1
- Layout: Single motif, worked in the round
- Piece size: 5 in (12.7 cm) tip to tip
- Size before edging (end of Round 5): 4.25 in (10.8 cm) tip to tip
- Edging depth (Round 6): 0.375 in (1.0 cm) at each tip
Materials
Thread: Choose a mercerized size 3 cotton crochet thread. Mercerized cotton holds starch well, has a soft sheen and keeps lace edges crisp. Avoid fuzzy or acrylic threads because they won’t hold the points.
- Cream (main color): 8 g / 22 m (24 yd)
Beads:
- 40 faceted crystal or glass beads, 4 mm, clear AB finish (36 needed, plus 4 spares)
- Bead holes must be at least 1 mm so the beads slide freely over size 3 thread
- Beads should be the same size so the tip clusters look even. Set aside any chipped or misshapen ones before stringing.
Tools:
- 2.25 mm (US B-1) crochet hook
- Big-eye beading needle or dental-floss threader, for stringing beads
- Tapestry needle, for weaving in ends
- Scissors
- Fabric stiffener or spray starch
- Blocking board or foam mat, plastic wrap and rustproof pins
- Ruler or tape measure
All quantities include a margin of about 25 percent for your test rounds and tails.
Abbreviations (US Terms)
- ch – chain
- sl st – slip stitch
- sc – single crochet
- dc – double crochet
- sp(s) – space(s)
- sk – skip
- st(s) – stitch(es)
- rep – repeat
Special stitches:
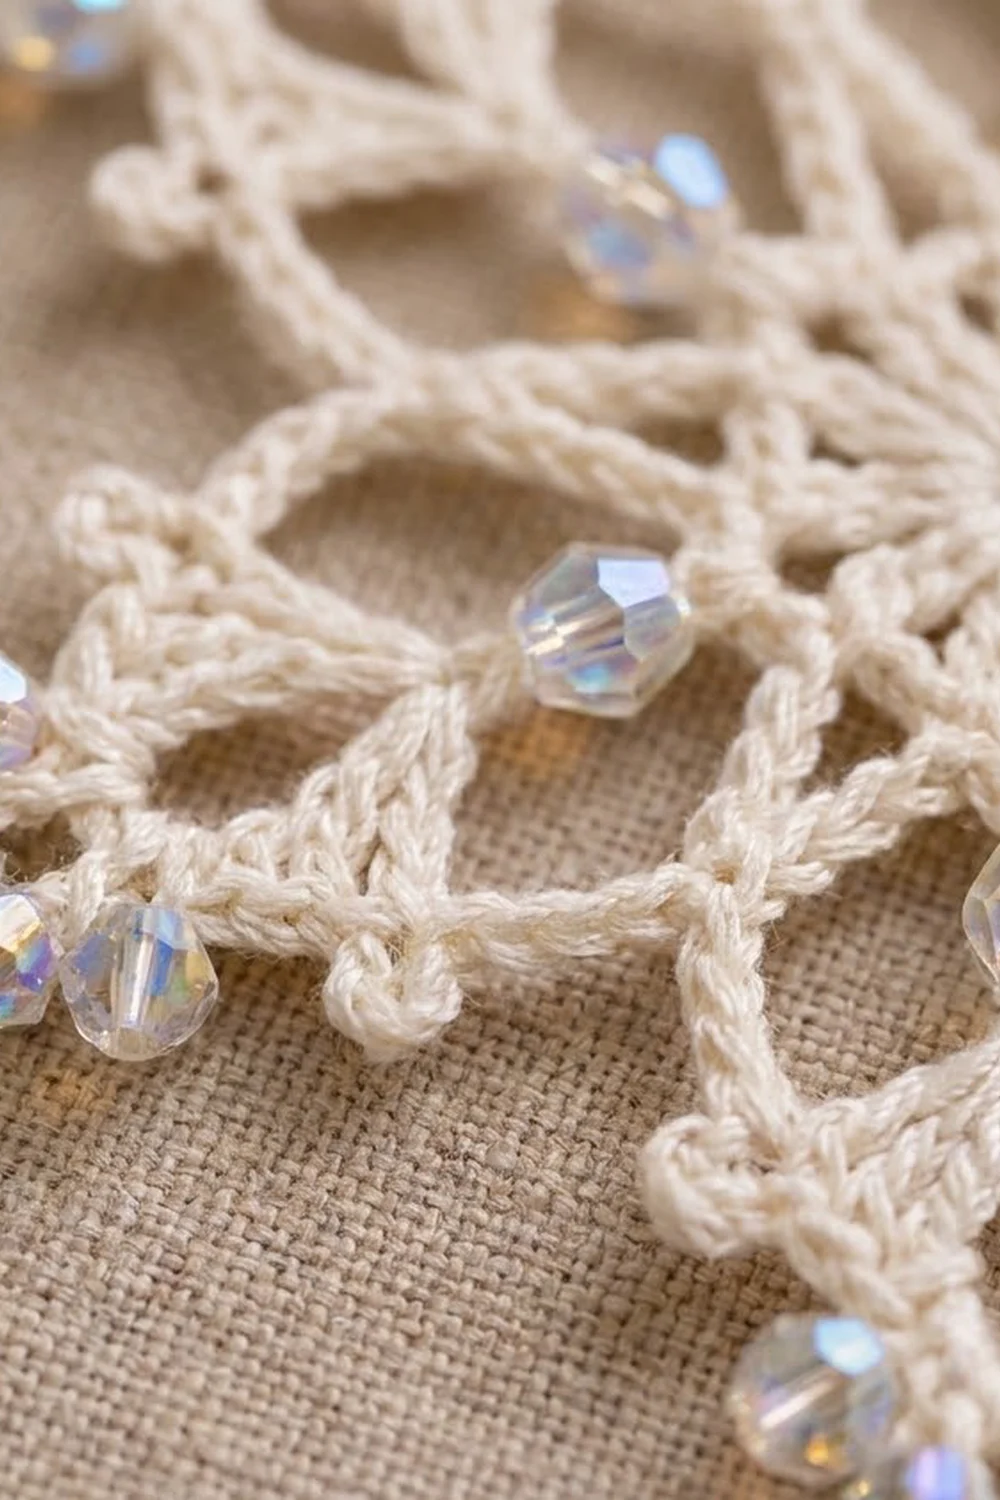
- Bead picot (bp): Ch 1, slide 1 bead up snug against the hook, ch 2 (the first of these 2 ch locks the bead in place), then sl st in the first ch of this picot. The bead sits at the outer tip of a small loop.
- 3-bead picot (3bp): Ch 1, slide 3 beads up snug against the hook, ch 2, then sl st in the first ch of this picot. The three beads bunch into a small cluster at the tip of the loop.
Stringing: Before you start, use the beading needle to thread 40 beads onto the ball end of the thread. Push them about 1 yd (0.9 m) down the thread, away from the working end, and slide them forward only when you need them.
Bead tip: The beads ride along the thread through Rounds 1 to 5. Every few rounds, push them back toward the ball so they don’t rub against your stitches or slow you down.
Gauge and Checkpoints
For thread lace, gauge is checked with diameter checkpoints rather than a square swatch. Work Rounds 1 to 3 once as a test before you commit.
- After Round 1: 0.75 in (1.9 cm) across
- After Round 2: 1.25 in (3.2 cm) across
- After Round 3: 2 in (5.1 cm) across, from petal tip to opposite petal tip
- After Round 4: 3 in (7.6 cm) across, tip to opposite tip
- After Round 5: 4.25 in (10.8 cm) tip to opposite tip
- After Round 6 and blocking: 5 in (12.7 cm) tip to opposite tip
At Round 3, a difference of up to 0.25 in (0.6 cm) is fine.
– Too big: If Round 3 measures more than 2.25 in (5.7 cm), switch to a 2.0 mm hook.
– Too small: If it measures less than 1.75 in (4.4 cm), switch to a 2.5 mm hook.
Unblocked lace often cups slightly, so flatten it gently with your fingers before measuring.
Pattern
Keep the beads pushed well away from the work. Rounds 1 to 5 use no beads.
Round 1 – Center Ring
Ch 6, then sl st in the first ch to form a ring.
Ch 3 (counts as dc). Work 17 dc in the ring. Sl st in the top of the beginning ch-3 to join.
Count: 18 dc.
The ring leaves the small open hole at the center of the finished snowflake.
Round 2 – Six Groups
Ch 3 (counts as dc), dc in next 2 sts, ch 3. Dc in next 3 sts, ch 3. Rep from * 4 more times. Sl st in the top of the beginning ch-3 to join.
Count: 18 dc in 6 groups of 3, plus 6 ch-3 sps.
Round 3 – Inner Star
Sl st in the next dc (the center dc of the first group). Ch 1, sc in the same st. Work (3 dc, ch 3, 3 dc) in next ch-3 sp, then sc in the center dc of the next 3-dc group. Rep from * 5 more times, leaving out the final sc on the last repeat. Sl st in the first sc to join.
Count: 6 sc, 36 dc, 6 ch-3 tip sps.
This makes six solid wedge-shaped petals. Each petal points outward to a ch-3 tip, and the sc stitches anchor the dips between petals.
Round 4 – Lace Hexagon
Sl st in next 3 dc and into the ch-3 tip sp. Ch 1, work (sc, ch 4, sc) in the same sp, ch 7. Work (sc, ch 4, sc) in next ch-3 tip sp, ch 7. Rep from * 4 more times. Sl st in the first sc to join.
Count: 12 sc, 6 ch-4 tip sps, 6 ch-7 valley loops.
The ch-7 loops arch over the dips of Round 3 and form the open ring of lace around the inner star. Keep these chains even. The loops should lie flat without pulling the petal tips inward.
Round 5 – Arms
Sl st in next ch-4 tip sp. Ch 1. Work (sc, ch 5, sc, ch 9, sc, ch 5, sc) all in the same ch-4 tip sp, then work 5 sc in the next ch-7 valley loop. Move to the next ch-4 tip sp and rep from * 5 more times. Sl st in the first sc to join.
Count per repeat: 9 sc (4 in the tip, 5 in the valley), 2 ch-5 side loops, 1 ch-9 tip loop.
Count for the round: 54 sc, 12 ch-5 side loops, 6 ch-9 tip loops.
Each arm now has a long center loop pointing outward and a shorter lobe on each side.
Round 6 – Beaded Edging
Round 6 is the finishing edge. It’s written out in full in the Border section below.
Border
On a snowflake, the “border” is the beaded single-crochet edging that wraps every loop of Round 5. There’s no joining step because this is one single piece.
Border Gauge
The edging puts slightly more than one sc per chain into each loop. This small overfill makes the loops curve outward into firm, rounded lobes instead of lying slack.
- Each ch-5 side loop gets 6 sc plus 1 bead picot.
- Each ch-9 tip loop gets 10 sc plus 1 three-bead picot.
Round 6
Sl st in next ch-5 side loop. Ch 1.
- In this ch-5 side loop, work (3 sc, bp, 3 sc).
- In the next ch-9 tip loop, work (5 sc, 3bp, 5 sc).
- In the next ch-5 side loop, work (3 sc, bp, 3 sc).
- Skip the last sc of the tip group and the first 2 sc of the valley. Work (sc, bp, sc) in the 3rd (center) valley sc.
- Skip the remaining 2 valley sc and the first sc of the next tip group. You’re now at the next arm’s first ch-5 side loop.
Repeat steps 1–5 five more times, ending back at the first ch-5 side loop. Sl st in the first sc to join. Fasten off, leaving an 8 in (20.3 cm) tail.
Count per arm (one repeat): 24 sc (6 + 10 + 6 + 2), 2 side bp, 1 tip 3bp, 1 valley bp.
Count for the round: 144 sc, 6 three-bead picots and 18 single bead picots (12 side + 6 valley).
Beads used: (6 × 3) + 18 = 36 beads.
Why the Math Works
- All six repeats are identical in every round, which keeps the snowflake symmetrical:
- Round 2: 18 dc ÷ 6 = 3 per group
- Round 3: 36 dc ÷ 6 = 6 per petal
- Round 5: 54 sc ÷ 6 = 9 per arm
- Round 6: 144 sc ÷ 6 = 24 per arm
- Each arm’s 24 edging sc break down as 6 + 6 for the side loops, 10 for the tip loop and 2 in the valley.
- The edging adds 0.375 in (1.0 cm) at each tip. Two opposite tips add 0.75 in (1.9 cm) to the 4.25 in (10.8 cm) Round 5 measurement, which gives the finished 5 in (12.7 cm).
Optional Hanging Loop
Thread a 10 in (25.4 cm) length of cream thread through the 3-bead picot of one arm. Knot the ends together and trim. The loop hangs about 4.5 in (11.4 cm) long.
Final Blocking
- Weave all ends into the backs of sc stitches. Don’t trim them closely yet.
- On paper, draw a 5 in (12.7 cm) circle and mark six points around it, 60 degrees apart. Put the paper on your blocking board and cover it with plastic wrap.
- Soak the snowflake in fabric stiffener, or wet it and spray it generously with starch. Press out the extra liquid in a towel.
- Lay the snowflake face up with the center hole over the center of the circle. Pin the 3-bead picot of each arm on a marked point, 2.5 in (6.4 cm) from the center.
- Pin each ch-5 side lobe outward so it rounds out fully. Pin each valley bead picot so it points straight out.
- Check that opposite tips measure 5 in (12.7 cm) across on all three axes.
- Let the snowflake dry completely, for at least 12 hours. Unpin it, then trim the woven ends.
Final Quality-Control Checklist
- The center ring is open and round, about 0.25 in (0.6 cm) across.
- The six inner petals are the same size and evenly spaced.
- Every arm has one tip loop and two side lobes.
- Each tip holds exactly 3 beads, and each side lobe and each valley holds 1 bead.
- The finished piece has 36 beads in total.
- The tip-to-tip measurement is 5 in (12.7 cm) on all three axes.
- The snowflake lies flat with no cupping or ruffling.
- No loose ends show on the front.
Troubleshooting
The center cups upward. Round 1 is too tight or your dc are short. Loosen your tension slightly, or go up a hook size for Rounds 1 and 2 only.
The edges ruffle. Your edging stitches are too loose or too tall. Keep the Round 6 sc firm, and check that you used exactly 6 sc in each ch-5 loop and 10 sc in each ch-9 loop.
A bead slips to the back. Slide the bead tight against the hook before you work the locking chain, then pull the next chain snug.
I ran out of beads before the end. You strung too few. Cut the thread and string more beads onto the ball end. Rejoin at the start of the next arm and hide the join inside a side loop.
Bead picots look floppy. Work the chain after the bead tightly, and pull the closing sl st firm.
The arms are uneven. Count the chains in each Round 5 loop. One extra chain in a ch-9 loop makes that arm visibly longer.
The snowflake won’t stay flat after drying. It wasn’t stiffened enough. Wet it again, use a stronger stiffener mix and pin it again.
Care
Spot clean gently with cool water and mild soap, then starch and pin it again if needed. Store it flat between sheets of tissue paper to protect the points and beads.
Final Notes
The Frostlight Snowflake follows a clear measurement chain:
– Round 1: 0.75 in (1.9 cm)
– Round 2: 1.25 in (3.2 cm)
– Round 3: 2 in (5.1 cm)
– Round 4: 3 in (7.6 cm)
– Round 5: 4.25 in (10.8 cm)
– After the beaded edging and blocking: 5 in (12.7 cm)
If your snowflake matches each checkpoint, the finished ornament will be the right size.
String your beads, count your repeats and block carefully. One snowflake takes about an evening, and a small stack of them makes a lovely set of gifts.
Happy crocheting!