

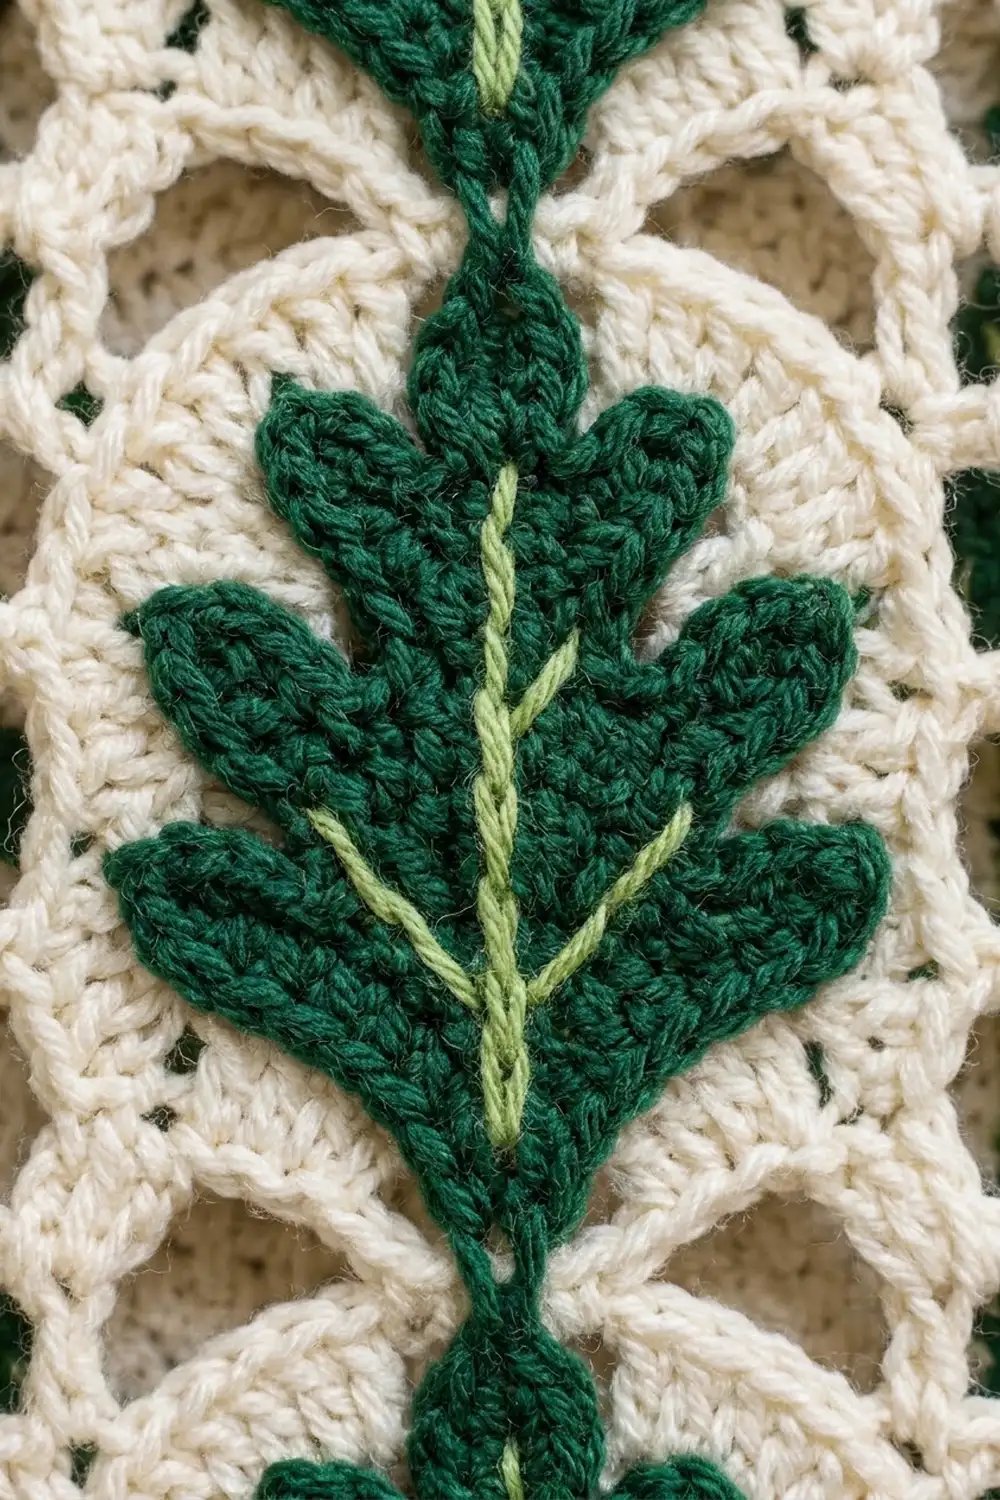
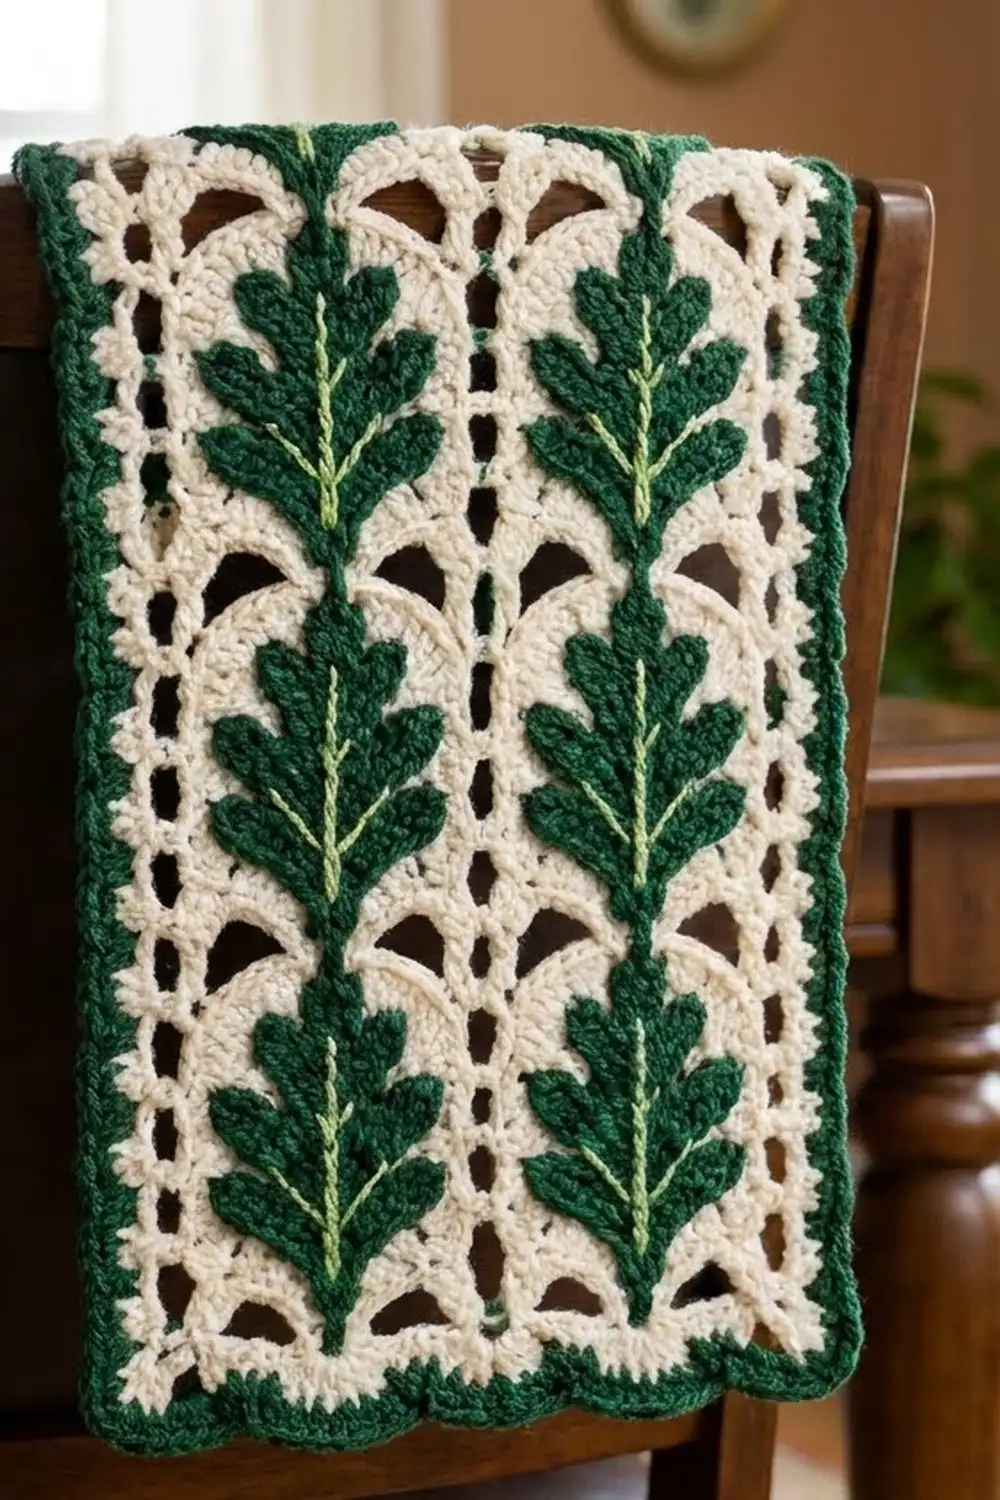
The Evergreen Oak Lace Panel is a tall rectangle of cream arch lace with two columns of forest-green oak leaves climbing its length. Each leaf has three rounded lobes per side, a pointed tip and a fine light-green vein. A corded green border frames the whole piece.
The look is classic and botanical. Cream lace keeps it light, the deep green adds contrast, and the lime vein gives each leaf a little highlight. It works well as a wall hanging, a dresser panel or a centerpiece mat.
This pattern uses US crochet terms. The finished panel measures 10.25 x 19.5 in (26.0 x 49.5 cm).
Construction is simple. You crochet one cream lace rectangle in rows, add a three-round green border, make six separate green leaves, stitch on the light-green veins, and sew the leaves on in two columns.
Finished Size and Construction
- Finished size: 10.25 x 19.5 in (26.0 x 49.5 cm)
- Skill level: Intermediate
- Terminology: US crochet terms
- Yarn weight: Worsted (#4)
- Hook: 5.0 mm (H-8)
- Number of pieces: 1 lace panel plus 6 leaf appliqués, all forming one finished panel
- Layout: 2 vertical leaf columns, 3 leaves each
- Panel size before border: 9.25 x 18.5 in (23.5 x 47.0 cm)
- Border depth: 0.5 in (1.3 cm) on every side
- Leaf size: 2.25 in (5.7 cm) wide x 4.75 in (12.1 cm) long, plus a 1.25 in (3.2 cm) stem
Materials
Choose a smooth worsted cotton or cotton blend. It shows the arches and leaf lobes clearly and blocks crisply. Avoid fuzzy or very splitty yarn, because the lace openings will blur.
- Cream (MC): 85 g / about 170 m
- Forest green (CC1): 55 g / about 110 m (border plus 6 leaves)
- Light green (CC2): 5 g / about 10 m (veins)
All quantities include a margin of roughly 15% for gauge swatches and tails.
Tools:
– 5.0 mm (H-8) crochet hook
– Yarn needle
– Rustproof pins
– Scissors
– Measuring tape
– Blocking mat or towel
– Spray bottle
Abbreviations (US Terms)
- ch – chain
- sl st – slip stitch
- sc – single crochet
- hdc – half double crochet
- dc – double crochet
- tr – treble crochet
- sk – skip
- sp – space
- st(s) – stitch(es)
- RS – right side
- rev sc – reverse single crochet (crab stitch)
Special stitches:
- Reverse sc (rev sc): Work from left to right (right to left if you crochet left-handed). Insert the hook into the next st to the right, yarn over, pull up a loop, then yarn over and pull through both loops.
- Picot: Ch 3, then sl st in the 3rd ch from the hook.
- Surface sl st: Hold the yarn behind the work. Insert the hook from front to back, pull up a loop, and pull it through the loop on your hook.
Gauge and Checkpoints
Gauge: 16 dc = 4 in (10.2 cm). Rows 1–3 of the panel = 1.5 in (3.8 cm), measured after a light block.
Before starting the panel, crochet one test leaf. It is small, uses the same hook and quickly shows your tension. It should measure about 2.25 in (5.7 cm) wide and 4.75 in (12.1 cm) from the base of the stem to the picot tip.
Panel checkpoints:
– After Row 1: 9.25 in (23.5 cm) wide
– After Row 13: 6.5 in (16.5 cm) tall
– After Row 25: 12.5 in (31.8 cm) tall
– After Row 37: 18.5 in (47.0 cm) tall
If your work is too big, go down 0.5 mm in hook size. If it is too small, go up 0.5 mm. Fix the width at Row 1, because the width is set there and never changes.
Lace Panel (Cream)
The panel uses a 6-stitch repeat plus 1. Each row has 37 stitches, counting each chain as one stitch.
Foundation: With MC, ch 39.
Row 1 (RS): Dc in the 4th ch from the hook (the skipped 3 ch count as the first dc). Dc in each remaining ch. Turn. (37 dc)
Width check: 9.25 in (23.5 cm).
Row 2 (arch row): Ch 1, sc in the first dc. Ch 5, sk the next 5 dc, sc in the next dc. Repeat from * 5 more times. The last sc goes in the top of the turning ch. Turn. (7 sc + 6 ch-5 arches = 37 sts)
Row 3 (solid row): Ch 3 (counts as dc). Work 5 dc in the next ch-5 sp, then dc in the next sc. Repeat from * 5 more times. Turn. (1 + 6 × 6 = 37 dc)
Rows 2 and 3 form the pattern. Because each arch sits right above the arch below, the openings line up into the vertical columns of arches you see in the photo.
Rows 4–37: Repeat Rows 2 and 3 seventeen more times. Rows 2 to 37 contain 18 pairs of rows. Row 37 is a solid row of 37 dc.
Fasten off MC and weave in the ends.
Panel check: 9.25 x 18.5 in (23.5 x 47.0 cm). There are 6 arch columns across. The leaves will sit on the 2nd and 5th columns, counting from either side.
Border (Green)
Border gauge: 4 sc = 1 in (2.5 cm) along every edge. The panel already measures 37 sts across (9.25 in) and 37 rows tall (18.5 in, or 74 half-row units at 2 sc each), so the border matches the fabric exactly.
Round 1: With the RS facing, join CC1 in the last dc of Row 37 (top right corner).
– Top edge: 3 sc in that corner st, sc in the next 35 sts, 3 sc in the last st.
– Left side: Work 2 sc in each row end, 37 rows × 2 = 74 sc.
– Bottom edge: Work into the free loops of the foundation chain. Put 3 sc in the first loop, sc in the next 35 loops, and 3 sc in the last loop.
– Right side: Work 74 sc in the row ends.
– Sl st to the first sc. (41 + 74 + 41 + 74 = 230 sc)
Counting corner to corner and including both corner center stitches, each top or bottom side has 39 sts and each long side has 78 sts. Check: 2 × 39 + 2 × 78 − 4 shared corners = 230. ✓
Round 2: Ch 1. Sc in each st around, with 3 sc in each corner center st. Sl st to the first sc. (238 sc: 41 per short side and 80 per long side, corner to corner. Check: 2 × 41 + 2 × 80 − 4 = 238. ✓)
Round 3: Ch 1. Rev sc in each st around. Sl st to the first rev sc. (238 rev sc)
The crab stitch makes the thick, beaded, slightly wavy edge.
Fasten off and weave in the ends.
Size check: 10.25 x 19.5 in (26.0 x 49.5 cm). The three rounds add 0.5 in (1.3 cm) per side.
Why the math works: Each corner gains 2 sts per increase round, so the corners lie flat. The sides are worked at the same 4 sts per inch as the panel’s own gauge, so the edge neither ruffles nor pulls in.
Leaves (Make 6, Green)
Each leaf is worked around a foundation chain. That chain becomes the center vein line.
With CC1, ch 19. The first chain from the hook is the tip chain. You skip it now and work into it later. That leaves 18 chs to work into.
Side A (tip to base), worked into the 18 chs:
Work the lobe sequence 3 times:
– Hdc in the next ch, dc in the next ch, 2 tr in the next ch, dc in the next ch, hdc in the next ch, sl st in the next ch.
Each lobe uses 6 ch and makes 7 sts. (21 sts on Side A)
Stem: Ch 5. Sl st in the 2nd ch from the hook and in the next 3 ch. (4 sl st) Sl st into the base of the last ch of the foundation to anchor the stem.
Side B (base to tip): Rotate the work and continue into the free loops on the other side of the foundation chain.
Work the mirrored lobe sequence 3 times:
– Sl st in the next ch, hdc in the next ch, dc in the next ch, 2 tr in the next ch, dc in the next ch, hdc in the next ch.
(21 sts on Side B)
Tip: In the skipped tip ch, work (sc, picot, sc). Sl st to the first hdc of Side A.
Leaf total: 21 + 21 + 2 sc + 1 picot, plus a 4-sl-st stem.
The notches between lobes line up across the vein, which gives each side the rounded oak outline. Fasten off and leave a 12 in (30.5 cm) tail for sewing.
Leaf check: 2.25 in (5.7 cm) wide and 4.75 in (12.1 cm) long, plus a 1.25 in (3.2 cm) stem.
Vein (Light Green)
With CC2 and the RS facing, start at the end of the stem. Surface sl st up the center line of the foundation chain and stop just below the picot. Keep each loop about the length of one chain so the line stays straight and doesn’t pucker.
Fasten off. Weave the ends into the back, under the green stitches only.
Placing and Sewing the Leaves
Lightly block all six leaves (see below) before you sew them on.
Column positions:
– The left column is centered on the 2nd arch column, 2.375 in (6.0 cm) in from the left edge of the panel (not counting the border).
– The right column is centered on the 5th arch column, also 2.375 in (6.0 cm) in from the right edge.
– The column centers are 4.5 in (11.4 cm) apart.
Stacking each column, measured from the lower edge of the panel without the border:
– Bottom leaf: stem end at 0.5 in (1.3 cm)
– Middle leaf: stem end at 6.25 in (15.9 cm), lying just over the tip of the bottom leaf
– Top leaf: stem end at 12 in (30.5 cm); its tip ends at 18 in (45.7 cm), 0.5 in (1.3 cm) below the top edge
All leaves point upward. Pin all six leaves before sewing anything.
Sew each leaf with the CC1 tail using small whipstitches through the outer loops. Catch the solid dc rows and the arch chains behind, but don’t pull the arches out of shape. Tack the stem down along its length and add 2–3 stitches at the picot tip.
Final Blocking
- Lay the panel RS up on a blocking mat or towel.
- Mist it evenly until it is damp through. Don’t soak it.
- Pin the four corners to 10.25 x 19.5 in (26.0 x 49.5 cm).
- Add pins every 2 in (5.1 cm) along each side, keeping the edges straight.
- Gently press each lace arch open with your fingers.
- Smooth each leaf flat, pressing the lobes outward and the tip to a point.
- Leave it to dry completely, then unpin.
Final Quality-Control Checklist
- The panel measures 10.25 x 19.5 in (26.0 x 49.5 cm).
- Every panel row has 37 sts, and there are 6 arch columns across.
- Border Rounds 2 and 3 have 238 sts each.
- All corners lie flat.
- Six leaves, each with 3 lobes per side and a picot tip.
- The veins run straight from the stem to just below the tip.
- The two columns are parallel and the same distance from each side.
- The leaves are evenly spaced and no sewing shows from the front.
- All ends are woven in securely.
Troubleshooting
- The arches lean or drift: You missed the first or last sc in Row 2. Count 7 sc in every arch row.
- The panel narrows: You skipped the turning-chain dc in Row 3. The ch-3 counts as a stitch, so always end in the last sc.
- The border ruffles: You are working too many sc along the sides. Use exactly 2 per row end.
- The border cups: Your tension is tight. Loosen up, or go up 0.5 mm for Round 3 only.
- The leaves curl: Block them before sewing. A slightly looser foundation chain also helps.
- The vein puckers: Your surface slip stitches are too tight. Pull each loop up to the height of one chain.
- The leaves look floppy: Add a few more tacking stitches at the widest lobes.
Care
Hand wash in cool water with a mild detergent. Press out the water in a towel, then dry flat, reshaping the arches and leaves while the panel is damp.
Final Notes
The measurements build on each other in this order:
- 16 dc = 4 in (10.2 cm) gives the 37-stitch Row 1 width of 9.25 in (23.5 cm).
- 37 rows give a height of 18.5 in (47.0 cm).
- Three border rounds at 4 sc per inch add 0.5 in (1.3 cm) per side, for a finished size of 10.25 x 19.5 in (26.0 x 49.5 cm).
- Six 4.75 in (12.1 cm) leaves stack three per column inside that frame.
Check each stage as you go and the finished panel will come out right.
Happy crocheting!