

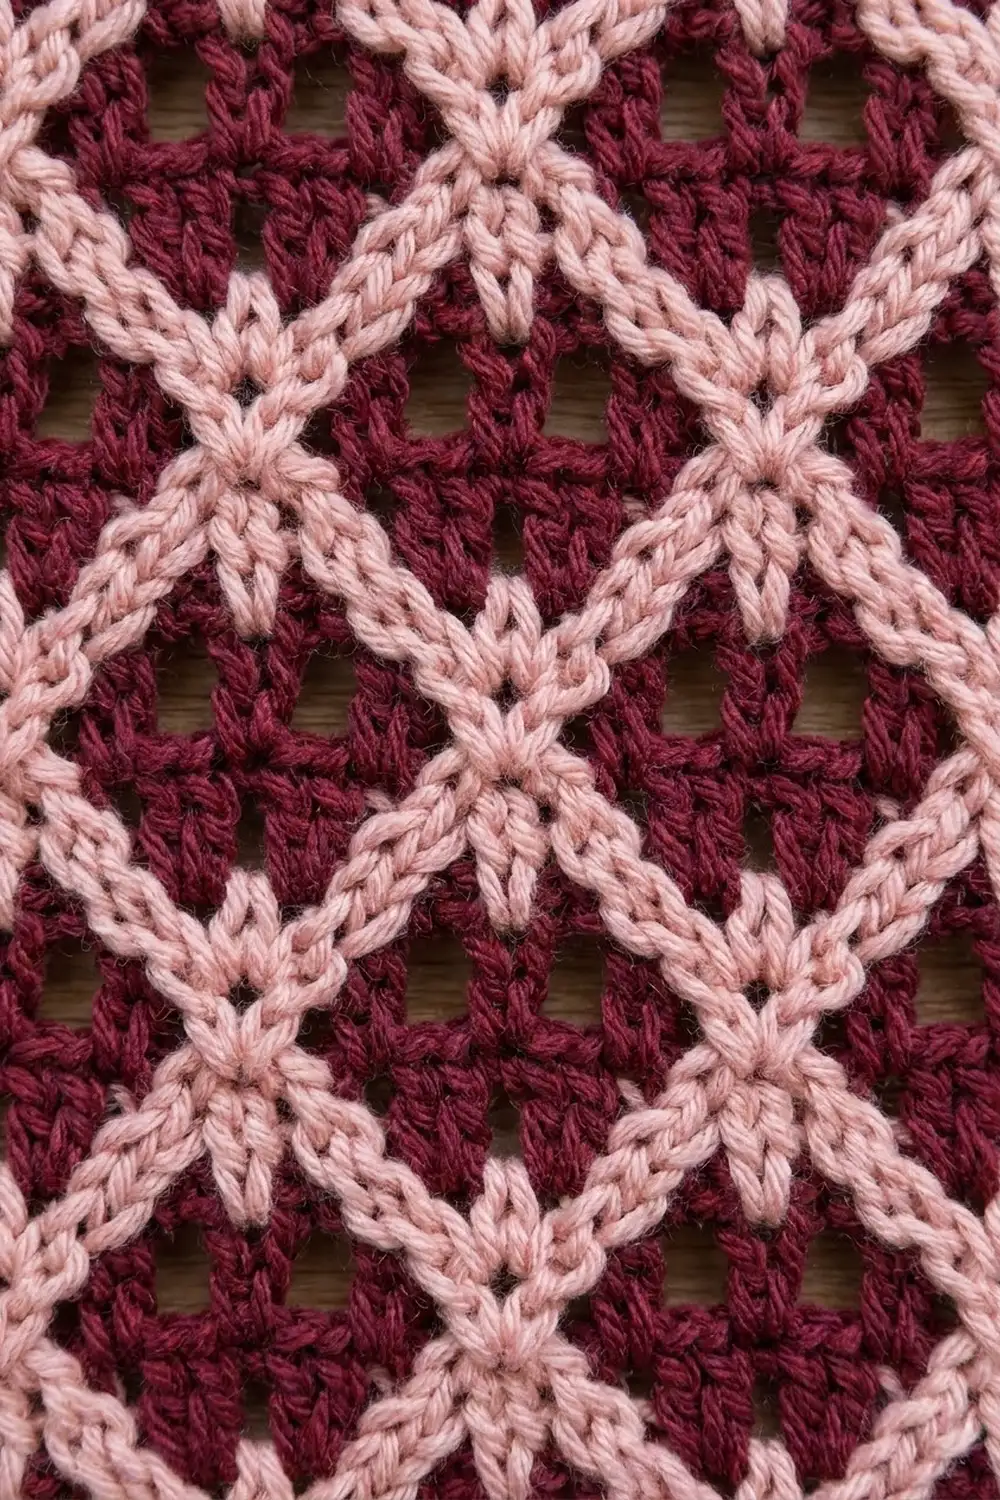
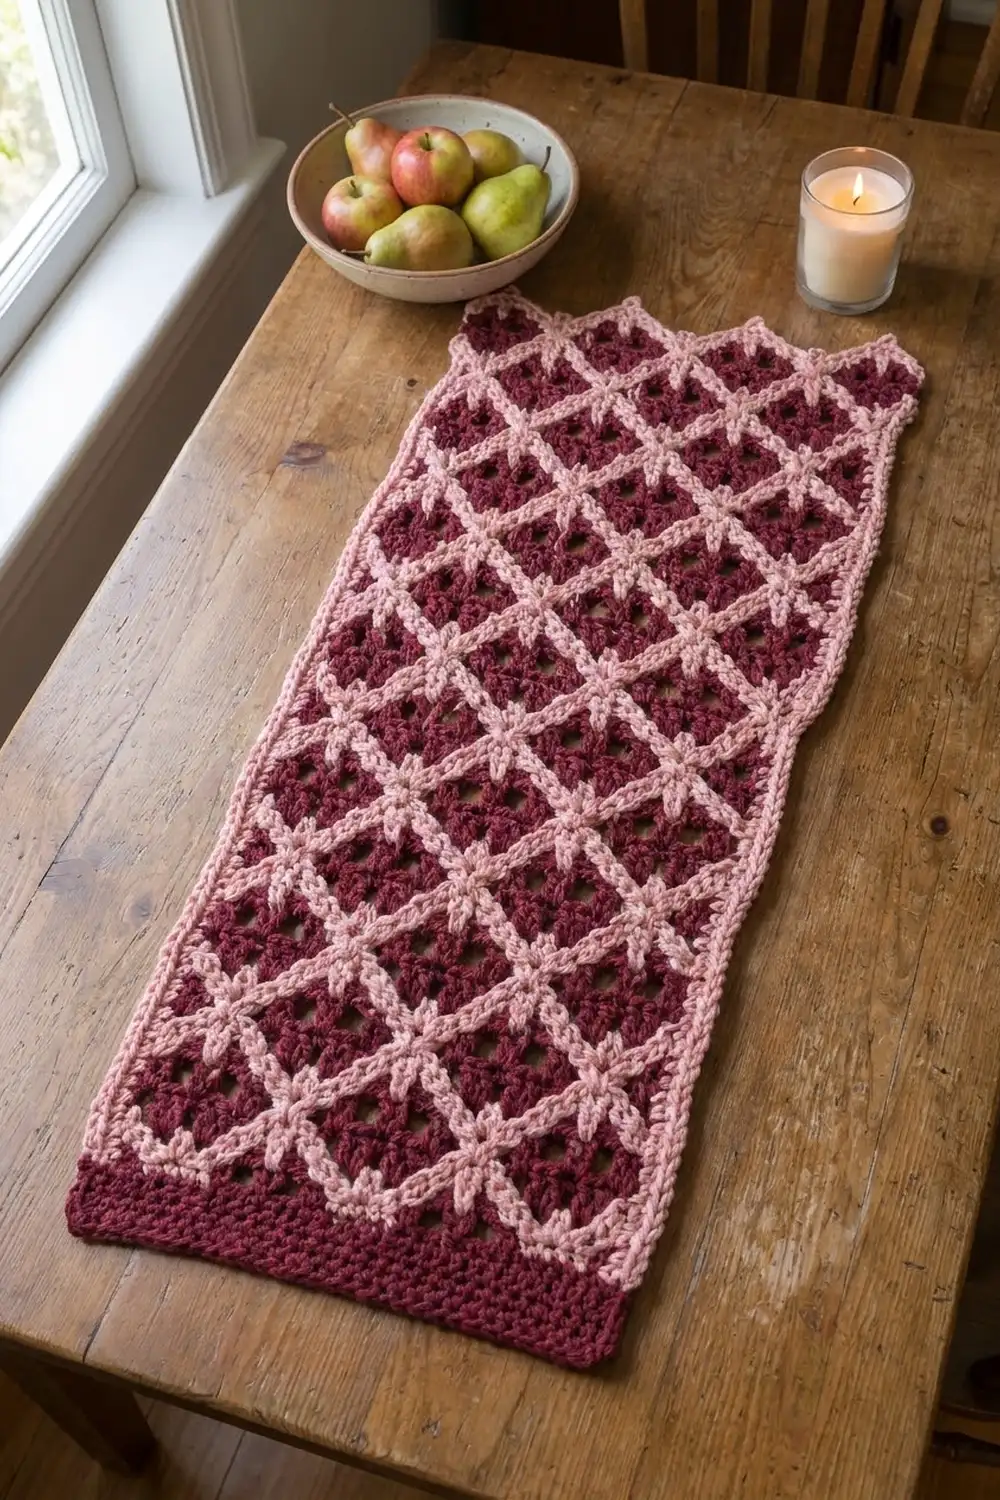
The Rosewood Lattice Panel is a single rectangle of deep burgundy crochet with a soft pink diamond trellis laid over it. A small raised star forms where two pink lines cross. Small eyelets open up in the center of each burgundy diamond and keep the fabric light.
The panel uses two colors: wine burgundy for the background and dusty rose for the lattice and edging. The look is classic and a little vintage. Use it as a table mat, a dresser runner, or a small wall hanging.
This pattern uses US crochet terms. The finished panel measures 9.25 in (23.5 cm) wide by 16.5 in (41.9 cm) long at the top valleys. It is 17.25 in (43.8 cm) long to the tips of the top points.
You work it in three stages. First, crochet the burgundy base in rows of double crochet with planned ch-1 eyelets. Next, add the pink lattice in surface slip stitch along marked diagonals. Last, work the border: one burgundy single crochet round, then two pink rows up the sides and across the top, shaped into four points.
Finished Size and Construction
- Finished size: 9.25 in x 16.5 in (23.5 cm x 41.9 cm) at the valleys; 17.25 in (43.8 cm) long at the points
- Skill level: Intermediate
- Terminology: US crochet terms
- Yarn weight: Worsted (#4)
- Hook: 4.5 mm (US 7) for the fabric; 5.0 mm (US H-8) for the lattice
- Number of pieces: 1 (single panel, no joining)
- Layout: One rectangle, worked flat, 31 stitches x 31 rows
- Size before border: 7.75 in x 15.5 in (19.7 cm x 39.4 cm)
- Border depth: 0.75 in (1.9 cm) on the sides and top valleys, 0.25 in (0.6 cm) on the bottom; the points rise another 0.75 in (1.9 cm)
Materials
Choose a smooth worsted-weight yarn with clear stitch definition, such as acrylic, a cotton blend, or a wool blend. Avoid fuzzy yarn, because the surface lattice needs to sit cleanly on the stitches.
- Color A (burgundy): 70 g, about 140 m (153 yd)
- Color B (dusty pink): 30 g, about 60 m (66 yd)
These amounts include a margin of about 25 percent to cover your gauge swatch and differences in tension.
Tools:
- 4.5 mm (US 7) and 5.0 mm (US H-8) crochet hooks
- 39 locking stitch markers (or scraps of contrast yarn)
- Tapestry needle and scissors
- Blocking mat, rust-proof pins, and a spray bottle
- Tape measure
Abbreviations (US Terms)
- ch – chain
- sl st – slip stitch
- sc – single crochet
- hdc – half double crochet
- dc – double crochet
- tr – treble crochet
- rev sc – reverse single crochet (crab stitch)
- sk – skip
- sp – space
- st(s) – stitch(es)
- RS / WS – right side / wrong side
Special stitch: surface slip stitch (surface sl st). Hold Color B behind the work. With the RS facing, insert the hook from front to back through the fabric, yarn over, and pull a loop to the front. For each new stitch, insert the hook at the next spot, yarn over, and pull a loop through the fabric and through the loop on the hook. Each surface sl st looks like one chain lying on the fabric.
Gauge and Checkpoints
Gauge: 16 dc and 8 rows = 4 in (10.2 cm) with the 4.5 mm hook.
So each dc is 0.25 in (0.6 cm) wide and each dc row is 0.5 in (1.3 cm) tall. Every measurement in this pattern depends on that.
Test first. Ch 22 and work 20 dc per row for 10 rows. In the middle of the swatch, measure 16 sts across and 8 rows down. Both should measure 4 in (10.2 cm).
- Too big (fewer than 16 sts in 4 in): go down 0.5 mm in hook size.
- Too small (more than 16 sts in 4 in): go up 0.5 mm in hook size.
- Width right but rows short: pull up the first loop of each dc slightly taller.
Practice about 6 in (15.2 cm) of surface sl st on the swatch too. It should lie flat without narrowing the fabric.
Panel checkpoints:
- After Row 1: 7.75 in (19.7 cm) wide
- After Row 7: 3.5 in (8.9 cm) tall
- After Row 13: 6.5 in (16.5 cm) tall
- After Row 31: 7.75 in x 15.5 in (19.7 cm x 39.4 cm)
The Base Panel (Color A)
Every row has 31 stitch positions. Each dc counts as one, and so does each ch-1 sp. The ch 3 at the start of a row counts as the first dc. On the row after an eyelet row, work 1 dc into each ch-1 sp.
There are three row types:
- Solid Row: Ch 3, turn, dc in each st across. (31 dc)
- Row A (eyelets at sts 3, 9, 11, 13, 19, 21, 23, 29): Ch 3, turn, dc in next st, ch 1, sk next st, dc in next 5 sts, [ch 1, sk next st, dc in next st] twice, ch 1, sk next st, dc in next 5 sts, [ch 1, sk next st, dc in next st] twice, ch 1, sk next st, dc in next 5 sts, ch 1, sk next st, dc in last 2 sts. (23 dc + 8 ch-1 sps = 31)
- Row B (eyelets at sts 4, 6, 8, 14, 16, 18, 24, 26, 28): Ch 3, turn, dc in next 2 sts, [ch 1, sk next st, dc in next st] 3 times, dc in next 4 sts, [ch 1, sk next st, dc in next st] 3 times, dc in next 4 sts, [ch 1, sk next st, dc in next st] 3 times, dc in last 2 sts. (22 dc + 9 ch-1 sps = 31)
Both eyelet rows are symmetrical, so they read the same from either direction. Each eyelet group lands on the center row of a burgundy diamond.
Foundation: With the 4.5 mm hook and Color A, ch 33.
Row 1 (RS): Dc in 4th ch from hook (the skipped chs count as the first dc), dc in each remaining ch across. (31 dc)
Rows 2–3: Solid Row. (31 dc)
Row 4: Row A. (31)
Rows 5–6: Solid Row. (31 dc)
Row 7: Row B. (31)
Rows 8–9: Solid Row. (31 dc)
Rows 10–27: Repeat Rows 4–9 three more times. Rows 10, 16, and 22 are Row A. Rows 13, 19, and 25 are Row B.
Row 28: Row A. (31)
Rows 29–31: Solid Row. (31 dc) Fasten off.
You now have 5 Row A rows (4, 10, 16, 22, 28) and 4 Row B rows (7, 13, 19, 25).
Checkpoint: 7.75 in x 15.5 in (19.7 cm x 39.4 cm).
The Pink Lattice (Color B)
Mark the intersection points. With the RS facing, number the stitches 1 to 31 from right to left and the rows 1 to 31 from the bottom. Place a marker on each of these stitches:
- Rows 1, 7, 13, 19, 25, 31: sts 1, 11, 21, 31 (24 markers)
- Rows 4, 10, 16, 22, 28: sts 6, 16, 26 (15 markers)
That is 39 markers in total. The points are 10 sts (2.5 in / 6.4 cm) apart across and 6 rows (3 in / 7.6 cm) apart vertically. Every marked stitch is a solid dc, never an eyelet.
How to travel. Each segment of the lattice runs diagonally from one marker to the next, covering 5 sts across and 3 rows up. Work 6 surface sl sts per segment, 2 for each row of height, so the sixth stitch lands in the next marked st. Use the 5.0 mm hook so the lattice doesn’t tighten the fabric.
Set 1 (lines rising to the left). With the RS facing, work each line from its first point to its last, then fasten off on the WS.
- Row 1 st 21 to Row 7 st 31 (2 segments)
- Row 1 st 11 to Row 13 st 31 (4 segments)
- Row 1 st 1 to Row 19 st 31 (6 segments)
- Row 7 st 1 to Row 25 st 31 (6 segments)
- Row 13 st 1 to Row 31 st 31 (6 segments)
- Row 19 st 1 to Row 31 st 21 (4 segments)
- Row 25 st 1 to Row 31 st 11 (2 segments)
Set 1 total: 30 segments, 180 surface sl sts.
Set 2 (lines rising to the right). These mirror Set 1.
- Row 1 st 11 to Row 7 st 1 (2 segments)
- Row 1 st 21 to Row 13 st 1 (4 segments)
- Row 1 st 31 to Row 19 st 1 (6 segments)
- Row 7 st 31 to Row 25 st 1 (6 segments)
- Row 13 st 31 to Row 31 st 1 (6 segments)
- Row 19 st 31 to Row 31 st 11 (4 segments)
- Row 25 st 31 to Row 31 st 21 (2 segments)
Set 2 total: 30 segments, 180 surface sl sts.
Stars. Set 2 crosses Set 1 at 23 interior points: sts 6, 16, and 26 on Rows 4, 10, 16, 22, and 28, plus sts 11 and 21 on Rows 7, 13, 19, and 25. At each crossing, work 2 surface sl sts into the marked st instead of 1. The doubled stitch sits on top of the Set 1 line and makes a raised star with four arms.
At the edges, the lines meet in V shapes at the edge markers, and the border will anchor these. Remove each marker once its point is done. Weave in the pink ends on the WS, under the lattice lines.
Checkpoint: The panel should still measure 7.75 in x 15.5 in (19.7 cm x 39.4 cm).
Border
Border gauge: Across the top and bottom, 16 sc = 4 in (10.2 cm). Along the sides, work 2 sc per dc row-end. A dc row is 0.5 in (1.3 cm) tall, so 2 sc per row-end gives 4 sc per inch, the same as 16 sc per 4 in. Because the two rates match, the sides stay flat instead of ruffling or pulling in.
Counting rule: Each corner gets 3 sc, and the middle one is the corner st. Each side count below includes the corner sts at both of its ends.
Round 1 (Color A, RS): With the RS facing, join Color A in st 1 of Row 31 (top-right corner). Ch 1.
- Top: 3 sc in st 1, sc in each of next 29 sts, 3 sc in st 31.
- Left side: 2 sc in each row-end of Rows 30 through 2. (58 sc)
- Bottom: 3 sc in the corner ch, sc in each of next 29 chs, 3 sc in the last ch.
- Right side: 2 sc in each row-end of Rows 2 through 30. (58 sc)
Sl st to first sc. Fasten off.
- Top and bottom: 33 sc each (2 corners + 31)
- Left and right: 62 sc each (2 corners + 60)
- Total: 33 + 33 + 62 + 62 − 4 shared corners = 186 sc
Checkpoint: 8.25 in x 16 in (21.0 cm x 40.6 cm).
Row 2 (Color B, RS, sides and top only): Join Color B in the bottom-right corner st.
- Right side: Sc in corner st, sc in each of next 60 sts. (61 sc)
- Top-right corner: (Tr, ch 3, tr) in corner st.
- Top: Dc in next st, hdc in next st, sc in next 6 sts, hdc in next st, dc in next st, (tr, ch 3, tr) in next st [peak], dc in next st, hdc in next st, sc in next 5 sts, hdc in next st, dc in next st, (tr, ch 3, tr) in next st [peak], dc in next st, hdc in next st, sc in next 6 sts, hdc in next st, dc in next st. (31 sts worked into, 33 sts made)
- Top-left corner: (Tr, ch 3, tr) in corner st.
- Left side: Sc in each of next 60 sts, sc in bottom-left corner st. (61 sc)
Total: 61 + 2 + 33 + 2 + 61 = 159 sts + 4 ch-3 sps. The two middle peaks sit above sts 11 and 21, where the lattice lines meet the top edge.
Row 3 (Color B, RS, do not turn): Ch 1. Work rev sc from left to right:
- Left side: Rev sc in each of 61 sc.
- Each corner and peak: Rev sc in tr, (rev sc, ch 3, rev sc) in ch-3 sp, rev sc in next tr.
- Top between points: Rev sc in each st.
- Right side: Rev sc in each of 61 sc.
Total: 61 + 4 (top-left corner) + 37 (top, both peaks included) + 4 (top-right corner) + 61 = 167 rev sc + 4 ch-3 picots. Fasten off.
The bottom edge stays as the plain burgundy sc from Round 1.
Checkpoint: 9.25 in x 16.5 in (23.5 cm x 41.9 cm) at the valleys, and 17.25 in (43.8 cm) to the peak tips.
Final Blocking
- Weave in all ends on the WS. Hide burgundy ends in burgundy stitches and pink ends under the pink lines.
- Lay the panel RS up on the mat.
- Pin the corners to a 9.25 in x 16.5 in (23.5 cm x 41.9 cm) rectangle.
- Pin along each side every 2 in (5.1 cm), keeping the edges straight.
- Pin the four top points upward so the tips reach 17.25 in (43.8 cm) from the bottom edge.
- Open each eyelet gently with a fingertip.
- Spray until damp. For acrylic, you can steam lightly instead, holding the iron 1 in (2.5 cm) above the fabric.
- Let it dry completely before unpinning.
Final Quality-Control Checklist
- Every base row has 31 stitch positions.
- An eyelet group sits in the center of every burgundy diamond.
- All 14 lattice lines are worked, 7 in each direction.
- All 23 interior crossings have a doubled star center.
- The lattice lies flat with no puckering.
- Round 1 has 186 sc.
- Row 2 has 159 sts and 4 ch-3 sps.
- Row 3 has 167 rev sc and 4 picots.
- The final size is 9.25 in x 16.5 in (23.5 cm x 41.9 cm).
Troubleshooting
Panel narrows toward the top. You are probably missing the last stitch, which is the top of the turning ch. Count to 31 after each row.
Lattice puckers the fabric. Use a hook 0.5 mm larger for the surface sl st, or keep the pulled-through loops looser.
Lines wander. Check that each segment has exactly 6 surface sl sts and ends on its marker.
Sides ruffle. Work 3 sc per 2 row-ends along the sides instead of 2 per row-end, and keep the corners as written.
Sides pull in. Your sc is tighter than your dc. Work Round 1 with the 5.0 mm hook.
Points look flat. Make sure each tr is complete, and pin the tips firmly upward when blocking.
Care
Hand wash in cool water with mild soap. Roll in a towel to press out the water, then dry flat and re-pin to size if needed.
Final Notes
The measurements build in a simple chain. A gauge of 16 dc and 8 rows = 4 in (10.2 cm) gives a 31-stitch, 31-row base measuring 7.75 in x 15.5 in (19.7 cm x 39.4 cm). The lattice points are 2.5 in (6.4 cm) apart across and 3 in (7.6 cm) apart vertically. Round 1 brings the panel to 8.25 in x 16 in (21.0 cm x 40.6 cm). The two pink rows finish it at 9.25 in x 16.5 in (23.5 cm x 41.9 cm), with the points rising to 17.25 in (43.8 cm).
Check your gauge, count every row, and keep the lattice relaxed on the fabric. Happy crocheting!