

The Seaglass Twin Pineapple Lace Panel is a narrow, airy strip with two light aqua pineapples stacked down the center. A deep teal lace frame surrounds them. Each pineapple has a fanned crown at the top and a diamond-lattice body that narrows to a soft point.
The two colors are deep teal and pale aqua. Together they read like sea glass on a wooden table. The style is classic pineapple lace with a modern, chunky look, because the whole piece is worked in worsted-weight yarn.
This pattern uses US crochet terms. The finished panel measures 6 × 13.5 in (15.2 × 34.3 cm) after blocking.
Construction is simple to follow. First you work both aqua pineapples in rows as one continuous column, linked at the center by a one-chain stem. Then you work teal rounds around the column: an outline round, a shaping round that turns the column into a rectangle, a mesh round, and a scalloped border.
Finished Size and Construction
- Finished size: 6 × 13.5 in (15.2 × 34.3 cm)
- Skill level: Intermediate
- Terminology: US crochet terms
- Yarn weight: Worsted (#4)
- Hook: 5.0 mm (H-8)
- Number of pieces: 1 (single panel)
- Layout: 2 pineapples stacked vertically in one center column
- Single pineapple size: 4 × 5.25 in (10.2 × 13.3 cm)
- Aqua column length: 10.75 in (27.3 cm)
- Size before border: 5.5 × 12.5 in (14.0 × 31.8 cm)
- Border depth: 0.5 in (1.3 cm) at the short ends, 0.25 in (0.6 cm) along the long sides
Materials
A smooth worsted cotton or cotton blend gives the clearest lace and blocks crisply. Pick a yarn of about 200 m per 100 g. Acrylic also works, but it holds the blocked shape less firmly.
- Color A (aqua/mint): 20 g, about 40 m
- Color B (deep teal): 45 g, about 90 m
Tools:
- 5.0 mm (H-8) crochet hook
- Tapestry needle
- Scissors
- Rust-proof pins
- Blocking mat or folded towel
- Spray bottle
- Ruler or tape measure
These quantities include a margin of about 25%, which covers your gauge swatch and any small differences in tension.
Abbreviations (US Terms)
- ch – chain
- sl st – slip stitch
- sc – single crochet
- hdc – half double crochet
- dc – double crochet
- tr – treble crochet (yarn over 2 times)
- dtr – double treble crochet (yarn over 3 times)
- sp – space
- sk – skip
- st(s) – stitch(es)
- RS – right side
Special stitch – Shell: 5 dc worked into the same ch-3 loop.
Mesh loop: a ch-3 loop anchored by an sc at each end.
Gauge and Checkpoints
Work one complete pineapple (Rows 1–10 below) and measure it before you continue. That pineapple is your gauge swatch.
- Mesh gauge: 4 ch-3 loops = 3 in (7.6 cm) wide, and 2 mesh rows = 1 in (2.5 cm) tall.
- After Row 6: 3.75 in (9.5 cm) wide and 2.75 in (7.0 cm) tall.
- After Row 8: 3.75 in (9.5 cm) tall.
- After Row 10: 4 in (10.2 cm) wide across the crown and 5.25 in (13.3 cm) tall.
- Full column: 10.75 in (27.3 cm).
- After teal Round 1: about 4.5 × 11.5 in (11.4 × 29.2 cm).
- After Round 2: 5 × 12 in (12.7 × 30.5 cm).
- After Round 3: 5.5 × 12.5 in (14.0 × 31.8 cm).
- After the border and blocking: 6 × 13.5 in (15.2 × 34.3 cm).
If your pineapple is too big, go down 0.5 mm in hook size. If it is too small, go up 0.5 mm. Don’t change the stitch counts, because the teal rounds depend on them exactly.
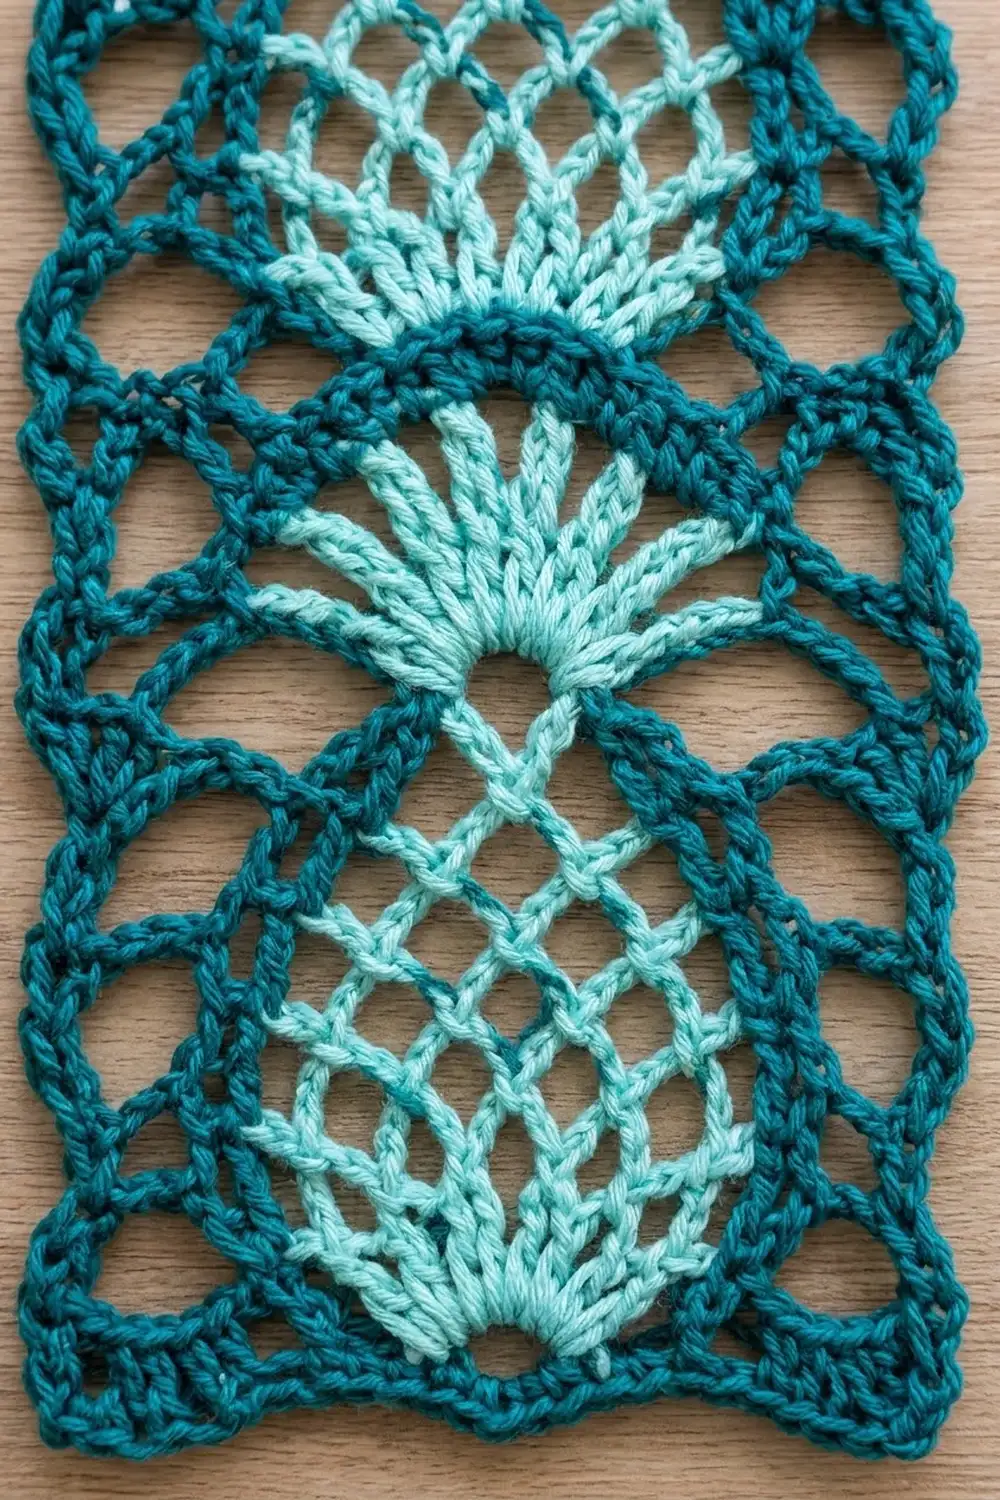
Pineapple Column (Color A)
Both pineapples are worked bottom to top, crown last, without fastening off between them.
Pineapple 1
Row 1 (RS): With Color A, ch 2, then work 3 sc in the 2nd ch from the hook. Turn. (3 sc)
Row 2: Ch 1, sc in the first sc, ch 3, sk the next sc, sc in the last sc. Turn. (1 loop, 2 sc)
Row 3 (increase): Ch 1, sc in the first sc, ch 3, sc in the ch-3 loop, ch 3, sc in the last sc. Turn. (2 loops, 3 sc)
Row 4 (increase): Ch 1, sc in the first sc, ch 3, sc in the first loop, (ch 3, sc in the next loop) across, ch 3, sc in the last sc. Turn. (3 loops, 4 sc)
Row 5: Repeat Row 4. (4 loops, 5 sc)
Row 6: Repeat Row 4. (5 loops, 6 sc)
The lattice is now at its widest. Each increase row adds exactly one loop because both edge sc anchor a new loop.
Row 7 (decrease): Sl st in the first sc, sl st in the first loop, ch 1, sc in the same loop, then (ch 3, sc in the next loop) 4 times. Leave the last sc unworked. Turn. (4 loops, 5 sc)
Row 8 (decrease): Sl st in the first sc, sl st in the first loop, ch 1, sc in the same loop, then (ch 3, sc in the next loop) 3 times. Turn. (3 loops, 4 sc)
Row 9 (crown fan, RS): Sl st in the first sc, sl st in the first loop, sl st in the next sc, sl st in the center loop. Ch 4 (counts as tr), then work 10 tr in the same center loop. Turn. (11 tr)
The two outer loops of Row 8 stay unworked. They form the “shoulders” under the crown.
Row 10: Ch 1, sc in the first tr, then (ch 2, sc in the next tr) 10 times, with the last sc in the top of the turning ch-4. Turn. (11 sc, 10 ch-2 sps)
This row spreads the fan into distinct spokes with a lightly spiked top edge.
Stem
Row 11: Ch 1, sl st in the first sc, then (sl st in the next ch-2 sp, sl st in the next sc) 5 times. You are now at the 6th sc, which is the center of the crown.
Pineapple 2
Row 1: Ch 3, then work 3 sc in the 2nd ch from the hook. The unused ch next to the crown is the stem. Turn. (3 sc)
Rows 2–10: Repeat Pineapple 1, Rows 2–10. Fasten off.
The upper pineapple’s point now sits directly on the lower pineapple’s crown. Check that the column measures 10.75 in (27.3 cm) from the bottom point to the top of the upper crown.
Teal Frame (Color B)
Round 1 (Outline)
With the RS facing, join Color B with an sc in the center sc of Pineapple 1, Row 1 (the bottom point). Work up the right edge:
- Pineapple 1 side: (Ch 3, sc around the edge sc of the next row) for Rows 2–8. (7 loops)
- Fan side: Ch 5, sc in the last sc of Row 10. (1 loop)
- Crown, right half: (Ch 3, sc in the next ch-2 sp) 5 times, then ch 3, sc around the stem. (6 loops)
- Pineapple 2 side: Ch 3, sc around the edge sc of Row 2, then (ch 3, sc around the edge sc of the next row) for Rows 3–8. (7 loops)
- Fan side: Ch 5, sc in the last sc of Row 10. (1 loop)
That is 22 loops on the right side.
- Top: (Ch 3, sc in the next ch-2 sp) 10 times, then ch 3, sc in the first sc of Row 10. (11 loops)
Work the left side as a mirror of the right, going down:
- Fan side: Ch 5, sc around the edge of Row 8. (1 loop)
- Pineapple 2 side: 6 loops to Rows 7–2, then 1 loop to the stem.
- Crown, left half: 5 loops into the remaining ch-2 sps, then ch 3, sc in the corner sc of Row 10. (6 loops)
- Fan side: Ch 5, sc around the edge of Row 8. (1 loop)
- Pineapple 1 side: 6 loops to Rows 7–2.
- Close: Ch 3, sl st to the first sc.
That is 22 loops on the left side.
Total: 55 loops (22 + 11 + 22). This teal outline traces each pineapple’s silhouette.
Round 2 (Shaping to a Rectangle)
This round uses taller stitches where the outline dips inward, so the outer edge comes out straight.
For reference, number the Round 1 loops from the bottom point: loops 1–22 up the right side, loops 23–33 across the top, and loops 34–55 down the left side.
Sl st in the first sc. Ch 1, sc in the same st (the bottom point). Then work:
- Bottom right: Ch 3, (hdc, ch 3, hdc) in loop 1, ch 3, (dc, ch 3, dc) in loop 2, ch 3, (tr, ch 3, tr) in loop 3, ch 3.
- Corner: (dtr, ch 5, dtr) in loop 4, ch 5.
- Right side, loops 5–21: Work one stitch in each loop, followed by ch 5, using these heights in order:
- dc, dc, hdc, hdc
- tr
- dtr in each of the next 7 loops
- tr, tr, dc, hdc, hdc
- Corner: (dc, ch 5, dc) in loop 22, ch 3.
- Top, loops 23–33: Work these stitches, each followed by ch 3:
- tr, dc
- (hdc, ch 3, hdc)
- sc in each of the next 5 loops
- (hdc, ch 3, hdc)
- dc, tr
- Corner: (dc, ch 5, dc) in loop 34, ch 5.
- Left side, loops 35–51: Work the right-side height sequence in reverse, each stitch followed by ch 5.
- Corner: (dtr, ch 5, dtr) in loop 52, ch 3.
- Bottom left: (tr, ch 3, tr) in loop 53, ch 3, (dc, ch 3, dc) in loop 54, ch 3, (hdc, ch 3, hdc) in loop 55, ch 3. Sl st to the first sc.
Counts per side (corner stitches included):
- Bottom: 15 sts (2 corner sts + 12 + the point sc), 14 ch-3 sps
- Right: 19 sts (2 corner sts + 17), 18 ch-5 sps
- Top: 15 sts (2 corner sts + 11 + 2 extra), 14 ch-3 sps
- Left: 19 sts, 18 ch-5 sps
- Corners: 4 ch-5 sps
Totals: 68 sts (55 + 4 corner extras + 6 bottom extras + 1 point sc + 2 top extras) and 68 spaces (28 + 36 + 4).
Checkpoint: 5 × 12 in (12.7 × 30.5 cm).
Round 3 (Mesh)
Sl st into the next ch-3 sp, then sl st into the corner ch-5 sp of loop 4. Ch 1, (sc, ch 3, sc) in the corner sp.
- Long sides: (Ch 5, sc in the next sp) 18 times, ch 5.
- Short sides: (Ch 3, sc in the next sp) 14 times, ch 3.
- Each corner: (sc, ch 3, sc).
Work around the whole piece this way, then sl st to the first sc.
Counts:
- 19 ch-5 loops on each long side
- 15 ch-3 loops on each short side
- 4 corner ch-3 loops
- 72 sc in total (8 corner sc + 14 + 14 + 18 + 18)
Checkpoint: 5.5 × 12.5 in (14.0 × 31.8 cm).
Border
Border gauge: One shell and one sc together cover about 0.7 in (1.8 cm) and stand 0.5 in (1.3 cm) deep. One picot loop sits about 0.25 in (0.6 cm) out from the edge.
Round 4: Sl st into the corner loop.
- Each corner: (sc, ch 5, sc) in the corner loop.
- Each long side: (sc, ch 3, sc) in each of the 19 ch-5 loops. (19 picot loops)
- Each short side: Shell in the first loop, then (sc in the next loop, shell in the next loop) 7 times. (8 shells and 7 sc, 40 dc)
Sl st to the first sc and fasten off.
Why the math works: Each short side has an odd number of loops (15), so the shells land in loops 1, 3, 5, … 15. That puts a shell at both ends and keeps the scallops symmetrical. Each long side has 19 loops, and every loop gets one picot, so nothing needs adjusting. The corners are worked separately, so no stitch is counted twice.
Final Blocking
- Weave in all ends along stitches of the same color. Don’t weave teal into the aqua lattice.
- Soak the panel in cool water for 10 minutes, then gently press out the water in a towel. Don’t wring it.
- Lay it on the mat and pin the 4 corners to a 6 × 13.5 in (15.2 × 34.3 cm) rectangle.
- Pin each long side straight, placing a pin in every 3rd picot loop.
- Pin the top of each shell on the short ends to form even scallops.
- Open each pineapple’s fan with your fingers and pin the 11 spokes evenly.
- Stretch the lattice gently so the diamonds look uniform, keeping each pineapple 4 in (10.2 cm) wide.
- Let it dry completely before you unpin it.
Final Quality-Control Checklist
- 2 aqua pineapples, each 4 × 5.25 in (10.2 × 13.3 cm)
- 11 tr per crown and 10 ch-2 sps in Row 10
- Round 1: 55 loops (22 / 11 / 22)
- Round 2: 68 sts and 68 spaces
- Round 3: 15 / 19 / 15 / 19 loops plus 4 corners
- Border: 8 shells per short side and 19 picots per long side
- Finished size: 6 × 13.5 in (15.2 × 34.3 cm), with all corners square
Troubleshooting
- Crown cups instead of fanning: Make sure all 11 tr are in the center loop only, and keep the ch-2 sps in Row 10 relaxed.
- Lattice is lopsided: Check that each increase row starts and ends with an sc in an edge sc.
- Long sides bow inward at the waist: Use dtr, not tr, in the crown loops in Round 2.
- Short ends flare: Go down 0.5 mm in hook size for the border only.
- Corners round off: Pin them firmly while blocking, and confirm each corner has a ch-5 sp in Round 2.
Care
Hand wash in cool water with a mild soap and dry flat. Re-pin the corners and scallops if they lose their shape.
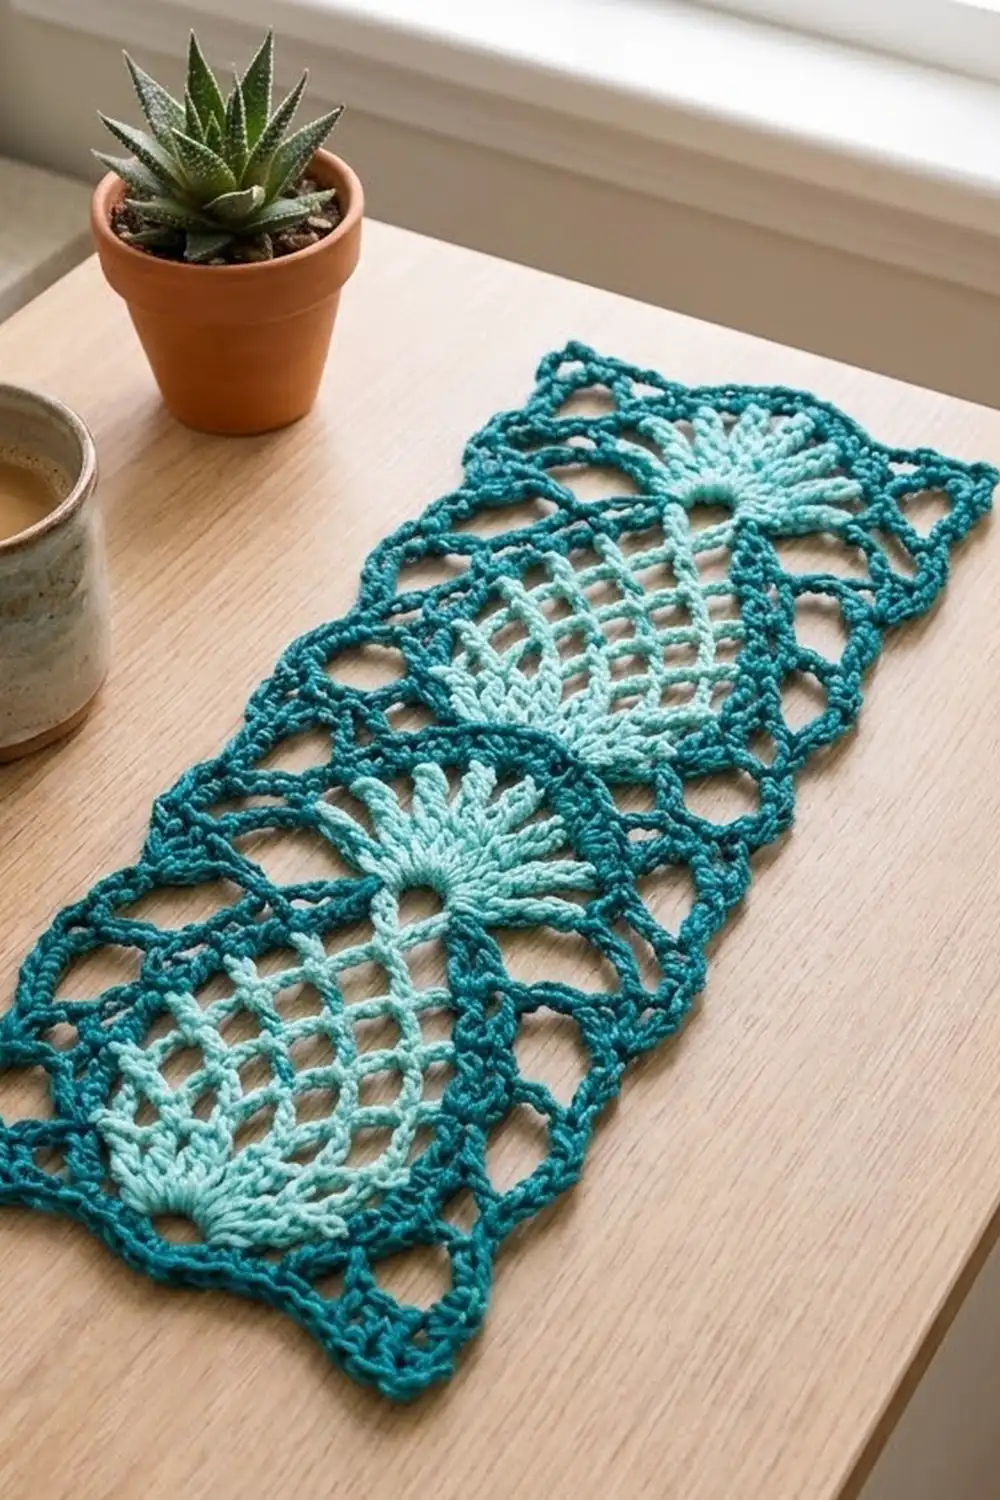
Final Notes
The measurement chain runs like this:
- Each pineapple: 4 × 5.25 in (10.2 × 13.3 cm)
- Aqua column: 10.75 in (27.3 cm)
- Teal outline: about 4.5 × 11.5 in (11.4 × 29.2 cm)
- Shaping round: 5 × 12 in (12.7 × 30.5 cm)
- Mesh round: 5.5 × 12.5 in (14.0 × 31.8 cm)
- Bordered panel: 6 × 13.5 in (15.2 × 34.3 cm)
If each checkpoint matches, the next round will fit. Happy crocheting!