

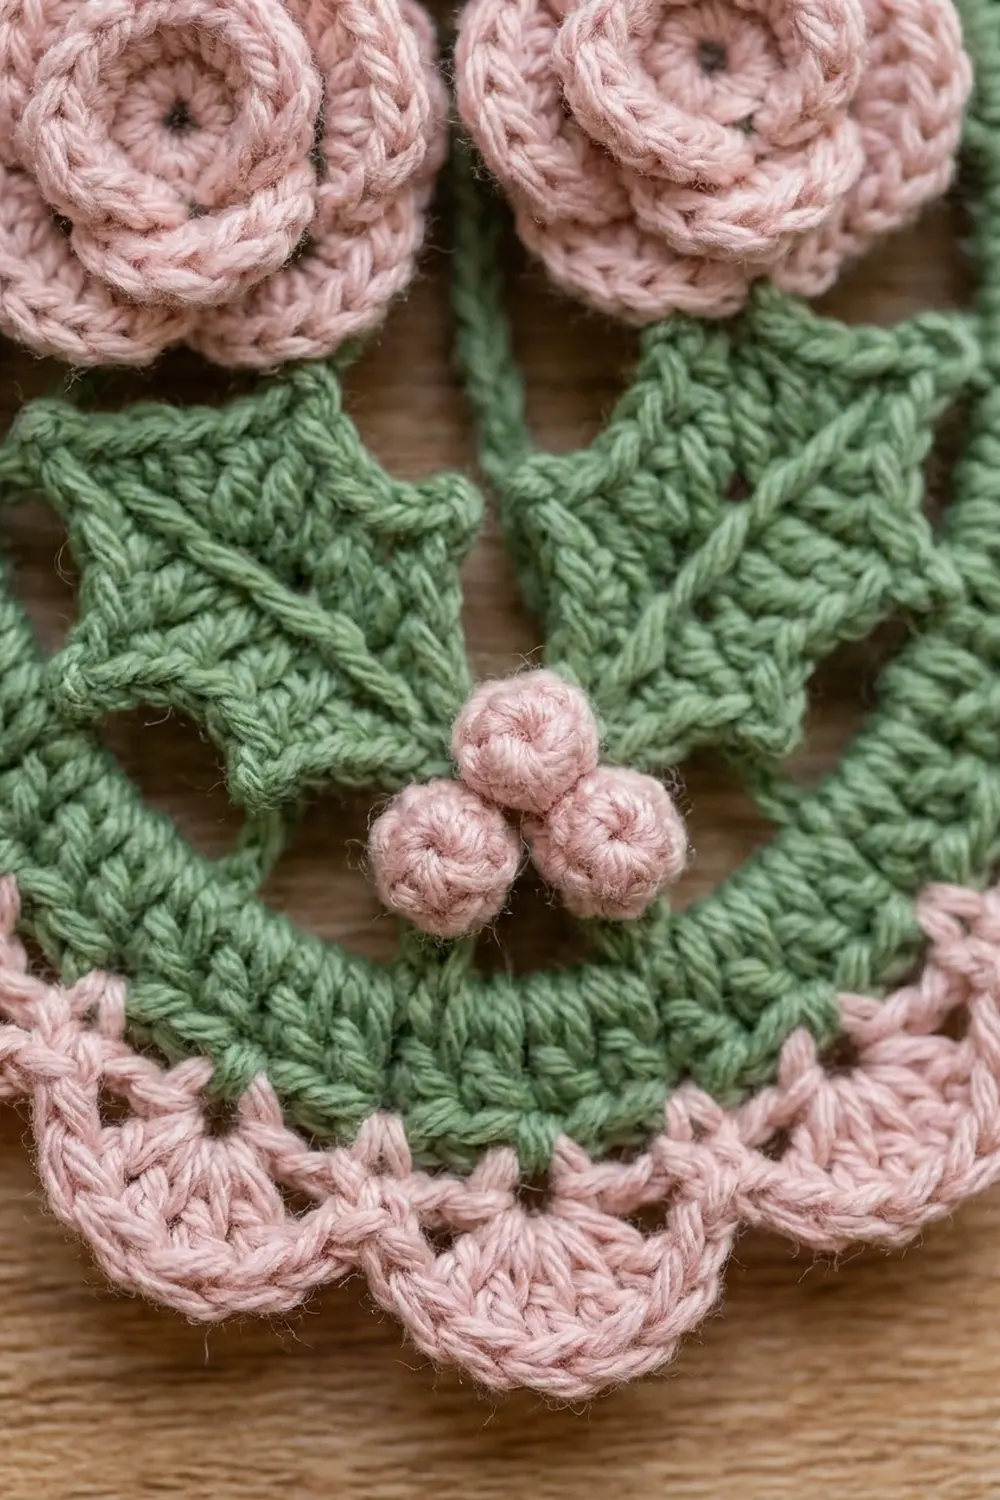
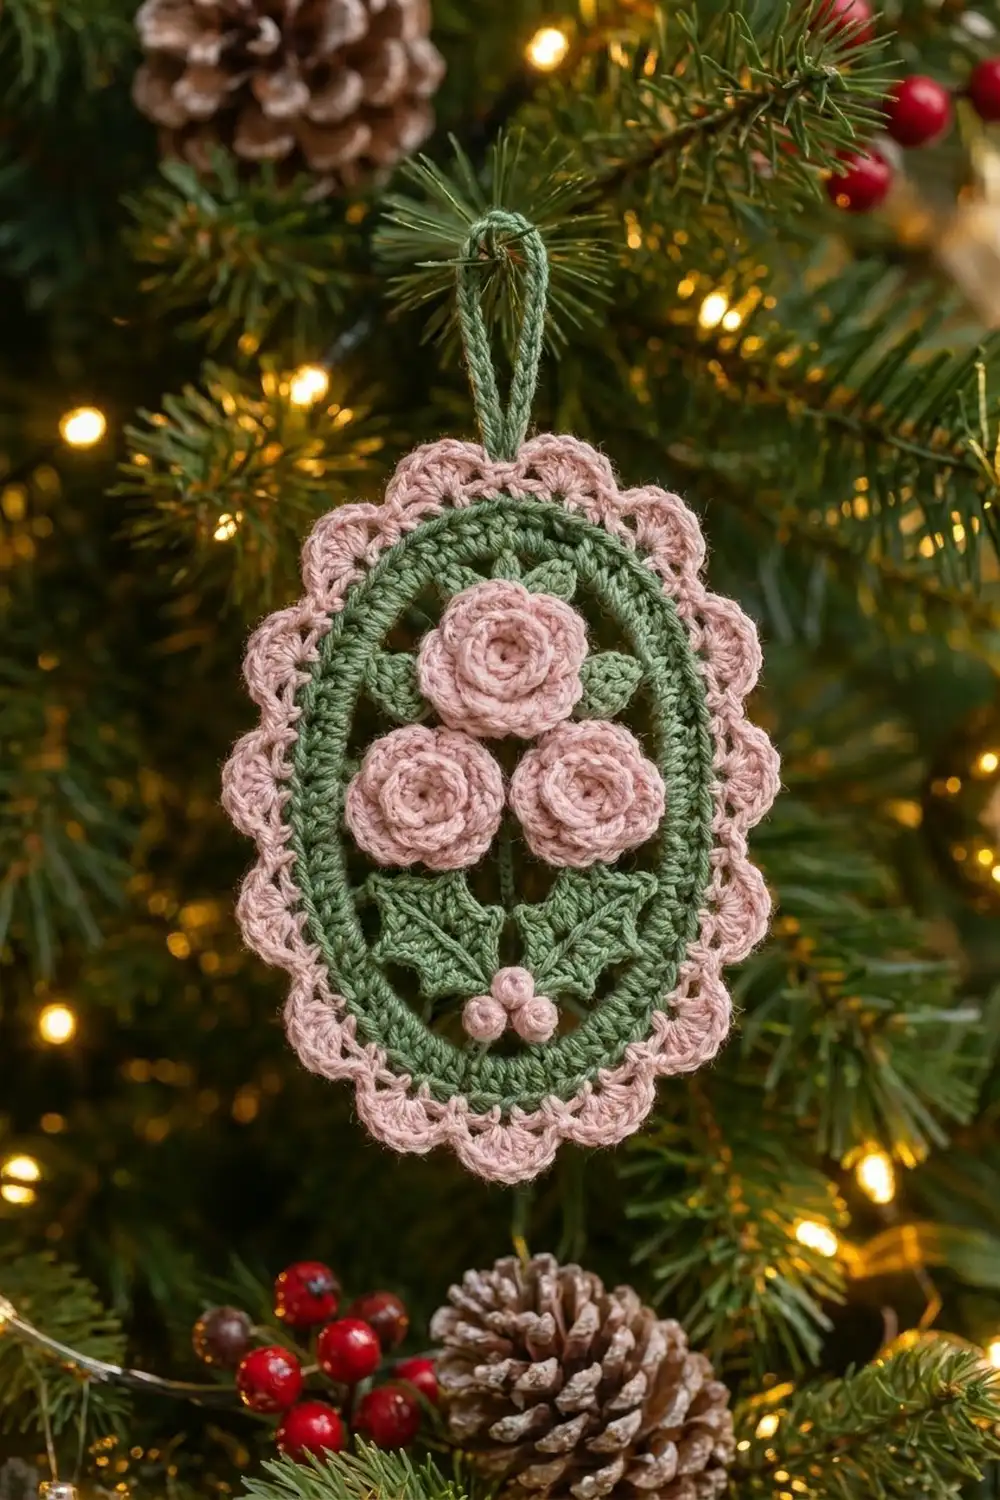
This Rose Cameo ornament is a small oval frame with an open center. Across the opening sit three rolled pink roses above two green holly leaves and a cluster of pink berries. A lacy pink shell border and a green hanging loop finish it, so it looks like a vintage cameo brooch on the tree.
The colors are soft and old-fashioned. Sage green is used for the frame, holly and stem, and blush pink for the roses, berries and scalloped border. It suits a cottage, Victorian or shabby-chic tree, and it also works as a gift-tag topper.
This pattern uses US crochet terms. The finished ornament measures 4.25 in wide x 5.5 in tall (10.8 x 14.0 cm) without the loop. With the loop, the total height is 7 in (17.8 cm).
You work the green frame in the round around a chain ring, then add a two-round pink border. The roses, leaves, berries and stem are made separately and sewn across the opening. The result is one finished ornament.
Finished Size and Construction
- Finished size: 4.25 x 5.5 in (10.8 x 14.0 cm), plus a 1.5 in (3.8 cm) loop
- Skill level: Intermediate
- Terminology: US
- Yarn weight: DK / light (#3), cotton or cotton blend
- Hook: 3.5 mm (E-4)
- Number of pieces: 1 ornament (frame plus 11 small sewn-on appliqués: 3 roses, 2 holly leaves, 2 small leaves, 3 berries, 1 stem)
- Layout: single portrait oval
- Inner opening: 1.5 x 2.75 in (3.8 x 7.0 cm)
- Size before border: 3 x 4.25 in (7.6 x 10.8 cm)
- Border depth: 0.625 in (1.6 cm) per side
Materials
Choose a smooth, mercerized DK cotton. It shows the stitches clearly, keeps the rose spirals crisp and blocks to a flat oval. Acrylic also works but needs gentler blocking.
- Sage green: 10 g, about 24 m (26 yd)
- Blush pink: 10 g, about 24 m (26 yd)
These amounts include extra for swatching and sewing tails.
Tools:
- 3.5 mm (E-4) crochet hook
- Tapestry needle
- 4 locking stitch markers
- Scissors
- Blocking mat, rustproof pins and a spray bottle
- Optional: fabric stiffener
Abbreviations (US Terms)
- ch – chain
- sl st – slip stitch
- sc – single crochet
- hdc – half double crochet
- dc – double crochet
- sk – skip
- sp – space
- st(s) – stitch(es)
- sc2tog – single crochet 2 together
Special stitches
- Shell: (dc, ch 1) 3 times, dc, all in the same st. One shell has 4 dc and 3 ch-1 sps.
- Picot: ch 3, sl st in the 3rd ch from hook.
Gauge and Checkpoints
Gauge: 21 sts = 4 in (10.2 cm) in dc or sc. One dc round is 3/8 in (1.0 cm) tall, and one sc round is 1/4 in (0.6 cm) tall.
Make the frame first as your test piece, since it doubles as your swatch. Check it at each stage before you go on:
- Chain ring: 36 ch joined, about 7 in (17.8 cm) around.
- After Rnd 1: the opening, laid flat as an oval, is 1.5 x 2.75 in (3.8 x 7.0 cm).
- After Rnd 2: the frame is 3 x 4.25 in (7.6 x 10.8 cm).
- After Rnd 3: 3.5 x 4.75 in (8.9 x 12.1 cm).
- After Rnd 4: 4.25 x 5.5 in (10.8 x 14.0 cm).
If too big: use a hook 0.25 mm smaller. If too small: use a hook 0.25 mm larger. Change the hook rather than the stitch counts, because the oval shape depends on the counts staying exact.
Frame
The frame has four sections: right side, bottom end, left side and top end. The sides keep the same count every round. All increases go into the ends, which is what makes the oval.
With green, ch 36 and sl st in the first ch to form a ring. Do not twist the chain.
Lay the ring flat as an oval. Place markers to divide it into 12 ch (right side), 6 ch (bottom end), 12 ch (left side) and 6 ch (top end).
Rnd 1: Working into the ring (over the chain, not into the chs), ch 3 (counts as dc), work 15 dc over the right side, 8 dc over the bottom end, 16 dc over the left side and 8 dc over the top end. Sl st to the top of the ch-3. (48 dc: 16 + 8 + 16 + 8)
Slide the dc evenly along the ring so the sections match your markers. Move the markers up to the first st of each section.
Rnd 2: Ch 3 (counts as dc), dc in next 15 sts (right side, 16 dc). Bottom end: dc in next st, (2 dc in next st) 6 times, dc in next st (14 dc). Left side: dc in next 16 sts. Top end: dc in next st, (2 dc in next st) 6 times, dc in next st (14 dc). Sl st to the top of the ch-3. Fasten off. (60 dc: 16 + 14 + 16 + 14)
Checkpoint: the frame lies flat and measures 3 x 4.25 in (7.6 x 10.8 cm). Move the markers up again.
Roses (make 3)
With pink, ch 25.
Row 1: Sc in 2nd ch from hook and in each ch across. (24 sc)
Row 2: Ch 1, turn. Sl st in first st, sk 1, 5 dc in next st, sk 1, sl st in next st; repeat from * 4 more times; sk 1, 5 dc in next st, sl st in last st. (6 petals)*
Fasten off, leaving a 10 in (25.4 cm) tail. Start rolling from the end without the tail. Roll the first two petals tightly to form the bud, then roll more loosely so the outer petals open. Stitch through all layers at the base. Each rose is about 1 in (2.5 cm) across.
Holly Leaves (make 2)
With green, ch 11.
Side 1: Working into the chs and starting in the 2nd ch from hook: sl st, sc, hdc, dc, picot, dc, dc, picot, dc, hdc, sc. (9 sts, 2 picots)
Tip: In the last ch, work (sc, ch 2, sc).
Side 2: Rotate the piece and work along the bottom loops of the same chs: sc, hdc, dc, picot, dc, dc, picot, dc, hdc, sc, sl st. (9 sts, 2 picots)
Sl st to the first sl st and fasten off, leaving a 10 in (25.4 cm) tail. The foundation chain forms the center vein, and the picots give the pointed holly edge. Each leaf is 1.25 x 0.625 in (3.2 x 1.6 cm).
Small Leaves (make 2)
With green, ch 6. Starting in the 2nd ch from hook, work: sl st, sc, hdc, dc. In the last ch, work (dc, ch 2, dc). Then work along the bottom loops: dc, hdc, sc, sl st. Fasten off, leaving a tail. Each leaf is 0.625 in (1.6 cm) long.
Berries (make 3)
With pink, make a magic ring.
Rnd 1: 6 sc in ring. Pull the ring closed and sl st to the first sc. (6 sc)
Rnd 2: Ch 1, 2 sc in each st around. (12 sc)
Rnd 3: Ch 1, sc2tog 6 times. (6 sts)
Tuck the starting tail inside as stuffing. Fasten off, weave the tail through the front loops and pull closed. Each berry is 3/8 in (1.0 cm) across.
Stem
With green, ch 7. Sl st in the 2nd ch from hook and in each ch across. (6 sl st) Fasten off, leaving a tail. The stem is about 1 in (2.5 cm) long.
Assemble the Center
Pin all the pieces in place on the frame, right side up, before you sew anything.
- Top rose: centered in the upper half of the opening. Its top edge overlaps Rnd 1 of the top end by about 1/4 in (0.6 cm).
- Lower roses: side by side directly below the top rose, touching each other and the top rose. Each overlaps Rnd 1 of its side by about 1/4 in (0.6 cm).
- Small leaves: one on each side, tucked into the gap between the top rose and the lower roses, with the tips pointing outward.
- Stem: running down from the point where the two lower roses meet, toward the bottom end.
- Holly leaves: one on each side of the lower end of the stem, angled outward in a shallow V. Their bases overlap Rnd 1 of the bottom end.
- Berries: a triangle of three at the bottom of the stem, covering the leaf bases. Place two side by side and one centered below them.
Sew each rose to the frame where it overlaps, then to the roses next to it. Use small stitches through the back layers only. Sew the leaves, stem and berries the same way. Every piece must touch either the frame or another piece, so the whole spray is supported across the open center. Weave in all ends on the back.
Border
Border gauge: the same 21 sts = 4 in (10.2 cm). Each shell repeat uses 4 sts and covers about 3/4 in (1.9 cm) of edge.
Rnd 3: Join pink with a sl st in the first st of the right side. Ch 1, sc in the same st and in the next 15 sts (right side, 16 sc). Bottom end: (sc in next st, 2 sc in next st) 6 times, sc in next 2 sts (14 sts worked + 6 added = 20 sc). Left side: sc in next 16 sts. Top end: work as for the bottom end (20 sc). Sl st to the first sc. (72 sc: 16 + 20 + 16 + 20)
Checkpoint: 3.5 x 4.75 in (8.9 x 12.1 cm).
Rnd 4: Ch 1, sc in next st, sk 1, shell in next st, sk 1; repeat from * 17 more times. Sl st to the first sc. Fasten off. (18 shells and 18 sc)*
Per section, this gives 4 shells on the right side, 5 on the bottom end, 4 on the left side and 5 on the top end. The 3rd shell of each end sits at the top center and bottom center.
Hanging loop: Join green with a sl st in the center ch-1 sp of the top-center shell. Ch 18 and sl st in the same sp. Work 24 sc into the ch-18 loop, then sl st to the first sc. Fasten off and weave the ends into the back of the frame. The loop stands 1.5 in (3.8 cm) tall.
Why the math works: each round makes the outline longer by about 2 x 3.14 x the round’s height. At 5.25 sts per inch, a 3/8 in (1.0 cm) dc round needs about 12 more sts, and a 1/4 in (0.6 cm) sc round needs about 8 more. Rnd 2 adds 12 (6 per end). Rnd 3 also adds 12, a few more than 8, which gives the shells room to fan out without cupping. The sides stay at 16 sts, so all the curve is in the ends and the shape stays oval. Because 16 and 20 are both multiples of 4, every section takes whole shells, and the top and bottom centers line up.
Final Blocking
- Lightly mist the ornament, or dip it in water and roll it in a towel to remove the excess.
- Lay it face up on the blocking mat.
- Pin the green frame to 3 x 4.25 in (7.6 x 10.8 cm). Check that both sides are straight and both ends are evenly curved.
- Pin the tip of each of the 18 shells so the border reaches 4.25 x 5.5 in (10.8 x 14.0 cm).
- Pin each holly picot outward to sharpen the points.
- Shape the rose petals with your fingertips. Do not flatten them.
- If you want extra hold, apply stiffener to the frame and border only.
- Let the ornament dry completely before unpinning.
Final Quality-Control Checklist
- Frame counts are 48 dc in Rnd 1 and 60 dc in Rnd 2.
- Rnd 3 has 72 sc. Rnd 4 has 18 shells: 4 on each side and 5 on each end.
- The ornament measures 4.25 x 5.5 in (10.8 x 14.0 cm) and lies flat.
- The loop sits at the top center and is 1.5 in (3.8 cm) tall.
- The roses form a neat triangle, and every piece is sewn to the frame or to another piece.
- The holly leaves mirror each other, and the berries are centered.
- No ends or sewing stitches show on the front.
Troubleshooting
- Border ruffles: your tension loosened on the shells. Use a hook one size smaller for Rnd 4 only.
- Border cups: check that Rnd 3 has 72 sc, then use a hook one size larger for Rnd 4.
- Frame looks round, not oval: the increases have drifted into the sides. Recount each section against 16 + 14 + 16 + 14.
- Gaps in Rnd 1: push the dc closer together along the ring before joining.
- Roses too flat: roll the centers tighter and sew the bases more firmly.
- Spray sags in the opening: add small tacking stitches where the pieces touch each other.
- Holly points disappear: re-pin the picots while the leaves are damp.
Care
Hand wash in cool water with mild soap, press the water out in a towel and dry flat, reshaping the roses as it dries. Store flat in tissue paper between seasons.
Final Notes
Here is how the measurements build up. A 36-ch ring gives a 1.5 x 2.75 in (3.8 x 7.0 cm) opening. Two dc rounds bring the frame to 3 x 4.25 in (7.6 x 10.8 cm). The sc round takes it to 3.5 x 4.75 in (8.9 x 12.1 cm), and the shells finish it at 4.25 x 5.5 in (10.8 x 14.0 cm), with a 1.5 in (3.8 cm) loop on top. Check your gauge at each step and every ornament you make will match.
Happy crocheting!